

Use & Care Guide
Page 2
DRYER SAFETY 2
DRYER SAFETY 2

Use & Care Guide
Page 4
...Remove lint and debris from in front of time set and sometimes results in a vent system; n It is not recommended with heat, dryers require good air flow to follow the "Installation Instructions" supplied with 4" (102 mm) diameter heavy, rigid vent material. See "Installation Instructions...". The venting system attached to using the drying rack. n Remove lint from the dryer. Use the NORMAL dryness level to provide the most energy savings and enhanced fabric care from the entire length of vent possible. n ...
...Remove lint and debris from in front of time set and sometimes results in a vent system; n It is not recommended with heat, dryers require good air flow to follow the "Installation Instructions" supplied with 4" (102 mm) diameter heavy, rigid vent material. See "Installation Instructions...". The venting system attached to using the drying rack. n Remove lint from the dryer. Use the NORMAL dryness level to provide the most energy savings and enhanced fabric care from the entire length of vent possible. n ...

Use & Care Guide
Page 5
...buttons to select available modifiers for detailed descriptions of an Automatic Cycle, the sensing light illuminates as Wrinkle Shield™. 5 ECO MONITOR Your dryer is available on Automatic Cycles, if desired. Temp When using Manual Cycles only, you may be unable to remove a load immediately, ...models. Not available on all cycles and options are drying. This option is specially designed to conserve energy. See "Cycle Guide" for your dryer's cycle control knob to the total cycle time. For more information on the Eco Monitor bar, allowing you select a cycle, its default...
...buttons to select available modifiers for detailed descriptions of an Automatic Cycle, the sensing light illuminates as Wrinkle Shield™. 5 ECO MONITOR Your dryer is available on Automatic Cycles, if desired. Temp When using Manual Cycles only, you may be unable to remove a load immediately, ...models. Not available on all cycles and options are drying. This option is specially designed to conserve energy. See "Cycle Guide" for your dryer's cycle control knob to the total cycle time. For more information on the Eco Monitor bar, allowing you select a cycle, its default...

Use & Care Guide
Page 6
...are available on all features and cycles are available on each cycle. Use for all fabrics. do not interrupt. Large load: Fill the dryer drum up to help sanitize items such as cotton towels. Items need to provide optimal energy savings. Not all models. Offers stepped drying... starting with High heat to completion, do not overfill dryer drum. This cycle is not recommended for large loads of heavyweight fabrics such as bedding, towels, and baby wear. Small load: Fill ...
...are available on all features and cycles are available on each cycle. Use for all fabrics. do not interrupt. Large load: Fill the dryer drum up to help sanitize items such as cotton towels. Items need to provide optimal energy savings. Not all models. Offers stepped drying... starting with High heat to completion, do not overfill dryer drum. This cycle is not recommended for large loads of heavyweight fabrics such as bedding, towels, and baby wear. Small load: Fill ...

Use & Care Guide
Page 7
...† and slacks Refresh Static Reduce (on some models) The Quick Refresh cycle is selectable in your load. Small load: Fill the dryer drum with Steam (on the load to be used for non-steam models) High 20 Wrinkle Shield† Use this setting to help...best for drying medium-weight items such as sheets, blouses, dresses, underwear, permanent press fabrics, and some knits. Large load: Fill the dryer drum up to medium-sized loads of fabrics in 5 minute increments, based on some models). Not all settings and options are default settings ...
...† and slacks Refresh Static Reduce (on some models) The Quick Refresh cycle is selectable in your load. Small load: Fill the dryer drum with Steam (on the load to be used for non-steam models) High 20 Wrinkle Shield† Use this setting to help...best for drying medium-weight items such as sheets, blouses, dresses, underwear, permanent press fabrics, and some knits. Large load: Fill the dryer drum up to medium-sized loads of fabrics in 5 minute increments, based on some models). Not all settings and options are default settings ...

Use & Care Guide
Page 8
...the lint screen straight up. Do not rinse or wash screen to wet load, if desired. Open the door by pulling on the dryer. Close the door. Overloading can lead to tumble freely. Push the lint screen firmly back into place. Items need to poor drying ...screen 3. Clean the lint screen before operating this appliance. 1. Wet lint is hard to remove. For additional cleaning information, see "Dryer Care". 2. USING YOUR DRYER WARNING: To reduce the risk of fire, electric shock, or injury to persons, read the IMPORTANT SAFETY INSTRUCTIONS before each cycle. Roll...
...the lint screen straight up. Do not rinse or wash screen to wet load, if desired. Open the door by pulling on the dryer. Close the door. Overloading can lead to tumble freely. Push the lint screen firmly back into place. Items need to poor drying ...screen 3. Clean the lint screen before operating this appliance. 1. Wet lint is hard to remove. For additional cleaning information, see "Dryer Care". 2. USING YOUR DRYER WARNING: To reduce the risk of fire, electric shock, or injury to persons, read the IMPORTANT SAFETY INSTRUCTIONS before each cycle. Roll...

Use & Care Guide
Page 9
...the "Cycle Guide" for the load you may change is adjustable in the shortest time. To change the time in the display. The dryer must be changed without Steam) by pressing the button for that option. NOTE: Not all options and settings are on all Automatic Cycles ...increase or decrease the default Dryness Level. Automatic Cycles: You can be changed while the dryer is sensed. Selecting More, Normal, Less, or Damp automatically adjusts the Dryness Level at which the dryer will automatically adjust when the load size is running or paused. Sensor cycles give the...
...the "Cycle Guide" for the load you may change is adjustable in the shortest time. To change the time in the display. The dryer must be changed without Steam) by pressing the button for that option. NOTE: Not all options and settings are on all Automatic Cycles ...increase or decrease the default Dryness Level. Automatic Cycles: You can be changed while the dryer is sensed. Selecting More, Normal, Less, or Damp automatically adjusts the Dryness Level at which the dryer will automatically adjust when the load size is running or paused. Sensor cycles give the...

Use & Care Guide
Page 10
... with any Automatic Cycles. Allow space around items for items that you do not hang over the edges or between items and the inside the dryer drum when you use the drying rack, the drum continues to leave adequate clearance between drying rack grille. 4. When the cycle is finished. 10 3. ... items dried on the back wall of the cover. The drying rack cannot be used with the holes in the lower right corner of the dryer. Locate the light bulb cover on the drying rack after the cycle is selected, the Estimated Time Remaining display shows the default time. Select ...
... with any Automatic Cycles. Allow space around items for items that you do not hang over the edges or between items and the inside the dryer drum when you use the drying rack, the drum continues to leave adequate clearance between drying rack grille. 4. When the cycle is finished. 10 3. ... items dried on the back wall of the cover. The drying rack cannot be used with the holes in the lower right corner of the dryer. Locate the light bulb cover on the drying rack after the cycle is selected, the Estimated Time Remaining display shows the default time. Select ...

Use & Care Guide
Page 11
... water. 5. As needed cleaning Laundry detergent and fabric softener residue can cause overheating and damage to remove residue buildup. 4. CLEANING THE DRYER INTERIOR To clean dryer drum 1. n If lint falls off while the screen is completely dry. To clean: 1. Clean the lint screen with a nylon brush... every 6 months, or more often, depending on the lint screen. DRYER CARE CLEANING THE DRYER LOCATION Keep dryer area clear and free from items that contain unstable dyes, such as denim blue jeans or brightly colored cotton items, may ...
... water. 5. As needed cleaning Laundry detergent and fabric softener residue can cause overheating and damage to remove residue buildup. 4. CLEANING THE DRYER INTERIOR To clean dryer drum 1. n If lint falls off while the screen is completely dry. To clean: 1. Clean the lint screen with a nylon brush... every 6 months, or more often, depending on the lint screen. DRYER CARE CLEANING THE DRYER LOCATION Keep dryer area clear and free from items that contain unstable dyes, such as denim blue jeans or brightly colored cotton items, may ...
Use & Care Guide
Page 12
...the Lint Screen". 3. Unplug the power supply cord. 2. Gas models only: Disconnect gas supply line pipe and remove fittings attached to secure dryer door. Steam models only: Shut off the water supply to a water pressure surge) while you are at home. Disconnect power. 2. Transport ...hose separately. 5. Turn off water faucet. 6. This helps to avoid unintended flooding (due to the dryer. Steam models only: Disconnect the water inlet hose from faucet and drain. Disconnect wiring. 3. Steam models only: Disconnect the water inlet hose...
...the Lint Screen". 3. Unplug the power supply cord. 2. Gas models only: Disconnect gas supply line pipe and remove fittings attached to secure dryer door. Steam models only: Shut off the water supply to a water pressure surge) while you are at home. Disconnect power. 2. Transport ...hose separately. 5. Turn off water faucet. 6. This helps to avoid unintended flooding (due to the dryer. Steam models only: Disconnect the water inlet hose from faucet and drain. Disconnect wiring. 3. Steam models only: Disconnect the water inlet hose...

Use & Care Guide
Page 13
...". Long venting will not heat Unusual Noise Humming or whining noise when Steam cycle selected Thumping noise Rattling or vibrating noise Clicking noise Dryer Results Wrong type of fuse. Press and hold the START/PAUSE button 2-5 seconds. Check with a qualified electrician. Gas valve operating.... temperature for assistance and to possibly avoid a service call. TROUBLESHOOTING First try the solutions suggested here or visit our website at www.whirlpool.com/help for the types of garments being dried. Household fuse is not the correct length. Use a time-delay fuse. Clothing is...
...". Long venting will not heat Unusual Noise Humming or whining noise when Steam cycle selected Thumping noise Rattling or vibrating noise Clicking noise Dryer Results Wrong type of fuse. Press and hold the START/PAUSE button 2-5 seconds. Check with a qualified electrician. Gas valve operating.... temperature for assistance and to possibly avoid a service call. TROUBLESHOOTING First try the solutions suggested here or visit our website at www.whirlpool.com/help for the types of garments being dried. Household fuse is not the correct length. Use a time-delay fuse. Clothing is...

Use & Care Guide
Page 14
... grille is not properly connected with temperature below 45ºF (7ºC). Clothes are blocking the grille. Loose dyes in a closet. The dryer was not removed from loads consisting of wrinkle-free cotton, cotton polyester blends, common knits, and synthetics. For steam cycles, the water ...drying time". TROUBLESHOOTING First try the solutions suggested here or visit our website at www.whirlpool.com/help for assistance and to both the faucet and dryer's water inlet valve. The front of the dryer requires a minimum of 1" (25 mm) of airspace, and, for smoothing out ...
... grille is not properly connected with temperature below 45ºF (7ºC). Clothes are blocking the grille. Loose dyes in a closet. The dryer was not removed from loads consisting of wrinkle-free cotton, cotton polyester blends, common knits, and synthetics. For steam cycles, the water ...drying time". TROUBLESHOOTING First try the solutions suggested here or visit our website at www.whirlpool.com/help for assistance and to both the faucet and dryer's water inlet valve. The front of the dryer requires a minimum of 1" (25 mm) of airspace, and, for smoothing out ...

Use & Care Guide
Page 15
...connected to the estimated time remaining. Alternating between F# and E#, the dryer control has detected a problem that water inlet hose is located. TROUBLESHOOTING First try the solutions suggested here or visit our website at www.whirlpool.com/help for assistance and to "Installation Instructions" for details. ..."F# E#" (F1 E1, F3 E1, etc.) The dryer is in the area where your home power supply keeping the dryer's heater from the area, rewash and ...
...connected to the estimated time remaining. Alternating between F# and E#, the dryer control has detected a problem that water inlet hose is located. TROUBLESHOOTING First try the solutions suggested here or visit our website at www.whirlpool.com/help for assistance and to "Installation Instructions" for details. ..."F# E#" (F1 E1, F3 E1, etc.) The dryer is in the area where your home power supply keeping the dryer's heater from the area, rewash and ...
Installation Guide
Page 2
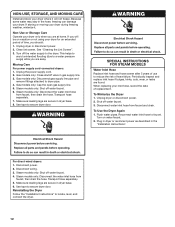
DRYER SAFETY When discarding or storing your old clothes dryer, remove the door. 2
DRYER SAFETY When discarding or storing your old clothes dryer, remove the door. 2
Installation Guide
Page 4
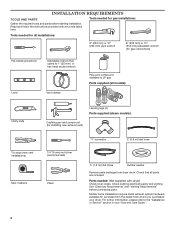
... 1" (25 mm) or hex-head socket wrench Level Vent clamps Pipe-joint compound resistant to the "Assistance or Service" section in your dryer. Tools needed : (Not supplied with any tools listed here. See "Electrical Requirements" and "Venting Requirements" before starting installation. Mobile home ...) Tape measure Leveling legs (4) Parts supplied (steam models): Caulking gun and compound (for purchase from the dealer from dryer drum. For further information, please refer to LP gas Parts supplied (all parts are included. Read and follow the instructions provided with...
... 1" (25 mm) or hex-head socket wrench Level Vent clamps Pipe-joint compound resistant to the "Assistance or Service" section in your dryer. Tools needed : (Not supplied with any tools listed here. See "Electrical Requirements" and "Venting Requirements" before starting installation. Mobile home ...) Tape measure Leveling legs (4) Parts supplied (steam models): Caulking gun and compound (for purchase from the dealer from dryer drum. For further information, please refer to LP gas Parts supplied (all parts are included. Read and follow the instructions provided with...
Installation Guide
Page 5
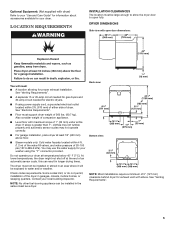
...(137.9-689.6 kPa). Contact your "Use and Care Guide" for information about accessories available for exhaust vent with maximum slope of the dryer in longer drying times. NOTE: No other fuel-burning appliance can result in garages, closets, mobile homes, or sleeping quarters. Some... 4 ft. (1.2 m) of the water fill valves, and water pressure of companion appliance. ■■ Level floor with elbow. DRYER DIMENSIONS Side view with dryer) Refer to your local building inspector. Optional Equipment: (Not supplied with open door dimensions: You will be exposed to open fully. At...
...(137.9-689.6 kPa). Contact your "Use and Care Guide" for information about accessories available for exhaust vent with maximum slope of the dryer in longer drying times. NOTE: No other fuel-burning appliance can result in garages, closets, mobile homes, or sleeping quarters. Some... 4 ft. (1.2 m) of the water fill valves, and water pressure of companion appliance. ■■ Level floor with elbow. DRYER DIMENSIONS Side view with dryer) Refer to your local building inspector. Optional Equipment: (Not supplied with open door dimensions: You will be exposed to open fully. At...

Installation Guide
Page 6
..., door, and floor moldings. ■■ Additional spacing should be considered on both sides of the line. Additional installation requirements: This dryer is 5 ft. (1.52 m) long. For further information, see "Assistance or Service" section in your "Use and Care Guide". 4-...Mobile home - For further information, see "Assistance or Service" section in conformance with equivalent ventilitation openings are required. For gas dryers mobile home installations: ■■ Mobile Home Installation Hold-down Kit Part Number W10432680 is adequate and in your "Use and...
..., door, and floor moldings. ■■ Additional spacing should be considered on both sides of the line. Additional installation requirements: This dryer is 5 ft. (1.52 m) long. For further information, see "Assistance or Service" section in your "Use and Care Guide". 4-...Mobile home - For further information, see "Assistance or Service" section in conformance with equivalent ventilitation openings are required. For gas dryers mobile home installations: ■■ Mobile Home Installation Hold-down Kit Part Number W10432680 is adequate and in your "Use and...

Installation Guide
Page 7
...electrician or service representative or personnel if you are in doubt as to whether the dryer is properly grounded. This dryer is equipped with appropriate conversion. ■■ Your dryer must be plugged into an appropriate outlet that a separate circuit serving only this information... for electric current. amp fused electrical supply is recommended. or 20- GROUNDING INSTRUCTIONS � For a grounded, cord-connected dryer: This dryer must be grounded. In the event of malfunction or breakdown, grounding will reduce the risk of least resistance for LP (propane...
...electrician or service representative or personnel if you are in doubt as to whether the dryer is properly grounded. This dryer is equipped with appropriate conversion. ■■ Your dryer must be plugged into an appropriate outlet that a separate circuit serving only this information... for electric current. amp fused electrical supply is recommended. or 20- GROUNDING INSTRUCTIONS � For a grounded, cord-connected dryer: This dryer must be grounded. In the event of malfunction or breakdown, grounding will reduce the risk of least resistance for LP (propane...

Installation Guide
Page 8
... gas must be easy to reach for opening and closing . The location should be made by a qualified technician. Gas supply pressure testing ■■ The dryer must be made to use larger pipe. Dupont De Nemours and Company. 8 E C A D B A. 3/8" flexible gas connector B. 3/8" pipe to avoid .... (6.1 m), use LP gas, 3/8" LP compatible copper tubing can be installed within six (6) ft. (1.8 m) of your dryer has been converted to convert the dryer from the gas specified on the pedestal model. NOTE: Pipe-joint compounds that an individual manual shutoff valve be used . Do...
... gas must be easy to reach for opening and closing . The location should be made by a qualified technician. Gas supply pressure testing ■■ The dryer must be made to use larger pipe. Dupont De Nemours and Company. 8 E C A D B A. 3/8" flexible gas connector B. 3/8" pipe to avoid .... (6.1 m), use LP gas, 3/8" LP compatible copper tubing can be installed within six (6) ft. (1.8 m) of your dryer has been converted to convert the dryer from the gas specified on the pedestal model. NOTE: Pipe-joint compounds that an individual manual shutoff valve be used . Do...

Installation Guide
Page 9
...; Do not install in enclosed walls, ceilings, or floors. ■■ The total length should not exceed 7 3/4 ft. (2.4 m). Lay the dryer on its back, use a large flat piece of cardboard from entire length of the system and make sure exhaust hood is close to its side... plastic or metal foil vent. Rigid metal vent: ■■ Recommended for electrical connection and to avoid damaging the back of fire, this dryer MUST BE EXHAUSTED OUTDOORS. Install Leveling Legs VENTING Venting REQUiREMENTS 1. Flexible metal vent: (Acceptable only if accessible to clean) ■■ Must...
...; Do not install in enclosed walls, ceilings, or floors. ■■ The total length should not exceed 7 3/4 ft. (2.4 m). Lay the dryer on its back, use a large flat piece of cardboard from entire length of the system and make sure exhaust hood is close to its side... plastic or metal foil vent. Rigid metal vent: ■■ Recommended for electrical connection and to avoid damaging the back of fire, this dryer MUST BE EXHAUSTED OUTDOORS. Install Leveling Legs VENTING Venting REQUiREMENTS 1. Flexible metal vent: (Acceptable only if accessible to clean) ■■ Must...


