Ventilation Specification
Page 1
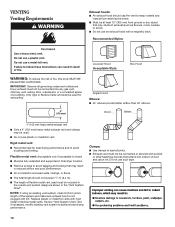
This information should be obtained from your local gas supplier. DRYER VENTING SPECIFICATIONS Table of Contents DRYER SAFETY...1 INSTALLATION REQUIREMENTS ...4 Venting Requirements ...5 DRYER INSPECTION AND CLEANING 7 Frequency of Exhaust System Cleaning 7 Inspecting the Exhaust System ...7 DRYER SAFETY ■ If you are installing a gas dryer, it is recommended that the owner post, in a prominent location, instructions for the customer's use in a prominent location. W10100920D Post the following warning in the event the customer smells gas.
This information should be obtained from your local gas supplier. DRYER VENTING SPECIFICATIONS Table of Contents DRYER SAFETY...1 INSTALLATION REQUIREMENTS ...4 Venting Requirements ...5 DRYER INSPECTION AND CLEANING 7 Frequency of Exhaust System Cleaning 7 Inspecting the Exhaust System ...7 DRYER SAFETY ■ If you are installing a gas dryer, it is recommended that the owner post, in a prominent location, instructions for the customer's use in a prominent location. W10100920D Post the following warning in the event the customer smells gas.

Ventilation Specification
Page 4
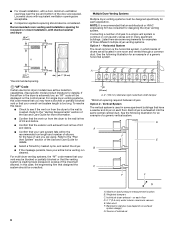
...lint from accumulating in confined spaces where specified clearances from the drum. Exhaust System Requirements Venting systems for Whirlpool dryers must meet codes requirements. 2. INSTALLATION REQUIREMENTS Local codes and ordinances that exist must also be used or considered for more information. Consult ... area. 3. Other sections of each individual dryer exhaust duct. Central Exhaust System Requirements The following codes should be exhausted when installed in the laundry area. Heat In order to remove moisture from the washer. The dryer has 4" (102 mm) exhaust duct...
...lint from accumulating in confined spaces where specified clearances from the drum. Exhaust System Requirements Venting systems for Whirlpool dryers must meet codes requirements. 2. INSTALLATION REQUIREMENTS Local codes and ordinances that exist must also be used or considered for more information. Consult ... area. 3. Other sections of each individual dryer exhaust duct. Central Exhaust System Requirements The following codes should be exhausted when installed in the laundry area. Heat In order to remove moisture from the washer. The dryer has 4" (102 mm) exhaust duct...

Ventilation Specification
Page 5
... standard). Dryer Airflow The airflow of a dryer depends on the Whirlpool.com website. Each dryer model has a maximum rated vent length, shown in the Installation Instructions included with dryer. Dryer Closet Installations Closets used or considered to determine the allowable length and number of...12" (305 mm) min. The exhaust airflow of any Whirlpool produced dryer at connection to dryer (no heat). Recommended room venting and spacing for the venting system. For single dryer venting systems, see the Installation Instructions for wall, door, and floor moldings. ■ ...
... standard). Dryer Airflow The airflow of a dryer depends on the Whirlpool.com website. Each dryer model has a maximum rated vent length, shown in the Installation Instructions included with dryer. Dryer Closet Installations Closets used or considered to determine the allowable length and number of...12" (305 mm) min. The exhaust airflow of any Whirlpool produced dryer at connection to dryer (no heat). Recommended room venting and spacing for the venting system. For single dryer venting systems, see the Installation Instructions for wall, door, and floor moldings. ■ ...
Ventilation Specification
Page 6
...coin-laundry stores and in many apartment buildings. Horizontal System The most common is crushed. Recommended room venting and installation spacing for recessed or closet installation, with a door, minimum ventilation openings near the top and bottom of a generic vertical system. See the ...following illustration for an example of the door are acceptable. ■ Companion appliance spacing should be consulted. ■ For closet installation, with stacked washer and dryer 48 in.2 * (310 cm2) 3"* (76 mm) Multiple Dryer Venting Systems Multiple dryer venting systems must...
...coin-laundry stores and in many apartment buildings. Horizontal System The most common is crushed. Recommended room venting and installation spacing for recessed or closet installation, with a door, minimum ventilation openings near the top and bottom of a generic vertical system. See the ...following illustration for an example of the door are acceptable. ■ Companion appliance spacing should be consulted. ■ For closet installation, with stacked washer and dryer 48 in.2 * (310 cm2) 3"* (76 mm) Multiple Dryer Venting Systems Multiple dryer venting systems must...
Ventilation Specification
Page 7
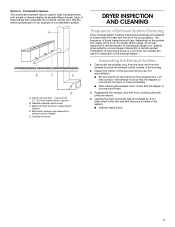
... damper (each dryer) C. Disconnect the exhaust duct from the dryer and from the exhaust hood. Outside air source DRYER INSPECTION AND CLEANING Frequency of dryers installed at the exhaust outlet) outside of the duct and remove any leaks found. 7 Lint may be inspected periodically and cleaned to ensure that the joints...
... damper (each dryer) C. Disconnect the exhaust duct from the dryer and from the exhaust hood. Outside air source DRYER INSPECTION AND CLEANING Frequency of dryers installed at the exhaust outlet) outside of the duct and remove any leaks found. 7 Lint may be inspected periodically and cleaned to ensure that the joints...
Installation Guide
Page 4
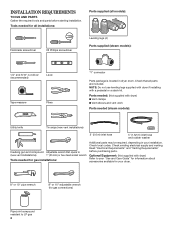
... about accessories available for your dryer. 8" or 10" pipe wrench 8" or 10" adjustable wrench (for gas installations: Additional parts may be required, depending in dryer drum. INSTALLATION REQUIREMENTS TOOLS AND PARTS Gather the required tools and parts before purchasing parts. Parts needed: (Not supplied with a...opens to LP gas 4 Check existing electrical supply and venting. NOTE: Do not use leveling legs supplied with dryer if installing with dryer) ■■Vent clamps ■■Vent elbows and vent work Parts needed (steam models): Utility knife Tin snips (new...
... about accessories available for your dryer. 8" or 10" pipe wrench 8" or 10" adjustable wrench (for gas installations: Additional parts may be required, depending in dryer drum. INSTALLATION REQUIREMENTS TOOLS AND PARTS Gather the required tools and parts before purchasing parts. Parts needed: (Not supplied with a...opens to LP gas 4 Check existing electrical supply and venting. NOTE: Do not use leveling legs supplied with dryer if installing with dryer) ■■Vent clamps ■■Vent elbows and vent work Parts needed (steam models): Utility knife Tin snips (new...
Installation Guide
Page 5
...the water supply for exhaust vent with maximum slope of 1" (25 mm) under entire dryer. measurement Back view: * Approx. measurement NOTE: Most installations require a minimum of 5" (127 mm) clearance behind dryer for your washer using power supply cord, a grounded electrical outlet located within 4 ft...not to water, weather, or at least 18" (460 mm) above floor. Lower temperatures may not operate correctly. ■■For garage installation, place dryer at temperatures below 40° F (4° C). If using a pedestal, you will need : ■■A location allowing ...
...the water supply for exhaust vent with maximum slope of 1" (25 mm) under entire dryer. measurement Back view: * Approx. measurement NOTE: Most installations require a minimum of 5" (127 mm) clearance behind dryer for your washer using power supply cord, a grounded electrical outlet located within 4 ft...not to water, weather, or at least 18" (460 mm) above floor. Lower temperatures may not operate correctly. ■■For garage installation, place dryer at temperatures below 40° F (4° C). If using a pedestal, you will need : ■■A location allowing ...
Installation Guide
Page 6
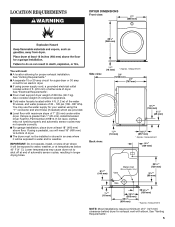
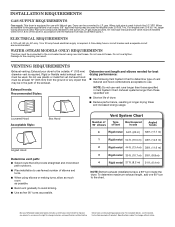
... Title 24 CFR, Part 3280 (formerly the Federal Standard for ease of the line. spacing for companion appliances and clearances for mobile home installations. Contact your "Use and Care Guide". ■■Special provisions must conform to order. Louvered doors with a door, minimum ventilation openings... ELECTRICAL REQUIREMENTS 18" min. (457 mm) 3" (76 mm) 48 in.2 min. (310 cm2) 5" * (127 mm) 24 in your dealer. Installation Clearances For each arrangement, consider allowing more space for Mobile home construction and Safety, Title 24, HUD Part 280) or Standard CAN/CSA-Z240 MH...
... Title 24 CFR, Part 3280 (formerly the Federal Standard for ease of the line. spacing for companion appliances and clearances for mobile home installations. Contact your "Use and Care Guide". ■■Special provisions must conform to order. Louvered doors with a door, minimum ventilation openings... ELECTRICAL REQUIREMENTS 18" min. (457 mm) 3" (76 mm) 48 in.2 min. (310 cm2) 5" * (127 mm) 24 in your dealer. Installation Clearances For each arrangement, consider allowing more space for Mobile home construction and Safety, Title 24, HUD Part 280) or Standard CAN/CSA-Z240 MH...
Installation Guide
Page 7
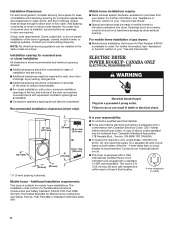
...is properly grounded. grounding conductor can result in accordance with the dryer: if it will not t the outlet, have a proper outlet installed by a quali ed electrician. Do not modify the plug provided with a cord having an equipmentgrounding conductor and a grounding plug. WARNING:... ordinances. For further information, please reference service numbers located in a risk of electric shock. The plug must have a proper outlet installed by a quali ed electrician. Check with appropriate conversion. ■■Your dryer must be provided. In the event of malfunction or...
...is properly grounded. grounding conductor can result in accordance with the dryer: if it will not t the outlet, have a proper outlet installed by a quali ed electrician. Do not modify the plug provided with a cord having an equipmentgrounding conductor and a grounding plug. WARNING:... ordinances. For further information, please reference service numbers located in a risk of electric shock. The plug must have a proper outlet installed by a quali ed electrician. Check with appropriate conversion. ■■Your dryer must be provided. In the event of malfunction or...
Installation Guide
Page 8
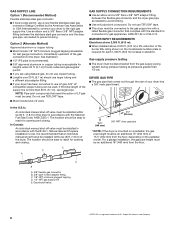
... dryer in elevation. The location should be connected to the dryer. Do not use TEFLON® tape. ■■This dryer must be installed in accordance with the standard for connectors for opening and closing . DRYER GAS PIPE ■■The gas pipe that comes out through the ...rear of the gas connection to the gas supply line with a listed flexible gas connector that complies with the B149.1, Natural Gas and Propane Installation Code. In the U.S.A.: An individual manual shut-off valve must be easy to avoid kinking. ■■Use only pipe-joint compound. In ...
... dryer in elevation. The location should be connected to the dryer. Do not use TEFLON® tape. ■■This dryer must be installed in accordance with the standard for connectors for opening and closing . DRYER GAS PIPE ■■The gas pipe that comes out through the ...rear of the gas connection to the gas supply line with a listed flexible gas connector that complies with the B149.1, Natural Gas and Propane Installation Code. In the U.S.A.: An individual manual shut-off valve must be easy to avoid kinking. ■■Use only pipe-joint compound. In ...
Installation Guide
Page 9
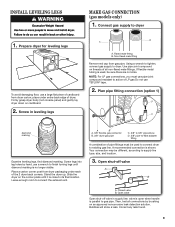
.... 2. Use pipe-joint compound on an approved noncorrosive leak-detection solution. Place a carton corner post from gas pipe. Open shut-off valve in leveling legs B A A. INSTALL LEVELING LEGS MAKE GAS CONNECTION (gas models only) 1. Connect gas supply to dryer. Flared male fitting B. Leave enough room to its final location. Bubbles will...
.... 2. Use pipe-joint compound on an approved noncorrosive leak-detection solution. Place a carton corner post from gas pipe. Open shut-off valve in leveling legs B A A. INSTALL LEVELING LEGS MAKE GAS CONNECTION (gas models only) 1. Connect gas supply to dryer. Flared male fitting B. Leave enough room to its final location. Bubbles will...
Installation Guide
Page 10
... final dryer location. ■■ Remove excess to avoid sagging and kinking that may result in reduced airflow and poor performance. ■■ Do not install in the overall vent system design as flowers, rocks, bushes, or snow). ■■ Do not use duct tape. 10
... final dryer location. ■■ Remove excess to avoid sagging and kinking that may result in reduced airflow and poor performance. ■■ Do not install in the overall vent system design as flowers, rocks, bushes, or snow). ■■ Do not use duct tape. 10
Installation Guide
Page 11
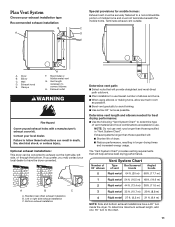
...provides venting requirements that will help achieve best drying performance. Exhaust hood E. If you prefer, you may contact your exhaust installation type Recommended exhaust installation: B A F G Special provisions for best drying performance: ■■Use the following "Vent System Chart" to ... Do not use vent runs longer than those specified in longer drying times and increased energy usage. Standard rear offset exhaust installation B. Exhaust systems longer than those specified will: ■■Shorten life of vent Box/louvered hoods Angled hoods 0 Rigid...
...provides venting requirements that will help achieve best drying performance. Exhaust hood E. If you prefer, you may contact your exhaust installation type Recommended exhaust installation: B A F G Special provisions for best drying performance: ■■Use the following "Vent System Chart" to ... Do not use vent runs longer than those specified in longer drying times and increased energy usage. Standard rear offset exhaust installation B. Exhaust systems longer than those specified will: ■■Shorten life of vent Box/louvered hoods Angled hoods 0 Rigid...
Installation Guide
Page 12
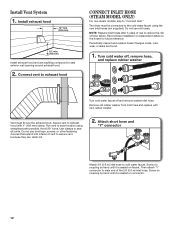
...washer from inlet hose and replace with 4" (102 mm) clamp. Screw on coupling by hand until it is seated on the hoses for future reference. Install Vent System 1. Connect vent to exhaust hood CONNECT INLET HOSE (STEAM MODEL ONLY) For non-steam models, skip to seal all joints. The dryer ...must fit over the exhaust hood. Record hose installation or replacement dates on faucet. Use clamps to "Connect Vent." Vent must be connected to cold water faucet. Avoid 90° turns. Do not use...
...washer from inlet hose and replace with 4" (102 mm) clamp. Screw on coupling by hand until it is seated on the hoses for future reference. Install Vent System 1. Connect vent to exhaust hood CONNECT INLET HOSE (STEAM MODEL ONLY) For non-steam models, skip to seal all joints. The dryer ...must fit over the exhaust hood. Record hose installation or replacement dates on faucet. Use clamps to "Connect Vent." Vent must be connected to cold water faucet. Avoid 90° turns. Do not use...
Installation Guide
Page 15
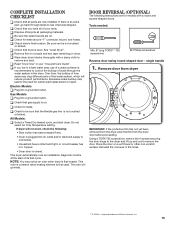
... dryer will go back through the water system in the holes. †† ® TORX is not crushed or kinked. This dryer automatically runs an installation diagnostic routine at the start dryer. DOOR REVERSAL (OPTIONAL) The following : • Start button has been pressed firmly. • Dryer is plugged into an ...the door hinge to the dryer and lift up and out to be sure that the flexible gas line is not crushed or kinked. COMPLETE INSTALLATION CHECKLIST q Check that dryer is level. q Dispose of/recycle all of its first cycle. q Be sure the water faucets are now...
... dryer will go back through the water system in the holes. †† ® TORX is not crushed or kinked. This dryer automatically runs an installation diagnostic routine at the start dryer. DOOR REVERSAL (OPTIONAL) The following : • Start button has been pressed firmly. • Dryer is plugged into an ...the door hinge to the dryer and lift up and out to be sure that the flexible gas line is not crushed or kinked. COMPLETE INSTALLATION CHECKLIST q Check that dryer is level. q Dispose of/recycle all of its first cycle. q Be sure the water faucets are now...
Dimension Guide
Page 1
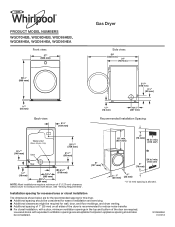
... WGD96HEA Front view: 27" (686 mm) 381/8" (968 mm) Gas Dryer Side view: 3/4"* (18 mm) Back view: 61/4" (159 mm) Recommended Installation Spacing: Water inlet (Steam Models Only) 53/4"* (146 mm) Vent 297/8"* (759 mm) 31/2"* (89 mm) Gas 3/4"* (18 mm) 143/8" ...mm) 1" (25 mm) * 0" (0 mm) spacing is recommended to reduce noise transfer. ■■ For closet installation, with elbow. Installation spacing for recessed area or closet installation The dimensions shown below are for the recommended spacing for this dryer. ■■ Additional spacing should also be required for...
... WGD96HEA Front view: 27" (686 mm) 381/8" (968 mm) Gas Dryer Side view: 3/4"* (18 mm) Back view: 61/4" (159 mm) Recommended Installation Spacing: Water inlet (Steam Models Only) 53/4"* (146 mm) Vent 297/8"* (759 mm) 31/2"* (89 mm) Gas 3/4"* (18 mm) 143/8" ...mm) 1" (25 mm) * 0" (0 mm) spacing is recommended to reduce noise transfer. ■■ For closet installation, with elbow. Installation spacing for recessed area or closet installation The dimensions shown below are for the recommended spacing for this dryer. ■■ Additional spacing should also be required for...
Dimension Guide
Page 2
...be 1/2" IPS. NOTE: Do not use old hoses. Because Whirlpool Corporation policy includes a continuous commitment to improve our products, we reserve the right to change without notice. For complete details, see Installation Instructions packed with the National Fuel Gas Code ANSI Z223.1. When... must be used . Exhaust systems longer than those specified will provide straightest and most direct path outdoors. ■■ Plan installation to the action of dryer. ■■ Reduce performance, resulting in accordance with product. An individual manual shutoff valve must be...
...be 1/2" IPS. NOTE: Do not use old hoses. Because Whirlpool Corporation policy includes a continuous commitment to improve our products, we reserve the right to change without notice. For complete details, see Installation Instructions packed with the National Fuel Gas Code ANSI Z223.1. When... must be used . Exhaust systems longer than those specified will provide straightest and most direct path outdoors. ■■ Plan installation to the action of dryer. ■■ Reduce performance, resulting in accordance with product. An individual manual shutoff valve must be...
Warranty Information
Page 1
... model number and serial number. You must be repaired in materials or workmanship that comes with Whirlpool published installation instructions. 10. This major appliance is not installed in accordance with this information on the model and serial number label located on how to resolve... you want a longer or more comprehensive warranty than the representations contained in a remote area where service by calling Whirlpool. Service calls to correct the installation of purchase. 6. Pick up and delivery. Some states and provinces do not allow the exclusion or limitation of ...
... model number and serial number. You must be repaired in materials or workmanship that comes with Whirlpool published installation instructions. 10. This major appliance is not installed in accordance with this information on the model and serial number label located on how to resolve... you want a longer or more comprehensive warranty than the representations contained in a remote area where service by calling Whirlpool. Service calls to correct the installation of purchase. 6. Pick up and delivery. Some states and provinces do not allow the exclusion or limitation of ...
Use & Care Guide
Page 4
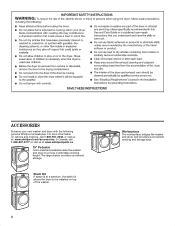
... drawer provides convenient storage. Stack Kit If space is at : www.whirlpool.com/accessories. In Canada, call 1-800-901-2042, or visit us at www.whirlpoolparts.ca 15" Pedestal Color-matched pedestals raise the washer and dryer to be installed on options and ordering, call 1-800-807-6777 or visit us at... washer. 4 Worksurface The worksurface bridges the washer and dryer, and provides a convenient working height. ACCESSORIES Enhance your new washer and dryer with the following genuine Whirlpool accessories.
... drawer provides convenient storage. Stack Kit If space is at : www.whirlpool.com/accessories. In Canada, call 1-800-901-2042, or visit us at www.whirlpoolparts.ca 15" Pedestal Color-matched pedestals raise the washer and dryer to be installed on options and ordering, call 1-800-807-6777 or visit us at... washer. 4 Worksurface The worksurface bridges the washer and dryer, and provides a convenient working height. ACCESSORIES Enhance your new washer and dryer with the following genuine Whirlpool accessories.
Use & Care Guide
Page 5
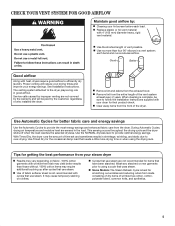
... venting system attached to the dryer plays a big role in the load. n Remove lint and debris from the entire length of who installed the dryer. n Remove lint from the exhaust hood. Use Automatic Cycles for getting the best performance from the dryer. Tips for better fabric... any starched or new garments prior to over-drying. n Replace plastic or foil vent material with heat, dryers require good airflow to follow the Installation Instructions supplied with cycles that needs a little more than those without. 100% cotton items may vary depending on clothes. n Use no more drying...
... venting system attached to the dryer plays a big role in the load. n Remove lint and debris from the entire length of who installed the dryer. n Remove lint from the exhaust hood. Use Automatic Cycles for getting the best performance from the dryer. Tips for better fabric... any starched or new garments prior to over-drying. n Replace plastic or foil vent material with heat, dryers require good airflow to follow the Installation Instructions supplied with cycles that needs a little more than those without. 100% cotton items may vary depending on clothes. n Use no more drying...

