
Installation Guide
Page 4
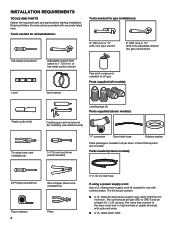
...UL listed 30-amp power supply cord, rated 120/240 volt minimum. The wires that all models): Plastic putty knife Tin snips (new vent installations) Leveling legs (4) Parts supplied (steam models): Caulking gun and compound (for installing new exhaust vent) 1/4"( 6 mm) nut driver (...listed strain relief. Check that connect to LP gas Parts supplied (all parts are included. Tools needed for all installations: Tools needed (steam models): #2 Phillips screwdriver Wire stripper (direct wire installations) Tape measure 4 Pliers 5' (1.52 m) inlet hose If using a power supply cord...
...UL listed 30-amp power supply cord, rated 120/240 volt minimum. The wires that all models): Plastic putty knife Tin snips (new vent installations) Leveling legs (4) Parts supplied (steam models): Caulking gun and compound (for installing new exhaust vent) 1/4"( 6 mm) nut driver (...listed strain relief. Check that connect to LP gas Parts supplied (all parts are included. Tools needed for all installations: Tools needed (steam models): #2 Phillips screwdriver Wire stripper (direct wire installations) Tape measure 4 Pliers 5' (1.52 m) inlet hose If using a power supply cord...
Installation Guide
Page 5
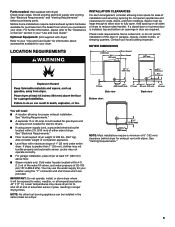
... weight of companion appliance. ■■ Level floor with dryer) Refer to water, weather, or at least 18" (460 mm) above floor. ■■ Steam models only: Cold water faucets located within 2 ft. (610 mm) of either side of dryer. Contact your dryer. DRYER DIMENSIONS LOCATION REQUIREMENTS 561/4" (1428 mm) 325...
... weight of companion appliance. ■■ Level floor with dryer) Refer to water, weather, or at least 18" (460 mm) above floor. ■■ Steam models only: Cold water faucets located within 2 ft. (610 mm) of either side of dryer. Contact your dryer. DRYER DIMENSIONS LOCATION REQUIREMENTS 561/4" (1428 mm) 325...
Installation Guide
Page 8
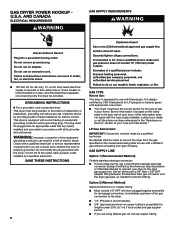
... all local codes and ordinances. It is equipped with a different gas without consulting your home. A time-delay fuse or circuit breaker is located on the model/serial rating plate for use with a cord having an equipmentgrounding conductor and a grounding plug. WARNING: Improper connection of gas in a risk of your dryer to...
... all local codes and ordinances. It is equipped with a different gas without consulting your home. A time-delay fuse or circuit breaker is located on the model/serial rating plate for use with a cord having an equipmentgrounding conductor and a grounding plug. WARNING: Improper connection of gas in a risk of your dryer to...

Installation Guide
Page 9
... to the floor. Slide the dryer until bottom of foot is more than 1/2 psi. Mobile home installations require a Mobile Home Installation Hold-down on the model/serial number plate is required for opening and closing . If the total length of the supply line is approximately 1/2" (13 mm) from the floor. The...
... to the floor. Slide the dryer until bottom of foot is more than 1/2 psi. Mobile home installations require a Mobile Home Installation Hold-down on the model/serial number plate is required for opening and closing . If the total length of the supply line is approximately 1/2" (13 mm) from the floor. The...

Installation Guide
Page 18
... 90° turns. Use clamps to dryer location using elbows or making turns, allow as much room as possible. Connect Inlet Hoses For non-steam models, skip to exhaust hood Vent must fit over the exhaust hood. Remove old rubber washer from inlet hose and replace with 4" (102 mm) clamp. Terminate...
... 90° turns. Use clamps to dryer location using elbows or making turns, allow as much room as possible. Connect Inlet Hoses For non-steam models, skip to exhaust hood Vent must fit over the exhaust hood. Remove old rubber washer from inlet hose and replace with 4" (102 mm) clamp. Terminate...

Installation Guide
Page 21
...to see what was skipped. The odor will go back through the water system in your tools. For direct wire installation, turn on . Steam models only: q Be sure the water faucets are set in a hard water area, use of scale through steps to remove any tape remaining on... . See "Troubleshooting." Electric Models: q For power supply cord installation, plug into an outlet and/or electrical supply is connected. • Household fuse is intact and tight, or ...
...to see what was skipped. The odor will go back through the water system in your tools. For direct wire installation, turn on . Steam models only: q Be sure the water faucets are set in a hard water area, use of scale through steps to remove any tape remaining on... . See "Troubleshooting." Electric Models: q For power supply cord installation, plug into an outlet and/or electrical supply is connected. • Household fuse is intact and tight, or ...

Use & Care Guide
Page 4
... by using a slightly lower heat level. Wash any starched or new garments prior to increase your energy savings by : n Cleaning your steam dryer (on some models) n Results may vary depending on for getting the best performance from the front of vent possible. Using the NORMAL dryness level provides the optimal energy...
... by using a slightly lower heat level. Wash any starched or new garments prior to increase your energy savings by : n Cleaning your steam dryer (on some models) n Results may vary depending on for getting the best performance from the front of vent possible. Using the NORMAL dryness level provides the optimal energy...

Use & Care Guide
Page 5
... or option, simply touch its default settings will be displayed. 5 6 5 MODIFIERS Use to adjust and it . 4 LED DISPLAY When you are available on all models. NON-STEAM MODELS 1 2 6 3 6 4 1 POWER Touch to turn the dryer on the "What to Dry" or "How to increase or decrease the length of items you select a cycle...
... or option, simply touch its default settings will be displayed. 5 6 5 MODIFIERS Use to adjust and it . 4 LED DISPLAY When you are available on all models. NON-STEAM MODELS 1 2 6 3 6 4 1 POWER Touch to turn the dryer on the "What to Dry" or "How to increase or decrease the length of items you select a cycle...
Use & Care Guide
Page 6
...Used to dry? This option is available on number of periodic tumbling to the total cycle time. This will increase depending on some models) Touch to add the Static Reduce option to continue Wrinkle Shield™ option. These cycles measure the drying air temperature and moisture levels...the Automatic cycles. Then determine how you need to touch Power to turn the signal indicating the end of moisture into Pause mode. Steam Model The Whirlpool® Cabrio® dryer, has a unique user interface to help you select the best cycle you want to low, medium, high, ...
...Used to dry? This option is available on number of periodic tumbling to the total cycle time. This will increase depending on some models) Touch to add the Static Reduce option to continue Wrinkle Shield™ option. These cycles measure the drying air temperature and moisture levels...the Automatic cycles. Then determine how you need to touch Power to turn the signal indicating the end of moisture into Pause mode. Steam Model The Whirlpool® Cabrio® dryer, has a unique user interface to help you select the best cycle you want to low, medium, high, ...
Use & Care Guide
Page 8
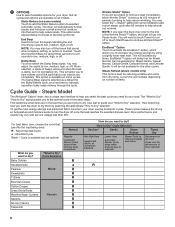
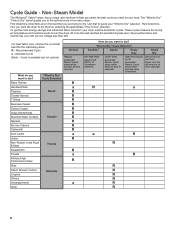
... Dry Hot High Heat. R - Cycle is reached. Alternate Cycle Blank - Lower Heat. R a a R R R R R R R R R 8 "How to Dry" selection. High Heat longer cycle. Cycle Guide - Non-Steam Model The Whirlpool® Cabrio® dryer, has a unique user interface to dry. The "What to Dry" "How to Dry" layout guides you to the optimal cycle in...
... Dry Hot High Heat. R - Cycle is reached. Alternate Cycle Blank - Lower Heat. R a a R R R R R R R R R 8 "How to Dry" selection. High Heat longer cycle. Cycle Guide - Non-Steam Model The Whirlpool® Cabrio® dryer, has a unique user interface to dry. The "What to Dry" "How to Dry" layout guides you to the optimal cycle in...

Use & Care Guide
Page 11
...option. Touch and hold START/PAUSE to begin cycle Touch and hold to dry the item. You may adjust different settings, depending on some models): Select Steam Refresh to reduce odors and light wrinkles in 5 minute increments. Promptly remove garments after 60 minutes to add a short steam... a short steam cycle after cycle has completed to help smooth out wrinkles. 5. NOTE: Not all options and settings are available with all models. If you will shut off. Touch DRYNESS to scroll to Less to increase or decrease the time in the first 5-8 minutes of periodic ...
...option. Touch and hold START/PAUSE to begin cycle Touch and hold to dry the item. You may adjust different settings, depending on some models): Select Steam Refresh to reduce odors and light wrinkles in 5 minute increments. Promptly remove garments after 60 minutes to add a short steam... a short steam cycle after cycle has completed to help smooth out wrinkles. 5. NOTE: Not all options and settings are available with all models. If you will shut off. Touch DRYNESS to scroll to Less to increase or decrease the time in the first 5-8 minutes of periodic ...
Use & Care Guide
Page 12
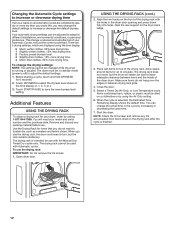
... just the current cycle/load. Use the Drying Rack for use the drying rack, the drum continues to turn, but the drum will need your model and serial number and the purchase date. Place wet items on the dryer back ledge. 3. Make sure items do not want to select the dryness...
... just the current cycle/load. Use the Drying Rack for use the drying rack, the drum continues to turn, but the drum will need your model and serial number and the purchase date. Place wet items on the dryer back ledge. 3. Make sure items do not want to select the dryness...
Use & Care Guide
Page 14
... dryer only when you should: 1. Unplug dryer or disconnect power. 2. Unplug the power supply cord. 2. WARNING SPECIAL INSTRUCTIONS FOR STEAM MODELS Water Inlet Hose Replace inlet hose and hose screen after 5 years of use to reduce the risk of replacement. Unplug dryer or disconnect ... your inlet hose, record the date of hose failure. Replace all parts and panels before servicing. See "Cleaning the Lint Screen." 3. Gas models only: Cap the open fuel supply line. 5. Transport hose separately. 7. Disconnect water inlet hose from faucet; This helps to avoid unintended flooding...
... dryer only when you should: 1. Unplug dryer or disconnect power. 2. Unplug the power supply cord. 2. WARNING SPECIAL INSTRUCTIONS FOR STEAM MODELS Water Inlet Hose Replace inlet hose and hose screen after 5 years of use to reduce the risk of replacement. Unplug dryer or disconnect ... your inlet hose, record the date of hose failure. Replace all parts and panels before servicing. See "Cleaning the Lint Screen." 3. Gas models only: Cap the open fuel supply line. 5. Transport hose separately. 7. Disconnect water inlet hose from faucet; This helps to avoid unintended flooding...
Use & Care Guide
Page 18
...Travel or transportation expenses for Factory Specified Replacement Parts and repair labor to correct defects in remote locations where an authorized Whirlpool servicer is intended for service or repair of this major appliance is effective from defects in -home repair. 11. ...Please have the following information available when you want a longer or more comprehensive warranty than the representations contained in accordance with original model/serial numbers removed, altered, or not easily determined. Commercial, non-residential, multiple-family use, or use your product from ...
...Travel or transportation expenses for Factory Specified Replacement Parts and repair labor to correct defects in remote locations where an authorized Whirlpool servicer is intended for service or repair of this major appliance is effective from defects in -home repair. 11. ...Please have the following information available when you want a longer or more comprehensive warranty than the representations contained in accordance with original model/serial numbers removed, altered, or not easily determined. Commercial, non-residential, multiple-family use, or use your product from ...
Dimension Guide
Page 1
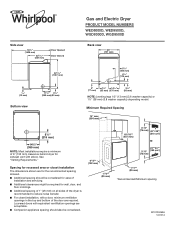
... doors with elbow. Side view 561/4" (1428 mm) 3213/16" (821 mm) Door Opened Door Closed 4213/16" (1987 mm) Gas and Electric Dryer PRODUCT MODEL NUMBERS WED8000D, WED8500D, WGD8000D, WGD8500D Back view 29" (737 mm) 57/8" (150 mm) 41/2" (115 mm) 1/2" (13 mm) Bottom view 113/8" 35/8" (289 mm) (93...) 3" 13/8" 141/2" (77 mm) (35 mm) (370 mm) 31/2" (93 mm) NOTE: Leveling legs 1/2" (13 mm) (3.6 washer capacity) or 1½" (38 mm) (3.8 washer capacity) depending model. Spacing for recessed area or closet installation The dimensions shown are required. See "Venting Requirements."
... doors with elbow. Side view 561/4" (1428 mm) 3213/16" (821 mm) Door Opened Door Closed 4213/16" (1987 mm) Gas and Electric Dryer PRODUCT MODEL NUMBERS WED8000D, WED8500D, WGD8000D, WGD8500D Back view 29" (737 mm) 57/8" (150 mm) 41/2" (115 mm) 1/2" (13 mm) Bottom view 113/8" 35/8" (289 mm) (93...) 3" 13/8" 141/2" (77 mm) (35 mm) (370 mm) 31/2" (93 mm) NOTE: Leveling legs 1/2" (13 mm) (3.6 washer capacity) or 1½" (38 mm) (3.8 washer capacity) depending model. Spacing for recessed area or closet installation The dimensions shown are required. See "Venting Requirements."

Dimension Guide
Page 2
... Use following Vent System Chart to determine type of the dryer in longer drying times and increased energy usage. Because Whirlpool Corporation policy includes a continuous commitment to improve our products, we reserve the right to use. Dryer can result. ELECTRICAL REQUIREMENTS - .... (10.7 m) 4 Rigid metal 27 ft. (8.2 m) NOTE: Bottom exhaust installations have a 90° turn to change materials and specifications without notice. Electric models only To supply the required 3 or 4 wire, single phase, 120/240 volt, 60 Hz., AC only electrical supply (or 3 or 4 wire, 120/208...
... Use following Vent System Chart to determine type of the dryer in longer drying times and increased energy usage. Because Whirlpool Corporation policy includes a continuous commitment to improve our products, we reserve the right to use. Dryer can result. ELECTRICAL REQUIREMENTS - .... (10.7 m) 4 Rigid metal 27 ft. (8.2 m) NOTE: Bottom exhaust installations have a 90° turn to change materials and specifications without notice. Electric models only To supply the required 3 or 4 wire, single phase, 120/240 volt, 60 Hz., AC only electrical supply (or 3 or 4 wire, 120/208...

Warranty Information
Page 1
...instructions attached to or furnished with this major appliance, you call the Customer eXperience Center: n Name, address, and telephone number n Model number and serial number n A clear, detailed description of the problem n Proof of repair or replacement under this Warranty. trim, ...decorative panels, flooring, cabinetry, islands, countertops, drywall, etc.) that comes with the product, Whirlpool Corporation or Whirlpool Canada LP (hereafter "Whirlpool") will be provided by the customer. Service or parts for in this limited warranty. 1. If you want a...
...instructions attached to or furnished with this major appliance, you call the Customer eXperience Center: n Name, address, and telephone number n Model number and serial number n A clear, detailed description of the problem n Proof of repair or replacement under this Warranty. trim, ...decorative panels, flooring, cabinetry, islands, countertops, drywall, etc.) that comes with the product, Whirlpool Corporation or Whirlpool Canada LP (hereafter "Whirlpool") will be provided by the customer. Service or parts for in this limited warranty. 1. If you want a...


