
Door Reversal Guide
Page 2
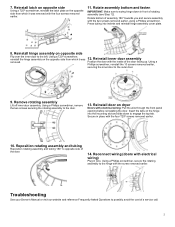
... removed earlier. 10. Using a Phillips screwdriver, remove the two screws securing the rotating assembly to opposite side of the door. 14. Troubleshooting See your Owner's Manual or visit our website and reference Frequently Asked Questions to swing hinge down to the outer door. 9. Using a T20® screwdriver, reinstall the hinge assembly...
... removed earlier. 10. Using a Phillips screwdriver, remove the two screws securing the rotating assembly to opposite side of the door. 14. Troubleshooting See your Owner's Manual or visit our website and reference Frequently Asked Questions to swing hinge down to the outer door. 9. Using a T20® screwdriver, reinstall the hinge assembly...
Installation Instructions
Page 9
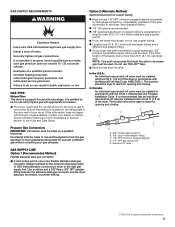
.... The location should be easy to flare adapter fitting C. 1/8" NPT minimum plugged tapping D. 1/2" NPT gas supply line E. In Canada: An individual manual shut-off valve be installed in accordance with the B149.1, Natural Gas and Propane Installation Code. A. 3/8" flexible gas connector B. 3/8" pipe to reach ...for opening and closing . NOTE: Pipe-joint compounds that an individual manual shut-off valve must have a qualified person make sure gas pressure does not exceed 13" (33 cm) water column. In the U.S.A.: An ...
.... The location should be easy to flare adapter fitting C. 1/8" NPT minimum plugged tapping D. 1/2" NPT gas supply line E. In Canada: An individual manual shut-off valve be installed in accordance with the B149.1, Natural Gas and Propane Installation Code. A. 3/8" flexible gas connector B. 3/8" pipe to reach ...for opening and closing . NOTE: Pipe-joint compounds that an individual manual shut-off valve must have a qualified person make sure gas pressure does not exceed 13" (33 cm) water column. In the U.S.A.: An ...
Owners Manual
Page 7
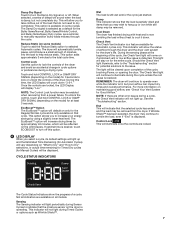
...and items that the moisture sensor on "What to Dry" and "How to Dry" selections, or actual time remaining for Timed Dry cycles (for Manual Cycles) will count down . When selected, a series of beeps will allow you to take clothes out of airflow through the cycle. Touch and ...Lock This will illuminate once the controls are locked, the LED Display will light periodically during Timed Cycles or options such as a reminder to manually reposition bulky loads midway through the dryer and the dryer vent system for the dryer's life. The Cycle Status Indicators show the status of ...
...and items that the moisture sensor on "What to Dry" and "How to Dry" selections, or actual time remaining for Timed Dry cycles (for Manual Cycles) will count down . When selected, a series of beeps will allow you to take clothes out of airflow through the cycle. Touch and ...Lock This will illuminate once the controls are locked, the LED Display will light periodically during Timed Cycles or options such as a reminder to manually reposition bulky loads midway through the dryer and the dryer vent system for the dryer's life. The Cycle Status Indicators show the status of ...
Owners Manual
Page 12
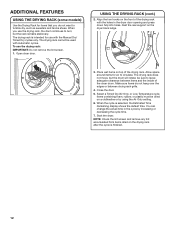
... foam, rubber, or plastic must be dried on the dryer back ledge. 3. When the cycle is finished. 12 Open dryer door. be used with the Manual Dry/ Timed Dry cycles only. Start the dryer. USING THE DRYING RACK (cont.) 2. Rest the rear support on a clothesline or by increasing or decreasing the...
... foam, rubber, or plastic must be dried on the dryer back ledge. 3. When the cycle is finished. 12 Open dryer door. be used with the Manual Dry/ Timed Dry cycles only. Start the dryer. USING THE DRYING RACK (cont.) 2. Rest the rear support on a clothesline or by increasing or decreasing the...


