
Owners Manual
Page 2
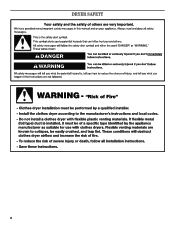
DRYER SAFETY 2
DRYER SAFETY 2

Owners Manual
Page 4
...Flow Along with 4" (102 mm) diameter heavy, rigid vent material. Proper venting will be sure to follow the Installation Instructions supplied with your dryer for final product check. Good Better n Remove lint and debris from the entire length of the vent system at least every 2 years. n... times and improve your lint screen before each bend and curve reduces air flow. See Installation Instructions. n Clear away items from the dryer. n Use the shortest length of vent possible. The venting system attached to over-drying. CHECK YOUR VENT SYSTEM FOR GOOD AIR FLOW...
...Flow Along with 4" (102 mm) diameter heavy, rigid vent material. Proper venting will be sure to follow the Installation Instructions supplied with your dryer for final product check. Good Better n Remove lint and debris from the entire length of the vent system at least every 2 years. n... times and improve your lint screen before each bend and curve reduces air flow. See Installation Instructions. n Clear away items from the dryer. n Use the shortest length of vent possible. The venting system attached to over-drying. CHECK YOUR VENT SYSTEM FOR GOOD AIR FLOW...
Owners Manual
Page 5
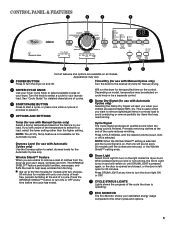
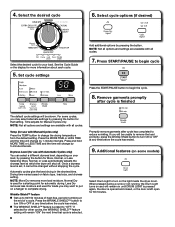
... that may need ironing. Cycle Signal The Cycle Signal produces an audible sound when the drying cycle is not available on the light inside the dryer drum. Press CYCLE SIGNAL until DRUM LIGHT is pressed again, or the door is opened and closed, or the door is selected. NOTE: When ... clothes are unsure of clothes from forming. Dryness Level (for use with Automatic Cycles only) Use the Dryness option to help keep wrinkles from the dryer as soon as it . 4 OPTIONS AND SETTINGS Temp (for use with Manual Cycles only) Select a drying temperature based on cycle knob or be a separate ...
... that may need ironing. Cycle Signal The Cycle Signal produces an audible sound when the drying cycle is not available on the light inside the dryer drum. Press CYCLE SIGNAL until DRUM LIGHT is pressed again, or the door is opened and closed, or the door is selected. NOTE: When ... clothes are unsure of clothes from forming. Dryness Level (for use with Automatic Cycles only) Use the Dryness option to help keep wrinkles from the dryer as soon as it . 4 OPTIONS AND SETTINGS Temp (for use with Manual Cycles only) Select a drying temperature based on cycle knob or be a separate ...
Owners Manual
Page 6
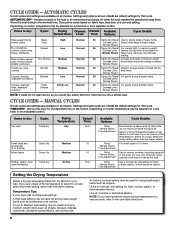
...Shield 40 Damp Dry Signal Medium to a damp level for a load, select the lower setting rather than the higher setting. Will run the dryer for drying large or heavy items. Dryness Level Evenly dries large or heavy loads. Items to dry: Any load Cycle: Timed Dry Small loads ... heavyweight items such as sheets, blouses, dresses, underwear, permanent press fabrics, and some knits. CYCLE GUIDE - Settings and options shown in your dryer has multiple heat settings: A High heat setting may be used for foam, rubber, plastic, or heat-sensitive fabrics. Settings and options shown in the...
...Shield 40 Damp Dry Signal Medium to a damp level for a load, select the lower setting rather than the higher setting. Will run the dryer for drying large or heavy items. Dryness Level Evenly dries large or heavy loads. Items to dry: Any load Cycle: Timed Dry Small loads ... heavyweight items such as sheets, blouses, dresses, underwear, permanent press fabrics, and some knits. CYCLE GUIDE - Settings and options shown in your dryer has multiple heat settings: A High heat setting may be used for foam, rubber, plastic, or heat-sensitive fabrics. Settings and options shown in the...
Owners Manual
Page 7
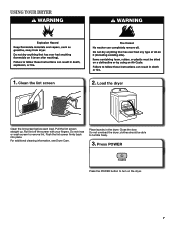
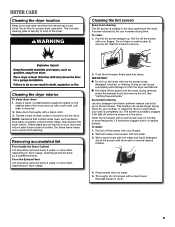
Close the door. Press POWER Press the POWER button to tumble freely. 3. Do not overload the dryer; Push the lint screen firmly back into place. For additional cleaning information, see Dryer Care. Load the dryer Clean the lint screen before each load. Roll lint off the screen with your fingers. clothes should be able to turn on the dryer. 7 Do not rinse or wash screen to remove lint. Place laundry in the dryer. USING YOUR DRYER 1. Clean the lint screen 2. Pull the lint screen straight up.
Close the door. Press POWER Press the POWER button to tumble freely. 3. Do not overload the dryer; Push the lint screen firmly back into place. For additional cleaning information, see Dryer Care. Load the dryer Clean the lint screen before each load. Roll lint off the screen with your fingers. clothes should be able to turn on the dryer. 7 Do not rinse or wash screen to remove lint. Place laundry in the dryer. USING YOUR DRYER 1. Clean the lint screen 2. Pull the lint screen straight up.
Owners Manual
Page 8
... button to turn ON or OFF at the end of a cycle. Press the WRINKLE SHIELD™ button to turn ON or OFF at which the dryer will remain "ON" the next time that setting. For some models) Select Drum Light to turn on until DRUM LIGHT is pressed again, the door... garments after cycle has completed to "OFF." Press and hold MORE TIME or LESS TIME and the time will remain on the light inside the dryer drum. Once a dryness level is preset to reduce wrinkling. NOTE: More Dry removes more information about each cycle. 5. 4. Select cycle options (if desired) Select the...
... button to turn ON or OFF at the end of a cycle. Press the WRINKLE SHIELD™ button to turn ON or OFF at which the dryer will remain "ON" the next time that setting. For some models) Select Drum Light to turn on until DRUM LIGHT is pressed again, the door... garments after cycle has completed to "OFF." Press and hold MORE TIME or LESS TIME and the time will remain on the light inside the dryer drum. Once a dryness level is preset to reduce wrinkling. NOTE: More Dry removes more information about each cycle. 5. 4. Select cycle options (if desired) Select the...
Owners Manual
Page 9
...avoid drum staining. Rinse screen with hot water. 3. Thoroughly dry lint screen with your fingers. Reinstall screen in front of the dryer. Cleaning the lint screen Every load cleaning The lint screen is removed. 2. Roll lint off the screen with hot water and ...damaged, blocked, or missing. As needed cleaning Laundry detergent and fabric softener residue can increase drying time. This includes clearing piles of laundry in dryer. 9 See "Venting Requirements." This buildup can cause overheating and damage to remove. Tumble a load of lint screen with hot water. 5. ...
...avoid drum staining. Rinse screen with hot water. 3. Thoroughly dry lint screen with your fingers. Reinstall screen in front of the dryer. Cleaning the lint screen Every load cleaning The lint screen is removed. 2. Roll lint off the screen with hot water and ...damaged, blocked, or missing. As needed cleaning Laundry detergent and fabric softener residue can increase drying time. This includes clearing piles of laundry in dryer. 9 See "Venting Requirements." This buildup can cause overheating and damage to remove. Tumble a load of lint screen with hot water. 5. ...
Owners Manual
Page 10
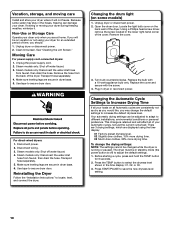
...Automatic Cycle Settings to adjust the default settings. 1. This change is retained and will be in the hoses, freezing can be changed while the dryer is off water faucet. 3. Before starting a cycle, press and hold the TEMP button for an extended period of your Automatic cycles, not... settings cannot be adjusted to adapt to increase the default dryness level. Unplug the power supply cord. 2. Transport hose separately. 4. For direct-wired dryers: 1. Steam models only: Disconnect the water inlet hose from faucet, then drain the hose. Changing the drum light (on the back wall of ...
...Automatic Cycle Settings to adjust the default settings. 1. This change is retained and will be in the hoses, freezing can be changed while the dryer is off water faucet. 3. Before starting a cycle, press and hold the TEMP button for an extended period of your Automatic cycles, not... settings cannot be adjusted to adapt to increase the default dryness level. Unplug the power supply cord. 2. Transport hose separately. 4. For direct-wired dryers: 1. Steam models only: Disconnect the water inlet hose from faucet, then drain the hose. Changing the drum light (on the back wall of ...
Owners Manual
Page 11
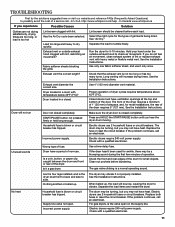
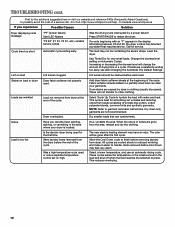
... experience Possible Causes Solution Clothes are not drying satisfactorily, drying times are too long, or load is the dryer level front to back and side to vibrate. Separate the load to dry quickly. Use only one fabric softener... an electrician. Is it only once. The gas valve clicking is blown or circuit breaker has tripped. The dryer may not have heat. The drum may be a thumping sound during the first few minutes of garments being ...vent diameter the correct size. When balled up . In Canada www.whirlpool.ca If you may vibrate if not properly installed. http://www...
... experience Possible Causes Solution Clothes are not drying satisfactorily, drying times are too long, or load is the dryer level front to back and side to vibrate. Separate the load to dry quickly. Use only one fabric softener... an electrician. Is it only once. The gas valve clicking is blown or circuit breaker has tripped. The dryer may not have heat. The drum may be a thumping sound during the first few minutes of garments being ...vent diameter the correct size. When balled up . In Canada www.whirlpool.ca If you may vibrate if not properly installed. http://www...
Owners Manual
Page 12
... "F" appears in the display. Select a lower temperature, and use an automatic drying cycle. This reduces overdrying. 12 http://www.whirlpool.com/help - Was the drying cycle interrupted by dyes in the area where your garments. Increasing or decreasing the dryness level will... ending early. Stains on high. Fabric softener sheets added to garment care label instructions. Dryer overloaded. All cycles are gone from the area, rewash and dry the clothing. In Canada www.whirlpool.ca If you recently been painting, staining, or varnishing in clothing (usually blue jeans)....
... "F" appears in the display. Select a lower temperature, and use an automatic drying cycle. This reduces overdrying. 12 http://www.whirlpool.com/help - Was the drying cycle interrupted by dyes in the area where your garments. Increasing or decreasing the dryness level will... ending early. Stains on high. Fabric softener sheets added to garment care label instructions. Dryer overloaded. All cycles are gone from the area, rewash and dry the clothing. In Canada www.whirlpool.ca If you recently been painting, staining, or varnishing in clothing (usually blue jeans)....

Dimension Guide
Page 1
...(8.2 m) 21 ft. (6.4 m) OVERALL DIMENSIONS 29" Wide Model Dryer dimensions For closet installation, with the National Fuel Gas Code ANSI Z223.1. Side view - closet or confined area C. Recessed area B. Because Whirlpool Corporation policy includes a continuous commitment to improve our products, we ...reserve the right to change without notice. 29" and 27" Wide Model Gas Dryer PRODUCT MODEL NUMBERS WGD4750X, WGD4800X, WGD4900X, WGD5500X...
...(8.2 m) 21 ft. (6.4 m) OVERALL DIMENSIONS 29" Wide Model Dryer dimensions For closet installation, with the National Fuel Gas Code ANSI Z223.1. Side view - closet or confined area C. Recessed area B. Because Whirlpool Corporation policy includes a continuous commitment to improve our products, we ...reserve the right to change without notice. 29" and 27" Wide Model Gas Dryer PRODUCT MODEL NUMBERS WGD4750X, WGD4800X, WGD4900X, WGD5500X...
Installation Instructions
Page 2
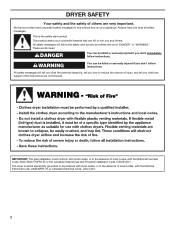
... safety messages in the absence of local codes, with the National Electrical Code, ANSI/NFPA 70 or Canadian Electrical Code, CSA C22.1. 2 The dryer must conform with local codes, or in the absence of local codes, with local codes, or in this manual and on your appliance. Always ... don't immediately follow instructions. All safety messages will tell you don't follow the safety alert symbol and either the word "DANGER" or "WARNING." DRYER SAFETY Your safety and the safety of others . This symbol alerts you to reduce the chance of injury, and tell you what the potential hazard...
... safety messages in the absence of local codes, with the National Electrical Code, ANSI/NFPA 70 or Canadian Electrical Code, CSA C22.1. 2 The dryer must conform with local codes, or in the absence of local codes, with local codes, or in this manual and on your appliance. Always ... don't immediately follow instructions. All safety messages will tell you don't follow the safety alert symbol and either the word "DANGER" or "WARNING." DRYER SAFETY Your safety and the safety of others . This symbol alerts you to reduce the chance of injury, and tell you what the potential hazard...
Installation Instructions
Page 4
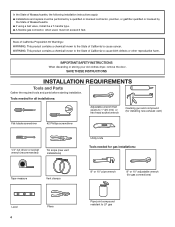
..., it shall be a T-handle type. � A flexible gas connector, when used, must not exceed 3 feet. IMPORTANT SAFETY INSTRUCTIONS When discarding or storing your old clothes dryer, remove the door.
..., it shall be a T-handle type. � A flexible gas connector, when used, must not exceed 3 feet. IMPORTANT SAFETY INSTRUCTIONS When discarding or storing your old clothes dryer, remove the door.
Installation Instructions
Page 5
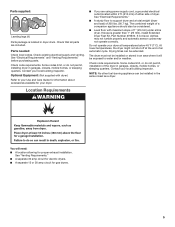
.... Some codes limit, or do not permit, installation of 200 lbs. (90.7 kg). The dryer must not be exposed to support dryer and a total weight (dryer and load) of the dryer in garages, closets, mobile homes, or sleeping quarters. See "Electrical Requirements" and "Venting Requirements"... before purchasing parts. Location Requirements You will be installed or stored in the same closet as a dryer. Parts needed: Check local codes. Check code requirements. NOTE: No other fuel-burning appliance can be installed in an area where ...
.... Some codes limit, or do not permit, installation of 200 lbs. (90.7 kg). The dryer must not be exposed to support dryer and a total weight (dryer and load) of the dryer in garages, closets, mobile homes, or sleeping quarters. See "Electrical Requirements" and "Venting Requirements"... before purchasing parts. Location Requirements You will be installed or stored in the same closet as a dryer. Parts needed: Check local codes. Check code requirements. NOTE: No other fuel-burning appliance can be installed in an area where ...
Installation Instructions
Page 6
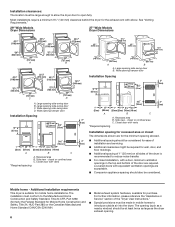
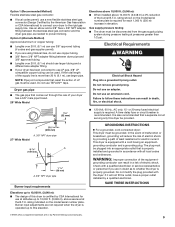
...considered. Wide opening (such as a nearby window) should also be large enough to allow the dryer door to open fully. See "Venting Requirements." 29" Wide Models Dryer Dimensions 27" Wide Models Dryer Dimensions 43 " (1092 mm) 23 ¾" (603 mm) 43 " (1092 mm) 13... (25 mm) (737 mm) (25 mm) (25 mm) (705 mm) A B C A. Large opening side-swing door D. Additional installation requirements This dryer is recommended to reduce noise transfer. ■■ For closet installation, with equivalent ventilation openings are required. closet or confined area C. Side view -
...considered. Wide opening (such as a nearby window) should also be large enough to allow the dryer door to open fully. See "Venting Requirements." 29" Wide Models Dryer Dimensions 27" Wide Models Dryer Dimensions 43 " (1092 mm) 23 ¾" (603 mm) 43 " (1092 mm) 13... (25 mm) (737 mm) (25 mm) (25 mm) (705 mm) A B C A. Large opening side-swing door D. Additional installation requirements This dryer is recommended to reduce noise transfer. ■■ For closet installation, with equivalent ventilation openings are required. closet or confined area C. Side view -
Installation Instructions
Page 7
..., fused on cardboard. 7 The plug must be sure that you are in back or other injury. 1. Firmly grasp dryer body (not console panel) and gently lay dryer down on both sides of electric shock by a qualified electrician. It is properly installed and grounded in accordance with a ...may be plugged into a grounded 4 prong outlet. If using a replacement power supply cord, it will reduce the risk of the line. This dryer is recommended. A time-delay fuse or circuit breaker is equipped with the Canadian Electrical Code, C22.1-latest edition and all local codes and ordinances...
..., fused on cardboard. 7 The plug must be sure that you are in back or other injury. 1. Firmly grasp dryer body (not console panel) and gently lay dryer down on both sides of electric shock by a qualified electrician. It is properly installed and grounded in accordance with a ...may be plugged into a grounded 4 prong outlet. If using a replacement power supply cord, it will reduce the risk of the line. This dryer is recommended. A time-delay fuse or circuit breaker is equipped with the Canadian Electrical Code, C22.1-latest edition and all local codes and ordinances...

Installation Instructions
Page 8
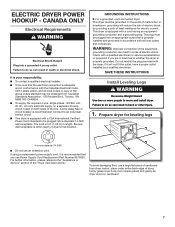
...9632; Must include 1/8" NPT minimum plugged tapping accessible for test gauge connection, immediately upstream of the gas connection to convert the dryer from the gas specified on its final location. In Canada: An individual manual shutoff valve must be installed within six (6) feet ... personnel. Mobile home installations require a Mobile Home Installation Hold-down Kit. For ordering information please reference the "Dryer User Instructions." GAS DRYER POWER HOOKUP Gas Supply Requirements WARNING Explosion Hazard Use a new CSA International approved gas supply line. Securely tighten ...
...9632; Must include 1/8" NPT minimum plugged tapping accessible for test gauge connection, immediately upstream of the gas connection to convert the dryer from the gas specified on its final location. In Canada: An individual manual shutoff valve must be installed within six (6) feet ... personnel. Mobile home installations require a Mobile Home Installation Hold-down Kit. For ordering information please reference the "Dryer User Instructions." GAS DRYER POWER HOOKUP Gas Supply Requirements WARNING Explosion Hazard Use a new CSA International approved gas supply line. Securely tighten ...
Installation Instructions
Page 9
... level at pressures greater than 20 ft. (6.1 m), use an adapter. NOTE: Pipe joint compounds that a separate circuit serving only this dryer be disconnected from the gas supply piping system during pressure testing at the B.T.U. Do not remove ground prong. or 20-amp fused electrical supply...action of LP gas must be provided. Check with all local codes and ordinances. Burner input adjustments are not required when the dryer is properly grounded. Dryer gas pipe ■■ The gas pipe that is a registered trademark of E.I. In the event of malfunction or breakdown,...
... level at pressures greater than 20 ft. (6.1 m), use an adapter. NOTE: Pipe joint compounds that a separate circuit serving only this dryer be disconnected from the gas supply piping system during pressure testing at the B.T.U. Do not remove ground prong. or 20-amp fused electrical supply...action of LP gas must be provided. Check with all local codes and ordinances. Burner input adjustments are not required when the dryer is properly grounded. Dryer gas pipe ■■ The gas pipe that is a registered trademark of E.I. In the event of malfunction or breakdown,...
Installation Instructions
Page 10
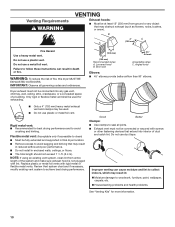
.... ■■ Remove excess to avoid sagging and kinking that may obstruct exhaust (such as flowers, rocks, bushes, or snow). Dryer exhaust must not be at least 12" (305 mm) from entire length of a building. Rigid metal vent: ■■ Recommended...) Acceptable styles: C. Good Better Clamps: ■■ Use clamps to clean) ■■ Must be connected into interior of fire, this dryer MUST BE EXHAUSTED OUTDOORS. Venting Requirements WARNING VENTING Exhaust hoods: ■■ Must be connected or secured with screws or other fastening devices that extend...
.... ■■ Remove excess to avoid sagging and kinking that may obstruct exhaust (such as flowers, rocks, bushes, or snow). Dryer exhaust must not be at least 12" (305 mm) from entire length of a building. Rigid metal vent: ■■ Recommended...) Acceptable styles: C. Good Better Clamps: ■■ Use clamps to clean) ■■ Must be connected into interior of fire, this dryer MUST BE EXHAUSTED OUTDOORS. Venting Requirements WARNING VENTING Exhaust hoods: ■■ Must be connected or secured with screws or other fastening devices that extend...
Installation Instructions
Page 11
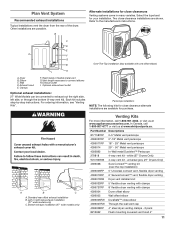
... or visit us at www.applianceaccessories.com. C D E A F G B Over-The-Top installation (also available with clamps 4396004 Dryer offset elbow 4396005 Wall offset elbow 4396006RW DuraSafe™ close -clearance installations are possible. Each kit includes step-by-step instructions. For ... the type best for close clearance alternate installations are available for purchase. Clamps F. Rigid metal or flexible metal vent G. Dryer B. Left or right side exhaust installation (27" wide models only) C. Vent length necessary to connect elbows H. Periscope installation...
... or visit us at www.applianceaccessories.com. C D E A F G B Over-The-Top installation (also available with clamps 4396004 Dryer offset elbow 4396005 Wall offset elbow 4396006RW DuraSafe™ close -clearance installations are possible. Each kit includes step-by-step instructions. For ... the type best for close clearance alternate installations are available for purchase. Clamps F. Rigid metal or flexible metal vent G. Dryer B. Left or right side exhaust installation (27" wide models only) C. Vent length necessary to connect elbows H. Periscope installation...


