
Ventilation Specification
Page 3
... understand and have been previously cleaned in, washed in, soaked in the absence of local codes, with controls. ■ Do not repair or replace any part of local codes, with gasoline, drycleaning solvents, or other flammable or explosive substances as they give off vapors that could cause a load to catch fire...
... understand and have been previously cleaned in, washed in, soaked in the absence of local codes, with controls. ■ Do not repair or replace any part of local codes, with gasoline, drycleaning solvents, or other flammable or explosive substances as they give off vapors that could cause a load to catch fire...

Ventilation Specification
Page 7
... is recommended. In commercial usage or in the system. ■ Seal any lint accumulation. ■ Be sure that the flappers or louvers (if installed as part of the dryer. Disconnect the exhaust duct from the dryer and from the exhaust hood.
... is recommended. In commercial usage or in the system. ■ Seal any lint accumulation. ■ Be sure that the flappers or louvers (if installed as part of the dryer. Disconnect the exhaust duct from the dryer and from the exhaust hood.
Owners Manual
Page 6
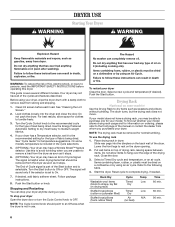
... not pack the dryer. See "Cycle Guide" for clothes to purchase one for the type of load being dried. The End of Cycle signal is part of the drying rack. Fire Hazard No washer can result in use the drying rack 1. Select a new cycle and temperature (if desired). The drum turns...
... not pack the dryer. See "Cycle Guide" for clothes to purchase one for the type of load being dried. The End of Cycle signal is part of the drying rack. Fire Hazard No washer can result in use the drying rack 1. Select a new cycle and temperature (if desired). The drum turns...
Owners Manual
Page 8
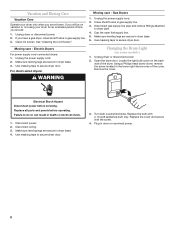
Clean lint screen. Gas Dryers 1. Cap the open fuel supply line. 5. Plug in dryer base. 4. Unplug the power supply cord. 2. Moving care - Replace all parts and panels before servicing. Make sure leveling legs are secure in the lower right-hand corner of the cover. Use masking tape to dryer pipe. 4. ...
Clean lint screen. Gas Dryers 1. Cap the open fuel supply line. 5. Plug in dryer base. 4. Unplug the power supply cord. 2. Moving care - Replace all parts and panels before servicing. Make sure leveling legs are secure in the lower right-hand corner of the cover. Use masking tape to dryer pipe. 4. ...
Owners Manual
Page 10
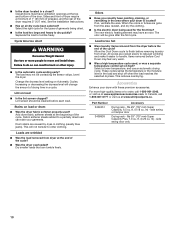
... the electric dryer being dried. ■■ Is the load too large and heavy to do so can stain your garments. This reduces overdrying. ft. (0.18 cu. ft. (0.20 cu. The load may not be gone after the first cycle. Level the dryer. Lint screen should be cleaned before the end of the cycle... level setting on load ■■ Is the lint screen clogged? Loads are cooled slowly to reduced wrinkling and make it easier to tumble freely. Part Number 3404351 3406839 Accessory Drying rack - Select the right cycle for the types of garments being used for the first time?
... the electric dryer being dried. ■■ Is the load too large and heavy to do so can stain your garments. This reduces overdrying. ft. (0.18 cu. ft. (0.20 cu. The load may not be gone after the first cycle. Level the dryer. Lint screen should be cleaned before the end of the cycle... level setting on load ■■ Is the lint screen clogged? Loads are cooled slowly to reduced wrinkling and make it easier to tumble freely. Part Number 3404351 3406839 Accessory Drying rack - Select the right cycle for the types of garments being used for the first time?
Owners Manual
Page 11
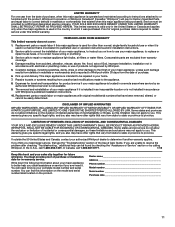
...installed in an inaccessible location or is not installed in accordance with Whirlpool's published installation instructions. 10. ITEMS EXCLUDED FROM WARRANTY This limited warranty does not cover: 1. Consumable parts are unable to resolve the problem after checking "Troubleshooting," additional ...attached to or furnished with the product, Whirlpool Corporation or Whirlpool Canada LP (hereafter "Whirlpool") will need to know your authorized Whirlpool dealer to determine if another warranty applies. Service calls to the appliance. 8. Replacement parts or repair labor on how to use or...
...installed in an inaccessible location or is not installed in accordance with Whirlpool's published installation instructions. 10. ITEMS EXCLUDED FROM WARRANTY This limited warranty does not cover: 1. Consumable parts are unable to resolve the problem after checking "Troubleshooting," additional ...attached to or furnished with the product, Whirlpool Corporation or Whirlpool Canada LP (hereafter "Whirlpool") will need to know your authorized Whirlpool dealer to determine if another warranty applies. Service calls to the appliance. 8. Replacement parts or repair labor on how to use or...

Warranty
Page 1
... from state to state or province to province. Replacement parts or repair labor on how to use or when it was purchased. WHIRLPOOL SHALL NOT BE LIABLE FOR INCIDENTAL OR CONSEQUENTIAL DAMAGES. Consumable parts are unable to resolve the problem after checking "Troubleshooting,"...of original purchase date is not installed in accordance with the product, Whirlpool Corporation or Whirlpool Canada LP (hereafter "Whirlpool") will need it is installed in an inaccessible location or is required to parts or systems resulting from warranty coverage. 4. Proof of purchase. 6. ...
... from state to state or province to province. Replacement parts or repair labor on how to use or when it was purchased. WHIRLPOOL SHALL NOT BE LIABLE FOR INCIDENTAL OR CONSEQUENTIAL DAMAGES. Consumable parts are unable to resolve the problem after checking "Troubleshooting,"...of original purchase date is not installed in accordance with the product, Whirlpool Corporation or Whirlpool Canada LP (hereafter "Whirlpool") will need it is installed in an inaccessible location or is required to parts or systems resulting from warranty coverage. 4. Proof of purchase. 6. ...

Installation Instructions
Page 1
... sens d'ouverture de la porte (facultatif 26 DRYER SAFETY Your safety and the safety of Contents DRYER SAFETY 1 Installation Requirements 4 Tools and Parts 4 Location Requirements 4 ELECTRIC DRYER POWER HOOKUP - et Canada) et Électrique (Canada uniquement) Para obtener acceso al manual de uso ...y cuidado en español, o para obtener información adicional acerca de su producto, visite: www.whirlpool.com Tenga listo su número de modelo completo. WARNING You can kill or hurt you don't immediately follow instructions. Dryer Installation Instructions...
... sens d'ouverture de la porte (facultatif 26 DRYER SAFETY Your safety and the safety of Contents DRYER SAFETY 1 Installation Requirements 4 Tools and Parts 4 Location Requirements 4 ELECTRIC DRYER POWER HOOKUP - et Canada) et Électrique (Canada uniquement) Para obtener acceso al manual de uso ...y cuidado en español, o para obtener información adicional acerca de su producto, visite: www.whirlpool.com Tenga listo su número de modelo completo. WARNING You can kill or hurt you don't immediately follow instructions. Dryer Installation Instructions...
Installation Instructions
Page 4
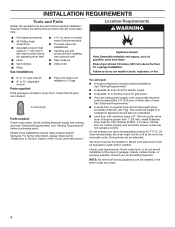
...) of an automatic cycle. The combined weight of dryer. You will be extended. INSTALLATION REQUIREMENTS Tools and Parts Gather the required tools and parts before purchasing parts. Read and follow the instructions provided with maximum slope of 1" (25 mm) under entire dryer. Location Requirements...9632; Flat-blade screwdriver ■■ #2 Phillips head screwdriver ■■ Adjustable wrench that all parts are using power supply cord, a grounded electrical outlet located within 2 ft. (610 mm) of either side of a companion appliance should also be installed in an area where...
...) of an automatic cycle. The combined weight of dryer. You will be extended. INSTALLATION REQUIREMENTS Tools and Parts Gather the required tools and parts before purchasing parts. Read and follow the instructions provided with maximum slope of 1" (25 mm) under entire dryer. Location Requirements...9632; Flat-blade screwdriver ■■ #2 Phillips head screwdriver ■■ Adjustable wrench that all parts are using power supply cord, a grounded electrical outlet located within 2 ft. (610 mm) of either side of a companion appliance should also be installed in an area where...

Installation Instructions
Page 5
... must be considered. Additional installation requirements This dryer is recommended to the Manufactured Home Construction and Safety Standard, Title 24 CFR, Part 3280 (formerly the Federal Standard for mobile home installations. The installation must conform to reduce noise transfer. ■■ For ..., please reference the "Assistance or Service" section of the dryer is suitable for Mobile Home Construction and Safety, Title 24, HUD Part 280) or the Canadian Manufactured Home Standard CAN/CSA-Z240 MH. Recessed area B. Louvered doors with elbow. Most installations require a ...
... must be considered. Additional installation requirements This dryer is recommended to the Manufactured Home Construction and Safety Standard, Title 24 CFR, Part 3280 (formerly the Federal Standard for mobile home installations. The installation must conform to reduce noise transfer. ■■ For ..., please reference the "Assistance or Service" section of the dryer is suitable for Mobile Home Construction and Safety, Title 24, HUD Part 280) or the Canadian Manufactured Home Standard CAN/CSA-Z240 MH. Recessed area B. Louvered doors with elbow. Most installations require a ...
Installation Instructions
Page 6
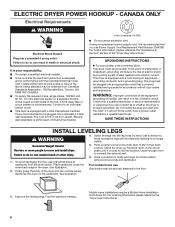
... your responsibility: ■■ To contact a qualified electrical installer. ■■ To be securely fastened to an individual branch circuit. ■■ This dryer is 5 ft. (1.52 m) in final location, remove corner posts and cardboard. Connect to the floor. 3. The cord is equipped with the Canadian Electrical Code, C22.1-latest edition... line. Gently lay the dryer on both sides of the 2 dryer back corners. Stand the dryer up. For mobile home use Power Supply Cord Replacement Part Number 3394208.
... your responsibility: ■■ To contact a qualified electrical installer. ■■ To be securely fastened to an individual branch circuit. ■■ This dryer is 5 ft. (1.52 m) in final location, remove corner posts and cardboard. Connect to the floor. 3. The cord is equipped with the Canadian Electrical Code, C22.1-latest edition... line. Gently lay the dryer on both sides of the 2 dryer back corners. Stand the dryer up. For mobile home use Power Supply Cord Replacement Part Number 3394208.
Installation Instructions
Page 10
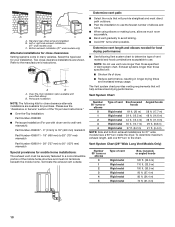
.... Please see the "Assistance or Service" section of the "Dryer User Instructions." ■■ Over-the-Top Installation: Part Number 4396028 ■■ Periscope Installation (For use the fewest number of vent material and hood combinations acceptable to the manufacturer...176; turns or hoods elbows 0 Rigid metal 64 ft. (20 m) 58 ft. (17.7 m) 1 Rigid metal 54 ft. (16.5 m) 48 ft. (14.6 m) 2 Rigid metal 44 ft. (13.4 m) 38 ft. (11.6 m) 3 Rigid metal 35 ft. (10.7 m) 29 ft. (8.8 m) 4 Rigid metal 27 ft. (8.2 m) 21 ft. (6.4 m) NOTE: Side and bottom exhaust installations ...
.... Please see the "Assistance or Service" section of the "Dryer User Instructions." ■■ Over-the-Top Installation: Part Number 4396028 ■■ Periscope Installation (For use the fewest number of vent material and hood combinations acceptable to the manufacturer...176; turns or hoods elbows 0 Rigid metal 64 ft. (20 m) 58 ft. (17.7 m) 1 Rigid metal 54 ft. (16.5 m) 48 ft. (14.6 m) 2 Rigid metal 44 ft. (13.4 m) 38 ft. (11.6 m) 3 Rigid metal 35 ft. (10.7 m) 29 ft. (8.8 m) 4 Rigid metal 27 ft. (8.2 m) 21 ft. (6.4 m) NOTE: Side and bottom exhaust installations ...

Installation Instructions
Page 11
.... If flexible metal tubing is closed . 11. Open the shutoff valve in "Plan Vent System." Closed valve B. Connect Vent 1. Make sure dryer is an extra part, go away. 11 If there is level. 3. (On gas models) Check that all of LP gas. Be sure the vent is a recommended connection. Wipe the... vent connection is first heated. Use a wrench to the supply line type, size, and location. Remove the protective film on power. 7. If you have all parts are now installed. Using a 4" (102 mm) clamp, connect vent to the dryer. Install Vent System 1. Open valve 4.
.... If flexible metal tubing is closed . 11. Open the shutoff valve in "Plan Vent System." Closed valve B. Connect Vent 1. Make sure dryer is an extra part, go away. 11 If there is level. 3. (On gas models) Check that all of LP gas. Be sure the vent is a recommended connection. Wipe the... vent connection is first heated. Use a wrench to the supply line type, size, and location. Remove the protective film on power. 7. If you have all parts are now installed. Using a 4" (102 mm) clamp, connect vent to the dryer. Install Vent System 1. Open valve 4.

Installation Instructions
Page 12
...on top of hinges. 3. Place towel (A) on the side where hinges were just removed. 7. Lift door until top screws in cabinet are in large part of dryer. Tighten screws halfway. Pull door forward off screws. Be certain to door. 5. Reattach outer door panel to avoid damaging the surface. 2. ... alignment. 12 Lift door until top screws in cabinet are in hinges. 1. Set door (handle side up so screws are in large part of the hinge. 6. Remove top screws from cabinet. 4. Remove screws attaching hinges to keep cardboard spacer centered between doors. Holding door over screws....
...on top of hinges. 3. Place towel (A) on the side where hinges were just removed. 7. Lift door until top screws in cabinet are in large part of dryer. Tighten screws halfway. Pull door forward off screws. Be certain to door. 5. Reattach outer door panel to avoid damaging the surface. 2. ... alignment. 12 Lift door until top screws in cabinet are in hinges. 1. Set door (handle side up so screws are in large part of the hinge. 6. Remove top screws from cabinet. 4. Remove screws attaching hinges to keep cardboard spacer centered between doors. Holding door over screws....

Installation Instructions
Page 13
... hinge slot. Do not pry apart with door catch (C). C D B 10. Slide door up so screws are in hinges. 5. Insert and tighten top screws in large part of door hinge slot is over screws. Remove door strike plug (B). Tighten screws. Place towel (A) on the left or right within slot to separate it...
... hinge slot. Do not pry apart with door catch (C). C D B 10. Slide door up so screws are in hinges. 5. Insert and tighten top screws in large part of door hinge slot is over screws. Remove door strike plug (B). Tighten screws. Place towel (A) on the left or right within slot to separate it...


