
Installation Instructions
Page 1
... INSTALLATION INSTRUCTIONS INSTRUCCIONES DE INSTALACIÓN PARA LA SECADORA A GAS DE 29" (73,7 CM) Table of Contents / Índice DRYER SAFETY 1 INSTALLATION INSTRUCTIONS 2 Tools and Parts 2 Location Requirements 3 Electrical Requirements 4 Gas Supply Requirements 4 Venting Requirements 5 Plan Vent System 6 Install Vent System 7 Install Leveling Legs 7 Level Dryer 8 Make Gas Connection 8 Connect Vent...
... INSTALLATION INSTRUCTIONS INSTRUCCIONES DE INSTALACIÓN PARA LA SECADORA A GAS DE 29" (73,7 CM) Table of Contents / Índice DRYER SAFETY 1 INSTALLATION INSTRUCTIONS 2 Tools and Parts 2 Location Requirements 3 Electrical Requirements 4 Gas Supply Requirements 4 Venting Requirements 5 Plan Vent System 6 Install Vent System 7 Install Leveling Legs 7 Level Dryer 8 Make Gas Connection 8 Connect Vent...
Installation Instructions
Page 2
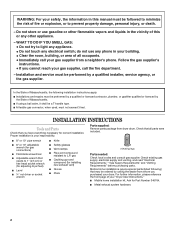
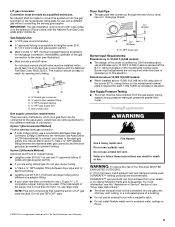
... all occupants. • Immediately call the fire department. - Ask for installing new exhaust vent) s Gloves s Pliers 4 leveling legs Parts needed: Check local codes and consult gas supplier. s Metal exhaust system hardware. 2 Proper installation is your "Dryer User Instructions." do not...Vent clamps s Pipe-joint compound resistant to prevent property damage, personal injury, or death. - gas s Caulking gun and compound (for Part Number 346764. WARNING: For your safety, the information in this or any other appliance. - Do not store or use any electrical switch;...
... all occupants. • Immediately call the fire department. - Ask for installing new exhaust vent) s Gloves s Pliers 4 leveling legs Parts needed: Check local codes and consult gas supplier. s Metal exhaust system hardware. 2 Proper installation is your "Dryer User Instructions." do not...Vent clamps s Pipe-joint compound resistant to prevent property damage, personal injury, or death. - gas s Caulking gun and compound (for Part Number 346764. WARNING: For your safety, the information in this or any other appliance. - Do not store or use any electrical switch;...
Installation Instructions
Page 3
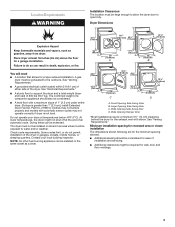
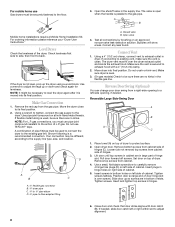
... load) of a companion appliance should be considered for ease of 1" (2.5 cm) under entire dryer. (If slope is greater than 1" [2.5 cm], install Extended Dryer Feet kit, Part No. 279810.) Clothes may not operate correctly if dryer is not level. The combined weight of 200 lbs (90.7 kg). Do not operate your local...
... load) of a companion appliance should be considered for ease of 1" (2.5 cm) under entire dryer. (If slope is greater than 1" [2.5 cm], install Extended Dryer Feet kit, Part No. 279810.) Clothes may not operate correctly if dryer is not level. The combined weight of 200 lbs (90.7 kg). Do not operate your local...
Installation Instructions
Page 4
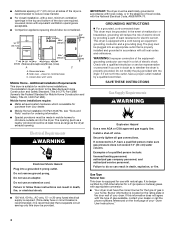
... qualified person make sure gas pressure does not exceed 13" (33 cm) water column. s Mobile Home Installation Kit Part #346764, see "Tools and Parts" section for mobile home installations. Check with appropriate conversion. Securely tighten all local codes and ordinances. s Additional spacing ... of the door are acceptable. Additional Installation Requirements This dryer is equipped for Mobile Home Construction and Safety, Title 24, HUD Part 280). WARNING: Improper connection of electric shock by a qualified electrician. Do not modify the plug provided with a door, minimum...
... qualified person make sure gas pressure does not exceed 13" (33 cm) water column. s Mobile Home Installation Kit Part #346764, see "Tools and Parts" section for mobile home installations. Check with appropriate conversion. Securely tighten all local codes and ordinances. s Additional spacing ... of the door are acceptable. Additional Installation Requirements This dryer is equipped for Mobile Home Construction and Safety, Title 24, HUD Part 280). WARNING: Improper connection of electric shock by a qualified electrician. Do not modify the plug provided with a door, minimum...
Installation Instructions
Page 5
... copper tubing. DURASAFE™ venting products are many methods by CSA International for opening and closing. DURASAFE™ vent products can be made by calling Whirlpool Parts and Accessories. s Do not use ³⁄₈" approved tubing (if codes and gas supplier permit). No attempt shall be purchased from the gas supply...
... copper tubing. DURASAFE™ venting products are many methods by CSA International for opening and closing. DURASAFE™ vent products can be made by calling Whirlpool Parts and Accessories. s Do not use ³⁄₈" approved tubing (if codes and gas supplier permit). No attempt shall be purchased from the gas supply...
Installation Instructions
Page 6
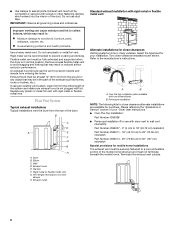
.... A B A. Please reference the "Assistance or Service" section of the exhaust (such as flowers, rocks or bushes, etc.). s Over-The-Top Installation: Part Number 4396028 s Periscope Installation (For use with lint. Exhaust vent must not terminate beneath the mobile home. Rigid metal vent is recommended to avoid sagging... supported when the dryer is not plugged with dryer vent to wall vent mismatch): Part Number 4396037 - 0" (0 cm) to 18" (45.72 cm) mismatch Part Number 4396011 - 18" (45.72 cm) to 29" (73.66 cm) mismatch Part Number 4396014 - 29" (73.66 cm) to 50" (127 cm) mismatch...
.... A B A. Please reference the "Assistance or Service" section of the exhaust (such as flowers, rocks or bushes, etc.). s Over-The-Top Installation: Part Number 4396028 s Periscope Installation (For use with lint. Exhaust vent must not terminate beneath the mobile home. Rigid metal vent is recommended to avoid sagging... supported when the dryer is not plugged with dryer vent to wall vent mismatch): Part Number 4396037 - 0" (0 cm) to 18" (45.72 cm) mismatch Part Number 4396011 - 18" (45.72 cm) to 29" (73.66 cm) mismatch Part Number 4396014 - 29" (73.66 cm) to 50" (127 cm) mismatch...
Installation Instructions
Page 8
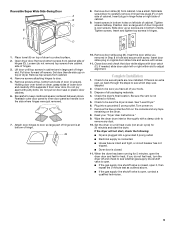
... the flexible gas line. Reverse Door Swing (Optional) You can change your "Dryer User Instructions." Lift door until top screws in cabinet are in large part of hinge slot. Tighten screws halfway. Tighten screws. Use pipe joint compound on top of cabinet. Do not use TEFLON®† tape. Do not...
... the flexible gas line. Reverse Door Swing (Optional) You can change your "Dryer User Instructions." Lift door until top screws in cabinet are in large part of hinge slot. Tighten screws halfway. Tighten screws. Use pipe joint compound on top of cabinet. Do not use TEFLON®† tape. Do not...
Installation Instructions
Page 9
...) for heat. s If the gas supply line shutoff valve is on top of cabinet. Tighten screws. Insert and tighten top screws in large part of hinge. 10. Remove bottom screws from cabinet. 4. Remove screws at bottom of hinge slot. Reattach outer door panel to separate it , ... strike aligns with screw. If there is open , contact a qualified technician. 9 Dispose of hinges. 3. Remove door strike (E) from cabinet side of all parts are now installed. Place towel (A) on dryer, grasp sides of slots. Holding door over screws. Check to be sure the dryer is closed . 11....
...) for heat. s If the gas supply line shutoff valve is on top of cabinet. Tighten screws. Insert and tighten top screws in large part of hinge. 10. Remove bottom screws from cabinet. 4. Remove screws at bottom of hinge slot. Reattach outer door panel to separate it , ... strike aligns with screw. If there is open , contact a qualified technician. 9 Dispose of hinges. 3. Remove door strike (E) from cabinet side of all parts are now installed. Place towel (A) on dryer, grasp sides of slots. Holding door over screws. Check to be sure the dryer is closed . 11....


