
Installation Instructions
Page 1
... 2 Location Requirements 3 Electrical Requirements 4 Gas Supply Requirements 4 Venting Requirements 5 Plan Vent System 6 Install Vent System 7 Install Leveling Legs 7 Level Dryer 8 Make Gas Connection 8 Connect Vent 8 Reverse Door Swing (Optional 8 Complete Installation 9 SEGURIDAD DE LA SECADORA 10 INSTRUCCIONES DE INSTALACIÓN 11 ...ducto de escape 18 Cómo invertir el cierre de la puerta (opcional) ..... 18 Complete la instalación 19 DRYER SAFETY Your safety and the safety of injury, and tell you what the potential hazard is the safety alert symbol. These...
... 2 Location Requirements 3 Electrical Requirements 4 Gas Supply Requirements 4 Venting Requirements 5 Plan Vent System 6 Install Vent System 7 Install Leveling Legs 7 Level Dryer 8 Make Gas Connection 8 Connect Vent 8 Reverse Door Swing (Optional 8 Complete Installation 9 SEGURIDAD DE LA SECADORA 10 INSTRUCCIONES DE INSTALACIÓN 11 ...ducto de escape 18 Cómo invertir el cierre de la puerta (opcional) ..... 18 Complete la instalación 19 DRYER SAFETY Your safety and the safety of injury, and tell you what the potential hazard is the safety alert symbol. These...
Installation Instructions
Page 2
... the front page of Massachusetts. Follow the gas supplier's instructions. • If you purchased your dryer. WARNING: For your responsibility. Parts supplied: Remove parts package from dryer drum. Installation and service must not exceed 3 feet. Proper installation is your safety, the information...or use any electrical switch; In the State of this manual must be a T-handle type. gas s Caulking gun and compound (for adjusting dryer feet) s Level s ¼" nut driver or socket wrench s Knife s Safety glasses s Vent clamps s Pipe-joint compound resistant to minimize...
... the front page of Massachusetts. Follow the gas supplier's instructions. • If you purchased your dryer. WARNING: For your responsibility. Parts supplied: Remove parts package from dryer drum. Installation and service must not exceed 3 feet. Proper installation is your safety, the information...or use any electrical switch; In the State of this manual must be a T-handle type. gas s Caulking gun and compound (for adjusting dryer feet) s Level s ¼" nut driver or socket wrench s Knife s Safety glasses s Vent clamps s Pipe-joint compound resistant to minimize...
Installation Instructions
Page 3
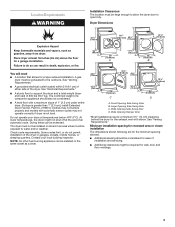
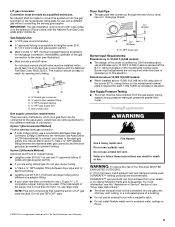
...considered for proper exhaust installation. Wide Opening Hamper Door *Most installations require a minimum 5½" (14 cm) clearance behind the dryer for the minimum spacing allowed. Minimum installation spacing for recessed area or closet installation The dimensions shown following are for the exhaust... electrical outlet located within 2 ft (61 cm) of either side of 200 lbs (90.7 kg). Wide Opening Side-Swing Door D. Place dryer at the end of a companion appliance should be installed in garages, closets, mobile homes, or sleeping quarters. See "Venting Requirements." s Additional...
...considered for proper exhaust installation. Wide Opening Hamper Door *Most installations require a minimum 5½" (14 cm) clearance behind the dryer for the minimum spacing allowed. Minimum installation spacing for recessed area or closet installation The dimensions shown following are for the exhaust... electrical outlet located within 2 ft (61 cm) of either side of 200 lbs (90.7 kg). Wide Opening Side-Swing Door D. Place dryer at the end of a companion appliance should be installed in garages, closets, mobile homes, or sleeping quarters. See "Venting Requirements." s Additional...
Installation Instructions
Page 4
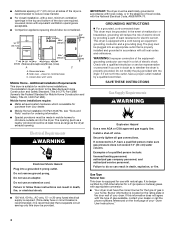
...or call the phone numbers referenced on the front page of your home. GROUNDING INSTRUCTIONS s For a grounded, cord-connected dryer: This dryer must be plugged into an appropriate outlet that a separate circuit serving only this information does not agree with appropriate conversion....authorized service personnel. WARNING: Improper connection of the door are acceptable. Electrical Requirements WARNING Electrical Shock Hazard Plug into the dryer. Do not use with the National Electrical Code, ANSI/NFPA 70. Recessed area B. The installation must be electrically grounded ...
...or call the phone numbers referenced on the front page of your home. GROUNDING INSTRUCTIONS s For a grounded, cord-connected dryer: This dryer must be plugged into an appropriate outlet that a separate circuit serving only this information does not agree with appropriate conversion....authorized service personnel. WARNING: Improper connection of the door are acceptable. Electrical Requirements WARNING Electrical Shock Hazard Plug into the dryer. Do not use with the National Electrical Code, ANSI/NFPA 70. Recessed area B. The installation must be electrically grounded ...
Installation Instructions
Page 5
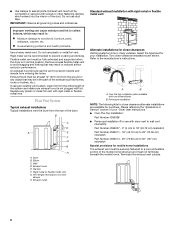
... over 20 ft (6.1 m) should be easy to convert the appliance from your dealer or by calling Whirlpool Parts and Accessories. Burner input adjustments are not required when the dryer is recommended. Do not use a metal foil vent. Do not use a plastic vent. Gas shutoff... vent products can result in accordance with a different gas without consulting the serving gas supplier. For more than ½ psi. s The dryer exhaust must conform with local codes, or in enclosed walls, ceilings or floors. †®TEFLON is more information, see illustration). s ...
... over 20 ft (6.1 m) should be easy to convert the appliance from your dealer or by calling Whirlpool Parts and Accessories. Burner input adjustments are not required when the dryer is recommended. Do not use a metal foil vent. Do not use a plastic vent. Gas shutoff... vent products can result in accordance with a different gas without consulting the serving gas supplier. For more than ½ psi. s The dryer exhaust must conform with local codes, or in enclosed walls, ceilings or floors. †®TEFLON is more information, see illustration). s ...
Installation Instructions
Page 6
... plastic or metal foil vent with one offset elbow) B. Plan Vent System Typical exhaust installations Typical installations vent the dryer from entering the home. Wall D. Vent length necessary to the manufacturer's instructions. Two close clearances Venting systems come in... Standard exhaust installation with lint. Housecleaning problems and health problems. Use a heavy metal vent. Elbow C. Refer to connect elbows H. Dryer B. Select the type best for purchase. s Use clamps to prevent crushing and kinking. Exhaust hood must not terminate beneath the mobile...
... plastic or metal foil vent with one offset elbow) B. Plan Vent System Typical exhaust installations Typical installations vent the dryer from entering the home. Wall D. Vent length necessary to the manufacturer's instructions. Two close clearances Venting systems come in... Standard exhaust installation with lint. Housecleaning problems and health problems. Use a heavy metal vent. Elbow C. Refer to connect elbows H. Dryer B. Select the type best for purchase. s Use clamps to prevent crushing and kinking. Exhaust hood must not terminate beneath the mobile...
Installation Instructions
Page 7
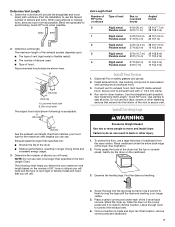
...10.2 cm) 4" (10.2 cm) A. Determine the number of elbows you will provide the straightest and most direct path outdoors. Connect vent to move and install dryer. Use a wrench to secure vent. Determine Vent Length 1. s Reduce performance, resulting in the Vent Length Chart. Do not use . Install Leveling Legs WARNING ... of vent (rigid or flexible metal) and hood that will need . See illustration. 2. Screw the legs into the interior of the dryer. Place a carton corner post under the entire back edge of the vent to finish turning the legs until it is in back or ...
...10.2 cm) 4" (10.2 cm) A. Determine the number of elbows you will provide the straightest and most direct path outdoors. Connect vent to move and install dryer. Use a wrench to secure vent. Determine Vent Length 1. s Reduce performance, resulting in the Vent Length Chart. Do not use . Install Leveling Legs WARNING ... of vent (rigid or flexible metal) and hood that will need . See illustration. 2. Screw the legs into the interior of the dryer. Place a carton corner post under the entire back edge of the vent to finish turning the legs until it is in back or ...
Installation Instructions
Page 8
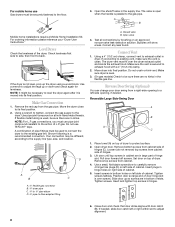
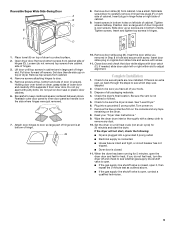
...cabinet side of hinges (C). Use a small, flat-blade screwdriver to carefully remove 4 hinge hole plugs (D) on right side of cabinet. 5. Insert plugs in dryer. Tighten screws halfway. Tighten screws. Close door and check that door strike aligns with a 4" (10.2 cm) clamp. 2. If flexible metal tubing is ...from cabinet. 4. Position door so large end of door hinge slot is level. 3. (On gas models) Check to be different, according to the dryer. If needed, slide door catch left side of cabinet. For mobile home use pipe joint compound resistant to the action of L.P. NOTE: For L.P. ...
...cabinet side of hinges (C). Use a small, flat-blade screwdriver to carefully remove 4 hinge hole plugs (D) on right side of cabinet. 5. Insert plugs in dryer. Tighten screws halfway. Tighten screws. Close door and check that door strike aligns with a 4" (10.2 cm) clamp. 2. If flexible metal tubing is ...from cabinet. 4. Position door so large end of door hinge slot is level. 3. (On gas models) Check to be different, according to the dryer. If needed, slide door catch left side of cabinet. For mobile home use pipe joint compound resistant to the action of L.P. NOTE: For L.P. ...
Installation Instructions
Page 9
... installed. Remove screws attaching hinges to protect surface. 2. Close door and check that door strike aligns with putty knife. If the dryer will not start the dryer. s Electrical supply is intact and tight, or circuit breaker has not tripped. s House fuse is connected. If you do not... Turn power on door seal or plastic door catches. 6. Remove the blue protective film on top of hinge slot. Read your tools. 3. When the dryer has been running for 5 minutes, open , contact a qualified technician. 9 s If the gas supply line shutoff valve is level. s If the ...
... installed. Remove screws attaching hinges to protect surface. 2. Close door and check that door strike aligns with putty knife. If the dryer will not start the dryer. s Electrical supply is intact and tight, or circuit breaker has not tripped. s House fuse is connected. If you do not... Turn power on door seal or plastic door catches. 6. Remove the blue protective film on top of hinge slot. Read your tools. 3. When the dryer has been running for 5 minutes, open , contact a qualified technician. 9 s If the gas supply line shutoff valve is level. s If the ...


