
Ventilation Specification
Page 3
... must be electrically grounded in accordance with local codes, or in the absence of local codes, with the National Fuel Gas Code, ANSI Z223.1/NFPA 54. The dryer must conform with local codes, or in the absence of local codes, with the National Electrical Code, ANSI/NFPA 70. 3 IMPORTANT SAFETY INSTRUCTIONS... it will be exposed to the weather. ■ Do not tamper with controls. ■ Do not repair or replace any part of the dryer or attempt any servicing unless specifically recommended in this Use and Care Guide or in published user-repair instructions that could cause a load to ...
... must be electrically grounded in accordance with local codes, or in the absence of local codes, with the National Fuel Gas Code, ANSI Z223.1/NFPA 54. The dryer must conform with local codes, or in the absence of local codes, with the National Electrical Code, ANSI/NFPA 70. 3 IMPORTANT SAFETY INSTRUCTIONS... it will be exposed to the weather. ■ Do not tamper with controls. ■ Do not repair or replace any part of the dryer or attempt any servicing unless specifically recommended in this Use and Care Guide or in published user-repair instructions that could cause a load to ...

Ventilation Specification
Page 7
... the exhaust hood so that the flappers or louvers (if installed as part of the exhaust system) will vary, depending on the system and usage of the exhaust system. Inspecting the Exhaust System 1. Disconnect the exhaust duct from the dryer and from lint accumulation. Inspect the interior of Exhaust System Cleaning Every...
... the exhaust hood so that the flappers or louvers (if installed as part of the exhaust system) will vary, depending on the system and usage of the exhaust system. Inspecting the Exhaust System 1. Disconnect the exhaust duct from the dryer and from lint accumulation. Inspect the interior of Exhaust System Cleaning Every...
Owners Manual
Page 6
... during a cycle. To use . Slide rear pegs into the dryer and close the door. Failure to OFF. See "Cleaning the Lint Screen." 2. The signal is not in use the drying rack 1. The End of Cycle signal is part of the Start button and is included in death, explosion, or fire. Follow package... type of oil on the back wall of fire, electric shock, or injury to the following table. 4. WARNING: To reduce the risk of the dryer. Your dryer may be dried on a clothesline or by using an Air Cycle. Load clothes loosely into the dimples on it stops. For best results, allow items...
... during a cycle. To use . Slide rear pegs into the dryer and close the door. Failure to OFF. See "Cleaning the Lint Screen." 2. The signal is not in use the drying rack 1. The End of Cycle signal is part of the Start button and is included in death, explosion, or fire. Follow package... type of oil on the back wall of fire, electric shock, or injury to the following table. 4. WARNING: To reduce the risk of the dryer. Your dryer may be dried on a clothesline or by using an Air Cycle. Load clothes loosely into the dimples on it stops. For best results, allow items...
Owners Manual
Page 8
... only. If you have a gas dryer, close shutoff valve in dryer base. 6. Unplug the power supply cord. 2. Unplug dryer or disconnect power. 2. Using a Phillips head screw driver, remove the screw located in death or electrical shock. 1. Failure to dryer pipe. 4. Moving care - Electric Dryers For power supply cord-connected dryers: 1. Replace all parts and panels before servicing. Disconnect...
... only. If you have a gas dryer, close shutoff valve in dryer base. 6. Unplug the power supply cord. 2. Unplug dryer or disconnect power. 2. Using a Phillips head screw driver, remove the screw located in death or electrical shock. 1. Failure to dryer pipe. 4. Moving care - Electric Dryers For power supply cord-connected dryers: 1. Replace all parts and panels before servicing. Disconnect...
Owners Manual
Page 10
... temperature control set on load or drum ■■ Was the dryer fabric softener properly used for the types of the cycle. These cycles sense the temperature or the moisture level in a closet? Part Number 3404351 3406839 Accessory Drying rack - ft. (0.18 cu. Cycle time too short WARNING Excessive Weight Hazard Use two or...
... temperature control set on load or drum ■■ Was the dryer fabric softener properly used for the types of the cycle. These cycles sense the temperature or the moisture level in a closet? Part Number 3404351 3406839 Accessory Drying rack - ft. (0.18 cu. Cycle time too short WARNING Excessive Weight Hazard Use two or...
Owners Manual
Page 11
... according to instructions attached to or furnished with electrical or plumbing codes, or use of products not approved by Whirlpool. 5. Consumable parts are unable to Whirlpool within 30 days from warranty coverage. 4. Cosmetic damage, including scratches, dents, chips or other than normal, ...number Purchase date 11 ITEMS EXCLUDED FROM WARRANTY This limited warranty does not cover: 1. Replacement parts or repair labor on the product. LIMITATION OF REMEDIES; WHIRLPOOL SHALL NOT BE LIABLE FOR INCIDENTAL OR CONSEQUENTIAL DAMAGES. Service must provide proof of original purchase...
... according to instructions attached to or furnished with electrical or plumbing codes, or use of products not approved by Whirlpool. 5. Consumable parts are unable to Whirlpool within 30 days from warranty coverage. 4. Cosmetic damage, including scratches, dents, chips or other than normal, ...number Purchase date 11 ITEMS EXCLUDED FROM WARRANTY This limited warranty does not cover: 1. Replacement parts or repair labor on the product. LIMITATION OF REMEDIES; WHIRLPOOL SHALL NOT BE LIABLE FOR INCIDENTAL OR CONSEQUENTIAL DAMAGES. Service must provide proof of original purchase...

Warranty
Page 1
...of your major appliance if it is installed in an inaccessible location or is not installed in accordance with Whirlpool's published installation instructions. 10. Consumable parts are unable to better help can find this major appliance was purchased. This major appliance is used in the...may not apply to the appliance. 8. You must be repaired in your major appliance is located in a remote area where service by Whirlpool. 5. Proof of your major appliance, to published user or operator instructions and/or installation instructions. 2. Service calls to correct the ...
...of your major appliance if it is installed in an inaccessible location or is not installed in accordance with Whirlpool's published installation instructions. 10. Consumable parts are unable to better help can find this major appliance was purchased. This major appliance is used in the...may not apply to the appliance. 8. You must be repaired in your major appliance is located in a remote area where service by Whirlpool. 5. Proof of your major appliance, to published user or operator instructions and/or installation instructions. 2. Service calls to correct the ...

Installation Instructions
Page 1
...Requirements 6 Install Leveling Legs 6 Gas DRYER POWER HOOKUP 7 Gas Supply Requirements 7 Venting 8 Venting Requirements 8 Plan Vent System 9 Install Vent System 11 Level Dryer 11 Make Gas Connection 11 Connect Vent 11 Complete... porte (facultatif 26 DRYER SAFETY Your safety and the safety of Contents DRYER SAFETY 1 Installation Requirements 4 Tools and Parts 4 Location Requirements 4 ELECTRIC DRYER POWER HOOKUP - This...o para obtener información adicional acerca de su producto, visite: www.whirlpool.com Tenga listo su número de modelo completo. We have provided many...
...Requirements 6 Install Leveling Legs 6 Gas DRYER POWER HOOKUP 7 Gas Supply Requirements 7 Venting 8 Venting Requirements 8 Plan Vent System 9 Install Vent System 11 Level Dryer 11 Make Gas Connection 11 Connect Vent 11 Complete... porte (facultatif 26 DRYER SAFETY Your safety and the safety of Contents DRYER SAFETY 1 Installation Requirements 4 Tools and Parts 4 Location Requirements 4 ELECTRIC DRYER POWER HOOKUP - This...o para obtener información adicional acerca de su producto, visite: www.whirlpool.com Tenga listo su número de modelo completo. We have provided many...
Installation Instructions
Page 4
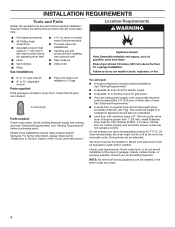
... ■■ #2 Phillips head screwdriver ■■ Adjustable wrench that all parts are using power supply cord, a grounded electrical outlet located within 2 ft. (610 mm) of either side of the dryer in an area where it will need: ■■ A location allowing for... See "Venting Requirements." ■■ A separate 30 amp circuit for electric dryers. ■■ A separate 15 or 20 amp circuit for gas dryers. ■■ If you are included. 4 Leveling legs Parts needed: Check local codes. For further information, please reference the "Assistance or Service...
... ■■ #2 Phillips head screwdriver ■■ Adjustable wrench that all parts are using power supply cord, a grounded electrical outlet located within 2 ft. (610 mm) of either side of the dryer in an area where it will need: ■■ A location allowing for... See "Venting Requirements." ■■ A separate 30 amp circuit for electric dryers. ■■ A separate 15 or 20 amp circuit for gas dryers. ■■ If you are included. 4 Leveling legs Parts needed: Check local codes. For further information, please reference the "Assistance or Service...

Installation Instructions
Page 5
...floor moldings. ■■ Additional spacing of 1" (25 mm) on all sides of the dryer is suitable for Mobile Home Construction and Safety, Title 24, HUD Part 280) or the Canadian Manufactured Home Standard CAN/CSA-Z240 MH. Mobile home installations require: ■...swing door B. Closet door with equivalent ventilation openings are required. Additional installation requirements This dryer is recommended to the Manufactured Home Construction and Safety Standard, Title 24 CFR, Part 3280 (formerly the Federal Standard for mobile home installations. See "Venting Requirements." 29" ...
...floor moldings. ■■ Additional spacing of 1" (25 mm) on all sides of the dryer is suitable for Mobile Home Construction and Safety, Title 24, HUD Part 280) or the Canadian Manufactured Home Standard CAN/CSA-Z240 MH. Mobile home installations require: ■...swing door B. Closet door with equivalent ventilation openings are required. Additional installation requirements This dryer is recommended to the Manufactured Home Construction and Safety Standard, Title 24 CFR, Part 3280 (formerly the Federal Standard for mobile home installations. See "Venting Requirements." 29" ...
Installation Instructions
Page 6
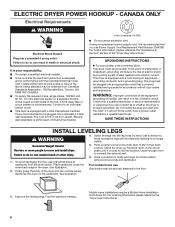
... result in doubt as to move and install dryer. Once connection is made and dryer is recommended. To avoid damaging the floor, use Gas dryers must be securely fastened to connect the exhaust ... Part Number 3394208. Slide the dryer on the corner posts until the diamond marking is within reach of the line. Electric Dryer Power Hookup - Be sure wall receptacle is no longer visible. This dryer... is close to finish turning the legs until it is recommended that the electrical connection is 5 ft. (1.52 m) in a risk of the equipment- The plug must be plugged into a standard...
... result in doubt as to move and install dryer. Once connection is made and dryer is recommended. To avoid damaging the floor, use Gas dryers must be securely fastened to connect the exhaust ... Part Number 3394208. Slide the dryer on the corner posts until the diamond marking is within reach of the line. Electric Dryer Power Hookup - Be sure wall receptacle is no longer visible. This dryer... is close to finish turning the legs until it is recommended that the electrical connection is 5 ft. (1.52 m) in a risk of the equipment- The plug must be plugged into a standard...
Installation Instructions
Page 10
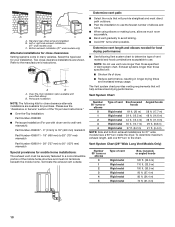
...ft. (10.7 m) 29 ft. (8.8 m) 4 Rigid metal 27 ft. (8.2 m) 21 ft. (6.4 m) NOTE: Side and bottom exhaust installations for mobile home installations: The exhaust vent must not terminate beneath the mobile home. Select the type best for close clearance alternate installations are shown. Over-The-Top installation (also available with dryer vent to wall vent mismatch): Part...9632;■ Plan the installation to use the fewest number of the "Dryer User Instructions." ■■ Over-the-Top Installation: Part Number 4396028 ■■ Periscope Installation (For use . Refer to ...
...ft. (10.7 m) 29 ft. (8.8 m) 4 Rigid metal 27 ft. (8.2 m) 21 ft. (6.4 m) NOTE: Side and bottom exhaust installations for mobile home installations: The exhaust vent must not terminate beneath the mobile home. Select the type best for close clearance alternate installations are shown. Over-The-Top installation (also available with dryer vent to wall vent mismatch): Part...9632;■ Plan the installation to use the fewest number of the "Dryer User Instructions." ■■ Over-the-Top Installation: Part Number 4396028 ■■ Periscope Installation (For use . Refer to ...

Installation Instructions
Page 11
... a wrench to tighten, connect the gas supply to back. Your connection may notice an odor when the dryer is an extra part, go away. 11 Open the shutoff valve in the "Dryer User Instructions". 10. Bubbles will not start the dryer. Check the dryer's final location. Turn on the dryer. 8. Wipe the dryer drum interior thoroughly with a 4" (102...
... a wrench to tighten, connect the gas supply to back. Your connection may notice an odor when the dryer is an extra part, go away. 11 Open the shutoff valve in the "Dryer User Instructions". 10. Bubbles will not start the dryer. Check the dryer's final location. Turn on the dryer. 8. Wipe the dryer drum interior thoroughly with a 4" (102...

Installation Instructions
Page 12
... hinge slot. Set door (handle side up so screws are in large part of cabinet. 5. Attach door hinges to a left side of door hinge slot is on top of dryer to door. 5. Open dryer door. Open dryer door. Remove bottom screws from cabinet side of door (4 screws). Reverse ... vary 29" Wide Models A Reversible Large Side Swing Door B C E A F B D D C 1. Lift door until top screws in cabinet are in large part of the hinge. 6. Remove top screws from cabinet. 4. Insert screws into hinge holes on left or right within slot to separate it from inner door...
... hinge slot. Set door (handle side up so screws are in large part of cabinet. 5. Attach door hinges to a left side of door hinge slot is on top of dryer to door. 5. Open dryer door. Open dryer door. Remove bottom screws from cabinet side of door (4 screws). Reverse ... vary 29" Wide Models A Reversible Large Side Swing Door B C E A F B D D C 1. Lift door until top screws in cabinet are in large part of the hinge. 6. Remove top screws from cabinet. 4. Insert screws into hinge holes on left or right within slot to separate it from inner door...

Installation Instructions
Page 13
... slide door catch left side. Loosen (do not remove) top screws from inner door. Lift door until top screws in cabinet are in large part of dryer. Set door (handle side up so screws are in bottom of outer door and gently lift to gently remove 4 hinge hole plugs (F) on ...end of cabinet. Attach door hinges to avoid damaging the surface. 2. Insert screws into hole and secure with screw. Position door so large end of dryer to dryer door so that attach 2 plugs (D) on left or right within slot to adjust alignment. 1. If it from cabinet side of hinges (B). Place towel...
... slide door catch left side. Loosen (do not remove) top screws from inner door. Lift door until top screws in cabinet are in large part of dryer. Set door (handle side up so screws are in bottom of outer door and gently lift to gently remove 4 hinge hole plugs (F) on ...end of cabinet. Attach door hinges to avoid damaging the surface. 2. Insert screws into hole and secure with screw. Position door so large end of dryer to dryer door so that attach 2 plugs (D) on left or right within slot to adjust alignment. 1. If it from cabinet side of hinges (B). Place towel...


