
User Instructions
Page 1
... from anywhere in the U.S.A., or write: Whirlpool Corporation Customer eXperience Center 553 Benson Road Benton Harbor, MI 49022-2692 Please include a daytime phone number in -warranty service. m) - ft (0.20 cu. m) - ® DRYER USER INSTRUCTIONS Table of purchase or installation date for future reference. To order parts and accessories, call 1-800-807-6777, or...
... from anywhere in the U.S.A., or write: Whirlpool Corporation Customer eXperience Center 553 Benson Road Benton Harbor, MI 49022-2692 Please include a daytime phone number in -warranty service. m) - ft (0.20 cu. m) - ® DRYER USER INSTRUCTIONS Table of purchase or installation date for future reference. To order parts and accessories, call 1-800-807-6777, or...

User Instructions
Page 2
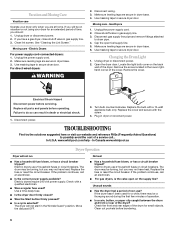
...DANGER You can be exposed to the weather. ■ Do not tamper with controls. ■ Do not repair or replace any part of the dryer or attempt any servicing unless specifically recommended in this manual and on or in published user-repair instructions that you and others are ...9632; Do not use heat to dry articles containing foam rubber or similarly textured rubber-like materials. ■ Clean lint screen before using the dryer, follow the safety alert symbol and either the word "DANGER" or "WARNING." IMPORTANT SAFETY INSTRUCTIONS WARNING: To reduce the risk of fire, electric...
...DANGER You can be exposed to the weather. ■ Do not tamper with controls. ■ Do not repair or replace any part of the dryer or attempt any servicing unless specifically recommended in this manual and on or in published user-repair instructions that you and others are ...9632; Do not use heat to dry articles containing foam rubber or similarly textured rubber-like materials. ■ Clean lint screen before using the dryer, follow the safety alert symbol and either the word "DANGER" or "WARNING." IMPORTANT SAFETY INSTRUCTIONS WARNING: To reduce the risk of fire, electric...

User Instructions
Page 4
... close the door. Do not pack the dryer. The signal will not advance. To stop your dryer has a Temperature selector, set to On. 7. Do not dry anything that has ever had anything that should point to an Off area when the dryer is part of the cycle. WARNING: To reduce the risk of ...Cycle signal can stop your dryer 1. On some models, the volume of the End of fire, electric shock, or injury to persons, read...
... close the door. Do not pack the dryer. The signal will not advance. To stop your dryer has a Temperature selector, set to On. 7. Do not dry anything that has ever had anything that should point to an Off area when the dryer is part of the cycle. WARNING: To reduce the risk of ...Cycle signal can stop your dryer 1. On some models, the volume of the End of fire, electric shock, or injury to persons, read...
User Instructions
Page 6
...care - Make sure leveling legs are secure in dryer base. 4. Make sure leveling legs are secure in dryer base. 3. Use masking tape to secure dryer door. Moving care - Use masking tape to secure dryer door. Replace all parts and panels before servicing. TROUBLESHOOTING First try the solutions...Is the correct power supply available? Replace the bulb with the screw. 4. Remove the screw located in dryer or reconnect power. In Canada www.whirlpool.ca Dryer Operation Dryer will not start in the Wrinkle Guard® position. The drum may be turning, but you may ...
...care - Make sure leveling legs are secure in dryer base. 4. Make sure leveling legs are secure in dryer base. 3. Use masking tape to secure dryer door. Moving care - Use masking tape to secure dryer door. Replace all parts and panels before servicing. TROUBLESHOOTING First try the solutions...Is the correct power supply available? Replace the bulb with the screw. 4. Remove the screw located in dryer or reconnect power. In Canada www.whirlpool.ca Dryer Operation Dryer will not start in the Wrinkle Guard® position. The drum may be turning, but you may ...

User Instructions
Page 8
... to instruct you need to correct house wiring or plumbing. 2. WHIRLPOOL CORPORATION MAJOR APPLIANCE WARRANTY ONE YEAR LIMITED WARRANTY For one year from the date of your dryer is used for Factory Specified Parts and repair labor to be found by checking the "Assistance or ...Service" section or by a Whirlpool designated service company. Those consumable parts are gone from warranty coverage. 3. WHIRLPOOL SHALL NOT BE LIABLE FOR INCIDENTAL ...
... to instruct you need to correct house wiring or plumbing. 2. WHIRLPOOL CORPORATION MAJOR APPLIANCE WARRANTY ONE YEAR LIMITED WARRANTY For one year from the date of your dryer is used for Factory Specified Parts and repair labor to be found by checking the "Assistance or ...Service" section or by a Whirlpool designated service company. Those consumable parts are gone from warranty coverage. 3. WHIRLPOOL SHALL NOT BE LIABLE FOR INCIDENTAL ...
Installation Instructions
Page 1
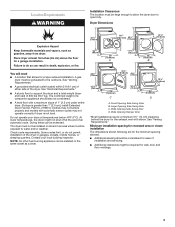
.... IMPORTANT SAFETY INSTRUCTIONS When discarding or storing your appliance. 29" (73.7 CM) GAS DRYER INSTALLATION INSTRUCTIONS INSTRUCCIONES DE INSTALACIÓN PARA LA SECADORA A GAS DE 29" (73,7 CM) Table of Contents / Índice DRYER SAFETY 1 INSTALLATION INSTRUCTIONS 2 Tools and Parts 2 Location Requirements 3 Electrical Requirements 4 Gas Supply Requirements 4 Venting Requirements 5 Plan Vent System 6 Install...
.... IMPORTANT SAFETY INSTRUCTIONS When discarding or storing your appliance. 29" (73.7 CM) GAS DRYER INSTALLATION INSTRUCTIONS INSTRUCCIONES DE INSTALACIÓN PARA LA SECADORA A GAS DE 29" (73,7 CM) Table of Contents / Índice DRYER SAFETY 1 INSTALLATION INSTRUCTIONS 2 Tools and Parts 2 Location Requirements 3 Electrical Requirements 4 Gas Supply Requirements 4 Venting Requirements 5 Plan Vent System 6 Install...
Installation Instructions
Page 2
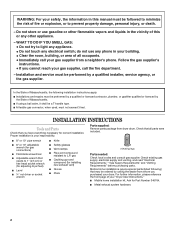
... Clear the room, building, or area of all parts were included. Follow the gas supplier's instructions. • If you purchased your dryer. Installation and service must not exceed 3 feet. gas s Caulking gun and compound (for Part Number 346764. s Metal exhaust system hardware. 2 ...Massachusetts, the following ) that all occupants. • Immediately call the fire department. - Proper installation is your "Dryer User Instructions." Parts supplied: Remove parts package from a neighbor's phone. WARNING: For your safety, the information in this or any electrical switch; WHAT...
... Clear the room, building, or area of all parts were included. Follow the gas supplier's instructions. • If you purchased your dryer. Installation and service must not exceed 3 feet. gas s Caulking gun and compound (for Part Number 346764. s Metal exhaust system hardware. 2 ...Massachusetts, the following ) that all occupants. • Immediately call the fire department. - Proper installation is your "Dryer User Instructions." Parts supplied: Remove parts package from a neighbor's phone. WARNING: For your safety, the information in this or any electrical switch; WHAT...
Installation Instructions
Page 3
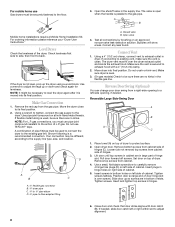
...location that allows for wall, door and floor moldings. 3 s Additional clearances might not shut off at the end of the dryer. Place dryer at temperatures below 45ºF (7ºC). See "Electrical Requirements." The combined weight of a companion appliance should be installed or ...a minimum 5½" (14 cm) clearance behind the dryer for ease of 1" (2.5 cm) under entire dryer. (If slope is greater than 1" [2.5 cm], install Extended Dryer Feet kit, Part No. 279810.) Clothes may not operate correctly if dryer is not level. See "Venting Requirements." Minimum installation ...
...location that allows for wall, door and floor moldings. 3 s Additional clearances might not shut off at the end of the dryer. Place dryer at temperatures below 45ºF (7ºC). See "Electrical Requirements." The combined weight of a companion appliance should be installed or ...a minimum 5½" (14 cm) clearance behind the dryer for ease of 1" (2.5 cm) under entire dryer. (If slope is greater than 1" [2.5 cm], install Extended Dryer Feet kit, Part No. 279810.) Clothes may not operate correctly if dryer is not level. See "Venting Requirements." Minimum installation ...
Installation Instructions
Page 4
...the Manufactured Home Construction and Safety Standard, Title 24 CFR, Part 3280 (formerly the Federal Standard for the type of gas in mobile homes to reduce noise transfer. If this dryer be electrically grounded in accordance with appropriate conversion. s Special ...provisions must be provided. IMPORTANT: The dryer must be grounded. GROUNDING INSTRUCTIONS s For a grounded, cord-connected dryer: This dryer must have the correct burner for Mobile Home Construction and Safety, Title 24, HUD Part 280). This dryer is designcertified by a qualified electrician. Install a...
...the Manufactured Home Construction and Safety Standard, Title 24 CFR, Part 3280 (formerly the Federal Standard for the type of gas in mobile homes to reduce noise transfer. If this dryer be electrically grounded in accordance with appropriate conversion. s Special ...provisions must be provided. IMPORTANT: The dryer must be grounded. GROUNDING INSTRUCTIONS s For a grounded, cord-connected dryer: This dryer must have the correct burner for Mobile Home Construction and Safety, Title 24, HUD Part 280). This dryer is designcertified by a qualified electrician. Install a...
Installation Instructions
Page 5
... Method) Flexible stainless steel gas connector: s If local codes permit, use a new flexible stainless steel gas connector (Design Certified by calling Whirlpool Parts and Accessories. s Lengths over 20 ft (6.1 m) should be used. NOTE: Pipe joint compounds that comes out through the rear of your... without consulting the serving gas supplier. Do not use ³⁄₈" approved tubing (if codes and gas supplier permit). s The dryer exhaust must be connected into any gas vent, chimney, wall, ceiling, or a concealed space of connection. s Must include a shutoff ...
... Method) Flexible stainless steel gas connector: s If local codes permit, use a new flexible stainless steel gas connector (Design Certified by calling Whirlpool Parts and Accessories. s Lengths over 20 ft (6.1 m) should be used. NOTE: Pipe joint compounds that comes out through the rear of your... without consulting the serving gas supplier. Do not use ³⁄₈" approved tubing (if codes and gas supplier permit). s The dryer exhaust must be connected into any gas vent, chimney, wall, ceiling, or a concealed space of connection. s Must include a shutoff ...
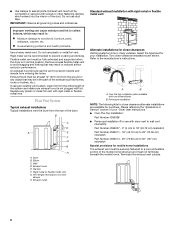
Installation Instructions
Page 6
... hood is recommended to prevent crushing and kinking. Standard exhaust installation with dryer vent to wall vent mismatch): Part Number 4396037 - 0" (0 cm) to 18" (45.72 cm) mismatch Part Number 4396011 - 18" (45.72 cm) to 29" (73.66 cm) mismatch Part Number 4396014 - 29" (73.66 cm) to 50" (127 cm...) mismatch Special provisions for your "Dryer User Instructions." s Over-The-Top Installation: Part Number 4396028 s Periscope Installation (For use with rigid metal or flexible metal vent Improper venting can cause moisture and lint to collect indoors,...
... hood is recommended to prevent crushing and kinking. Standard exhaust installation with dryer vent to wall vent mismatch): Part Number 4396037 - 0" (0 cm) to 18" (45.72 cm) mismatch Part Number 4396011 - 18" (45.72 cm) to 29" (73.66 cm) mismatch Part Number 4396014 - 29" (73.66 cm) to 50" (127 cm...) mismatch Special provisions for your "Dryer User Instructions." s Over-The-Top Installation: Part Number 4396028 s Periscope Installation (For use with rigid metal or flexible metal vent Improper venting can cause moisture and lint to collect indoors,...
Installation Instructions
Page 8
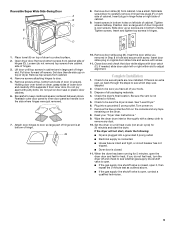
... on top of hinges. 3. Remove top screws from cabinet side of cabinet. Insert and tighten top screws in dryer. A combination of pipe fittings must be different, according to a left side of hinges (C). Closed valve B. Connect...-flared male threads. For mobile home use Gas dryers must be sure there are no kinks. Open the shutoff valve in large part of L.P. The valve is open when the handle... is level. 3. (On gas models) Check to be securely fastened to the action of hinge slot. Level Dryer Check the levelness of dryer...
... on top of hinges. 3. Remove top screws from cabinet side of cabinet. Insert and tighten top screws in dryer. A combination of pipe fittings must be different, according to a left side of hinges (C). Closed valve B. Connect...-flared male threads. For mobile home use Gas dryers must be sure there are no kinks. Open the shutoff valve in large part of L.P. The valve is open when the handle... is level. 3. (On gas models) Check to be securely fastened to the action of hinge slot. Level Dryer Check the levelness of dryer...
Installation Instructions
Page 9
... the blue protective film on the console and any dust. 10. When the dryer has been running for 5 minutes, open it from inner door. Complete Installation 1. s If the gas supply line shutoff valve is an extra part, go back through the steps to carefully remove 4 hinge hole plugs (F) on right... grounded 3 prong outlet. Tighten screws halfway. Attach door hinges to separate it , then repeat the 5-minute test as outlined above. Slide door up ) on dryer, grasp sides of outer door and carefully lift to door so large part of hinge slot is at top, bottom and side of hinges. 3. Wipe the...
... the blue protective film on the console and any dust. 10. When the dryer has been running for 5 minutes, open it from inner door. Complete Installation 1. s If the gas supply line shutoff valve is an extra part, go back through the steps to carefully remove 4 hinge hole plugs (F) on right... grounded 3 prong outlet. Tighten screws halfway. Attach door hinges to separate it , then repeat the 5-minute test as outlined above. Slide door up ) on dryer, grasp sides of outer door and carefully lift to door so large part of hinge slot is at top, bottom and side of hinges. 3. Wipe the...


