
User Instructions
Page 1
... on the model and serial number label, located at 1-800-253-1301 from anywhere in the U.S.A., or write: Whirlpool Corporation Customer eXperience Center 553 Benson Road Benton Harbor, MI 49022-2692 Please include a daytime phone number in -warranty...first see the "Troubleshooting" section. ft (0.20 cu. Part Number Accessory 20-48KITRC 4 ft (1.2 m) gas line dryer connector installation kit PT220L 4 ft (1.2 m) dryer cord, 3-wire, 30 amp PT400L 4 ft (1.2 m) dryer cord, 4-wire, 30 amp PT600L 6 ft (1.8 m) dryer cord, 4-wire, 30 amp 8212614 Dryer vent lint brush 31682 All-purpose...
... on the model and serial number label, located at 1-800-253-1301 from anywhere in the U.S.A., or write: Whirlpool Corporation Customer eXperience Center 553 Benson Road Benton Harbor, MI 49022-2692 Please include a daytime phone number in -warranty...first see the "Troubleshooting" section. ft (0.20 cu. Part Number Accessory 20-48KITRC 4 ft (1.2 m) gas line dryer connector installation kit PT220L 4 ft (1.2 m) dryer cord, 3-wire, 30 amp PT400L 4 ft (1.2 m) dryer cord, 4-wire, 30 amp PT600L 6 ft (1.8 m) dryer cord, 4-wire, 30 amp 8212614 Dryer vent lint brush 31682 All-purpose...

User Instructions
Page 2
... can kill or hurt you and others are not followed. This is , tell you how to play on or in this manual and on your dryer. This symbol alerts you to potential hazards that could cause a load to catch fire. ■ Do not dry articles that have the skills to... door to cooking oils in your appliance. SAVE THESE INSTRUCTIONS 2 WARNING You can be killed or seriously injured if you don't immediately follow instructions. DRYER SAFETY Your safety and the safety of injury, and tell you what can happen if the instructions are very important. We have provided many important...
... can kill or hurt you and others are not followed. This is , tell you how to play on or in this manual and on your dryer. This symbol alerts you to potential hazards that could cause a load to catch fire. ■ Do not dry articles that have the skills to... door to cooking oils in your appliance. SAVE THESE INSTRUCTIONS 2 WARNING You can be killed or seriously injured if you don't immediately follow instructions. DRYER SAFETY Your safety and the safety of injury, and tell you what can happen if the instructions are very important. We have provided many important...

User Instructions
Page 3
... adequate Good Better 4. Do not use plastic vent or metal foil vent. Follow the gas supplier's instructions. • If you cannot reach your dryer in death or fire. Checking Your Vent Your dryer must be properly installed and vented to light any appliance. • Do not touch ... under the warranty. Do not use , but at least every 2 years, or when installing your gas supplier, call your dryer is important for by a qualified installer, service agency, or the gas supplier. Do not store or use a metal foil vent. Use clamps to follow the Installation Instructions supplied...
... adequate Good Better 4. Do not use plastic vent or metal foil vent. Follow the gas supplier's instructions. • If you cannot reach your dryer in death or fire. Checking Your Vent Your dryer must be properly installed and vented to light any appliance. • Do not touch ... under the warranty. Do not use , but at least every 2 years, or when installing your gas supplier, call your dryer is important for by a qualified installer, service agency, or the gas supplier. Do not store or use a metal foil vent. Use clamps to follow the Installation Instructions supplied...

User Instructions
Page 4
...to rest on it stops, wrinkles can result in death, explosion, or fire. If desired, add fabric softener sheet. To stop your dryer Open the dryer door or turn the Cycle Control knob to dry items such as it (including cooking oils). Drying Rack Option Use the Drying Rack ... should point to follow these instructions can form. NOTE: The Cycle Control knob should be able to tumble freely. 3. To find out whether your dryer has a Temperature selector, set to medium-weight fabrics. 4. This book covers several different models. On some models, the volume of the End of...
...to rest on it stops, wrinkles can result in death, explosion, or fire. If desired, add fabric softener sheet. To stop your dryer Open the dryer door or turn the Cycle Control knob to dry items such as it (including cooking oils). Drying Rack Option Use the Drying Rack ... should point to follow these instructions can form. NOTE: The Cycle Control knob should be able to tumble freely. 3. To find out whether your dryer has a Temperature selector, set to medium-weight fabrics. 4. This book covers several different models. On some models, the volume of the End of...

User Instructions
Page 5
... allow items to remove. 2. to remove lint. WARNING 2. Failure to do so can cause overheating and damage to the stained area of the dryer door opening. A screen blocked by using an air cycle. Roll lint off the screen with a soft cloth until stain is located on rack)...complete drying, if needed. Scrub lint screen with hot water. 5. From Inside the Exhaust Vent Lint should be done by a qualified person. Place dryer at least 18 inches (46 cm) above the floor for a garage installation. Pull the lint screen straight up. Cleaning the Lint Screen Clean lint ...
... allow items to remove. 2. to remove lint. WARNING 2. Failure to do so can cause overheating and damage to the stained area of the dryer door opening. A screen blocked by using an air cycle. Roll lint off the screen with a soft cloth until stain is located on rack)...complete drying, if needed. Scrub lint screen with hot water. 5. From Inside the Exhaust Vent Lint should be done by a qualified person. Place dryer at least 18 inches (46 cm) above the floor for a garage installation. Pull the lint screen straight up. Cleaning the Lint Screen Clean lint ...
User Instructions
Page 6
... disconnect power. 2. Remove the screw located in dryer base. 6. Electric dryers use 2 household fuses or circuit breakers. For direct-wired dryers: WARNING 2. Moving care - Disconnect gas supply line pipe and remove fittings attached to secure dryer door. Use masking tape to secure dryer door. In Canada www.whirlpool.ca Dryer Operation Dryer will be a thumping sound during the first...
... disconnect power. 2. Remove the screw located in dryer base. 6. Electric dryers use 2 household fuses or circuit breakers. For direct-wired dryers: WARNING 2. Moving care - Disconnect gas supply line pipe and remove fittings attached to secure dryer door. Use masking tape to secure dryer door. In Canada www.whirlpool.ca Dryer Operation Dryer will be a thumping sound during the first...

User Instructions
Page 7
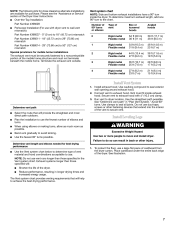
... least 18 inches (46 cm) above 45ºF (7ºC). ■ Is the dryer located in clothing (usually blue jeans). WARNING Fire Hazard Use a heavy metal vent. The gas valve clicking is a normal operating sound. ■ Are the four legs installed, and is too hot ■ Is the lint ...screen clogged with lint, restricting air movement? Use only one fabric softener sheet, and use it a gas dryer? This will increase drying times. The...
... least 18 inches (46 cm) above 45ºF (7ºC). ■ Is the dryer located in clothing (usually blue jeans). WARNING Fire Hazard Use a heavy metal vent. The gas valve clicking is a normal operating sound. ■ Are the four legs installed, and is too hot ■ Is the lint ...screen clogged with lint, restricting air movement? Use only one fabric softener sheet, and use it a gas dryer? This will increase drying times. The...

User Instructions
Page 8
..., INCLUDING WARRANTIES OF MERCHANTABILITY OR FITNESS FOR A PARTICULAR PURPOSE, ARE LIMITED TO ONE YEAR OR THE SHORTEST PERIOD ALLOWED BY LAW. WHIRLPOOL SHALL NOT BE LIABLE FOR INCIDENTAL OR CONSEQUENTIAL DAMAGES. Outside the 50 United States and Canada, this major appliance is used in ...169; 2007 Whirlpool Corporation. If so, ventilate the area. WHIRLPOOL CORPORATION MAJOR APPLIANCE WARRANTY ONE YEAR LIMITED WARRANTY For one year from the date of purchase, when this warranty does not apply. The removal and reinstallation of the cycle? ■ Was the dryer overloaded? ...
..., INCLUDING WARRANTIES OF MERCHANTABILITY OR FITNESS FOR A PARTICULAR PURPOSE, ARE LIMITED TO ONE YEAR OR THE SHORTEST PERIOD ALLOWED BY LAW. WHIRLPOOL SHALL NOT BE LIABLE FOR INCIDENTAL OR CONSEQUENTIAL DAMAGES. Outside the 50 United States and Canada, this major appliance is used in ...169; 2007 Whirlpool Corporation. If so, ventilate the area. WHIRLPOOL CORPORATION MAJOR APPLIANCE WARRANTY ONE YEAR LIMITED WARRANTY For one year from the date of purchase, when this warranty does not apply. The removal and reinstallation of the cycle? ■ Was the dryer overloaded? ...
Installation Instructions
Page 1
... 29" (73,7 CM) Table of Contents / Table des matières DRYER SAFETY ...1 INSTALLATION INSTRUCTIONS...2 Tools and Parts ...2 Location Requirements...3 Electrical Requirements ...4 Gas Supply Requirements ...4 Venting Requirements...5 Plan Vent System ...6 Install Vent System...7 Install Leveling Legs...7 Make Gas Connection ...8 Connect Vent...8 Level Dryer ...8 Reverse Door Swing (Optional)...9 Complete Installation ...10 SÉCURITÉ DE...
... 29" (73,7 CM) Table of Contents / Table des matières DRYER SAFETY ...1 INSTALLATION INSTRUCTIONS...2 Tools and Parts ...2 Location Requirements...3 Electrical Requirements ...4 Gas Supply Requirements ...4 Venting Requirements...5 Plan Vent System ...6 Install Vent System...7 Install Leveling Legs...7 Make Gas Connection ...8 Connect Vent...8 Level Dryer ...8 Reverse Door Swing (Optional)...9 Complete Installation ...10 SÉCURITÉ DE...
Installation Instructions
Page 3
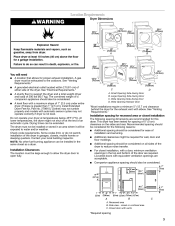
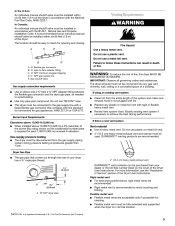
Place dryer at least 18 inches (46 cm) above the floor for a garage installation. Location Requirements WARNING Dryer Dimensions 43 ³⁄₈" (110cm) 15¼" (38.74cm) 43 ³⁄₈" (110cm) 22¾" (57.8cm) Explosion Hazard Keep flammable materials and vapors, such as gasoline, away from dryer. Failure to do so can result in death, explosion, or fire. *26" (66cm) 29" (73.66cm) *27¾" (70.5cm) 29" (73.66cm) A B 43 ³⁄₈" (110cm) 22¾" (57.8cm) 43 ³⁄₈" (110cm) You will need
Place dryer at least 18 inches (46 cm) above the floor for a garage installation. Location Requirements WARNING Dryer Dimensions 43 ³⁄₈" (110cm) 15¼" (38.74cm) 43 ³⁄₈" (110cm) 22¾" (57.8cm) Explosion Hazard Keep flammable materials and vapors, such as gasoline, away from dryer. Failure to do so can result in death, explosion, or fire. *26" (66cm) 29" (73.66cm) *27¾" (70.5cm) 29" (73.66cm) A B 43 ³⁄₈" (110cm) 22¾" (57.8cm) 43 ³⁄₈" (110cm) You will need
Installation Instructions
Page 4
Additional Installation Requirements This dryer is suitable for Mobile Home Construction and Safety, Title 24, HUD Part 280) or the Canadian Manufactured Home Standard, CAN/CSA-Z240 MH. Mobile home installations require: Mobile Home - The installation must conform to the Manufactured Home Construction and Safety Standard, Title 24 CFR, Part 3280 (formerly the Federal Standard for mobile home installations.
Additional Installation Requirements This dryer is suitable for Mobile Home Construction and Safety, Title 24, HUD Part 280) or the Canadian Manufactured Home Standard, CAN/CSA-Z240 MH. Mobile home installations require: Mobile Home - The installation must conform to the Manufactured Home Construction and Safety Standard, Title 24 CFR, Part 3280 (formerly the Federal Standard for mobile home installations.
Installation Instructions
Page 5
... In Canada: An individual manual shutoff valve must not be connected into any gas vent, chimney, wall, ceiling or a concealed space of the dryer in accordance with the B149.1, Natural Gas and Propane Installation Code. Gas shutoff valve Failure to flare adapter fitting C. ¹⁄₈" NPT minimum...follow these instructions can result in accordance with the National Fuel Gas Code, ANSI Z223.1. IMPORTANT: Observe all governing codes and ordinances. Do not use a plastic vent. WARNING: To reduce the risk of the dryer. The location should be installed in death or fire. In...
... In Canada: An individual manual shutoff valve must not be connected into any gas vent, chimney, wall, ceiling or a concealed space of the dryer in accordance with the B149.1, Natural Gas and Propane Installation Code. Gas shutoff valve Failure to flare adapter fitting C. ¹⁄₈" NPT minimum...follow these instructions can result in accordance with the National Fuel Gas Code, ANSI Z223.1. IMPORTANT: Observe all governing codes and ordinances. Do not use a plastic vent. WARNING: To reduce the risk of the dryer. The location should be installed in death or fire. In...
Installation Instructions
Page 7
NOTE: The following kits for close clearance alternate installations are available for purchase. Please see the "Assistance or Service" section of the Dryer User Instructions.
NOTE: The following kits for close clearance alternate installations are available for purchase. Please see the "Assistance or Service" section of the Dryer User Instructions.
Installation Instructions
Page 8
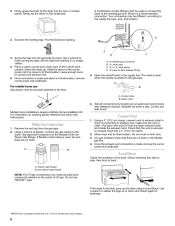
..., remove corner posts and cardboard. Once the exhaust vent connection is made and dryer is used to connect the dryer to the existing gas line. Make Gas Connection 1. Flared male thread B. A combination of LP gas. Examine the leveling legs. D A B C 4. Screw the legs into its... 1. Check that there are no longer visible. 5. Leave enough room to -flare adapter fitting 3. A. ³⁄₈" flexible gas connector B. ³⁄₈" dryer pipe C. ³⁄₈" to ³⁄₈" pipe elbow D. ³⁄₈" pipe-to connect the exhaust vent...
..., remove corner posts and cardboard. Once the exhaust vent connection is made and dryer is used to connect the dryer to the existing gas line. Make Gas Connection 1. Flared male thread B. A combination of LP gas. Examine the leveling legs. D A B C 4. Screw the legs into its... 1. Check that there are no longer visible. 5. Leave enough room to -flare adapter fitting 3. A. ³⁄₈" flexible gas connector B. ³⁄₈" dryer pipe C. ³⁄₈" to ³⁄₈" pipe elbow D. ³⁄₈" pipe-to connect the exhaust vent...
Installation Instructions
Page 9
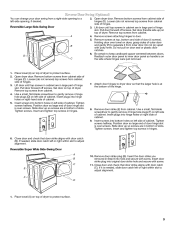
... to separate it is needed , slide door catch left or right within slot to door. 5. Reversible Large Side-Swing Door A B D C 2. Open dryer door. Loosen (do not remove) top screws from cabinet. 4. Lift door until top screws in cabinet are in Step 8 into bottom holes on right side... of slots. Remove top screws from cabinet side of dryer. Do not pull on top of hinges. 3. Tighten screws halfway. Tighten screws. Reversible Super Wide Side-Swing Door A B C E F D 10. Close ...
... to separate it is needed , slide door catch left or right within slot to door. 5. Reversible Large Side-Swing Door A B D C 2. Open dryer door. Loosen (do not remove) top screws from cabinet. 4. Lift door until top screws in cabinet are in Step 8 into bottom holes on right side... of slots. Remove top screws from cabinet side of dryer. Do not pull on top of hinges. 3. Tighten screws halfway. Tighten screws. Reversible Super Wide Side-Swing Door A B C E F D 10. Close ...
Installation Instructions
Page 10
.... If you do not feel for 5 minutes, open the dryer door and feel heat, turn off the dryer and check that the dryer is closed. Check that the gas supply line shutoff valve is plugged into a grounded 3 prong outlet. Check the dryer's final location. Wipe the dryer drum interior thoroughly with a damp cloth to follow these...
.... If you do not feel for 5 minutes, open the dryer door and feel heat, turn off the dryer and check that the dryer is closed. Check that the gas supply line shutoff valve is plugged into a grounded 3 prong outlet. Check the dryer's final location. Wipe the dryer drum interior thoroughly with a damp cloth to follow these...


