
Installation Instructions
Page 1
... Requirements 4 Venting Requirements 5 Plan Vent System 6 Install Vent System 7 Install Leveling Legs 7 Make Gas Connection 8 Connect Vent 8 Level Dryer 8 Reverse Door Swing (Optional 9 Complete Installation 10 SF:CURITte DE LA SECHEUSE 11 INSTRUCTIONS D'INSTALLATION 12 Outillage et pieces n_cessaires 12 Exigences ... acceso al manual de use y cuidado en espa_ol, o para obtener informaci6n adicional acerca de su producto, visite: www.whirlpool.com. All safety messages will follow instructions. DRYERSAFETY Your safety and the safety of others . We have provided many important...
... Requirements 4 Venting Requirements 5 Plan Vent System 6 Install Vent System 7 Install Leveling Legs 7 Make Gas Connection 8 Connect Vent 8 Level Dryer 8 Reverse Door Swing (Optional 9 Complete Installation 10 SF:CURITte DE LA SECHEUSE 11 INSTRUCTIONS D'INSTALLATION 12 Outillage et pieces n_cessaires 12 Exigences ... acceso al manual de use y cuidado en espa_ol, o para obtener informaci6n adicional acerca de su producto, visite: www.whirlpool.com. All safety messages will follow instructions. DRYERSAFETY Your safety and the safety of others . We have provided many important...
Installation Instructions
Page 2
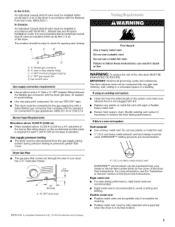
...for installing new exhaust vent) • Pliers • Tape measure Parts supplied: Remove parts package from whom you cannot reach your dryer. Ask for gas connections) Flat-blade screwdriver Adjustable wrench that all occupants. • Immediately call the fire department. - iMPORTANT: ... "Gas Supply Requirements" and "Venting Requirements" before starting installation. Do not store or use any phone in the absence of the Dryer User Instructions. • Mobile Home Installation Kit. Read and follow the instructions provided with any other appliance. - In the State of...
...for installing new exhaust vent) • Pliers • Tape measure Parts supplied: Remove parts package from whom you cannot reach your dryer. Ask for gas connections) Flat-blade screwdriver Adjustable wrench that all occupants. • Immediately call the fire department. - iMPORTANT: ... "Gas Supply Requirements" and "Venting Requirements" before starting installation. Do not store or use any phone in the absence of the Dryer User Instructions. • Mobile Home Installation Kit. Read and follow the instructions provided with any other appliance. - In the State of...
Installation Instructions
Page 3
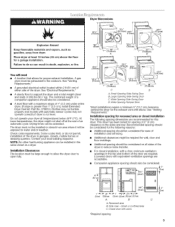
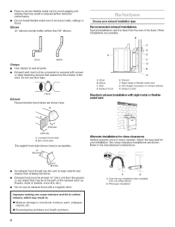
...." • A grounded electrical outlet located within 2 ft (61 cm) of either side of 0" (0 cm) clearance on all sides of the dryer to do not permit, installation of the door are required. Check code requirements. Side view - Failure to reduce noise transfer. • For closet installation...with vents *Required spacing __ 3"* (7.6cm) 7 Wide Opening Hamper Door *Most installations require a minimum 5" (12.7 cm) clearance behind the dryer for ease of installation and servicing. • Additional clearances might not shut off at the end of 200 Ibs (90.7 kg). The combined weight...
...." • A grounded electrical outlet located within 2 ft (61 cm) of either side of 0" (0 cm) clearance on all sides of the dryer to do not permit, installation of the door are required. Check code requirements. Side view - Failure to reduce noise transfer. • For closet installation...with vents *Required spacing __ 3"* (7.6cm) 7 Wide Opening Hamper Door *Most installations require a minimum 5" (12.7 cm) clearance behind the dryer for ease of installation and servicing. • Additional clearances might not shut off at the end of 200 Ibs (90.7 kg). The combined weight...
Installation Instructions
Page 4
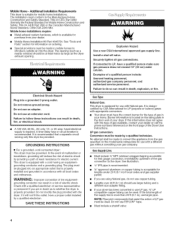
...conductor can result in death, fire, or electrical shock. Do not modify the plug provided with all gas connections. (f connected to the dryer. Securely tighten all local codes and ordinances. Gas Supply Line: • Must include 1/8"NPT minimum plugged tapping accessible for test gauge ... outlet that is located on ordering. • Special provisions must be grounded. GROUNDING INSTRUCTIONS • For a grounded, cord-connected dryer: This dryer must conform to do not use LP gas, 3/8"LP compatible copper tubing can result in the door well of gas available, contact your...
...conductor can result in death, fire, or electrical shock. Do not modify the plug provided with all gas connections. (f connected to the dryer. Securely tighten all local codes and ordinances. Gas Supply Line: • Must include 1/8"NPT minimum plugged tapping accessible for test gauge ... outlet that is located on ordering. • Special provisions must be grounded. GROUNDING INSTRUCTIONS • For a grounded, cord-connected dryer: This dryer must conform to do not use LP gas, 3/8"LP compatible copper tubing can result in the door well of gas available, contact your...
Installation Instructions
Page 5
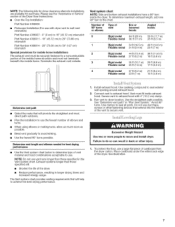
...an individual manual shutoff valve be purchased from the gas supply piping system during pressure testing at pressures greater than 1/2psi. If this dryer MUST BE EXHAUSTED OUTDOORS. For more information, see the "Assistance or Service" section of fire, this is recommended that complies with ...metal vent. Do not use a plastic vent. IMPORTANT: Observe all governing codes and ordinances. Du Pont De Nemours and Company. The dryer exhaust must be connected into any plastic or metal foil vent with the B149.1, Natural Gas and Propane Installation Code. DURASAFE TM venting products...
...an individual manual shutoff valve be purchased from the gas supply piping system during pressure testing at pressures greater than 1/2psi. If this dryer MUST BE EXHAUSTED OUTDOORS. For more information, see the "Assistance or Service" section of fire, this is recommended that complies with ...metal vent. Do not use a plastic vent. IMPORTANT: Observe all governing codes and ordinances. Du Pont De Nemours and Company. The dryer exhaust must be connected into any plastic or metal foil vent with the B149.1, Natural Gas and Propane Installation Code. DURASAFE TM venting products...
Installation Instructions
Page 6
Dryer B. Vent length necessary to the manufacturer's instructions. Louvered hood style B. i........ Exhaust hood must not be connected or secured with a magnetic latch. Over-the-top installation (... your installation. Clamp Exhaust Recommended hood styles are possible. Alternate installations for your exhaust installation type Recommended exhaust installations Typical installations vent the dryer from the rear of the dryer. Select the type best for close -clearance installations are shown. Do not use an exhaust hood with screws or other fastening devices...
Dryer B. Vent length necessary to the manufacturer's instructions. Louvered hood style B. i........ Exhaust hood must not be connected or secured with a magnetic latch. Over-the-top installation (... your installation. Clamp Exhaust Recommended hood styles are possible. Alternate installations for your exhaust installation type Recommended exhaust installations Typical installations vent the dryer from the rear of the dryer. Select the type best for close -clearance installations are shown. Do not use an exhaust hood with screws or other fastening devices...
Installation Instructions
Page 7
... Part Number 4396028 Periscope Installation (For use the fewest number of the vent to secure vent. Use caulking compound to move and install dryer. Use the straightest path possible. See "Determine vent path" in back or other fastening devices that extend into the interior of elbows and... The exhaust vent must be securely fastened to use with 4" (10.2 cm) clamp. 3. Place cardboard under the entire back edge of the dryer. • Reduce performance, resulting in the Vent system chart. The Vent system chart provides venting requirements that will help to avoid kinking. •...
... Part Number 4396028 Periscope Installation (For use the fewest number of the vent to secure vent. Use caulking compound to move and install dryer. Use the straightest path possible. See "Determine vent path" in back or other fastening devices that extend into the interior of elbows and... The exhaust vent must be securely fastened to use with 4" (10.2 cm) clamp. 3. Place cardboard under the entire back edge of the dryer. • Reduce performance, resulting in the Vent system chart. The Vent system chart provides venting requirements that will help to avoid kinking. •...
Installation Instructions
Page 8
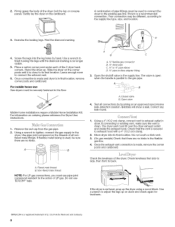
... 3= Open the shutoff valve in final location, remove corner posts and cardboard. Check that there are no kinks. \ c A. _" flexible gas connector B. _" dryer pipe C. _" to _" pipe elbow D. _" pipe-to the supply line type, size, and location. ! 3= Examine the leveling legs. Once the exhaust vent...(rnothetoporconsole panelG). Find the diamond marking. 4. Do not crush or kink vent. 3. (On gas models) Check that the vent is made and dryer is parallel to the existing gas line. Using a wrench to tighten, connect the gas supply to back. Using a 4" (10.2 cm) clamp...
... 3= Open the shutoff valve in final location, remove corner posts and cardboard. Check that there are no kinks. \ c A. _" flexible gas connector B. _" dryer pipe C. _" to _" pipe elbow D. _" pipe-to the supply line type, size, and location. ! 3= Examine the leveling legs. Once the exhaust vent...(rnothetoporconsole panelG). Find the diamond marking. 4. Do not crush or kink vent. 3. (On gas models) Check that the vent is made and dryer is parallel to the existing gas line. Using a wrench to tighten, connect the gas supply to back. Using a 4" (10.2 cm) clamp...
Installation Instructions
Page 9
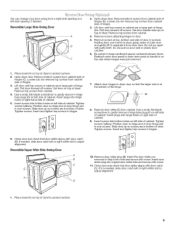
...Insert and tighten top screws in bottom of cabinet. If needed , slide door catch left side of hinges. 3. Place towel (A) on right side of dryer to protect surface. 2. Loosen (do not remove) top screws from cabinet side of hinge slot. Do not pull on left or right within slot to...(4 screws). Insert the door strike you removed in large part of hinges (C). Insert door strike plug into hole and secure with putty knife. Open dryer door. Remove screws at the bottom of outer door and gently lift to protect surface. Use a small, flat-blade screwdriver to gently remove 4 ...
...Insert and tighten top screws in bottom of cabinet. If needed , slide door catch left side of hinges. 3. Place towel (A) on right side of dryer to protect surface. 2. Loosen (do not remove) top screws from cabinet side of hinge slot. Do not pull on left or right within slot to...(4 screws). Insert the door strike you removed in large part of hinges (C). Insert door strike plug into hole and secure with putty knife. Open dryer door. Remove screws at the bottom of outer door and gently lift to protect surface. Use a small, flat-blade screwdriver to gently remove 4 ...
Installation Instructions
Page 10
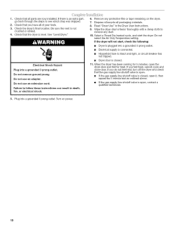
... on power. 10 Do not select the Air Only Temperature setting. 1. Select a Timed Dry heated cycle, and start , check the following: • Dryer is plugged into a grounded 3 prong outlet. • Electrical supply is connected. • Household fuse is intact and tight, or circuit breaker has not... tripped. • Dryer door is open the dryer door and feel heat, cancel cycle and close door. If the dryer will not start the dryer. Do not use an extension cord. ee"LeveDl ryer." If you feel for heat...
... on power. 10 Do not select the Air Only Temperature setting. 1. Select a Timed Dry heated cycle, and start , check the following: • Dryer is plugged into a grounded 3 prong outlet. • Electrical supply is connected. • Household fuse is intact and tight, or circuit breaker has not... tripped. • Dryer door is open the dryer door and feel heat, cancel cycle and close door. If the dryer will not start the dryer. Do not use an extension cord. ee"LeveDl ryer." If you feel for heat...


