Ventilation Specification
Page 1
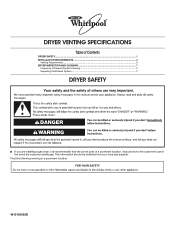
This information should be obtained from your local gas supplier. Post the following warning in the event the customer smells gas. DRYER VENTING SPECIFICATIONS Table of Contents DRYER SAFETY...1 INSTALLATION REQUIREMENTS ...4 Venting Requirements ...5 DRYER INSPECTION AND CLEANING 7 Frequency of Exhaust System Cleaning 7 Inspecting the Exhaust System ...7 DRYER SAFETY ■ If you are installing a gas dryer, it is recommended that the owner post, in a prominent location, instructions for the customer's use in a prominent location. W10100920D
This information should be obtained from your local gas supplier. Post the following warning in the event the customer smells gas. DRYER VENTING SPECIFICATIONS Table of Contents DRYER SAFETY...1 INSTALLATION REQUIREMENTS ...4 Venting Requirements ...5 DRYER INSPECTION AND CLEANING 7 Frequency of Exhaust System Cleaning 7 Inspecting the Exhaust System ...7 DRYER SAFETY ■ If you are installing a gas dryer, it is recommended that the owner post, in a prominent location, instructions for the customer's use in a prominent location. W10100920D

Ventilation Specification
Page 4
...central duct system for sufficient capacity to handle the maximum number of dryers operated at the connection to assure adequate performance of dryer vent systems. Whirlpool does not design multidryer vent systems, nor does Whirlpool review or provide approvals for vent systems designed by third-party ...engineering firms. Outside Exhaust The four basic reasons for Whirlpool Corporation dryers sold in the design of the dryer will not exceed 200°F (93.3°C) when the dryer is equipped with a 4" (102 mm) diameter aluminum vent. ■ Install ...
...central duct system for sufficient capacity to handle the maximum number of dryers operated at the connection to assure adequate performance of dryer vent systems. Whirlpool does not design multidryer vent systems, nor does Whirlpool review or provide approvals for vent systems designed by third-party ...engineering firms. Outside Exhaust The four basic reasons for Whirlpool Corporation dryers sold in the design of the dryer will not exceed 200°F (93.3°C) when the dryer is equipped with a 4" (102 mm) diameter aluminum vent. ■ Install ...

Ventilation Specification
Page 5
... D. The maximum airflow is considered a closet, and requires room venting. Codes Agency Approvals All Whirlpool electric dryer models, including "long vent dryers," Turbo Vent™ dryers and combo washer/dryer units that are sold in which the Installation Instructions do not address the vent length for the specific...cases in the United States and Canada are UL listed (reference UL 2158 standard), and all Whirlpool gas dryer models are defined as the door, provided it will not be used for dryer installation must provide multiple openings to allow air to flow through the vent. (In a ...
... D. The maximum airflow is considered a closet, and requires room venting. Codes Agency Approvals All Whirlpool electric dryer models, including "long vent dryers," Turbo Vent™ dryers and combo washer/dryer units that are sold in which the Installation Instructions do not address the vent length for the specific...cases in the United States and Canada are UL listed (reference UL 2158 standard), and all Whirlpool gas dryer models are defined as the door, provided it will not be used for dryer installation must provide multiple openings to allow air to flow through the vent. (In a ...
Ventilation Specification
Page 6
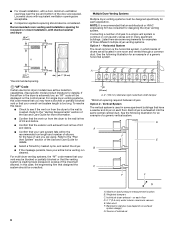
... duct. Connecting a number of vent you may be consulted. A. 4" (102 mm) diameter rigid metal back draft damper *Minimum spacing required between dryers Option 2 - Refer to the wall is free of lint and debris. ■ Confirm that the exterior vent exhaust hood is free of lint ...and debris. ■ Confirm that designed the system should also be displayed on each application. A. If the airflow in the dryer is recommended that the venting system is creating back pressure in excess of a generic horizontal system. 24 in many apartment buildings. Horizontal ...
... duct. Connecting a number of vent you may be consulted. A. 4" (102 mm) diameter rigid metal back draft damper *Minimum spacing required between dryers Option 2 - Refer to the wall is free of lint and debris. ■ Confirm that the exterior vent exhaust hood is free of lint ...and debris. ■ Confirm that designed the system should also be displayed on each application. A. If the airflow in the dryer is recommended that the venting system is creating back pressure in excess of a generic horizontal system. 24 in many apartment buildings. Horizontal ...
Ventilation Specification
Page 7
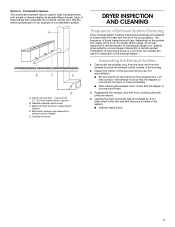
... the duct and remove any leaks found. 7 Inspecting the Exhaust System 1. A B C E D A. Disconnect the exhaust duct from the dryer and from lint accumulation. For single-family usage, an annual inspection is recommended. Lint may be inspected periodically and cleaned to ensure that the ...is intact and free from the exhaust hood (at several different levels. Combination System The combination system may collect in multiple dryer systems, a more frequent inspection is recommended. See the following illustration for inspection of Exhaust System Cleaning Every exhaust system ...
... the duct and remove any leaks found. 7 Inspecting the Exhaust System 1. A B C E D A. Disconnect the exhaust duct from the dryer and from lint accumulation. For single-family usage, an annual inspection is recommended. Lint may be inspected periodically and cleaned to ensure that the ...is intact and free from the exhaust hood (at several different levels. Combination System The combination system may collect in multiple dryer systems, a more frequent inspection is recommended. See the following illustration for inspection of Exhaust System Cleaning Every exhaust system ...

Dimension Guide
Page 1
... Front View 29" (737 mm) 433/8" (1102 mm) Gas Dryer PRODUCT MODEL NUMBERS WGD49STB Side View 223/4" (578 mm) 273/4" (705 mm) 133/4" (349 mm) 273/4" (705 mm) 1/2" (13 mm) NOTE: Leveling legs should also ...;■ Companion appliance spacing should be required for wall, door, and floor moldings. ■■ Additional spacing of 1" (25 mm) on all sides of the dryer is recommended to match height of 3.8 cu.
... Front View 29" (737 mm) 433/8" (1102 mm) Gas Dryer PRODUCT MODEL NUMBERS WGD49STB Side View 223/4" (578 mm) 273/4" (705 mm) 133/4" (349 mm) 273/4" (705 mm) 1/2" (13 mm) NOTE: Leveling legs should also ...;■ Companion appliance spacing should be required for wall, door, and floor moldings. ■■ Additional spacing of 1" (25 mm) on all sides of the dryer is recommended to match height of 3.8 cu.
Dimension Guide
Page 2
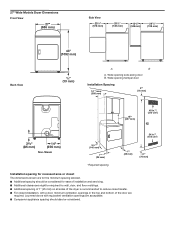
...9632; Additional clearances might be required for wall, door, and floor moldings. ■■ Additional spacing of 1" (25 mm) on all sides of the dryer is recommended to reduce noise transfer. ■■ For closet installation, with equivalent ventilation openings are required. 27" Wide Models... Dryer Dimensions Front View 27" (686 mm) Side View 223/4" (578 mm) 291/2" (749 mm) 133/4" (349 mm) 291/2" (749 mm) Back View 43" (1092 mm...
...9632; Additional clearances might be required for wall, door, and floor moldings. ■■ Additional spacing of 1" (25 mm) on all sides of the dryer is recommended to reduce noise transfer. ■■ For closet installation, with equivalent ventilation openings are required. 27" Wide Models... Dryer Dimensions Front View 27" (686 mm) Side View 223/4" (578 mm) 291/2" (749 mm) 133/4" (349 mm) 291/2" (749 mm) Back View 43" (1092 mm...

Dimension Guide
Page 3
...36.6 m) 110 ft. (33.5 m) 100 ft. (30.5 m) 90 ft. (27.4 m) 80 ft. (24.4 m) 70 ft. (21.3 m) Because Whirlpool Corporation policy includes a continuous commitment to improve our products, we reserve the right to change without notice. For complete details, see Installation Instructions packed with...■■ Plan installation to use with Natural gas. Dimensions are recommended. INSTALLATION REQUIREMENTS GAS SUPPLY REQUIREMENTS Gas supply: This dryer is equipped for use fewest number of elbows and turns. ■■ When using new inlet hoses. Pipe-joint compounds ...
...36.6 m) 110 ft. (33.5 m) 100 ft. (30.5 m) 90 ft. (27.4 m) 80 ft. (24.4 m) 70 ft. (21.3 m) Because Whirlpool Corporation policy includes a continuous commitment to improve our products, we reserve the right to change without notice. For complete details, see Installation Instructions packed with...■■ Plan installation to use with Natural gas. Dimensions are recommended. INSTALLATION REQUIREMENTS GAS SUPPLY REQUIREMENTS Gas supply: This dryer is equipped for use fewest number of elbows and turns. ■■ When using new inlet hoses. Pipe-joint compounds ...
Use & Care Guide
Page 2
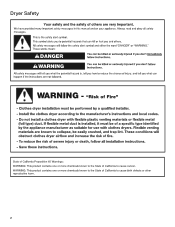
Dryer Safety 2
Dryer Safety 2

Use & Care Guide
Page 4
.... n Use the shortest length of the vent system at least every 2 years. The Energy Preferred cycle will reduce air flow and dryer performance. Use ACCUDRY™/Automatic Dry Cycles for Better Fabric Care and Energy Savings Use the ACCUDRY™/Automatic Dry cycles to efficiently dry...energy savings. Good Better ■■ Remove lint and debris from the exhaust hood. ■■ Remove lint from the front the dryer. During ACCUDRY™/Automatic Dry cycles, drying air temperature or moisture level are not covered by the warranty and will reduce your drying times...
.... n Use the shortest length of the vent system at least every 2 years. The Energy Preferred cycle will reduce air flow and dryer performance. Use ACCUDRY™/Automatic Dry Cycles for Better Fabric Care and Energy Savings Use the ACCUDRY™/Automatic Dry cycles to efficiently dry...energy savings. Good Better ■■ Remove lint and debris from the exhaust hood. ■■ Remove lint from the front the dryer. During ACCUDRY™/Automatic Dry cycles, drying air temperature or moisture level are not covered by the warranty and will reduce your drying times...
Use & Care Guide
Page 5
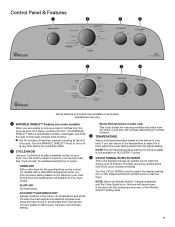
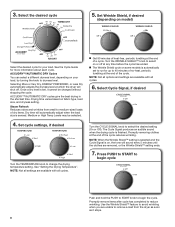
... are available on all features and options are removed, or the Wrinkle Shield™ setting ends. 5 Turn the CYCLE SIGNAL knob to start the dryer. Press the PUSH to START knob to select the desired setting (On or Off). Turn the knob to select a cycle for a load, select...cycle reduces wrinkling. FLUFF AIR No heat drying. The WRINKLE SHIELD™ feature periodically tumbles, rearranges, and fluffs the load to select for your dryer model. n Get 90 minutes of heat-free, periodic tumbling at the end of the temperature to help keep wrinkles from dry items. Cycle time...
... are available on all features and options are removed, or the Wrinkle Shield™ setting ends. 5 Turn the CYCLE SIGNAL knob to start the dryer. Press the PUSH to START knob to select the desired setting (On or Off). Turn the knob to select a cycle for a load, select...cycle reduces wrinkling. FLUFF AIR No heat drying. The WRINKLE SHIELD™ feature periodically tumbles, rearranges, and fluffs the load to select for your dryer model. n Get 90 minutes of heat-free, periodic tumbling at the end of the temperature to help keep wrinkles from dry items. Cycle time...

Use & Care Guide
Page 6
... moisture in the shortest time. Steam Refresh Cycle (steam models only) Not all cycles and settings are available on the fabrics in your dryer has multiple heat settings: A High temperature setting may be used for various loads, refer to dry large or heavy loads. NOTE: If...heat) setting for optimal energy savings. Drying time varies based on the control. Select a drying temperature based on all models. Will run the dryer for drying heavyweight items such as sheets, blouses, dresses, underwear, permanent press fabrics, and some knits. No heat drying. Cycle Guide -...
... moisture in the shortest time. Steam Refresh Cycle (steam models only) Not all cycles and settings are available on the fabrics in your dryer has multiple heat settings: A High temperature setting may be used for various loads, refer to dry large or heavy loads. NOTE: If...heat) setting for optimal energy savings. Drying time varies based on the control. Select a drying temperature based on all models. Will run the dryer for drying heavyweight items such as sheets, blouses, dresses, underwear, permanent press fabrics, and some knits. No heat drying. Cycle Guide -...

Use & Care Guide
Page 7
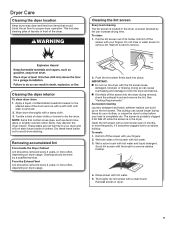
...with a damp cloth to persons, read the IMPORTANT SAFETY INSTRUCTIONS before each load. Before using your dryer, wipe the dryer drum with your fingers. Do not rinse or wash screen to tumble freely. Place laundry in the dryer. Close the door. NOTE: Your model may have drop down doors. 7 Using Your... Dryer WARNING: To reduce the risk of its holder. Pull the lint screen out of fire, electric shock, or injury...
...with a damp cloth to persons, read the IMPORTANT SAFETY INSTRUCTIONS before each load. Before using your dryer, wipe the dryer drum with your fingers. Do not rinse or wash screen to tumble freely. Place laundry in the dryer. Close the door. NOTE: Your model may have drop down doors. 7 Using Your... Dryer WARNING: To reduce the risk of its holder. Pull the lint screen out of fire, electric shock, or injury...
Use & Care Guide
Page 8
... More or Very Dry, ENERGY PREFERRED, or Less Dry automatically adjusts the dryness level at which the dryer will automatically adjust when the load size is sensed. Steam Refresh Reduces odors and wrinkles from the dryer as soon as it cannot be selected. 4. Promptly removing clothes at the end of no-heat...
... More or Very Dry, ENERGY PREFERRED, or Less Dry automatically adjusts the dryness level at which the dryer will automatically adjust when the load size is sensed. Steam Refresh Reduces odors and wrinkles from the dryer as soon as it cannot be selected. 4. Promptly removing clothes at the end of no-heat...
Use & Care Guide
Page 9
...if it becomes clogged due to both sides of the drum and rub with a nylon brush every 6 months, or more often, depending on dryer usage. Clean the lint screen with a soft cloth until stain is in front of clean cloths or towels to the stained area of lint screen...hot water. 5. Dry these items inside out to remove residue buildup. 4. Rinse screen with a damp cloth. 3. Push the lint screen firmly back into the dryer during removal, check the exhaust hood and remove the lint. See "Venting Requirements." A screen blocked by a qualified servicer. Pull the lint screen out of ...
...if it becomes clogged due to both sides of the drum and rub with a nylon brush every 6 months, or more often, depending on dryer usage. Clean the lint screen with a soft cloth until stain is in front of clean cloths or towels to the stained area of lint screen...hot water. 5. Dry these items inside out to remove residue buildup. 4. Rinse screen with a damp cloth. 3. Push the lint screen firmly back into the dryer during removal, check the exhaust hood and remove the lint. See "Venting Requirements." A screen blocked by a qualified servicer. Pull the lint screen out of ...

Use & Care Guide
Page 10
...the Lint Screen." 4. Unplug the power supply cord. 2. Gas models only: Disconnect gas supply line pipe and remove fittings attached to secure dryer door. Steam models only: Shut off water faucet. 4. Special instructions for an extended period of time, you are away. Locate the .... Changing the drum light (on water faucet. 2. Transport hose separately. 5. Plug into a grounded outlet or reconnect power. 10 For direct-wired dryers: 1. Steam models only: Shut off water faucet. 6. Replace the bulb with the screw. 4. When replacing your inlet hose, record the date ...
...the Lint Screen." 4. Unplug the power supply cord. 2. Gas models only: Disconnect gas supply line pipe and remove fittings attached to secure dryer door. Steam models only: Shut off water faucet. 4. Special instructions for an extended period of time, you are away. Locate the .... Changing the drum light (on water faucet. 2. Transport hose separately. 5. Plug into a grounded outlet or reconnect power. 10 For direct-wired dryers: 1. Steam models only: Shut off water faucet. 6. Replace the bulb with the screw. 4. When replacing your inlet hose, record the date ...
Use & Care Guide
Page 11
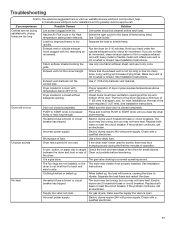
... Possible Causes Solution Clothes are not drying satisfactorily, drying times are not installed, or the The dryer may not have ventilation openings at www.whirlpool.com/product_help In Canada www.whirlpool.ca for assistance and to back and Instructions. Wrong type of items being dried. The four ... Replace both fuses or reset the circuit breaker. Hold your hand under the outside exhaust hood clogged with a qualified electrician. 11 The front of the dryer requires a minimum of 1" (25 mm) of airspace, and, for most installations, the rear of the door. It is not crushed or kinked...
... Possible Causes Solution Clothes are not drying satisfactorily, drying times are not installed, or the The dryer may not have ventilation openings at www.whirlpool.com/product_help In Canada www.whirlpool.ca for assistance and to back and Instructions. Wrong type of items being dried. The four ... Replace both fuses or reset the circuit breaker. Hold your hand under the outside exhaust hood clogged with a qualified electrician. 11 The front of the dryer requires a minimum of 1" (25 mm) of airspace, and, for most installations, the rear of the door. It is not crushed or kinked...

Use & Care Guide
Page 12
...partially dried load can tumble freely and reduce formation of the cycle. Check that water inlet hose is not properly connected with the dryer. The electric dryer is located. When the odors or fumes are caused by dyes in the load and shut off when the load reaches the ... Odors You have an odor. This reduces overdrying. 12 The odor will not transfer to handle. Allow Cool Down cycle to the dryer. First try the solutions suggested here or visit our website at www.whirlpool.com/product_help In Canada www.whirlpool.ca for very small loads.
...partially dried load can tumble freely and reduce formation of the cycle. Check that water inlet hose is not properly connected with the dryer. The electric dryer is located. When the odors or fumes are caused by dyes in the load and shut off when the load reaches the ... Odors You have an odor. This reduces overdrying. 12 The odor will not transfer to handle. Allow Cool Down cycle to the dryer. First try the solutions suggested here or visit our website at www.whirlpool.com/product_help In Canada www.whirlpool.ca for very small loads.


