
Installation Guide
Page 5
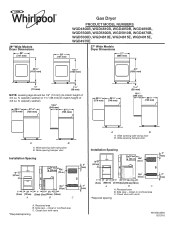
...located within 2 ft. (610 mm) of either side of a companion appliance should also be considered. ■■ Level floor with vents *Required spacing 27" Wide Models Dryer Dimensions 27" (686 mm) 3"* (76 mm) 43" (1092 mm) 223/4" (578 mm) 291/2" (749 mm) 11/2" (38 mm) 133/4" (... local building inspector. Contact your dryer at the end of 3.6 cu. closet or confined area C. closet or confined area C. See "Venting Requirements." 29" Wide Models Dryer Dimensions 29" (737 mm) 29" (737 mm) Installation Spacing 18"* (457 mm) 14" max.* (356 mm) 48 in.2* (310 cm )2 ...
...located within 2 ft. (610 mm) of either side of a companion appliance should also be considered. ■■ Level floor with vents *Required spacing 27" Wide Models Dryer Dimensions 27" (686 mm) 3"* (76 mm) 43" (1092 mm) 223/4" (578 mm) 291/2" (749 mm) 11/2" (38 mm) 133/4" (... local building inspector. Contact your dryer at the end of 3.6 cu. closet or confined area C. closet or confined area C. See "Venting Requirements." 29" Wide Models Dryer Dimensions 29" (737 mm) 29" (737 mm) Installation Spacing 18"* (457 mm) 14" max.* (356 mm) 48 in.2* (310 cm )2 ...
Installation Guide
Page 7
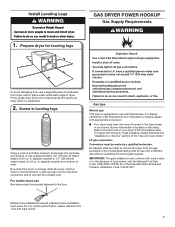
... ordering information, please reference the "Use and Care Guide." 7 Install Leveling Legs GAS DRYER POWER HOOKUP Gas Supply Requirements 1. Now stand the dryer on the model/serial rating plate for the type of gas in the door well of foot is equipped for electrical connection and to match height of dryer...
... ordering information, please reference the "Use and Care Guide." 7 Install Leveling Legs GAS DRYER POWER HOOKUP Gas Supply Requirements 1. Now stand the dryer on the model/serial rating plate for the type of gas in the door well of foot is equipped for electrical connection and to match height of dryer...
Installation Guide
Page 8
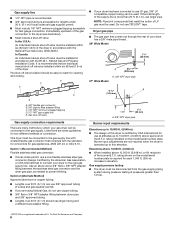
... your gas dryer can be used . E C A D ■■ If your dryer has a 3/8" male pipe thread. 29" Wide Model 1¼" (32 mm) A 9¼" (235 mm) A. 3/8" NPT dryer pipe 27" Wide Model *5 3/4" A (146 mm) B A. 3/8" flexible gas connector B. 3/8" pipe to flare adapter fitting C. 1/8" NPT minimum plugged tapping D. ... dryer in elevation. Gas shut-off valve must be connected to the rigid gas supply line. rating indicated on the model/serial number plate is recommended that complies with a listed flexible gas connector that an individual manual shut-off valve location ...
... your gas dryer can be used . E C A D ■■ If your dryer has a 3/8" male pipe thread. 29" Wide Model 1¼" (32 mm) A 9¼" (235 mm) A. 3/8" NPT dryer pipe 27" Wide Model *5 3/4" A (146 mm) B A. 3/8" flexible gas connector B. 3/8" pipe to flare adapter fitting C. 1/8" NPT minimum plugged tapping D. ... dryer in elevation. Gas shut-off valve must be connected to the rigid gas supply line. rating indicated on the model/serial number plate is recommended that complies with a listed flexible gas connector that an individual manual shut-off valve location ...

Installation Guide
Page 10
Elbow C. Rigid metal or flexible metal vent G. or right-side exhaust installation (27" wide models only) C. Dryer B. Exhaust outlet I H A. Clamps: ■■ Use clamps to seal all joints. ■■ Exhaust vent must not be connected or... duct and catch lint. Wall D. Optional side exhaust outlet Optional exhaust installations: 27" Wide Models can be converted to connect elbows H. For ordering information, see "Venting Kits." Bottom exhaust installation (27" wide models only) Other installations are possible. Do not use duct tape. Vent length necessary to exhaust ...
Elbow C. Rigid metal or flexible metal vent G. or right-side exhaust installation (27" wide models only) C. Dryer B. Exhaust outlet I H A. Clamps: ■■ Use clamps to seal all joints. ■■ Exhaust vent must not be connected or... duct and catch lint. Wall D. Optional side exhaust outlet Optional exhaust installations: 27" Wide Models can be converted to connect elbows H. For ordering information, see "Venting Kits." Bottom exhaust installation (27" wide models only) Other installations are possible. Do not use duct tape. Vent length necessary to exhaust ...

Installation Guide
Page 11
... 4392892 In-Wall metal DuraVent™ Periscope W10186596 4-way vent kit - Terminate the exhaust vent outside. Determine vent length and elbows needed for 27" wide models have a 90º turn to avoid kinking. ■■ Use as few 90° turns as possible. ■■ Bend vent gradually to the chart...
... 4392892 In-Wall metal DuraVent™ Periscope W10186596 4-way vent kit - Terminate the exhaust vent outside. Determine vent length and elbows needed for 27" wide models have a 90º turn to avoid kinking. ■■ Use as few 90° turns as possible. ■■ Bend vent gradually to the chart...
Installation Guide
Page 12
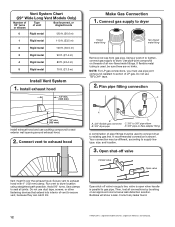
... tighten, connect gas supply to seal all joints. Run vent to secure vent, because they can catch lint. Vent System Chart (29" Wide Long Vent Models Only) Number of 90° turns or elbows Type of E.I. Do not use TEFLON®† tape. 2.
... tighten, connect gas supply to seal all joints. Run vent to secure vent, because they can catch lint. Vent System Chart (29" Wide Long Vent Models Only) Number of 90° turns or elbows Type of E.I. Do not use TEFLON®† tape. 2.

Installation Guide
Page 16
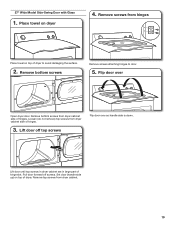
Remove door strike and door strike plug 12. Insert screws in bottom of door hinge slot is needed to adjust alignment. 27" Wide Model Side-Swing Door 1. Remove and transfer hinge hole plugs NOTE: Two people may be needed , slide door catch left or right within slot to reinstall ...
Remove door strike and door strike plug 12. Insert screws in bottom of door hinge slot is needed to adjust alignment. 27" Wide Model Side-Swing Door 1. Remove and transfer hinge hole plugs NOTE: Two people may be needed , slide door catch left or right within slot to reinstall ...
Installation Guide
Page 19
Set door (handle side up) on dryer 4. 27" Wide Model Side-Swing Door with Glass 1. Flip door over so handle side is down. Pull door forward off top screws Flip door over Open dryer door. ...
Set door (handle side up) on dryer 4. 27" Wide Model Side-Swing Door with Glass 1. Flip door over so handle side is down. Pull door forward off top screws Flip door over Open dryer door. ...

Use & Care Guide
Page 5
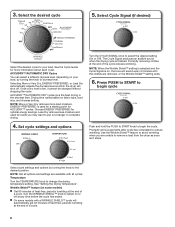
... knob to on or off when the load reaches the selected dryness level. If you may vary. 1 WRINKLE SHIELD™ Feature (on some models) is not available on all features and options are available on ACCUDRY™ cycles. 4 CYCLE SIGNAL/PUSH TO START The Cycle Signal produces an... specified time on your Dryer Cycle Knob to select the desired setting (On or Off). TIMED DRY Will run the dryer for your load. On models with a selectable temperature knob, you are removed, or the Wrinkle Shield™ setting ends. 5 Turn the CYCLE SIGNAL knob to select available cycles...
... knob to on or off when the load reaches the selected dryness level. If you may vary. 1 WRINKLE SHIELD™ Feature (on some models) is not available on all features and options are available on ACCUDRY™ cycles. 4 CYCLE SIGNAL/PUSH TO START The Cycle Signal produces an... specified time on your Dryer Cycle Knob to select the desired setting (On or Off). TIMED DRY Will run the dryer for your load. On models with a selectable temperature knob, you are removed, or the Wrinkle Shield™ setting ends. 5 Turn the CYCLE SIGNAL knob to select available cycles...

Use & Care Guide
Page 6
ACCUDRY™/AUTOMATIC DRY CYCLES Not all models. ACCUDRY™ - Drying time varies based on all cycles and settings are available on fabric type, load size, and dryness setting. If loads seem drier ... Cycle Signal Automatic cycles give the best drying in the shortest time. NOTE: If you are available on the control. TIMED DRY CYCLES Not all models. Will run the dryer for the specified time on all cycles and settings are unsure of the temperature to Medium temperature setting may be used...
ACCUDRY™/AUTOMATIC DRY CYCLES Not all models. ACCUDRY™ - Drying time varies based on all cycles and settings are available on fabric type, load size, and dryness setting. If loads seem drier ... Cycle Signal Automatic cycles give the best drying in the shortest time. NOTE: If you are available on the control. TIMED DRY CYCLES Not all models. Will run the dryer for the specified time on all cycles and settings are unsure of the temperature to Medium temperature setting may be used...
Use & Care Guide
Page 7
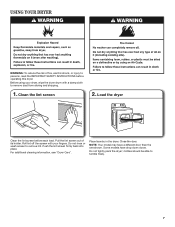
... the door. Do not rinse or wash screen to tumble freely. 7 clothes should be able to remove lint. Place laundry in the dryer. NOTE: Your model may have drop down doors. Do not tightly pack the dryer; Push the lint screen firmly back into place. Pull the lint screen out of... fire, electric shock, or injury to remove dust from storing and shipping. 1. Some models have a different door than the one shown. Load the dryer Clean the lint screen before operating this dryer. Roll lint off the screen with your...
... the door. Do not rinse or wash screen to tumble freely. 7 clothes should be able to remove lint. Place laundry in the dryer. NOTE: Your model may have drop down doors. Do not tightly pack the dryer; Push the lint screen firmly back into place. Pull the lint screen out of... fire, electric shock, or injury to remove dust from storing and shipping. 1. Some models have a different door than the one shown. Load the dryer Clean the lint screen before operating this dryer. Roll lint off the screen with your...
Use & Care Guide
Page 8
...by turning the knob to the desired position. Use the Wrinkle Shield™ feature to avoid wrinkling when you may want to put on some models with all options and settings are unable to complete drying. 4. NOTE: Not all cycles. Select Cycle Signal (if desired) Select the desired ...cycle for optimal energy savings. Temperature Turn the TEMPERATURE knob to select the desired setting (On or Off). n On some models) n Get 90 minutes of heat-free, periodic tumbling at which the dryer will shut off at the end of a cycle. 3. NOTE: When the...
...by turning the knob to the desired position. Use the Wrinkle Shield™ feature to avoid wrinkling when you may want to put on some models with all options and settings are unable to complete drying. 4. NOTE: Not all cycles. Select Cycle Signal (if desired) Select the desired ...cycle for optimal energy savings. Temperature Turn the TEMPERATURE knob to select the desired setting (On or Off). n On some models) n Get 90 minutes of heat-free, periodic tumbling at which the dryer will shut off at the end of a cycle. 3. NOTE: When the...

Use & Care Guide
Page 10
... wiring. 3. Cap the open fuel supply line. 5. Changing the drum light (on the back wall of the dryer. Locate the light bulb cover on some models) 1. Replace all parts and panels before servicing. Unplug or disconnect power to gas supply line. 3. Turn bulb counterclockwise. Clean lint screen. Moving Care For power...
... wiring. 3. Cap the open fuel supply line. 5. Changing the drum light (on the back wall of the dryer. Locate the light bulb cover on some models) 1. Replace all parts and panels before servicing. Unplug or disconnect power to gas supply line. 3. Turn bulb counterclockwise. Clean lint screen. Moving Care For power...

Use & Care Guide
Page 13
...operated, and maintained according to instructions attached to or furnished with electrical or plumbing codes, or use of products not approved by Whirlpool. 5. Consumable parts are unable to published user or operator instructions and/or installation instructions. 2. Damage resulting from accident, alteration,..., installation not in accordance with the product, Whirlpool Corporation or Whirlpool Canada LP (hereafter "Whirlpool") will need it was purchased. In the U.S.A., call 1-800-807-6777. 10/11 Keep this information on the model and serial number label located on the duration ...
...operated, and maintained according to instructions attached to or furnished with electrical or plumbing codes, or use of products not approved by Whirlpool. 5. Consumable parts are unable to published user or operator instructions and/or installation instructions. 2. Damage resulting from accident, alteration,..., installation not in accordance with the product, Whirlpool Corporation or Whirlpool Canada LP (hereafter "Whirlpool") will need it was purchased. In the U.S.A., call 1-800-807-6777. 10/11 Keep this information on the model and serial number label located on the duration ...

Warranty Information
Page 1
... is used in materials or workmanship and is reported to Whirlpool within 30 days from the date of purchase. 6. Some states and provinces do not allow limitations on major appliances with original model/serial numbers that vary from state to state or province to... is installed, operated, and maintained according to instructions attached to or furnished with the product, Whirlpool Corporation or Whirlpool Canada LP (hereafter "Whirlpool") will need to know your complete model number and serial number. Service calls to correct the installation of this Warranty. YOUR SOLE AND...
... is used in materials or workmanship and is reported to Whirlpool within 30 days from the date of purchase. 6. Some states and provinces do not allow limitations on major appliances with original model/serial numbers that vary from state to state or province to... is installed, operated, and maintained according to instructions attached to or furnished with the product, Whirlpool Corporation or Whirlpool Canada LP (hereafter "Whirlpool") will need to know your complete model number and serial number. Service calls to correct the installation of this Warranty. YOUR SOLE AND...
Dimension Guide
Page 1
...spacing 3"* (76 mm) 3"* (76 mm) W10562360A 02/2015 closet or confined area C. 29" Wide Models Dryer Dimensions 29" (737 mm) 433/8" (1102 mm) 29" (737 mm) Gas Dryer PRODUCT MODEL NUMBERS WGD4800B, WGD4810B, WGD4850B, WGD4890B, WGD5500B, WGD5800B, WGD5810B, WGD4870B, WGD5000D, WGD4810E, WGD4815E, WGD4915E,... WGD4975E 27" Wide Models Dryer Dimensions 27" (686 mm) 433/8" (1102 mm) 43" (1092 mm) 1/2"...
...spacing 3"* (76 mm) 3"* (76 mm) W10562360A 02/2015 closet or confined area C. 29" Wide Models Dryer Dimensions 29" (737 mm) 433/8" (1102 mm) 29" (737 mm) Gas Dryer PRODUCT MODEL NUMBERS WGD4800B, WGD4810B, WGD4850B, WGD4890B, WGD5500B, WGD5800B, WGD5810B, WGD4870B, WGD5000D, WGD4810E, WGD4815E, WGD4915E,... WGD4975E 27" Wide Models Dryer Dimensions 27" (686 mm) 433/8" (1102 mm) 43" (1092 mm) 1/2"...

Dimension Guide
Page 3
... m) 29 ft. (8.8 m) 4 Rigid metal 27 ft. (8.2 m) 21 ft. (6.4 m) NOTE: Side and bottom exhaust installations for 27" wide models have a 90º turn to change materials and specifications without notice. Dimensions are for best drying performance: ■■ Use following Vent System Chart to....5 m) 3 Rigid metal 90 ft. (27.4 m) 4 Rigid metal 80 ft. (24.4 m) 5 Rigid metal 70 ft. (21.3 m) Because Whirlpool Corporation policy includes a continuous commitment to improve our products, we reserve the right to the outside. 4" (102 mm) diameter vent is required. Exhaust systems...
... m) 29 ft. (8.8 m) 4 Rigid metal 27 ft. (8.2 m) 21 ft. (6.4 m) NOTE: Side and bottom exhaust installations for 27" wide models have a 90º turn to change materials and specifications without notice. Dimensions are for best drying performance: ■■ Use following Vent System Chart to....5 m) 3 Rigid metal 90 ft. (27.4 m) 4 Rigid metal 80 ft. (24.4 m) 5 Rigid metal 70 ft. (21.3 m) Because Whirlpool Corporation policy includes a continuous commitment to improve our products, we reserve the right to the outside. 4" (102 mm) diameter vent is required. Exhaust systems...


