
Use and Care Guide
Page 3
... word "DANGER" or "WARNING." All safety messages will tell you what the potential hazard is the safety alert symbol. All safety messages will follow instructions. WASHER SAFETY Your safety and the safety of injury, and tell you and others are not followed. 3 This symbol alerts you to reduce the chance of...
... word "DANGER" or "WARNING." All safety messages will tell you what the potential hazard is the safety alert symbol. All safety messages will follow instructions. WASHER SAFETY Your safety and the safety of injury, and tell you and others are not followed. 3 This symbol alerts you to reduce the chance of...

Use and Care Guide
Page 4
You may select a 10" (254 mm) or a 15.5" (394 mm) pedestal. Tools needed for this washer. The parts supplied are in the washer drum. Options Pedestal You have the option of purchasing pedestals of approximately 48" (1219 mm) or 53.5" (1359 mm), respectively. These pedestals will add to the total height of the washer for a total height of different heights separately for connecting the water inlet hoses INSTALLATION REQUIREMENTS Tools and Parts Gather the required tools and parts before starting installation.
You may select a 10" (254 mm) or a 15.5" (394 mm) pedestal. Tools needed for this washer. The parts supplied are in the washer drum. Options Pedestal You have the option of purchasing pedestals of approximately 48" (1219 mm) or 53.5" (1359 mm), respectively. These pedestals will add to the total height of the washer for a total height of different heights separately for connecting the water inlet hoses INSTALLATION REQUIREMENTS Tools and Parts Gather the required tools and parts before starting installation.

Use and Care Guide
Page 5
Proper installation is your washer improves performance and minimizes noise and possible washer "walk." You will need See "Drain System." Your washer can be considered. Companion appliance location requirements should also be installed under a custom counter, or in a basement, laundry room, closet, or recessed area. Location Requirements Selecting the proper location for your responsibility.
Proper installation is your washer improves performance and minimizes noise and possible washer "walk." You will need See "Drain System." Your washer can be considered. Companion appliance location requirements should also be installed under a custom counter, or in a basement, laundry room, closet, or recessed area. Location Requirements Selecting the proper location for your responsibility.
Use and Care Guide
Page 6
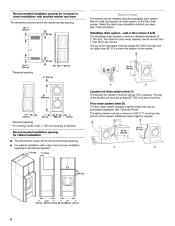
... tub must be a minimum of 28" (711 mm) from the bottom of the washer. See "Tools and Parts." Recommended installation spacing for the recommended spacing. 48 in.2 * (310 cm2) 3"* (...76 mm) Drain System The washer can be no higher than 17 gal. (64 L) per minute. The siphon break must be at... least 30" (762 mm) high and no less than 96" (2.4 m) from the bottom of the washer. 3"* (76 mm) 24 in.2 * (155 cm2) 1"* (25 mm) 30" min. (762 mm) *Required spacing 6"* (152 mm) ...
... tub must be a minimum of 28" (711 mm) from the bottom of the washer. See "Tools and Parts." Recommended installation spacing for the recommended spacing. 48 in.2 * (310 cm2) 3"* (...76 mm) Drain System The washer can be no higher than 17 gal. (64 L) per minute. The siphon break must be at... least 30" (762 mm) high and no less than 96" (2.4 m) from the bottom of the washer. 3"* (76 mm) 24 in.2 * (155 cm2) 1"* (25 mm) 30" min. (762 mm) *Required spacing 6"* (152 mm) ...
Use and Care Guide
Page 8
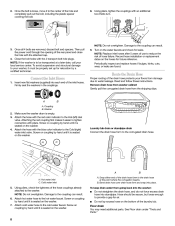
... begins. Attach the hose with an additional two-thirds turn. Hot water inlet C. Bend drain hose over drain hose form and snap into the washer: 2. Close the bolt holes with pliers. Turn on the hoses for leaks. Record hose installation or replacement dates on the water faucets and check... drain water from the shipping clips. NOTE: Do not overtighten. Screw on coupling by hand until it easier to water leakage. Insert new flat washers (supplied) into each end of the drain hose form to the drain hose at a later date, call your floors from damage due to tighten...
... begins. Attach the hose with an additional two-thirds turn. Hot water inlet C. Bend drain hose over drain hose form and snap into the washer: 2. Close the bolt holes with pliers. Turn on the hoses for leaks. Record hose installation or replacement dates on the water faucets and check... drain water from the shipping clips. NOTE: Do not overtighten. Screw on coupling by hand until it easier to water leakage. Insert new flat washers (supplied) into each end of the drain hose form to the drain hose at a later date, call your floors from damage due to tighten...
Use and Care Guide
Page 9
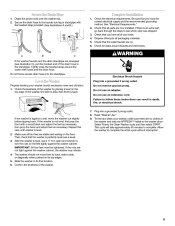
... wrench to complete the entire cycle without interruption. 9 After the washer is not level, first prop the front with the beaded strap provided. (See illustrations A and B.) Complete Installation 1. To test and clean your washer, make sure there are on its final location. 6. Secure the... and the drain standpipe are now installed. Confirm the levelness of the washer, first side to side, then front to the washer drum. Check that the washer is level. 2. The washer should not move the washer out slightly before tipping back. Check that you have all parts are ...
... wrench to complete the entire cycle without interruption. 9 After the washer is not level, first prop the front with the beaded strap provided. (See illustrations A and B.) Complete Installation 1. To test and clean your washer, make sure there are on its final location. 6. Secure the... and the drain standpipe are now installed. Confirm the levelness of the washer, first side to side, then front to the washer drum. Check that the washer is level. 2. The washer should not move the washer out slightly before tipping back. Check that you have all parts are ...
Use and Care Guide
Page 10
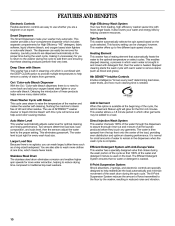
... your oxygen based stain fighter or your color-safe bleach. High-Efficiency Wash System Your new front-loading, high-efficiency washer saves time with Steam This washer has a built-in reduced noise and vibration. 10 It also lowers your washer truly automatic. FEATURES AND BENEFITS Electronic Controls Flexible electronic controls are easy to use of the...
... your oxygen based stain fighter or your color-safe bleach. High-Efficiency Wash System Your new front-loading, high-efficiency washer saves time with Steam This washer has a built-in reduced noise and vibration. 10 It also lowers your washer truly automatic. FEATURES AND BENEFITS Electronic Controls Flexible electronic controls are easy to use of the...
Use and Care Guide
Page 11
... laundry products on the handle. Overloading can cause poor cleaning. Vibration is clean before operating this manual for a medium-size load. Open the washer door by pulling on the top surface of this type of detergent to ensure the interior is normal during the final installation ... the amount of detergent will use . This initial cycle serves to use less detergent based on load size. This wash system, along with less water, will likely result in washer errors, longer cycle times, and reduced rinsing performance. Use only HE High Efficiency detergent. Use only...
... laundry products on the handle. Overloading can cause poor cleaning. Vibration is clean before operating this manual for a medium-size load. Open the washer door by pulling on the top surface of this type of detergent to ensure the interior is normal during the final installation ... the amount of detergent will use . This initial cycle serves to use less detergent based on load size. This wash system, along with less water, will likely result in washer errors, longer cycle times, and reduced rinsing performance. Use only HE High Efficiency detergent. Use only...
Use and Care Guide
Page 12
The washer door will remain locked during the wash cycle. Close the washer door by pushing it firmly until the lock clicks. NOTES: 2.
The washer door will remain locked during the wash cycle. Close the washer door by pushing it firmly until the lock clicks. NOTES: 2.
Use and Care Guide
Page 14
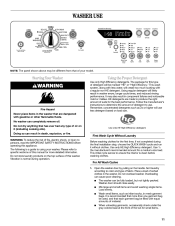
... the current cycle by NSF International, an independent third-party testing and certification organization. The washer door unlocks, and items can also use of NSF Protocol P172 for approximately 1 second) to the load. Cycles, Options, and Modifiers can be changed anytime before the door unlocks. Select the ... complete, the DONE status light will illuminate, the door unlocks, and the wash load can add items to continue the cycle. NOTE: If the water level or the temperature is too high, the washer will not illuminate. Press START (for Pause/Cancel and Start. Controls Lock/Unlock ...
... the current cycle by NSF International, an independent third-party testing and certification organization. The washer door unlocks, and items can also use of NSF Protocol P172 for approximately 1 second) to the load. Cycles, Options, and Modifiers can be changed anytime before the door unlocks. Select the ... complete, the DONE status light will illuminate, the door unlocks, and the wash load can add items to continue the cycle. NOTE: If the water level or the temperature is too high, the washer will not illuminate. Press START (for Pause/Cancel and Start. Controls Lock/Unlock ...

Use and Care Guide
Page 15
... The cycle time will be extended if oversudsing occurs or the load is sensing, the estimated time will flash and the Sensing status light will change as cycles are selected. Hand Washables Quick Wash (2-3 items) Clean Washer Soak Rinse/Spin Drain/Spin Cycles Cycles can be reset by ...status light glows, the door is updated. NOTE: To lock or unlock the controls when the washer is designed for different types of your water pressure, water temperature, detergent, and clothes load. The reminder light will automatically sense the progress in the cycle and adjust the Estimated Time ...
... The cycle time will be extended if oversudsing occurs or the load is sensing, the estimated time will flash and the Sensing status light will change as cycles are selected. Hand Washables Quick Wash (2-3 items) Clean Washer Soak Rinse/Spin Drain/Spin Cycles Cycles can be reset by ...status light glows, the door is updated. NOTE: To lock or unlock the controls when the washer is designed for different types of your water pressure, water temperature, detergent, and clothes load. The reminder light will automatically sense the progress in the cycle and adjust the Estimated Time ...
Use and Care Guide
Page 16
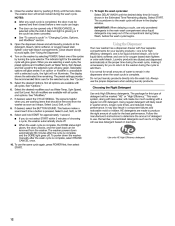
... clothing. A Rinse/Spin cycle is followed by medium wash action and low-spin speeds to wash small loads of exercise wear such as blankets and comforters. See "Cleaning Your Washer" in stains. NOTE: For the best energy performance, use the Normal/Casual Cycle. Drain without drum ...This cycle combines low-speed tumbling and medium-speed spin for gentle fabric care. Use this cycle to maintain load balance. Active Wear Use this cycle with AFFRESH™ washer cleaner tablet or liquid chlorine bleach to wash large items such as biking shorts, tank tops, running tights,...
... clothing. A Rinse/Spin cycle is followed by medium wash action and low-spin speeds to wash small loads of exercise wear such as blankets and comforters. See "Cleaning Your Washer" in stains. NOTE: For the best energy performance, use the Normal/Casual Cycle. Drain without drum ...This cycle combines low-speed tumbling and medium-speed spin for gentle fabric care. Use this cycle to maintain load balance. Active Wear Use this cycle with AFFRESH™ washer cleaner tablet or liquid chlorine bleach to wash large items such as biking shorts, tank tops, running tights,...

Use and Care Guide
Page 17
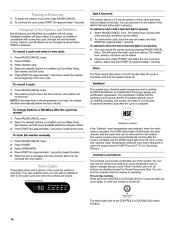
.... If an option is helpful when you are available with a selected cycle, the light will delay the addition of detergent or bleach residue from the washer as soon as the first rinse. Not all cycles. This option provides an additional rinse with the same water temperature as it stops. Extra Rinse...
.... If an option is helpful when you are available with a selected cycle, the light will delay the addition of detergent or bleach residue from the washer as soon as the first rinse. Not all cycles. This option provides an additional rinse with the same water temperature as it stops. Extra Rinse...
Use and Care Guide
Page 20
d) Wipe down area thoroughly with a dry cloth and let the washer interior air dry with door open. IMPORTANT:
d) Wipe down area thoroughly with a dry cloth and let the washer interior air dry with door open. IMPORTANT:
Use and Care Guide
Page 21
...recommended amount of a service call. Shut off both water faucets. 3. IMPORTANT: Call for a medium-size load, to the rear panel of R.V.-type antifreeze in 1 qt (1 L) of the washer. Do not remove ground prong. Do not use an adapter. TROUBLESHOOTING First try the solutions suggested here or...of HE detergent for relocation by a certified technician. www.whirlpool.com/help In Canada www.whirlpool.ca Unplug the power cord. 3. Disconnect the water inlet hoses from the drain system and attach to faucets. Run the washer through the Quick Wash cycle with 1/2 the manufacturer's ...
...recommended amount of a service call. Shut off both water faucets. 3. IMPORTANT: Call for a medium-size load, to the rear panel of R.V.-type antifreeze in 1 qt (1 L) of the washer. Do not remove ground prong. Do not use an adapter. TROUBLESHOOTING First try the solutions suggested here or...of HE detergent for relocation by a certified technician. www.whirlpool.com/help In Canada www.whirlpool.ca Unplug the power cord. 3. Disconnect the water inlet hoses from the drain system and attach to faucets. Run the washer through the Quick Wash cycle with 1/2 the manufacturer's ...


