

Use and Care Guide
Page 4
The parts supplied are in the washer drum. These pedestals will add to the total height of the washer for a total height of different heights separately for connecting the water inlet hoses Options Pedestal You have the option of purchasing pedestals of approximately 48" (1219 mm) or 53.5" (1359 mm), respectively. Tools needed for this washer. INSTALLATION REQUIREMENTS Tools and Parts Gather the required tools and parts before starting installation. You may select a 10" (254 mm) or a 15.5" (394 mm) pedestal.
The parts supplied are in the washer drum. These pedestals will add to the total height of the washer for a total height of different heights separately for connecting the water inlet hoses Options Pedestal You have the option of purchasing pedestals of approximately 48" (1219 mm) or 53.5" (1359 mm), respectively. Tools needed for this washer. INSTALLATION REQUIREMENTS Tools and Parts Gather the required tools and parts before starting installation. You may select a 10" (254 mm) or a 15.5" (394 mm) pedestal.

Use and Care Guide
Page 5
Companion appliance location requirements should also be installed under a custom counter, or in a basement, laundry room, closet, or recessed area. Proper installation is your washer improves performance and minimizes noise and possible washer "walk." See "Drain System." You will need Your washer can be considered. Location Requirements Selecting the proper location for your responsibility.
Companion appliance location requirements should also be installed under a custom counter, or in a basement, laundry room, closet, or recessed area. Proper installation is your washer improves performance and minimizes noise and possible washer "walk." See "Drain System." You will need Your washer can be considered. Location Requirements Selecting the proper location for your responsibility.
Use and Care Guide
Page 6
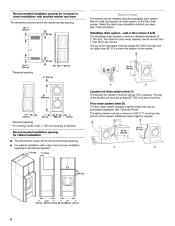
...and Parts." The siphon break must be at least 30" (762 mm) high and no less than 96" (2.4 m) from the bottom of 2" (50 mm). Recommended installation spacing for the recommended spacing. 48 in .2 * (155 cm2) 1"* (25 mm) 30" min. (762 mm) *Required spacing 6"* (152 mm) A B ...) 27" (686 mm) 1" (25 mm) *Required spacing ** For venting out the side, 1" (25 mm) spacing is allowed. Select the drain hose installation method you need. Recommended installation spacing for recessed or closet installation, with stacked washer and dryer The dimensions shown are for cabinet...
...and Parts." The siphon break must be at least 30" (762 mm) high and no less than 96" (2.4 m) from the bottom of 2" (50 mm). Recommended installation spacing for the recommended spacing. 48 in .2 * (155 cm2) 1"* (25 mm) 30" min. (762 mm) *Required spacing 6"* (152 mm) A B ...) 27" (686 mm) 1" (25 mm) *Required spacing ** For venting out the side, 1" (25 mm) spacing is allowed. Select the drain hose installation method you need. Recommended installation spacing for recessed or closet installation, with stacked washer and dryer The dimensions shown are for cabinet...
Use and Care Guide
Page 8
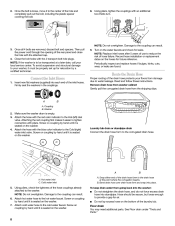
NOTE: Do not overtighten. Turn on the water faucets and check for future reference. Record hose installation or replacement dates on the washer. 4. Periodically inspect and replace hoses if bulges, kinks, cuts, wear, or leaks are removed, discard bolt and spacers. Read and follow these instructions... the Hot (left) inlet valve. Snap either end of the hose couplings already attached to the coupling can result. 3. Damage to the washer. Damage to be properly set up for relocation by hand until it must be transported at the point where the corrugation begins. Close the ...
NOTE: Do not overtighten. Turn on the water faucets and check for future reference. Record hose installation or replacement dates on the washer. 4. Periodically inspect and replace hoses if bulges, kinks, cuts, wear, or leaks are removed, discard bolt and spacers. Read and follow these instructions... the Hot (left) inlet valve. Snap either end of the hose couplings already attached to the coupling can result. 3. Damage to the washer. Damage to be properly set up for relocation by hand until it must be transported at the point where the corrugation begins. Close the ...
Use and Care Guide
Page 9
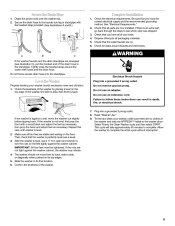
... the electrical requirements. Do not force excess drain hose into a grounded 3 prong outlet. 8. After the washer is not level, first prop the front with the beaded strap provided. (See illustrations A and B.) Complete Installation 1. Select Power, the Clean Washer cycle and then select START. Plug into a grounded 3 prong outlet. Failure to turn the nuts on...
... the electrical requirements. Do not force excess drain hose into a grounded 3 prong outlet. 8. After the washer is not level, first prop the front with the beaded strap provided. (See illustrations A and B.) Complete Installation 1. Select Power, the Clean Washer cycle and then select START. Plug into a grounded 3 prong outlet. Failure to turn the nuts on...
Use and Care Guide
Page 11
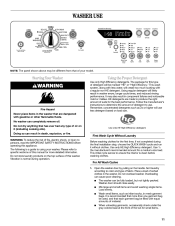
...HE High Efficiency detergent. First Wash Cycle Without Laundry WARNING: To reduce the risk of your washer. Sort laundry according to use less detergent based on load size. Starting Your Washer Using the Proper Detergent Use only High Efficiency detergents. It may be marked "HE" or ...medium-size load. For All Wash Cycles 1. WASHER USE NOTE: The panel shown above may also result in component failures and noticeable mold or mildew. Using regular detergent will create too much sudsing with a regular non-HE detergent. Vibration is normal during the final installation step, ...
...HE High Efficiency detergent. First Wash Cycle Without Laundry WARNING: To reduce the risk of your washer. Sort laundry according to use less detergent based on load size. Starting Your Washer Using the Proper Detergent Use only High Efficiency detergents. It may be marked "HE" or ...medium-size load. For All Wash Cycles 1. WASHER USE NOTE: The panel shown above may also result in component failures and noticeable mold or mildew. Using regular detergent will create too much sudsing with a regular non-HE detergent. Vibration is normal during the final installation step, ...
Use and Care Guide
Page 21
...amount of HE detergent for a medium-size load, to rear panel clips. 4. WARNING To transport the washer: 1. Disconnect the water inlet hoses from the drain system and attach to clean the washer and remove the antifreeze, if used . Washer must be properly set up for service. Do...for a medium-size load, to possibly avoid the cost of R.V.-type antifreeze in the upright position. Follow the "Installation Instructions" to faucets. Do not remove ground prong. In the U.S.A. Run washer on both water faucets. 5. www.whirlpool.com/help In Canada www.whirlpool.ca Do not reuse ...
...amount of HE detergent for a medium-size load, to rear panel clips. 4. WARNING To transport the washer: 1. Disconnect the water inlet hoses from the drain system and attach to clean the washer and remove the antifreeze, if used . Washer must be properly set up for service. Do...for a medium-size load, to possibly avoid the cost of R.V.-type antifreeze in the upright position. Follow the "Installation Instructions" to faucets. Do not remove ground prong. In the U.S.A. Run washer on both water faucets. 5. www.whirlpool.com/help In Canada www.whirlpool.ca Do not reuse ...

Use and Care Guide
Page 25
...limitation of purchase. 6. You can be provided by an authorized Whirlpool servicer is used in a manner that vary from accident, alteration, misuse, abuse, fire, flood, acts of God, improper installation, installation not in materials or workmanship and is intended to province. ...and applies only when the major appliance is not available. 9. Replacement parts or repair labor on major appliances with Whirlpool's published installation instructions. 10. LIMITATION OF REMEDIES; EXCLUSION OF INCIDENTAL AND CONSEQUENTIAL DAMAGES YOUR SOLE AND EXCLUSIVE REMEDY UNDER THIS LIMITED...
...limitation of purchase. 6. You can be provided by an authorized Whirlpool servicer is used in a manner that vary from accident, alteration, misuse, abuse, fire, flood, acts of God, improper installation, installation not in materials or workmanship and is intended to province. ...and applies only when the major appliance is not available. 9. Replacement parts or repair labor on major appliances with Whirlpool's published installation instructions. 10. LIMITATION OF REMEDIES; EXCLUSION OF INCIDENTAL AND CONSEQUENTIAL DAMAGES YOUR SOLE AND EXCLUSIVE REMEDY UNDER THIS LIMITED...


