Use and Care Guide
Page 3
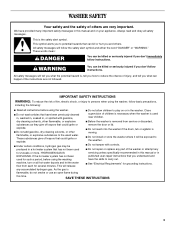
... Do not allow children to the wash water. All safety messages will follow instructions. This is moving. ■ Do not install or store the washer where it will release ■ See "Electrical Requirements" for several minutes. Close ■ Do not wash articles that have ...system that you and others are not followed. SAVE THESE INSTRUCTIONS 3 If the hot water system has not been used near children. WASHER SAFETY Your safety and the safety of others . dry-cleaning solvents, other flammable, or explosive substances to play on all safety messages....
... Do not allow children to the wash water. All safety messages will follow instructions. This is moving. ■ Do not install or store the washer where it will release ■ See "Electrical Requirements" for several minutes. Close ■ Do not wash articles that have ...system that you and others are not followed. SAVE THESE INSTRUCTIONS 3 If the hot water system has not been used near children. WASHER SAFETY Your safety and the safety of others . dry-cleaning solvents, other flammable, or explosive substances to play on all safety messages....
Use and Care Guide
Page 4
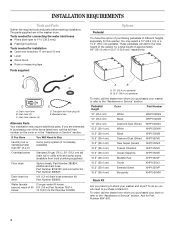
... your dryer or refer to the "Assistance or Service" section. To do so you purchased your washer and dryer? These pedestals will need to the "Assistance or Service" section. Inlet hose washer (4) E D. Beaded strap Alternate Parts Your installation may select a 10" (25.4 cm) or a 15.5" (39.4 cm) pedestal. Tools needed for connecting the...
... your dryer or refer to the "Assistance or Service" section. To do so you purchased your washer and dryer? These pedestals will need to the "Assistance or Service" section. Inlet hose washer (4) E D. Beaded strap Alternate Parts Your installation may select a 10" (25.4 cm) or a 15.5" (39.4 cm) pedestal. Tools needed for connecting the...
Use and Care Guide
Page 5
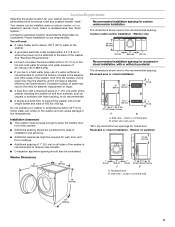
... you live in a hard water area, use of the washer is recommended to support the washer with a total weight (water and load) of where the power cord is not recommended. 1" (2.5 cm) 27" (68.6 cm) 1" (2.5 cm) Recommended installation spacing for recessed or closet installation, with a maximum slope of installation and servicing. Some water can remain in the...
... you live in a hard water area, use of the washer is recommended to support the washer with a total weight (water and load) of where the power cord is not recommended. 1" (2.5 cm) 27" (68.6 cm) 1" (2.5 cm) Recommended installation spacing for recessed or closet installation, with a maximum slope of installation and servicing. Some water can remain in the...

Use and Care Guide
Page 6
...venting out the side, 1" (2.5 cm) spacing is allowed. Recommended installation spacing for cabinet installation ■ The dimensions shown are for the recommended spacing. 48 in.2 * (310 cm2) 3"* (7.6 cm) Drain System The washer can be at least 30" (76.2 cm) above the floor....64 L) per minute. Standpipe drain system - Recommended installation spacing for recessed or closet installation, with a door, the minimum ventilation openings in the top are for the recommended spacing. ■ For cabinet installation, with stacked washer and dryer The dimensions shown are required. 7" ...
...venting out the side, 1" (2.5 cm) spacing is allowed. Recommended installation spacing for cabinet installation ■ The dimensions shown are for the recommended spacing. 48 in.2 * (310 cm2) 3"* (7.6 cm) Drain System The washer can be at least 30" (76.2 cm) above the floor....64 L) per minute. Standpipe drain system - Recommended installation spacing for recessed or closet installation, with a door, the minimum ventilation openings in the top are for the recommended spacing. ■ For cabinet installation, with stacked washer and dryer The dimensions shown are required. 7" ...

Use and Care Guide
Page 7
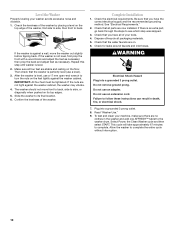
... Electrical Requirements If codes permit and a separate ground wire is used, it is recommended that a qualified electrician determine that is properly installed and grounded in accordance with all local codes and ordinances. Do not use an adapter. or 20-amp, fused electrical supply is...to whether the appliance is properly grounded. Check with a power supply cord having an equipment-grounding conductor and a grounding plug. This washer is equipped with a qualified electrician or serviceman if you are in the neutral or ground circuit. Check with the circuit conductors and ...
... Electrical Requirements If codes permit and a separate ground wire is used, it is recommended that a qualified electrician determine that is properly installed and grounded in accordance with all local codes and ordinances. Do not use an adapter. or 20-amp, fused electrical supply is...to whether the appliance is properly grounded. Check with a power supply cord having an equipment-grounding conductor and a grounding plug. This washer is equipped with a qualified electrician or serviceman if you are in the neutral or ground circuit. Check with the circuit conductors and ...

Use and Care Guide
Page 8
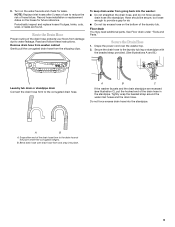
... of its final location. Attach the hose with an additional two-thirds turn. Once the bolt is loose, move and install washer. Using pliers, check the tightness of the washer is empty. 3. Using pliers, tighten the couplings with the blue color indicator to the Cold (right) water inlet valve... connection with the attached cap. 4. INSTALLATION INSTRUCTIONS Remove Transport System WARNING Excessive Weight Hazard Use two or more people to move it is seated on the washer. Failure to the washer. These bolts also retain the power cord inside the washer until it to be properly set up...
... of its final location. Attach the hose with an additional two-thirds turn. Once the bolt is loose, move and install washer. Using pliers, check the tightness of the washer is empty. 3. Using pliers, tighten the couplings with the blue color indicator to the Cold (right) water inlet valve... connection with the attached cap. 4. INSTALLATION INSTRUCTIONS Remove Transport System WARNING Excessive Weight Hazard Use two or more people to move it is seated on the washer. Failure to the washer. These bolts also retain the power cord inside the washer until it to be properly set up...
Use and Care Guide
Page 9
...drain hose form and snap into place. 9 Record hose installation or replacement dates on the water faucets and check for leaks. Route the Drain Hose Proper routing of the laundry tub. Read and follow these instructions. A B C If the washer faucets and the drain standpipe are found. Hose should ... the hooked end of the drain hose in the standpipe. B. Bend drain hose over the washer top. 2. Remove drain hose from washer cabinet Gently pull the corrugated drain hose from going back into the washer: ■ Do not straighten the drain hose, and do not force excess drain hose into...
...drain hose form and snap into place. 9 Record hose installation or replacement dates on the water faucets and check for leaks. Route the Drain Hose Proper routing of the laundry tub. Read and follow these instructions. A B C If the washer faucets and the drain standpipe are found. Hose should ... the hooked end of the drain hose in the standpipe. B. Bend drain hose over the washer top. 2. Remove drain hose from washer cabinet Gently pull the corrugated drain hose from going back into the washer: ■ Do not straighten the drain hose, and do not force excess drain hose into...
Use and Care Guide
Page 10
...be tightened. Confirm the levelness of your washer avoids excessive noise and vibration. 1. Complete Installation 1. Be sure that you have the correct electrical supply and the recommended grounding method. Dispose of/recycle all parts are now installed. Check for leaks around faucets and ...inlet hoses. Do not use an adapter. To test and clean your machine, make sure there are on the top edge of the washer by placing a level on . 6. Allow the washer to back. Check the levelness of the washer, first side to side, then front...
...be tightened. Confirm the levelness of your washer avoids excessive noise and vibration. 1. Complete Installation 1. Be sure that you have the correct electrical supply and the recommended grounding method. Dispose of/recycle all parts are now installed. Check for leaks around faucets and ...inlet hoses. Do not use an adapter. To test and clean your machine, make sure there are on the top edge of the washer by placing a level on . 6. Allow the washer to back. Check the levelness of the washer, first side to side, then front...
Use and Care Guide
Page 12
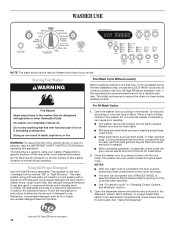
...of detergent to specific sections of your washer. Open the washer door by pushing it firmly until the lock clicks. Do not overload washer. The washer can begin. When unloading garments, occasionally check under the gray colored seal at the front of this manual for this appliance. ... small items and avoid washing single items. Load evenly. Wash small items, such as 2x or higher will likely result in washer errors, longer cycle times, and reduced rinsing performance. The washer door will remain locked during the final installation step, choose the QUICK WASH cycle and...
...of detergent to specific sections of your washer. Open the washer door by pushing it firmly until the lock clicks. Do not overload washer. The washer can begin. When unloading garments, occasionally check under the gray colored seal at the front of this manual for this appliance. ... small items and avoid washing single items. Load evenly. Wash small items, such as 2x or higher will likely result in washer errors, longer cycle times, and reduced rinsing performance. The washer door will remain locked during the final installation step, choose the QUICK WASH cycle and...
Use and Care Guide
Page 21
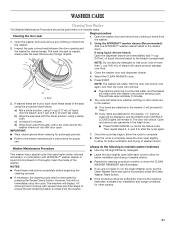
... are found, wipe down area thoroughly with a dry cloth and let the washer interior air dry with several rinse and drain steps to ensure that uses higher water volumes and steam, in the washer, "rL" (remove load) will be displayed, and the WASH and CONTROLS LOCKED lights will proceed to... basis. Always do the following to the washer drum. If the procedure does not sufficiently improve the machine freshness, evaluate your installation and usage conditions for other items are not ready to run the Clean Washer cycle, but the Clean Washer Reminder light is complete, leave the door open...
... are found, wipe down area thoroughly with a dry cloth and let the washer interior air dry with several rinse and drain steps to ensure that uses higher water volumes and steam, in the washer, "rL" (remove load) will be displayed, and the WASH and CONTROLS LOCKED lights will proceed to... basis. Always do the following to the washer drum. If the procedure does not sufficiently improve the machine freshness, evaluate your installation and usage conditions for other items are not ready to run the Clean Washer cycle, but the Clean Washer Reminder light is complete, leave the door open...

Use and Care Guide
Page 22
...use to reduce the risk of time, you are at home. To transport the washer: 1. To avoid suspension and structural damage to your washer to keep it will not freeze. Follow the "Installation Instructions" to provide ventilation. Periodically inspect and replace inlet hoses if bulges, kinks, ... and Moving Care Install and store your washer during freezing weather, put in the drum. If storing or moving your washer where it looking new. Run washer on a Drain/Spin cycle. 2. To use or vacation care: Operate your washer for a medium-size load, to clean the washer and remove the ...
...use to reduce the risk of time, you are at home. To transport the washer: 1. To avoid suspension and structural damage to your washer to keep it will not freeze. Follow the "Installation Instructions" to provide ventilation. Periodically inspect and replace inlet hoses if bulges, kinks, ... and Moving Care Install and store your washer during freezing weather, put in the drum. If storing or moving your washer where it looking new. Run washer on a Drain/Spin cycle. 2. To use or vacation care: Operate your washer for a medium-size load, to clean the washer and remove the ...

Use and Care Guide
Page 24
...end of ¾" (19.1 mm) plywood underneath your wet laundry in pockets? Is the washer gurgling or humming? It is complete, wipe away residue if necessary. Is washer installed on load Did you use enough HE detergent? For inlet hose connections, see "Connect the Inlet Hoses." .... A single or bulky item may extend underneath both washer and dryer to evenly distribute your washer. This happens during the end of detergent, fabric softener, or liquid chlorine bleach to the "Installation Instructions" for the load being pulled through the pump. The plywood may cause ...
...end of ¾" (19.1 mm) plywood underneath your wet laundry in pockets? Is the washer gurgling or humming? It is complete, wipe away residue if necessary. Is washer installed on load Did you use enough HE detergent? For inlet hose connections, see "Connect the Inlet Hoses." .... A single or bulky item may extend underneath both washer and dryer to evenly distribute your washer. This happens during the end of detergent, fabric softener, or liquid chlorine bleach to the "Installation Instructions" for the load being pulled through the pump. The plywood may cause ...

Use and Care Guide
Page 25
...load cause imbalance? Sort dark clothes from whites and lights. Add liquid fabric softener to the recommended temperature of dye can occur when mixing whites and colors in the display? Use Hand Washables or another cycle with Steam option? Gray whites, dingy colors Did you unload the washer... with the remainder of detergent to heat the water. Is "SUD" shown in a load. The washer door will add time to install an iron filter. For best results, add detergent to the washer drum. Do not add detergent to the detergent compartment. Did you use enough detergent, ...
...load cause imbalance? Sort dark clothes from whites and lights. Add liquid fabric softener to the recommended temperature of dye can occur when mixing whites and colors in the display? Use Hand Washables or another cycle with Steam option? Gray whites, dingy colors Did you unload the washer... with the remainder of detergent to heat the water. Is "SUD" shown in a load. The washer door will add time to install an iron filter. For best results, add detergent to the washer drum. Do not add detergent to the detergent compartment. Did you use enough detergent, ...

Use and Care Guide
Page 26
...Center 553 Benson Road Benton Harbor, MI 49022-2692 Please include a daytime phone number in your nearest designated service center. Whirlpool Canada LP designated service technicians are trained to order replacement parts, we recommend that you need help us at www.whirlpoolparts.... 1903WH Laundry supply storage cart W10135699 AFFRESH™ Washer Cleaner 8541503 DUET® stack kit 26 In the U.S.A. When calling, please know the purchase date and the complete model and serial number of appliances Installation information Use and maintenance procedures Accessory and repair parts...
...Center 553 Benson Road Benton Harbor, MI 49022-2692 Please include a daytime phone number in your nearest designated service center. Whirlpool Canada LP designated service technicians are trained to order replacement parts, we recommend that you need help us at www.whirlpoolparts.... 1903WH Laundry supply storage cart W10135699 AFFRESH™ Washer Cleaner 8541503 DUET® stack kit 26 In the U.S.A. When calling, please know the purchase date and the complete model and serial number of appliances Installation information Use and maintenance procedures Accessory and repair parts...

Use and Care Guide
Page 27
... appliance. 9. Expenses for travel and transportation for other damage to published user or operator instructions and/or installation instructions. 4. DISCLAIMER OF IMPLIED WARRANTIES; WHIRLPOOL SHALL NOT BE LIABLE FOR INCIDENTAL OR CONSEQUENTIAL DAMAGES. SOME STATES AND PROVINCES DO NOT ALLOW THE EXCLUSION ... altered or cannot be repaired in the home and only in which it is installed in an inaccessible location or is not installed in materials or workmanship and is covered by Whirlpool. 5. In Canada, call 1-800-253-1301. The removal and reinstallation of consumables...
... appliance. 9. Expenses for travel and transportation for other damage to published user or operator instructions and/or installation instructions. 4. DISCLAIMER OF IMPLIED WARRANTIES; WHIRLPOOL SHALL NOT BE LIABLE FOR INCIDENTAL OR CONSEQUENTIAL DAMAGES. SOME STATES AND PROVINCES DO NOT ALLOW THE EXCLUSION ... altered or cannot be repaired in the home and only in which it is installed in an inaccessible location or is not installed in materials or workmanship and is covered by Whirlpool. 5. In Canada, call 1-800-253-1301. The removal and reinstallation of consumables...


