Use and Care Guide
Page 2
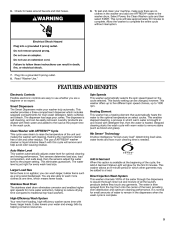
... the Drain Hose ...8 Secure the Drain Hose...8 Level the Washer ...8 Complete Installation ...8 FEATURES AND BENEFITS ...9 WASHER USE ...10 Starting Your Washer...10 Using the Proper Detergent...10 Using the Dispenser...11 Pausing or Restarting ...12 Changing Cycles, Options, and Modifiers...12 Status Lights ...12 Cycles ...13 Normal Washer Sounds...14 Options...15 Modifiers ...15 Laundry Guide ...16...
... the Drain Hose ...8 Secure the Drain Hose...8 Level the Washer ...8 Complete Installation ...8 FEATURES AND BENEFITS ...9 WASHER USE ...10 Starting Your Washer...10 Using the Proper Detergent...10 Using the Dispenser...11 Pausing or Restarting ...12 Changing Cycles, Options, and Modifiers...12 Status Lights ...12 Cycles ...13 Normal Washer Sounds...14 Options...15 Modifiers ...15 Laundry Guide ...16...

Use and Care Guide
Page 3
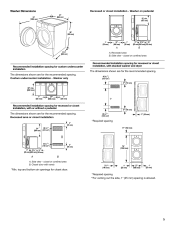
A B Tools needed for connecting the water inlet hoses Pliers (that open to reduce the risk of hose failure. Drain hose form B. Inlet hose washer (4) D. Transport bolt hole plug (4) E. Record hose installation or replacement dates for installation D E A. Inlet hose (2) C. Beaded strap NOTE: Replace inlet hoses after ...mm Level Wood block Ruler or measuring tape C Tools needed for future reference. 3 The parts supplied are in the washer drum. INSTALLATION REQUIREMENTS Parts supplied: Tools and Parts Gather the required tools and parts before starting installation.
A B Tools needed for connecting the water inlet hoses Pliers (that open to reduce the risk of hose failure. Drain hose form B. Inlet hose washer (4) D. Transport bolt hole plug (4) E. Record hose installation or replacement dates for installation D E A. Inlet hose (2) C. Beaded strap NOTE: Replace inlet hoses after ...mm Level Wood block Ruler or measuring tape C Tools needed for future reference. 3 The parts supplied are in the washer drum. INSTALLATION REQUIREMENTS Parts supplied: Tools and Parts Gather the required tools and parts before starting installation.

Use and Care Guide
Page 4
... beyond reach of the items listed here, call the dealer from local plumbing suppliers) Siphon break, Part Number 285834; Your washer can be considered. Companion appliance location requirements should also be installed under a custom counter, or in purchasing one of fill ...hoses Location Requirements Selecting the proper location for Part Number 8541503. To do so you purchased your washer and dryer? and connector kit, Part Number 285835 4 ft (1.2 m) drain hose extension kit, Part Number 285863 2 longer water fill hoses: ...
... beyond reach of the items listed here, call the dealer from local plumbing suppliers) Siphon break, Part Number 285834; Your washer can be considered. Companion appliance location requirements should also be installed under a custom counter, or in purchasing one of fill ...hoses Location Requirements Selecting the proper location for Part Number 8541503. To do so you purchased your washer and dryer? and connector kit, Part Number 285835 4 ft (1.2 m) drain hose extension kit, Part Number 285863 2 longer water fill hoses: ...
Use and Care Guide
Page 5
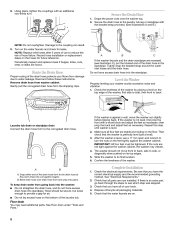
... without a pedestal The dimensions shown are for recessed or closet installation, with vents *Min. Recessed area B. Side view - closet or confined area B. Washer Dimensions 51" (1295 mm) 27" (686 mm) Recessed or closet installation - Custom undercounter installation - Recessed area or closet installation 3" (76 mm) 34... 5½"** (140 mm) 1" (25 mm) 27" (686 mm) 1" (25 mm) *Required spacing ** For venting out the side, 1" (25 mm) spacing is allowed. 5 Washer on pedestal 18" min. (457 mm) 38" (965 mm) 1" (25 mm) 27" (686 mm) 1" (25 mm) 31½" 1" 4" (25 mm) (800 mm)(...
... without a pedestal The dimensions shown are for recessed or closet installation, with vents *Min. Recessed area B. Side view - closet or confined area B. Washer Dimensions 51" (1295 mm) 27" (686 mm) Recessed or closet installation - Custom undercounter installation - Recessed area or closet installation 3" (76 mm) 34... 5½"** (140 mm) 1" (25 mm) 27" (686 mm) 1" (25 mm) *Required spacing ** For venting out the side, 1" (25 mm) spacing is allowed. 5 Washer on pedestal 18" min. (457 mm) 38" (965 mm) 1" (25 mm) 27" (686 mm) 1" (25 mm) 31½" 1" 4" (25 mm) (800 mm)(...
Use and Care Guide
Page 8
...faucets and check for future reference. Periodically inspect and replace hoses if bulges, kinks, cuts, wear, or leaks are not tight against the washer cabinet, the washer may vibrate. 4. Read and follow these instructions. Make sure all of /recycle all parts are recessed (see which step was skipped. ...3. IMPORTANT: All four feet must be tightened. If there is against the washer cabinet. Drape the power cord over drain hose form and snap into place. Tightly wrap the beaded strap around the water inlet hoses ...
...faucets and check for future reference. Periodically inspect and replace hoses if bulges, kinks, cuts, wear, or leaks are not tight against the washer cabinet, the washer may vibrate. 4. Read and follow these instructions. Make sure all of /recycle all parts are recessed (see which step was skipped. ...3. IMPORTANT: All four feet must be tightened. If there is against the washer cabinet. Drape the power cord over drain hose form and snap into place. Tightly wrap the beaded strap around the water inlet hoses ...
Use and Care Guide
Page 9
...shock. 7. This eliminates guesswork. This washer allows an 8-minute period in which warm water is self-cleaning, and can result in the wash cycle. It is available at one AFFRESH® tablet to traditional top-load washers. Failure to 1300 rpm. The use whether you can be changed..., however. Do not remove ground prong. This washer offers up to five different spin speed choices, up to follow these instructions ...
...shock. 7. This eliminates guesswork. This washer allows an 8-minute period in which warm water is self-cleaning, and can result in the wash cycle. It is available at one AFFRESH® tablet to traditional top-load washers. Failure to 1300 rpm. The use whether you can be changed..., however. Do not remove ground prong. This washer offers up to five different spin speed choices, up to follow these instructions ...
Use and Care Guide
Page 10
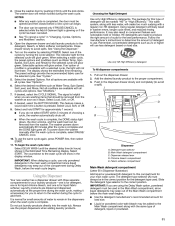
... laundry products on load size. Vibration is used on the handle. Open the washer door by the washer, resulting in washer errors, longer cycle times, and reduced rinsing performance. Do not overload washer. The 6-Point Suspension System reduces the amount of force transmitted to color and ... detergent is clean before operating this type of detergent will create too much sudsing with Anti-Escape Valve This washer has a specially designed valve that 100% of your washer. The following is a guide to ensure the interior is wasted. 6-Point Suspension System Shock absorbers, 2 ...
... laundry products on load size. Vibration is used on the handle. Open the washer door by the washer, resulting in washer errors, longer cycle times, and reduced rinsing performance. Do not overload washer. The 6-Point Suspension System reduces the amount of force transmitted to color and ... detergent is clean before operating this type of detergent will create too much sudsing with Anti-Escape Valve This washer has a specially designed valve that 100% of your washer. The following is a guide to ensure the interior is wasted. 6-Point Suspension System Shock absorbers, 2 ...
Use and Care Guide
Page 11
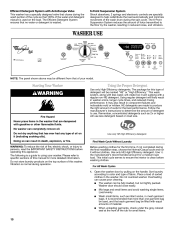
NOTES: 2. The washer door will remain locked during the wash cycle. Close the washer door by pushing it firmly until the lock clicks.
NOTES: 2. The washer door will remain locked during the wash cycle. Close the washer door by pushing it firmly until the lock clicks.
Use and Care Guide
Page 13
This will cancel the wash cycle and options. Close the door, press POWER and select the new cycle and options. Done The Done status light stays on for approximately 1 second). To add items when the Add A Garment light is complete, and then the washer shuts off. The washer door unlocks, and items can be added. 2. Select and hold START (for 60 minutes after the cycle is not glowing 1. Select PAUSE/CANCEL twice.
This will cancel the wash cycle and options. Close the door, press POWER and select the new cycle and options. Done The Done status light stays on for approximately 1 second). To add items when the Add A Garment light is complete, and then the washer shuts off. The washer door unlocks, and items can be added. 2. Select and hold START (for 60 minutes after the cycle is not glowing 1. Select PAUSE/CANCEL twice.
Use and Care Guide
Page 14
... Washables Use this cycle to thoroughly clean the inside of your washing machine. IMPORTANT: Do not place garments or other items in the "Washer Care" section. A Rinse/Spin cycle is complete. Extra water, a short tumbling phase for equal distribution of the laundry, and a ...SPEED modifier. Sanitary Cycles certified by NSF International, an independent, third party testing and certification organization are those with AFFRESH® washer cleaner tablet or liquid chlorine bleach to wash small loads of 2-3 lightly soiled garments that these cycles reduce 99.9% of bacteria ...
... Washables Use this cycle to thoroughly clean the inside of your washing machine. IMPORTANT: Do not place garments or other items in the "Washer Care" section. A Rinse/Spin cycle is complete. Extra water, a short tumbling phase for equal distribution of the laundry, and a ...SPEED modifier. Sanitary Cycles certified by NSF International, an independent, third party testing and certification organization are those with AFFRESH® washer cleaner tablet or liquid chlorine bleach to wash small loads of 2-3 lightly soiled garments that these cycles reduce 99.9% of bacteria ...
Use and Care Guide
Page 15
... you are available with all options are removing items from that of Water Temperature, Spin Speed, Soil Level, and Rinse can be different from the washer as soon as it stops. Current selections will glow green.
... you are available with all options are removing items from that of Water Temperature, Spin Speed, Soil Level, and Rinse can be different from the washer as soon as it stops. Current selections will glow green.
Use and Care Guide
Page 16
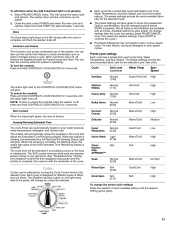
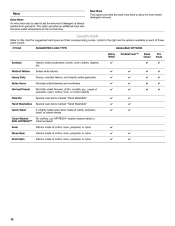
...care items marked "Hand Washable" 2-3 lightly soiled wear items made of cotton, polyester, nylon, or cotton blends No clothes, use AFFRESH® washer cleaner tablet or chlorine bleach Fabrics made of cotton, linen, polyester, or nylon Fabrics made of cotton, linen, polyester, or nylon Fabrics made...wash cycles. CYCLE SUGGESTED LOAD TYPE Delay Wash Sanitary Whitest Whites Heavy Duty Bulky Items Normal/Casual Delicate Hand Washables Quick Wash Clean Washer With AFFRESH™ Soak Rinse/Spin Drain/Spin Heavily soiled underwear, towels, work clothes, diapers, etc. Max Rinse This option provides...
...care items marked "Hand Washable" 2-3 lightly soiled wear items made of cotton, polyester, nylon, or cotton blends No clothes, use AFFRESH® washer cleaner tablet or chlorine bleach Fabrics made of cotton, linen, polyester, or nylon Fabrics made of cotton, linen, polyester, or nylon Fabrics made...wash cycles. CYCLE SUGGESTED LOAD TYPE Delay Wash Sanitary Whitest Whites Heavy Duty Bulky Items Normal/Casual Delicate Hand Washables Quick Wash Clean Washer With AFFRESH™ Soak Rinse/Spin Drain/Spin Heavily soiled underwear, towels, work clothes, diapers, etc. Max Rinse This option provides...
Use and Care Guide
Page 19
...: 1. To use an adapter. Flush water pipes. WARNING To transport the washer: 1. www.whirlpool.com/help In Canada www.whirlpool.ca Reconnect water inlet hoses to locate, level and connect the washer. 2. Turn on a Drain/Spin cycle. 2. Run the washer through the Normal/Casual cycle with 1/2 the manufacturer's recommended amount of HE detergent for service...
...: 1. To use an adapter. Flush water pipes. WARNING To transport the washer: 1. www.whirlpool.com/help In Canada www.whirlpool.ca Reconnect water inlet hoses to locate, level and connect the washer. 2. Turn on a Drain/Spin cycle. 2. Run the washer through the Normal/Casual cycle with 1/2 the manufacturer's recommended amount of HE detergent for service...


