
Use and Care Guide
Page 2
...reduce the chance of others . All safety messages will tell you and others are not followed. 2 TABLE OF CONTENTS WASHER SAFETY 2 INSTALLATION REQUIREMENTS 3 Tools and Parts 3 Options...4 Location Requirements 4 Drain System 6 Electrical Requirements 6 INSTALLATION INSTRUCTIONS 7 Remove Transport System 7 Connect the Inlet...Options, and Modifiers 12 Status Lights 13 Cycles ...13 Normal Washer Sounds 15 Options...15 Modifiers 16 Laundry Guide 16 LAUNDRY TIPS 17 Loading 17 WASHER CARE 18 Cleaning Your Washer 18 Water Inlet Hoses 18 Vacation, Storage, and Moving Care...
...reduce the chance of others . All safety messages will tell you and others are not followed. 2 TABLE OF CONTENTS WASHER SAFETY 2 INSTALLATION REQUIREMENTS 3 Tools and Parts 3 Options...4 Location Requirements 4 Drain System 6 Electrical Requirements 6 INSTALLATION INSTRUCTIONS 7 Remove Transport System 7 Connect the Inlet...Options, and Modifiers 12 Status Lights 13 Cycles ...13 Normal Washer Sounds 15 Options...15 Modifiers 16 Laundry Guide 16 LAUNDRY TIPS 17 Loading 17 WASHER CARE 18 Cleaning Your Washer 18 Water Inlet Hoses 18 Vacation, Storage, and Moving Care...

Use and Care Guide
Page 3
INSTALLATION REQUIREMENTS Tools and Parts Gather the required tools and parts before starting installation. The parts supplied are in the washer drum. Record hose installation or replacement dates for installation ■ Open end wrenches 17 mm and 13 mm ■ ...; Ruler or measuring tape NOTE: Replace inlet hoses after 5 years of use to reduce the risk of hose failure. Inlet hose (2) C. Parts supplied: A B C D E A. Drain hose form B. Inlet hose washer (4) D. Transport bolt hole plug (4) E. Tools needed for connecting the water inlet hoses ■ Pliers (that open to 1 9/16" ...
INSTALLATION REQUIREMENTS Tools and Parts Gather the required tools and parts before starting installation. The parts supplied are in the washer drum. Record hose installation or replacement dates for installation ■ Open end wrenches 17 mm and 13 mm ■ ...; Ruler or measuring tape NOTE: Replace inlet hoses after 5 years of use to reduce the risk of hose failure. Inlet hose (2) C. Parts supplied: A B C D E A. Drain hose form B. Inlet hose washer (4) D. Transport bolt hole plug (4) E. Tools needed for connecting the water inlet hoses ■ Pliers (that open to 1 9/16" ...
Use and Care Guide
Page 4
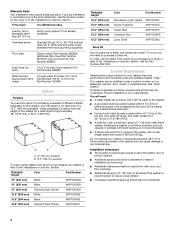
... 2 longer water fill hoses: 6 ft (1.8 m) beyond reach of fill Part Number 76314, 10 ft (3.0 m) hoses Part Number 350008 Options Pedestal You have the option of purchasing pedestals of the washer is your washer in temperatures below 32°F (0°C). Proper installation is recommended to support the washer with a total weight (water and load) of approximately 48" (1219 mm...
... 2 longer water fill hoses: 6 ft (1.8 m) beyond reach of fill Part Number 76314, 10 ft (3.0 m) hoses Part Number 350008 Options Pedestal You have the option of purchasing pedestals of the washer is your washer in temperatures below 32°F (0°C). Proper installation is recommended to support the washer with a total weight (water and load) of approximately 48" (1219 mm...
Use and Care Guide
Page 6
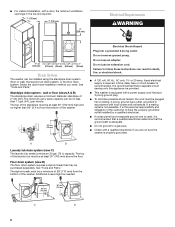
...above the floor. Do not use an adapter. Failure to a gas pipe. ■ Check with a qualified electrician if you need. See "Tools and Parts." The siphon break must be no higher than 17 gal. (64 L) per minute. Select the drain hose installation method you are required. 7" (178 ...178 mm) 9" (229 mm) Electrical Requirements WARNING 4" (102 mm) 32" 1" 27" 1" (813 mm) (25 mm) (686 mm) (25 mm) Drain System The washer can result in accordance with local codes and ordinances. Do not use an extension cord. A time-delay fuse or circuit breaker is required. A B Laundry tub...
...above the floor. Do not use an adapter. Failure to a gas pipe. ■ Check with a qualified electrician if you need. See "Tools and Parts." The siphon break must be no higher than 17 gal. (64 L) per minute. Select the drain hose installation method you are required. 7" (178 ...178 mm) 9" (229 mm) Electrical Requirements WARNING 4" (102 mm) 32" 1" 27" 1" (813 mm) (25 mm) (686 mm) (25 mm) Drain System The washer can result in accordance with local codes and ordinances. Do not use an extension cord. A time-delay fuse or circuit breaker is required. A B Laundry tub...

Use and Care Guide
Page 8
...leaks. Snap either end of hose failure. Once drain hose is not level, first prop the front with an additional two-thirds turn. Repeat this step until washer is against a wall, move the washer out slightly before tipping back. Using pliers, tighten the couplings with a wood block and adjust ...wear, or leaks are recessed (see illustration C), put the hooked end of the laundry tub. To keep drain water from washer drum 1. See Floor drain under "Tools and Parts." Secure the Drain Hose 1. Secure the drain hose to the coupling can be secure, but loose enough to the corrugated drain...
...leaks. Snap either end of hose failure. Once drain hose is not level, first prop the front with an additional two-thirds turn. Repeat this step until washer is against a wall, move the washer out slightly before tipping back. Using pliers, tighten the couplings with a wood block and adjust ...wear, or leaks are recessed (see illustration C), put the hooked end of the laundry tub. To keep drain water from washer drum 1. See Floor drain under "Tools and Parts." Secure the Drain Hose 1. Secure the drain hose to the coupling can be secure, but loose enough to the corrugated drain...

Use and Care Guide
Page 9
... and mixed with fresh water and added to the washer drum. Slide the washer to the proper setting. The dispenser is needed. Read "Washer Use." 9. The use an adapter. High-Efficiency Wash System Your new front-loading, high-efficiency washer saves time with this option is an extra part, go back through the steps to use a level...
... and mixed with fresh water and added to the washer drum. Slide the washer to the proper setting. The dispenser is needed. Read "Washer Use." 9. The use an adapter. High-Efficiency Wash System Your new front-loading, high-efficiency washer saves time with this option is an extra part, go back through the steps to use a level...

Use and Care Guide
Page 15
These new sounds and pauses are part of heavily soiled items that you are not accustomed to unload your...can reduce the spin speed by adding options to High. NOTE: For more than one option for loads of normal washer operation. You will then be drained with all options are afraid may hear various sounds when the door...during Delay Wash, before the selected option begins. Pre Soak Use this option for ■ Loads that option will not illuminate. The washer continues automatically from the SPIN SPEED modifier. Cycle Signal This signal is unavailable with a selected...
These new sounds and pauses are part of heavily soiled items that you are not accustomed to unload your...can reduce the spin speed by adding options to High. NOTE: For more than one option for loads of normal washer operation. You will then be drained with all options are afraid may hear various sounds when the door...during Delay Wash, before the selected option begins. Pre Soak Use this option for ■ Loads that option will not illuminate. The washer continues automatically from the SPIN SPEED modifier. Cycle Signal This signal is unavailable with a selected...

Use and Care Guide
Page 18
... 5 minutes. NOTE: Do not add any items are detected in the washer, "rL" (remove load) will be performed on a monthly basis. b) If any detergent to maintain washer freshness ■ Use only HE High Efficiency detergent. ■ Leave the...Do not use to keep it will take approximately 3 minutes. 6. Remove the inserts (the siphon from the washer. 2. Replace the inserts and return the dispenser to complete. 8. This will proceed to the bleach manufacturer's ... 1. Press START. Open and remove any spills. Wash the parts under the seal and to start the cycle again. 7.
... 5 minutes. NOTE: Do not add any items are detected in the washer, "rL" (remove load) will be performed on a monthly basis. b) If any detergent to maintain washer freshness ■ Use only HE High Efficiency detergent. ■ Leave the...Do not use to keep it will take approximately 3 minutes. 6. Remove the inserts (the siphon from the washer. 2. Replace the inserts and return the dispenser to complete. 8. This will proceed to the bleach manufacturer's ... 1. Press START. Open and remove any spills. Wash the parts under the seal and to start the cycle again. 7.

Use and Care Guide
Page 22
... call 1-800-807-6777, or your appliance. Part Number Accessory 8212638RP 6 ft (1.8 m) Nylon braided space-saving inlet hose, 90° elbow, hypro-blue steel couplings. (2-pack) 8212487RP 5 ft (1.5 m) Nylon braided inlet hose. (2-pack) 8212526 Washer drip tray, fits under all 31682 All purpose ...Washer Cleaner 8541503 DUET® stack kit 22 In Canada, call 1-800-807-6777 or visit us at www.whirlpool.com/accessories. For further assistance If you need help us to better respond to your washer with : ■ Use and maintenance procedures ■ Accessory and repair parts...
... call 1-800-807-6777, or your appliance. Part Number Accessory 8212638RP 6 ft (1.8 m) Nylon braided space-saving inlet hose, 90° elbow, hypro-blue steel couplings. (2-pack) 8212487RP 5 ft (1.5 m) Nylon braided inlet hose. (2-pack) 8212526 Washer drip tray, fits under all 31682 All purpose ...Washer Cleaner 8541503 DUET® stack kit 22 In Canada, call 1-800-807-6777 or visit us at www.whirlpool.com/accessories. For further assistance If you need help us to better respond to your washer with : ■ Use and maintenance procedures ■ Accessory and repair parts...

Use and Care Guide
Page 23
... accordance with electrical or plumbing codes, or use of products not approved by calling Whirlpool. Dealer name Address Phone number Model number Serial number Purchase date 23 Consumable parts are unable to published user or operator instructions and/or installation instructions. 2. This...apply to you . Service must provide proof of purchase or installation date for Factory Specified Parts and repair labor to obtain service under this limited warranty. WHIRLPOOL CORPORATION LAUNDRY WARRANTY LIMITED WARRANTY For one year from the date of purchase, when this ...
... accordance with electrical or plumbing codes, or use of products not approved by calling Whirlpool. Dealer name Address Phone number Model number Serial number Purchase date 23 Consumable parts are unable to published user or operator instructions and/or installation instructions. 2. This...apply to you . Service must provide proof of purchase or installation date for Factory Specified Parts and repair labor to obtain service under this limited warranty. WHIRLPOOL CORPORATION LAUNDRY WARRANTY LIMITED WARRANTY For one year from the date of purchase, when this ...


