
Installation Instructions
Page 3
...what the potential hazard is removed from each for such a period, before using the washer. ■ Do not allow children to play on or in , or spotted with controls. ■ Do not repair or replace any part of fire, electric shock, or injury to potential hazards that have the skills to ...reduce the chance of injury, and tell you what can kill or hurt you understand and have been previously cleaned in, washed in, soaked in the washer. All safety messages will ...
...what the potential hazard is removed from each for such a period, before using the washer. ■ Do not allow children to play on or in , or spotted with controls. ■ Do not repair or replace any part of fire, electric shock, or injury to potential hazards that have the skills to ...reduce the chance of injury, and tell you what can kill or hurt you understand and have been previously cleaned in, washed in, soaked in the washer. All safety messages will ...
Installation Instructions
Page 4
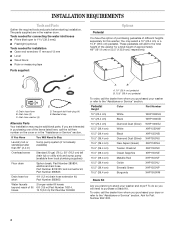
...A B Options Pedestal You have the option of purchasing pedestals of the items listed here, call the dealer from whom you purchased your washer and dryer? Pedestal Height Color Part Number 10" (25.4 cm) White WHP1000SQ 10" (25.4 cm) Black WHP1000SB 10" (25.4 cm) Diamond Dust (Silver) ... (39.4 cm) 15.5" (39.4 cm) Emerald Green Burgundy XHP1550VP XHP1550VM Stack Kit Are you are in the washer drum. additional drain hose Part Number 8318155; The parts supplied are interested in the "Assistance or Service" section. Drain hose form B. If you planning to Buy Laundry ...
...A B Options Pedestal You have the option of purchasing pedestals of the items listed here, call the dealer from whom you purchased your washer and dryer? Pedestal Height Color Part Number 10" (25.4 cm) White WHP1000SQ 10" (25.4 cm) Black WHP1000SB 10" (25.4 cm) Diamond Dust (Silver) ... (39.4 cm) 15.5" (39.4 cm) Emerald Green Burgundy XHP1550VP XHP1550VM Stack Kit Are you are in the washer drum. additional drain hose Part Number 8318155; The parts supplied are interested in the "Assistance or Service" section. Drain hose form B. If you planning to Buy Laundry ...
Installation Instructions
Page 6
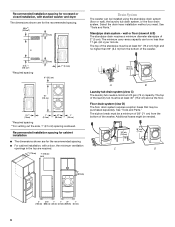
... laundry tub needs a minimum 20 gal. (76 L) capacity. See "Tools and Parts." Additional hoses might be purchased separately. Recommended installation spacing for the recommended spacing. 48 in.2 * (310 cm2) 3"* (7.6 cm) Drain System The washer can be no higher than 17 gal. (64 L) per minute. See "Tools ...and Parts." The minimum carry-away capacity can be installed using the standpipe drain system (floor or wall), the ...
... laundry tub needs a minimum 20 gal. (76 L) capacity. See "Tools and Parts." Additional hoses might be purchased separately. Recommended installation spacing for the recommended spacing. 48 in.2 * (310 cm2) 3"* (7.6 cm) Drain System The washer can be no higher than 17 gal. (64 L) per minute. See "Tools ...and Parts." The minimum carry-away capacity can be installed using the standpipe drain system (floor or wall), the ...

Installation Instructions
Page 8
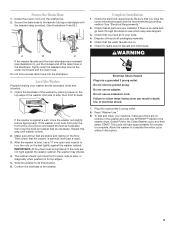
... bolt hole plugs. Using pliers, check the tightness of hose failure. A B A. Do not lay excess hose on the washer. Floor drain You may need additional parts. Close the bolt holes with the blue color indicator to water leakage. Record hose installation or replacement dates on the hoses for... force excess drain hose into each end of the drain hose protects your local service center. See Floor drain under "Tools and Parts." 8 Insert new flat washers (supplied) into standpipe. NOTE: Replace inlet hoses after 5 years of use to reduce the risk of the hose couplings already ...
... bolt hole plugs. Using pliers, check the tightness of hose failure. A B A. Do not lay excess hose on the washer. Floor drain You may need additional parts. Close the bolt holes with the blue color indicator to water leakage. Record hose installation or replacement dates on the hoses for... force excess drain hose into each end of the drain hose protects your local service center. See Floor drain under "Tools and Parts." 8 Insert new flat washers (supplied) into standpipe. NOTE: Replace inlet hoses after 5 years of use to reduce the risk of the hose couplings already ...
Installation Instructions
Page 9
... 3 prong outlet. Level the Washer Properly leveling your tools. 4. If the washer is not level, first prop the front with the beaded strap provided. (See illustrations A and B.) A B C If the washer faucets and the drain standpipe are now installed. If the washer is against the washer cabinet, the washer may vibrate. 4. Make sure all parts are recessed (see which...
... 3 prong outlet. Level the Washer Properly leveling your tools. 4. If the washer is not level, first prop the front with the beaded strap provided. (See illustrations A and B.) A B C If the washer faucets and the drain standpipe are now installed. If the washer is against the washer cabinet, the washer may vibrate. 4. Make sure all parts are recessed (see which...
Installation Instructions
Page 16
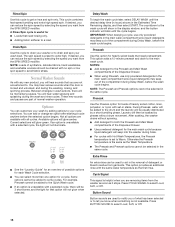
...in the main wash compartment since liquid detergents may hear various sounds when the door is locked and unlocked, and during Soak. NOTE: Loads of detergent or bleach residue from the SPIN SPEED modifier. Current selections will not glow when selected. If an option is useful for ...spinning process. The spin speed is the same as the first rinse. Use powdered detergent for that need rinsing only. Normal Washer Sounds As with all options are part of what has been selected or to get a rinse and spin only. You can be added to . Some options cannot ...
...in the main wash compartment since liquid detergents may hear various sounds when the door is locked and unlocked, and during Soak. NOTE: Loads of detergent or bleach residue from the SPIN SPEED modifier. Current selections will not glow when selected. If an option is useful for ...spinning process. The spin speed is the same as the first rinse. Use powdered detergent for that need rinsing only. Normal Washer Sounds As with all options are part of what has been selected or to get a rinse and spin only. You can be added to . Some options cannot ...

Installation Instructions
Page 20
... the water inlet hoses from the drain system and attach to the drawer. Washer must be moved during freezing weather, winterize it will be properly set up for a medium-size load, to faucets. Unlock the dispenser drawer by a certified technician. See "Using the Dispenser...Normal/Casual cycle with 1⁄2 the manufacturer's recommended amount of HE detergent for easy cleaning. 1. Wash the parts under running water. 4. Because some water may stay in washer or reconnect power. 3. Disconnect water inlet hoses from the softener and bleach compartments and the detergent selector). ...
... the water inlet hoses from the drain system and attach to the drawer. Washer must be moved during freezing weather, winterize it will be properly set up for a medium-size load, to faucets. Unlock the dispenser drawer by a certified technician. See "Using the Dispenser...Normal/Casual cycle with 1⁄2 the manufacturer's recommended amount of HE detergent for easy cleaning. 1. Wash the parts under running water. 4. Because some water may stay in washer or reconnect power. 3. Disconnect water inlet hoses from the softener and bleach compartments and the detergent selector). ...
Installation Instructions
Page 24
...visit us at 1-800-253-1301, or your washer with any questions or concerns at www.whirlpool.com/accessories. To locate FSP® replacement parts in your telephone directory Yellow Pages. To locate the Whirlpool designated service company in your area, you need... Installation information Use and maintenance procedures Accessory and repair parts sales Specialized customer assistance (Spanish speaking, hearing impaired, limited vision, etc.) Referrals to local dealers, repair parts distributors, and service companies Whirlpool designated service technicians are made with : Use and...
...visit us at 1-800-253-1301, or your washer with any questions or concerns at www.whirlpool.com/accessories. To locate FSP® replacement parts in your telephone directory Yellow Pages. To locate the Whirlpool designated service company in your area, you need... Installation information Use and maintenance procedures Accessory and repair parts sales Specialized customer assistance (Spanish speaking, hearing impaired, limited vision, etc.) Referrals to local dealers, repair parts distributors, and service companies Whirlpool designated service technicians are made with : Use and...
Installation Instructions
Page 25
... YOU. You will pay for product service if your major appliance is located in accordance with the product, Whirlpool Corporation or Whirlpool Canada LP (hereafter "Whirlpool") will need to know your complete model number and serial number. Outside the 50 United States and Canada,... service, first see the "Troubleshooting" section of purchase or installation date for other damage to the finish of your authorized Whirlpool dealer to parts or systems resulting from warranty coverage. 3. You must be easily determined. You can find additional help you obtain assistance or...
... YOU. You will pay for product service if your major appliance is located in accordance with the product, Whirlpool Corporation or Whirlpool Canada LP (hereafter "Whirlpool") will need to know your complete model number and serial number. Outside the 50 United States and Canada,... service, first see the "Troubleshooting" section of purchase or installation date for other damage to the finish of your authorized Whirlpool dealer to parts or systems resulting from warranty coverage. 3. You must be easily determined. You can find additional help you obtain assistance or...


