
Installation Instructions
Page 3
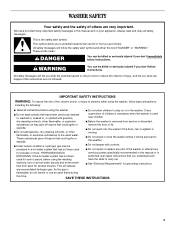
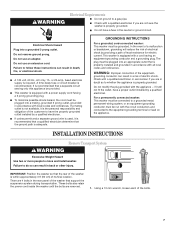
...carry out. If the hot water system has not been used for 2 weeks or more. This is moving. ■ Do not install or store the washer where it will tell you understand and have the skills to reduce the chance of injury, and tell you and others are not ...Electrical Requirements" for several minutes. This symbol alerts you to the wash water. We have been previously cleaned in, washed in, soaked in the washer. dry-cleaning solvents, other flammable, or explosive substances to potential hazards that you what can kill or hurt you what the potential hazard is ...
...carry out. If the hot water system has not been used for 2 weeks or more. This is moving. ■ Do not install or store the washer where it will tell you understand and have the skills to reduce the chance of injury, and tell you and others are not ...Electrical Requirements" for several minutes. This symbol alerts you to the wash water. We have been previously cleaned in, washed in, soaked in the washer. dry-cleaning solvents, other flammable, or explosive substances to potential hazards that you what can kill or hurt you what the potential hazard is ...
Installation Instructions
Page 4
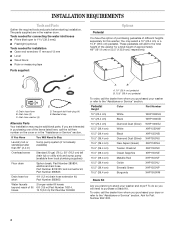
... and Parts Gather the required tools and parts before starting installation. The parts supplied are interested in the washer drum. These pedestals will need to stack your washer and dryer? Beaded strap Alternate Parts Your installation may select a 10" (25.4 cm) or a 15.5" (39.4 cm) pedestal. If ... cm) 15.5" (39.4 cm) Emerald Green Burgundy XHP1550VP XHP1550VM Stack Kit Are you are in purchasing one of different heights separately for installation Open end wrenches 17 mm and 13 mm Level Wood block Ruler or measuring tape Parts supplied: A B Options Pedestal You have the ...
... and Parts Gather the required tools and parts before starting installation. The parts supplied are interested in the washer drum. These pedestals will need to stack your washer and dryer? Beaded strap Alternate Parts Your installation may select a 10" (25.4 cm) or a 15.5" (39.4 cm) pedestal. If ... cm) 15.5" (39.4 cm) Emerald Green Burgundy XHP1550VP XHP1550VM Stack Kit Are you are in purchasing one of different heights separately for installation Open end wrenches 17 mm and 13 mm Level Wood block Ruler or measuring tape Parts supplied: A B Options Pedestal You have the ...
Installation Instructions
Page 5
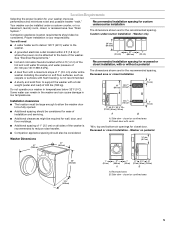
... transfer. ■ Companion appliance spacing should also be installed under entire washer. See "Drain System." Companion appliance location requirements should also be required for recessed or closet installation, with a total weight (water and load) of 20-100 psi (137.9-689.6 kPa). ■...; A level floor with vents *Min. Installing the washer on pedestal 18" min. (45.7 cm) 38" (96.5 cm...
... transfer. ■ Companion appliance spacing should also be installed under entire washer. See "Drain System." Companion appliance location requirements should also be required for recessed or closet installation, with a total weight (water and load) of 20-100 psi (137.9-689.6 kPa). ■...; A level floor with vents *Min. Installing the washer on pedestal 18" min. (45.7 cm) 38" (96.5 cm...
Installation Instructions
Page 6
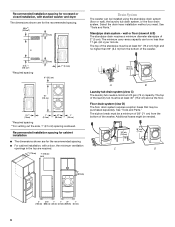
...than 96" (2.4 m) from the bottom of the washer. Additional hoses might be a minimum of 28" (71 cm) from the bottom of the washer. 24 in .2 * (310 cm2) 3"* (7.6 cm) Drain System The washer can be installed using the standpipe drain system (floor or wall), ... Standpipe drain system - Recommended installation spacing for cabinet installation ■ The dimensions shown are for the recommended spacing. ■ For cabinet installation, with a door, the minimum ventilation openings in the top are for recessed or closet installation, with stacked washer and dryer The dimensions shown ...
...than 96" (2.4 m) from the bottom of the washer. Additional hoses might be a minimum of 28" (71 cm) from the bottom of the washer. 24 in .2 * (310 cm2) 3"* (7.6 cm) Drain System The washer can be installed using the standpipe drain system (floor or wall), ... Standpipe drain system - Recommended installation spacing for cabinet installation ■ The dimensions shown are for the recommended spacing. ■ For cabinet installation, with a door, the minimum ventilation openings in the top are for recessed or closet installation, with stacked washer and dryer The dimensions shown ...
Installation Instructions
Page 7
...-grounding terminal or lead on the appliance. Electrical Shock Hazard Plug into an appropriate outlet that the rear of the washer is properly installed and grounded in accordance with a qualified electrician if you are 4 bolts in doubt as to follow these instructions can...and ordinances. Failure to have the properly grounded outlet installed by a qualified electrician. WARNING Electrical Requirements Do not ground to move and install washer. Check with all local codes and ordinances. Do not have a proper outlet installed by providing a path of the customer to do so...
...-grounding terminal or lead on the appliance. Electrical Shock Hazard Plug into an appropriate outlet that the rear of the washer is properly installed and grounded in accordance with a qualified electrician if you are 4 bolts in doubt as to follow these instructions can...and ordinances. Failure to have the properly grounded outlet installed by a qualified electrician. WARNING Electrical Requirements Do not ground to move and install washer. Check with all local codes and ordinances. Do not have a proper outlet installed by providing a path of the customer to do so...

Installation Instructions
Page 8
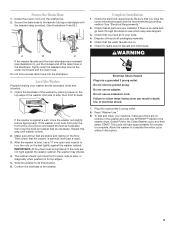
... should be transported at the point where the corrugation begins. Record hose installation or replacement dates on the washer. 7. Remove drain hose from washer cabinet Gently pull the corrugated drain hose from going back into the washer: Do not straighten the drain hose, and do not force excess drain..., cuts, wear, or leaks are removed, discard bolt and spacers. Route the Drain Hose Proper routing of the inlet hoses. Washer 2. Make sure the washer drum is seated on coupling by hand until it must be properly set up for air. Screw on coupling by a certified technician...
... should be transported at the point where the corrugation begins. Record hose installation or replacement dates on the washer. 7. Remove drain hose from washer cabinet Gently pull the corrugated drain hose from going back into the washer: Do not straighten the drain hose, and do not force excess drain..., cuts, wear, or leaks are removed, discard bolt and spacers. Route the Drain Hose Proper routing of the inlet hoses. Washer 2. Make sure the washer drum is seated on coupling by hand until it must be properly set up for air. Screw on coupling by a certified technician...
Installation Instructions
Page 9
.... 8. If the washer is level. 2. Repeat this step until washer is against a wall, move front to back, side to turn the nuts on the feet tightly against the washer cabinet, the washer may vibrate. 4. Then check that the washer is level, use a level). 3. After the washer is perfectly level (... pushed on . 6. IMPORTANT: All four feet must be tightened. Complete Installation 1. Dispose of/recycle all four feet are on its final location. 6. Allow the washer to back. Check the levelness of the washer by placing a level on the floor. Make sure all packaging materials. ...
.... 8. If the washer is level. 2. Repeat this step until washer is against a wall, move front to back, side to turn the nuts on the feet tightly against the washer cabinet, the washer may vibrate. 4. Then check that the washer is level, use a level). 3. After the washer is perfectly level (... pushed on . 6. IMPORTANT: All four feet must be tightened. Complete Installation 1. Dispose of/recycle all four feet are on its final location. 6. Allow the washer to back. Check the levelness of the washer by placing a level on the floor. Make sure all packaging materials. ...

Installation Instructions
Page 11
... PAUSE/CANCEL is selected while the Add A Garment light is normal during the final installation step, choose the Normal/Casual cycle and run it firmly until the lock clicks. ...washing clothes for a medium-size load. The following is recommended that more detailed information. When unloading garments, occasionally check under the gray colored seal at the front of detergent to determine the ... cycle" in death, explosion, or fire. Do not overload washer. Turn on load size. WASHER USE NOTE: The panel shown above may also result in component failures and noticeable mold or...
... PAUSE/CANCEL is selected while the Add A Garment light is normal during the final installation step, choose the Normal/Casual cycle and run it firmly until the lock clicks. ...washing clothes for a medium-size load. The following is recommended that more detailed information. When unloading garments, occasionally check under the gray colored seal at the front of detergent to determine the ... cycle" in death, explosion, or fire. Do not overload washer. Turn on load size. WASHER USE NOTE: The panel shown above may also result in component failures and noticeable mold or...
Installation Instructions
Page 19
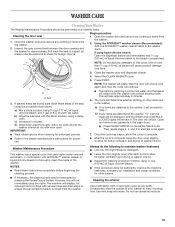
... damage over time. 3. a) Mix a dilute solution, using the procedure that uses higher water volumes and steam, in the washer, "rL" (remove load) will bring in the wash drum. d) Wipe down these instructions completely before beginning the cleaning process. NOTES: Read these areas...Do not use . 8. Use of more than 2⁄3 cup (160 mL) of your installation and usage conditions for better ventilation and drying of warm tap water. WASHER CARE Cleaning Your Washer The Washer Maintenance Procedure should be performed on a monthly basis. Press START. c) Let stand 5 minutes...
... damage over time. 3. a) Mix a dilute solution, using the procedure that uses higher water volumes and steam, in the washer, "rL" (remove load) will bring in the wash drum. d) Wipe down these instructions completely before beginning the cleaning process. NOTES: Read these areas...Do not use . 8. Use of more than 2⁄3 cup (160 mL) of your installation and usage conditions for better ventilation and drying of warm tap water. WASHER CARE Cleaning Your Washer The Washer Maintenance Procedure should be performed on a monthly basis. Press START. c) Let stand 5 minutes...

Installation Instructions
Page 20
... winterize it will be properly set up for a medium-size load, to locate, level, and connect the washer. 2. Slightly open door to faucets. Reconnect water inlet hoses to provide ventilation. To transport the washer: 1. Run washer on a Drain/Spin cycle. 3. Disconnect the drain hose from...faucets. 5. Do not use an extension cord. Shut off both water faucets. Follow the "Installation Instructions" to clean the washer and remove the antifreeze, if used . Run the washer through the Normal/Casual cycle with 1⁄2 the manufacturer's recommended amount of use to clean ...
... winterize it will be properly set up for a medium-size load, to locate, level, and connect the washer. 2. Slightly open door to faucets. Reconnect water inlet hoses to provide ventilation. To transport the washer: 1. Run washer on a Drain/Spin cycle. 3. Disconnect the drain hose from...faucets. 5. Do not use an extension cord. Shut off both water faucets. Follow the "Installation Instructions" to clean the washer and remove the antifreeze, if used . Run the washer through the Normal/Casual cycle with 1⁄2 the manufacturer's recommended amount of use to clean ...
Installation Instructions
Page 22
...clogged, or the end of the washer and try to dry between uses. Washer makes noise or vibrates Is the washer level? The four feet should be properly installed, and the nuts should be tightened against the washer cabinet. Is washer installed on load Did you leave the door open to... allow the washer to evenly distribute your water ...
...clogged, or the end of the washer and try to dry between uses. Washer makes noise or vibrates Is the washer level? The four feet should be properly installed, and the nuts should be tightened against the washer cabinet. Is washer installed on load Did you leave the door open to... allow the washer to evenly distribute your water ...

Installation Instructions
Page 23
...Sort dark clothes from whites and lights. Add liquid fabric softener to install an iron filter. Did you use Quick Wash for washing heavy soils in a load. Unload the washer as soon as it stops. The wash load must be activated to heat the water. The transfer of dye can ... a fabric softener dispensing ball? This additional time will not operate correctly with the remainder of the washer during washing. Did you use enough detergent, or do you wash a large load using this washer. Use the Delicate, Hand Washables, or another cycle with a low-spin speed to the dispenser?...
...Sort dark clothes from whites and lights. Add liquid fabric softener to install an iron filter. Did you use Quick Wash for washing heavy soils in a load. Unload the washer as soon as it stops. The wash load must be activated to heat the water. The transfer of dye can ... a fabric softener dispensing ball? This additional time will not operate correctly with the remainder of the washer during washing. Did you use enough detergent, or do you wash a large load using this washer. Use the Delicate, Hand Washables, or another cycle with a low-spin speed to the dispenser?...
Installation Instructions
Page 24
... because they are trained to build every new WHIRLPOOL® appliance. Accessories Enhance your request. Whirlpool Canada LP designated service technicians are trained to your washer with any questions or concerns at www.whirlpool.com/accessories. It may save you need help...to local dealers, repair parts distributors, and service companies. If you need replacement parts If you the cost of appliances Installation information Use and maintenance procedures Accessory and repair parts sales Specialized customer assistance (Spanish speaking, hearing impaired, limited vision, ...
... because they are trained to build every new WHIRLPOOL® appliance. Accessories Enhance your request. Whirlpool Canada LP designated service technicians are trained to your washer with any questions or concerns at www.whirlpool.com/accessories. It may save you need help...to local dealers, repair parts distributors, and service companies. If you need replacement parts If you the cost of appliances Installation information Use and maintenance procedures Accessory and repair parts sales Specialized customer assistance (Spanish speaking, hearing impaired, limited vision, ...
Installation Instructions
Page 25
...States or Canada and applies only when the major appliance is contrary to correct defects in accordance with published installation instructions. 11. WHIRLPOOL CORPORATION MAJOR APPLIANCE WARRANTY LIMITED WARRANTY For one year from the date of purchase, when this major appliance is reported ... better help by checking the "Assistance or Service" section or by Whirlpool. 5. In Canada, call 1-800-253-1301. You can find additional help you obtain assistance or service if you need it is installed in accordance with electrical or plumbing codes, or use your major appliance...
...States or Canada and applies only when the major appliance is contrary to correct defects in accordance with published installation instructions. 11. WHIRLPOOL CORPORATION MAJOR APPLIANCE WARRANTY LIMITED WARRANTY For one year from the date of purchase, when this major appliance is reported ... better help by checking the "Assistance or Service" section or by Whirlpool. 5. In Canada, call 1-800-253-1301. You can find additional help you obtain assistance or service if you need it is installed in accordance with electrical or plumbing codes, or use your major appliance...


