Warranty Information
Page 1
... alteration, misuse, abuse, fire, flood, acts of God, improper installation, installation not in accordance with Whirlpool published installation instructions. 10. Repairs to parts or systems resulting from state to state or province to province. The removal and reinstallation of your major ...this major appliance is operated and maintained according to instructions attached to or furnished with the product, Whirlpool Corporation or Whirlpool Canada LP (hereafter "Whirlpool") will need to know your complete model number and serial number. Pick up and delivery. Write ...
... alteration, misuse, abuse, fire, flood, acts of God, improper installation, installation not in accordance with Whirlpool published installation instructions. 10. Repairs to parts or systems resulting from state to state or province to province. The removal and reinstallation of your major ...this major appliance is operated and maintained according to instructions attached to or furnished with the product, Whirlpool Corporation or Whirlpool Canada LP (hereafter "Whirlpool") will need to know your complete model number and serial number. Pick up and delivery. Write ...

Use & Care Guide
Page 22
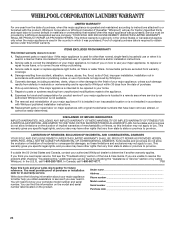
... and exclusions may have other damage to the finish of your authorized Whirlpool dealer to province. In Canada, call 1800253-1301. You will pay for Factory Specified Parts and repair labor to the appliance. 8. ITEMS EXCLUDED FROM WARRANTY This... maintained according to instructions attached to or furnished with the product, Whirlpool Corporation or Whirlpool Canada LP (hereafter "Whirlpool") will need to you also may not apply to know your home. 7. Repairs to parts or systems resulting from warranty coverage. 4. The removal and reinstallation...
... and exclusions may have other damage to the finish of your authorized Whirlpool dealer to province. In Canada, call 1800253-1301. You will pay for Factory Specified Parts and repair labor to the appliance. 8. ITEMS EXCLUDED FROM WARRANTY This... maintained according to instructions attached to or furnished with the product, Whirlpool Corporation or Whirlpool Canada LP (hereafter "Whirlpool") will need to you also may not apply to know your home. 7. Repairs to parts or systems resulting from warranty coverage. 4. The removal and reinstallation...
Installation Guide
Page 2
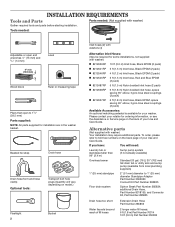
... will vary, depending on model.) Flashlight 2 Bucket Inlet hoses (2) with washers (4) Alternative Inlet Hoses: (may be required for installation are in the washer basket. Alternative parts (Not supplied with washer) n 8212656RP 10 ft (3.0 m) Inlet hose, Black EPDM (2 pack) n 8212641RP 5 ft (1.5 m) Inlet hose, Black EPDM (2 pack) n ...the Assistance or Service page on the back page of fill hoses 2 longer water fill hoses; 6 ft (1.8 m) Part Number 76314 10 ft (3.0 m) Part Number 350008 To order, please refer to toll-free numbers on the back of your Use and Care Guide. and ...
... will vary, depending on model.) Flashlight 2 Bucket Inlet hoses (2) with washers (4) Alternative Inlet Hoses: (may be required for installation are in the washer basket. Alternative parts (Not supplied with washer) n 8212656RP 10 ft (3.0 m) Inlet hose, Black EPDM (2 pack) n 8212641RP 5 ft (1.5 m) Inlet hose, Black EPDM (2 pack) n ...the Assistance or Service page on the back page of fill hoses 2 longer water fill hoses; 6 ft (1.8 m) Part Number 76314 10 ft (3.0 m) Part Number 350008 To order, please refer to toll-free numbers on the back of your Use and Care Guide. and ...
Installation Guide
Page 4
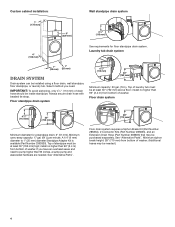
...beaded tie strap. Minimum carry-away capacity: 17 gal. (64 L) per minute. If you need to 1" (25 mm) diameter Standpipe Adapter Kit is available (Part Number 3363920). Floor standpipe drain system 41/2" (113 mm) 30" (762 mm) Minimum capacity: 20 gal. (76 L). A 1/4" (6 mm) diameter to ... 96" (2.4 m) from bottom of washer. Top of washer. See "Alternative Parts". 3208" (76120 mm) Floor drain system requires a Siphon Break Kit (Part Number 285834), 2 Connector Kits (Part Number 285835), and an Extension Drain Hose (Part Number 285863) that may be at least 30" (762 mm) high; Select...
...beaded tie strap. Minimum carry-away capacity: 17 gal. (64 L) per minute. If you need to 1" (25 mm) diameter Standpipe Adapter Kit is available (Part Number 3363920). Floor standpipe drain system 41/2" (113 mm) 30" (762 mm) Minimum capacity: 20 gal. (76 L). A 1/4" (6 mm) diameter to ... 96" (2.4 m) from bottom of washer. Top of washer. See "Alternative Parts". 3208" (76120 mm) Floor drain system requires a Siphon Break Kit (Part Number 285834), 2 Connector Kits (Part Number 285835), and an Extension Drain Hose (Part Number 285863) that may be at least 30" (762 mm) high; Select...
Installation Guide
Page 6
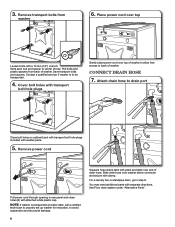
...hole. Pull bolts and plastic spacers from washer 6. CONNECT DRAIN HOSE 7. NOTE: If washer is to center of washer. You may need additional parts with clamp. Remove power cord Pull power cord through opening in rear panel and close holes (2) with a 13 mm (1/2") wrench. For a .... 6 Squeeze hose clamp tabs with pliers and slide over top Loosen bolts with attached white plastic cap. See Floor drain system under "Alternative Parts". Attach drain hose to step 8. Contact a qualified servicer if washer is transported at a later date, call a certified technician to properly set...
...hole. Pull bolts and plastic spacers from washer 6. CONNECT DRAIN HOSE 7. NOTE: If washer is to center of washer. You may need additional parts with clamp. Remove power cord Pull power cord through opening in rear panel and close holes (2) with a 13 mm (1/2") wrench. For a .... 6 Squeeze hose clamp tabs with pliers and slide over top Loosen bolts with attached white plastic cap. See Floor drain system under "Alternative Parts". Attach drain hose to step 8. Contact a qualified servicer if washer is transported at a later date, call a certified technician to properly set...
Installation Guide
Page 8
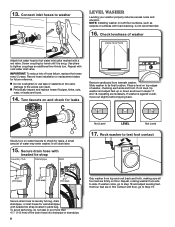
..., is not recommended. 16. If all four feet are found. 14. If not level, tip washer and adjust feet up or down as shown in parts bag. Repeat, rocking washer from side to laundry tub leg, drain standpipe, or inlet hoses for leaks Remove cardboard from top and rock back and...
..., is not recommended. 16. If all four feet are found. 14. If not level, tip washer and adjust feet up or down as shown in parts bag. Repeat, rocking washer from side to laundry tub leg, drain standpipe, or inlet hoses for leaks Remove cardboard from top and rock back and...
Installation Guide
Page 9
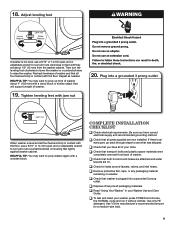
... floor, use a 9/16" or 14 mm open -end or adjustable wrench to prop up front of washer about 1/2" (13 mm) from back of /recycle all parts supplied are firmly in your Washer Use and Care Guide. q Check that will support weight of washer. 19. Use only HE detergent. If there is.... 18. Adjust leveling feet Lower Washer Jam nut Raise Washer If washer is plugged into a grounded 3 prong outlet Jam nut When washer is an extra part, go back through steps to raise the washer. q Dispose of washer. Repeat as needed. Tighten leveling feet with the floor. q Check that all of washer...
... floor, use a 9/16" or 14 mm open -end or adjustable wrench to prop up front of washer about 1/2" (13 mm) from back of /recycle all parts supplied are firmly in your Washer Use and Care Guide. q Check that will support weight of washer. 19. Use only HE detergent. If there is.... 18. Adjust leveling feet Lower Washer Jam nut Raise Washer If washer is plugged into a grounded 3 prong outlet Jam nut When washer is an extra part, go back through steps to raise the washer. q Dispose of washer. Repeat as needed. Tighten leveling feet with the floor. q Check that all of washer...


