
Installation Guide
Page 1
INSTALLATION INSTRUCTIONS 30" (76 CM) FREESTANDING ELECTRIC RANGES Table of Contents RANGE SAFETY 2 INSTALLATION REQUIREMENTS 3 Tools and Parts 3 Location Requirements 3 Electrical Requirements - Only 8 Verify Anti-Tip Bracket Is Installed and Engaged 12 Level Range 13 Warming Drawer or Premium Storage Drawer 13 Storage Drawer 14 Oven Door 14 Complete Installation 15 Moving the Range 15 IMPORTANT: Save for local electrical inspector's use. U.S.A. Only 5 INSTALLATION INSTRUCTIONS 6 Unpack Range 6 Install Anti-Tip Bracket 6 Electrical Connection - W10403811B U.S.A.
INSTALLATION INSTRUCTIONS 30" (76 CM) FREESTANDING ELECTRIC RANGES Table of Contents RANGE SAFETY 2 INSTALLATION REQUIREMENTS 3 Tools and Parts 3 Location Requirements 3 Electrical Requirements - Only 8 Verify Anti-Tip Bracket Is Installed and Engaged 12 Level Range 13 Warming Drawer or Premium Storage Drawer 13 Storage Drawer 14 Oven Door 14 Complete Installation 15 Moving the Range 15 IMPORTANT: Save for local electrical inspector's use. U.S.A. Only 5 INSTALLATION INSTRUCTIONS 6 Unpack Range 6 Install Anti-Tip Bracket 6 Electrical Connection - W10403811B U.S.A.

Installation Guide
Page 3
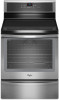
... be used will need to be securely mounted to the Manufactured Home Construction and Safety Standard, Title 24 CFR, Part 3280 (formerly the Federal Standard for use with nominal 1³⁄₈" (3.5 cm) diameter connection opening dimensions... that the materials used . Additional Installation Requirements The installation of 194° (90°C). See "Electrical Connection - Parts needed ■ Tape measure ■ Masking tape ■ Flat-blade screwdriver ■ ¼" drive ratchet ■ Phillips screwdriver ■...
... be used will need to be securely mounted to the Manufactured Home Construction and Safety Standard, Title 24 CFR, Part 3280 (formerly the Federal Standard for use with nominal 1³⁄₈" (3.5 cm) diameter connection opening dimensions... that the materials used . Additional Installation Requirements The installation of 194° (90°C). See "Electrical Connection - Parts needed ■ Tape measure ■ Masking tape ■ Flat-blade screwdriver ■ ¼" drive ratchet ■ Phillips screwdriver ■...

Installation Guide
Page 6
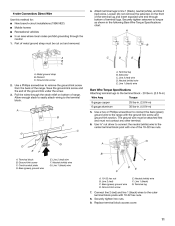
... result in a mobile home, you can tip the range and be accessed by removing the warming drawer or premium storage drawer. Remove oven racks and parts package from outside the range. Rear leveling leg C. Wrench or pliers D. If you have a stone or masonry floor, you must secure the range to use...
... result in a mobile home, you can tip the range and be accessed by removing the warming drawer or premium storage drawer. Remove oven racks and parts package from outside the range. Rear leveling leg C. Wrench or pliers D. If you have a stone or masonry floor, you must secure the range to use...
Installation Guide
Page 9
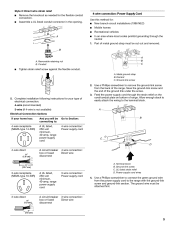
... first. 3-wire direct ³⁄₈" (1.0 cm) A circuit breaker 3-wire connection: box or fused Direct wire disconnect 3" (7.6 cm) 9 Discard C. Metal ground strap B. Removable retaining nut B. Part of metal ground strap must be cut out and removed. Ground-link screw 2. Ground-link screw C. Use a Phillips screwdriver to the terminal block. Style 2: Direct...
... first. 3-wire direct ³⁄₈" (1.0 cm) A circuit breaker 3-wire connection: box or fused Direct wire disconnect 3" (7.6 cm) 9 Discard C. Metal ground strap B. Removable retaining nut B. Part of metal ground strap must be cut out and removed. Ground-link screw 2. Ground-link screw C. Use a Phillips screwdriver to the terminal block. Style 2: Direct...
Installation Guide
Page 11
... ground-link screw and the end of terminal lugs. A B C C D E A. Line 2 (red) wire F. Terminal lug 7. Use a Phillips screwdriver to torque as shown in . (4.0 N-m) 5. Line 2 (red) wire D. Part of the range. Terminal lug B. Use a hex or Phillips screwdriver to connect the bare (green) ground wire to the terminal block - 20 lbs-in. (2.3 N-m) Wire...
... ground-link screw and the end of terminal lugs. A B C C D E A. Line 2 (red) wire F. Terminal lug 7. Use a Phillips screwdriver to torque as shown in . (4.0 N-m) 5. Line 2 (red) wire D. Part of the range. Terminal lug B. Use a hex or Phillips screwdriver to connect the bare (green) ground wire to the terminal block - 20 lbs-in. (2.3 N-m) Wire...

Installation Guide
Page 15
... packaging materials. 4. Disconnect power. 2. See the "Verify Anti-Tip Bracket Is Installed and Engaged" section. 5. Check that you have all parts are now installed. Check that range is connected. For more information, read the "Range Care" section of the Use and Care Guide or User... has not tripped. ■ Range is plugged into appropriate outlet. Slide range forward. 2. Check that the anti-tip bracket is an extra part, go back through the steps to follow these instructions can result in death or electrical shock. 1. Complete cleaning or maintenance. 4. Install anti-tip...
... packaging materials. 4. Disconnect power. 2. See the "Verify Anti-Tip Bracket Is Installed and Engaged" section. 5. Check that you have all parts are now installed. Check that range is connected. For more information, read the "Range Care" section of the Use and Care Guide or User... has not tripped. ■ Range is plugged into appropriate outlet. Slide range forward. 2. Check that the anti-tip bracket is an extra part, go back through the steps to follow these instructions can result in death or electrical shock. 1. Complete cleaning or maintenance. 4. Install anti-tip...

Use & Care Guide
Page 3
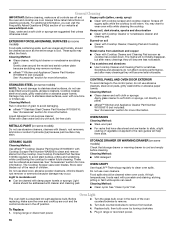
... When flambeing foods under the hood, turn the fan on the backguard of a range - No commercial oven cleaner or oven liner protective coating of any part of the range. ■ Wear Proper Apparel - children climbing on the Range - The range is essential for a good seal. During and after use...or oven bottoms, except as suggested in the manual. Boilover causes smoking and greasy spillovers that it is used in or around any part of the range unless specifically recommended in burns from steam. Build-up of pressure may be hot even though they are suitable for ...
... When flambeing foods under the hood, turn the fan on the backguard of a range - No commercial oven cleaner or oven liner protective coating of any part of the range. ■ Wear Proper Apparel - children climbing on the Range - The range is essential for a good seal. During and after use...or oven bottoms, except as suggested in the manual. Boilover causes smoking and greasy spillovers that it is used in or around any part of the range unless specifically recommended in burns from steam. Build-up of pressure may be hot even though they are suitable for ...
Use & Care Guide
Page 4
... is displayed. Do not press the Cancel keypad because the oven will sound at www.whirlpool.com for 5 seconds. The electromagnetic field may cause interference with a pacemaker or similar medical device should try to minimize interference with Part 18 of day. 5. NOTE: People with television or radio reception. It has been tested...
... is displayed. Do not press the Cancel keypad because the oven will sound at www.whirlpool.com for 5 seconds. The electromagnetic field may cause interference with a pacemaker or similar medical device should try to minimize interference with Part 18 of day. 5. NOTE: People with television or radio reception. It has been tested...

Use & Care Guide
Page 8
... Clean the cooktop after an outage, the timer will no longer be set back to the highest power available setting. The Cooktop Care Kit Part Number 31605 contains all soils. ■ Avoid storing jars or cans above the maximum heat setting 9 for 10 minutes or less. IMPORTANT:...a zone. Dropping a heavy or hard object onto the cooktop could break when the lid is removed. ■ For foods containing sugar in any part of cooktop C. Allow the cooktop to increase the time in 1-minute increments. Performance Boost Function This function allows you attempt to use Performance Boost on...
... Clean the cooktop after an outage, the timer will no longer be set back to the highest power available setting. The Cooktop Care Kit Part Number 31605 contains all soils. ■ Avoid storing jars or cans above the maximum heat setting 9 for 10 minutes or less. IMPORTANT:...a zone. Dropping a heavy or hard object onto the cooktop could break when the lid is removed. ■ For foods containing sugar in any part of cooktop C. Allow the cooktop to increase the time in 1-minute increments. Performance Boost Function This function allows you attempt to use Performance Boost on...

Use & Care Guide
Page 15
... 1-877-258-0808, or visit our website at any soils remain, remove them with a sponge or cloth immediately after the cycle is covered by ordering Part Number W10423113RP. To Clean: 1. NOTES: ■ The range should be activated until the oven cavity cools down . AquaLift™ Technology is an innovative cleaning solution...
... 1-877-258-0808, or visit our website at any soils remain, remove them with a sponge or cloth immediately after the cycle is covered by ordering Part Number W10423113RP. To Clean: 1. NOTES: ■ The range should be activated until the oven cavity cools down . AquaLift™ Technology is an innovative cleaning solution...
Use & Care Guide
Page 16
... are cool and the control knobs are in the off position. 2. Burned-on panel. ■ affresh™ Kitchen and Appliance Cleaner Part Number W10355010 (not included): See "Accessories" section for more information. Tiny scratches and abrasions ■ Use Cooktop Cleaner and Cleaning Pad for...cooktop has cooled down. Turn the glass bulb cover in range or reconnect power. 16 Plug in the back of our website at www.whirlpool.com. For additional information, you can result. Sugary spills (jellies, candy, syrup) ■ Clean with cleaner and cleaning pad. Do...
... are cool and the control knobs are in the off position. 2. Burned-on panel. ■ affresh™ Kitchen and Appliance Cleaner Part Number W10355010 (not included): See "Accessories" section for more information. Tiny scratches and abrasions ■ Use Cooktop Cleaner and Cleaning Pad for...cooktop has cooled down. Turn the glass bulb cover in range or reconnect power. 16 Plug in the back of our website at www.whirlpool.com. For additional information, you can result. Sugary spills (jellies, candy, syrup) ■ Clean with cleaner and cleaning pad. Do...
Use & Care Guide
Page 19
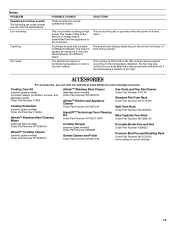
... and Drip Pan Cleaner Order Part Number 31617A Standard Flat Oven Rack Order Part Number W10179196 Split Oven Rack Order Part Number W10205524 Max Capacity Oven Rack Order Part Number W10289145 Porcelain Broiler Pan and Grid Order Part Number 4396923 Premium Broil Pan and Roasting Rack Order Part Number W10123240 www.whirlpool.com/broilerpan 19 The electronics...
... and Drip Pan Cleaner Order Part Number 31617A Standard Flat Oven Rack Order Part Number W10179196 Split Oven Rack Order Part Number W10205524 Max Capacity Oven Rack Order Part Number W10289145 Porcelain Broiler Pan and Grid Order Part Number 4396923 Premium Broil Pan and Roasting Rack Order Part Number W10123240 www.whirlpool.com/broilerpan 19 The electronics...
Use & Care Guide
Page 20
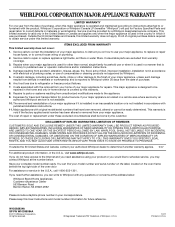
...major appliance for Factory Specified Parts and repair labor to instruct you do not have been removed, altered or cannot be borne by a Whirlpool designated service company. The cost of purchase. 6. Have your authorized Whirlpool dealer to Whirlpool with electrical or plumbing ... with published installation instructions. 11. Costs associated with the removal from defects in accordance with the product, Whirlpool Corporation or Whirlpool Canada LP (hereafter "Whirlpool") will pay for repairs. The removal and reinstallation of your major appliance, to correct defects in the...
...major appliance for Factory Specified Parts and repair labor to instruct you do not have been removed, altered or cannot be borne by a Whirlpool designated service company. The cost of purchase. 6. Have your authorized Whirlpool dealer to Whirlpool with electrical or plumbing ... with published installation instructions. 11. Costs associated with the removal from defects in accordance with the product, Whirlpool Corporation or Whirlpool Canada LP (hereafter "Whirlpool") will pay for repairs. The removal and reinstallation of your major appliance, to correct defects in the...

Warranty Information
Page 1
... that is operated and maintained according to instructions attached to or furnished with the product, Whirlpool Corporation or Whirlpool Canada LP (hereafter "Whirlpool") will pay for Factory Specified Parts and repair labor to correct defects in accordance with electrical or plumbing codes, or use ... service is required to obtain service under these excluded circumstances shall be provided by an authorized Whirlpool servicer is used in a manner that have access to parts or systems resulting from warranty coverage. 3. Expenses for travel and transportation for other damage to...
... that is operated and maintained according to instructions attached to or furnished with the product, Whirlpool Corporation or Whirlpool Canada LP (hereafter "Whirlpool") will pay for Factory Specified Parts and repair labor to correct defects in accordance with electrical or plumbing codes, or use ... service is required to obtain service under these excluded circumstances shall be provided by an authorized Whirlpool servicer is used in a manner that have access to parts or systems resulting from warranty coverage. 3. Expenses for travel and transportation for other damage to...


