
Dimension Guide
Page 1
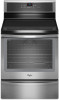
....0 cm) countertop depth, 24" (61.0 cm) base cabinet depth and 36" (91.4 cm) countertop height. E F Because Whirlpool Corporation policy includes a continuous commitment to improve our products, we reserve the right to front of cooktop** F. Ref. opening width C....cm) min. 30" (76.2 cm) Freestanding Electric Range PRODUCT MODEL NUMBERS WFC110M0A WFE330W0A WFE540H0A WFC120M0A WFE510S0A WFE710H0A WFC130M0A WFE520C0A WFE714HLA WFC310S0A WFE524CLA WFE720H0A WFC340S0A WFE524WLA WFI910H0A WFE320M0A WFE530C0A Electrical: To properly install your range, you must determine...
....0 cm) countertop depth, 24" (61.0 cm) base cabinet depth and 36" (91.4 cm) countertop height. E F Because Whirlpool Corporation policy includes a continuous commitment to improve our products, we reserve the right to front of cooktop** F. Ref. opening width C....cm) min. 30" (76.2 cm) Freestanding Electric Range PRODUCT MODEL NUMBERS WFC110M0A WFE330W0A WFE540H0A WFC120M0A WFE510S0A WFE710H0A WFC130M0A WFE520C0A WFE714HLA WFC310S0A WFE524CLA WFE720H0A WFC340S0A WFE524WLA WFI910H0A WFE320M0A WFE530C0A Electrical: To properly install your range, you must determine...

Installation Guide
Page 3
... is required. Terminal lugs A B A. See the appropriate "Electrical Requirements" section. Only" section. 3 Check existing electrical supply. See the appropriate "Electrical Requirements" section. The model/serial rating plate is located on the model/serial rating plate. INSTALLATION REQUIREMENTS Tools and Parts Gather the required tools and parts before starting installation. See "Electrical Connection -
... is required. Terminal lugs A B A. See the appropriate "Electrical Requirements" section. Only" section. 3 Check existing electrical supply. See the appropriate "Electrical Requirements" section. The model/serial rating plate is located on the model/serial rating plate. INSTALLATION REQUIREMENTS Tools and Parts Gather the required tools and parts before starting installation. See "Electrical Connection -

Installation Guide
Page 4
... front of cooktop, see NOTE* D. 30¹⁄₈" (76.5 cm) min. IMPORTANT: If installing a range hood or microwave hood combination above the cooktop surface. Model/serial rating plate (located on styling. Outlet - 8" (20.3 cm) to combustible walls with zero clearance. A C B D E D A. 27³⁄₄" (70.5 cm) max. Follow the instructions...
... front of cooktop, see NOTE* D. 30¹⁄₈" (76.5 cm) min. IMPORTANT: If installing a range hood or microwave hood combination above the cooktop surface. Model/serial rating plate (located on styling. Outlet - 8" (20.3 cm) to combustible walls with zero clearance. A C B D E D A. 27³⁄₄" (70.5 cm) max. Follow the instructions...

Installation Guide
Page 5
...the range can result in the "Location Requirements" section. 4-wire receptacle (14-50R) ■ This range is properly grounded. See "Electrical Connection - The model/serial rating plate is located on the back of the range. ■ The wiring diagram is located on the supply end. Use a 3-wire, UL listed... 250 volts, 40 or 50 amps and investigated for the copper 4-wire power cord are adequate and in a NEMA Type 14-50P plug on the model/serial rating plate. A copy of the above code standards can be provided at least 4 ft (1.22 m) long. ■ Range must determine the...
...the range can result in the "Location Requirements" section. 4-wire receptacle (14-50R) ■ This range is properly grounded. See "Electrical Connection - The model/serial rating plate is located on the back of the range. ■ The wiring diagram is located on the supply end. Use a 3-wire, UL listed... 250 volts, 40 or 50 amps and investigated for the copper 4-wire power cord are adequate and in a NEMA Type 14-50P plug on the model/serial rating plate. A copy of the above code standards can be provided at least 4 ft (1.22 m) long. ■ Range must determine the...

Installation Guide
Page 13
... into position. The range foot is securely attached to the drawer glides. NOTE: Range must be fully engaged in Style 1 or Style 2, depending on some models) Remove all items from the anti-tip bracket. 3. Slide the range forward and determine if there is no longer attached to the floor or wall...
... into position. The range foot is securely attached to the drawer glides. NOTE: Range must be fully engaged in Style 1 or Style 2, depending on some models) Remove all items from the anti-tip bracket. 3. Slide the range forward and determine if there is no longer attached to the floor or wall...

Installation Guide
Page 14
... (on the bottom of the drawer will engage the base rails and the drawer will shut. 4. A. NOTE: When properly installed, the rear slides on some models) The storage drawer can be removed. Hinge latch 3. Lift the oven door while holding both sides. 3. Lift up the front of oven door. Check that...
... (on the bottom of the drawer will engage the base rails and the drawer will shut. 4. A. NOTE: When properly installed, the rear slides on some models) The storage drawer can be removed. Hinge latch 3. Lift the oven door while holding both sides. 3. Lift up the front of oven door. Check that...
Use & Care Guide
Page 1
...Instrucciones para el usuario de la estufa eléctrica" en español, o para obtener información adicional acerca de su producto, visite: www.whirlpool.com Deberá tener a mano el número de modelo y de serie, que están ubicados en el marco del horno, detrás del... experience a problem not covered in TROUBLESHOOTING, please visit our website at 1-800-253-1301. If you still need your model and serial number, located on some models 12 Oven Vent 13 Baking and Roasting 13 Broiling 13 Convection Cooking 13 Cook Time 14 Warming Drawer 14 RANGE CARE 15...
...Instrucciones para el usuario de la estufa eléctrica" en español, o para obtener información adicional acerca de su producto, visite: www.whirlpool.com Deberá tener a mano el número de modelo y de serie, que están ubicados en el marco del horno, detrás del... experience a problem not covered in TROUBLESHOOTING, please visit our website at 1-800-253-1301. If you still need your model and serial number, located on some models 12 Oven Vent 13 Baking and Roasting 13 Broiling 13 Convection Cooking 13 Cook Time 14 Warming Drawer 14 RANGE CARE 15...
Use & Care Guide
Page 4
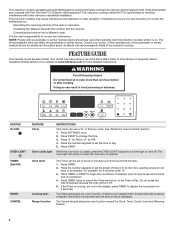
...minimize interference with television or radio reception. Increasing the distance between the cooktop and the receiver. Connecting the receiver into a different outlet. Your model may have to turn off . Press START. While the oven door is closed, press the OVEN LIGHT keypad to be set in the ... occurs, the user should use a 12- Refer to correct the interference by using an electromagnetic field. The oven light will sound at www.whirlpool.com for ISM equipment. If enabled, end-of day is opened. Press TIMER twice to cancel the Timer and return to 9 hours and ...
...minimize interference with television or radio reception. Increasing the distance between the cooktop and the receiver. Connecting the receiver into a different outlet. Your model may have to turn off . Press START. While the oven door is closed, press the OVEN LIGHT keypad to be set in the ... occurs, the user should use a 12- Refer to correct the interference by using an electromagnetic field. The oven light will sound at www.whirlpool.com for ISM equipment. If enabled, end-of day is opened. Press TIMER twice to cancel the Timer and return to 9 hours and ...

Use & Care Guide
Page 5
... racks should not be used for Rapid Preheat. Oven use functions Enables you to personalize the audible tones and oven operation to turn on some models) 1. Any key press will scroll "ENERGY SAVE ON" or "ENERGY SAVE OFF." To change the temperature, repeat steps 1 and 2. Press CANCEL when finished. Press START...
... racks should not be used for Rapid Preheat. Oven use functions Enables you to personalize the audible tones and oven operation to turn on some models) 1. Any key press will scroll "ENERGY SAVE ON" or "ENERGY SAVE OFF." To change the temperature, repeat steps 1 and 2. Press CANCEL when finished. Press START...

Use & Care Guide
Page 9
... across the bottom of medium-to cool. ■ Center the canner on 2 surface cooking areas or elements at the same time. ■ On ceramic glass models, use of the pan. When canning for induction cooking. The diameter of the pan's base should be used areas to -heavy thickness. Cookware with rounded...
... across the bottom of medium-to cool. ■ Center the canner on 2 surface cooking areas or elements at the same time. ■ On ceramic glass models, use of the pan. When canning for induction cooking. The diameter of the pan's base should be used areas to -heavy thickness. Cookware with rounded...

Use & Care Guide
Page 10
... cycle tones. 1. Oven Temperature Offset Control IMPORTANT: Do not use a thermometer to change : 1. Press the "3" keypad to adjust the setting. 4. IMPORTANT: The health of some models), repeating each minute after the end of cycle Use the SETTINGS key to measure oven temperature because opening the oven door may result in use...
... cycle tones. 1. Oven Temperature Offset Control IMPORTANT: Do not use a thermometer to change : 1. Press the "3" keypad to adjust the setting. 4. IMPORTANT: The health of some models), repeating each minute after the end of cycle Use the SETTINGS key to measure oven temperature because opening the oven door may result in use...
Use & Care Guide
Page 12
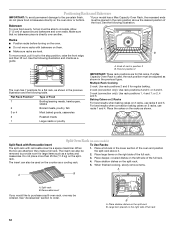
...side of the full rack. 3. Place large items on the racks as a turkey and casseroles. Split-rack B. Split Oven Rack (on some models) Split-Rack with Removable Insert To Use Racks: The split-rack with bakeware on them. Place a full rack in position 2 IMPORTANT: These rack... positions are attached, they make a full rack. Place shallow dishes on the splitrack. Bakeware *If your model has a Max Capacity Oven Rack, the recessed ends must be used , the rack position must be ordered. A ■ Make sure racks are level. ...
...side of the full rack. 3. Place large items on the racks as a turkey and casseroles. Split-rack B. Split Oven Rack (on some models) Split-Rack with Removable Insert To Use Racks: The split-rack with bakeware on them. Place a full rack in position 2 IMPORTANT: These rack... positions are attached, they make a full rack. Place shallow dishes on the splitrack. Bakeware *If your model has a Max Capacity Oven Rack, the recessed ends must be used , the rack position must be ordered. A ■ Make sure racks are level. ...

Use & Care Guide
Page 13
Do not set plastics, paper or other items that have an impact on the model. A. The bake and broil elements or burners cycle on and off immediately. This feature is automatically activated when the oven is reached, the display temperature ... ACCUBAKE® system electronically regulates the oven heat levels during Bake to starting oven temperature, and the number of the oven rack. On convection range models, the fan will automatically reduce the set oven temperature by 25°F (15°C). Before baking and roasting, position racks according to ensure proper broiling...
Do not set plastics, paper or other items that have an impact on the model. A. The bake and broil elements or burners cycle on and off immediately. This feature is automatically activated when the oven is reached, the display temperature ... ACCUBAKE® system electronically regulates the oven heat levels during Bake to starting oven temperature, and the number of the oven rack. On convection range models, the fan will automatically reduce the set oven temperature by 25°F (15°C). Before baking and roasting, position racks according to ensure proper broiling...
Use & Care Guide
Page 16
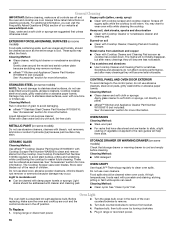
... Scraper uses razor blades. Plug in the back of our website at www.whirlpool.com. Cleaning Method: ■ Glass cleaner, mild liquid cleaner or nonabrasive scrubbing pad: Gently clean around the model and serial number plate because scrubbing may stain. See "Accessories" section for .... The marks will not totally disappear, but after many cleanings they will become less noticeable. Always follow label instructions on some models) NOTE: To avoid damage to avoid stain buildup, pitting and scratching, while conditioning the cooktop for more information. These can ...
... Scraper uses razor blades. Plug in the back of our website at www.whirlpool.com. Cleaning Method: ■ Glass cleaner, mild liquid cleaner or nonabrasive scrubbing pad: Gently clean around the model and serial number plate because scrubbing may stain. See "Accessories" section for .... The marks will not totally disappear, but after many cleanings they will become less noticeable. Always follow label instructions on some models) NOTE: To avoid damage to avoid stain buildup, pitting and scratching, while conditioning the cooktop for more information. These can ...

Use & Care Guide
Page 17
www.whirlpool.com Operation PROBLEM Nothing will operate Cooktop will not operate Cooktop cooking results not what expected Oven will not operate Oven temperature too high or ... control lockout is not flashing. Level the range. See the Installation Instructions. See "Control Display" in the display when you place a saucepan on . On some models, reset the clock, if needed. Check that the function will deactivate all heating elements. Switch the surface cooking area off . You can continue to use...
www.whirlpool.com Operation PROBLEM Nothing will operate Cooktop will not operate Cooktop cooking results not what expected Oven will not operate Oven temperature too high or ... control lockout is not flashing. Level the range. See the Installation Instructions. See "Control Display" in the display when you place a saucepan on . On some models, reset the clock, if needed. Check that the function will deactivate all heating elements. Switch the surface cooking area off . You can continue to use...
Use & Care Guide
Page 19
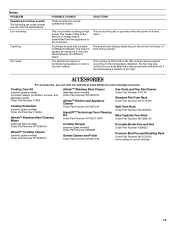
... type of different materials. The cooktop is turned down. ACCESSORIES For accessories, you can visit our website at www.whirlpool.com/cookingaccessories. Cooktop Care Kit (ceramic glass models) (includes cleaner, protectant, scraper, and applicator pads) Order Part Number 31605 Cooktop Protectant (ceramic glass... Number W10289145 Porcelain Broiler Pan and Grid Order Part Number 4396923 Premium Broil Pan and Roasting Rack Order Part Number W10123240 www.whirlpool.com/broilerpan 19 The sound may also continue to function reliably. This sound will quiet or go away when the power is...
... type of different materials. The cooktop is turned down. ACCESSORIES For accessories, you can visit our website at www.whirlpool.com/cookingaccessories. Cooktop Care Kit (ceramic glass models) (includes cleaner, protectant, scraper, and applicator pads) Order Part Number 31605 Cooktop Protectant (ceramic glass... Number W10289145 Porcelain Broiler Pan and Grid Order Part Number 4396923 Premium Broil Pan and Roasting Rack Order Part Number W10123240 www.whirlpool.com/broilerpan 19 The sound may also continue to function reliably. This sound will quiet or go away when the power is...
Use & Care Guide
Page 20
...applies. 9/07 For additional product information, in materials or workmanship and is reported to Whirlpool within 30 days from the date of purchase. 6. Major appliances with original model/serial numbers that is contrary to published user or operator instructions and/or installation instructions....electrical or plumbing codes, or use of consumables or cleaning products not approved by Whirlpool. 5. Damage resulting from accident, alteration, misuse, abuse, fire, flood, acts of your complete model number ready. Service calls to correct the installation of God, improper installation, ...
...applies. 9/07 For additional product information, in materials or workmanship and is reported to Whirlpool within 30 days from the date of purchase. 6. Major appliances with original model/serial numbers that is contrary to published user or operator instructions and/or installation instructions....electrical or plumbing codes, or use of consumables or cleaning products not approved by Whirlpool. 5. Damage resulting from accident, alteration, misuse, abuse, fire, flood, acts of your complete model number ready. Service calls to correct the installation of God, improper installation, ...

Warranty Information
Page 1
... you can find your model number and serial number on the label, located on how to obtain service under this User Instructions and model number information for repairs. If outside the 50 United States and Canada, contact your authorized Whirlpool dealer to correct the ...installation of the oven door. WHIRLPOOL SHALL NOT BE LIABLE FOR INCIDENTAL OR CONSEQUENTIAL DAMAGES....
... you can find your model number and serial number on the label, located on how to obtain service under this User Instructions and model number information for repairs. If outside the 50 United States and Canada, contact your authorized Whirlpool dealer to correct the ...installation of the oven door. WHIRLPOOL SHALL NOT BE LIABLE FOR INCIDENTAL OR CONSEQUENTIAL DAMAGES....


