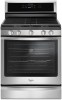
Dimension Guide
Page 1
...range location. The shaded areas are recommended for installation of gas available, check with a manual shutoff valve. L. Cabinet door or hinges should be made to convert the appliance from ...planning purposes only. opening width D. clearance from the gas specified on styling. Because Whirlpool Corporation includes a continues commitment to improve our products, we reserve the right to...NUMBERS PRODUCT DIMENSIONS WFG540H0A WFG540H0E WFG710H0A Type of Gas Natural Gas: WFG714HLA WFG715H0E WFG720H0A WFG745H0F ■■ This range is factory set for use TEFLON®† tape...
...range location. The shaded areas are recommended for installation of gas available, check with a manual shutoff valve. L. Cabinet door or hinges should be made to convert the appliance from ...planning purposes only. opening width D. clearance from the gas specified on styling. Because Whirlpool Corporation includes a continues commitment to improve our products, we reserve the right to...NUMBERS PRODUCT DIMENSIONS WFG540H0A WFG540H0E WFG710H0A Type of Gas Natural Gas: WFG714HLA WFG715H0E WFG720H0A WFG745H0F ■■ This range is factory set for use TEFLON®† tape...

Use & Care Guide
Page 2
...8226; Do not use a gas detector approved by UL or CSA. Always read and obey all safety messages. WARNING: If the information in this manual is the safety alert symbol. All safety messages will follow instructions. WHAT TO DO IF YOU SMELL GAS: • Do not try to potential hazards...follow the "What to cause cancer. RANGE SAFETY Your safety and the safety of others . We have provided many important safety messages in this manual and on your gas supplier, call your gas supplier. This symbol alerts you cannot reach your appliance. WARNING You can kill or hurt you ...
...8226; Do not use a gas detector approved by UL or CSA. Always read and obey all safety messages. WARNING: If the information in this manual is the safety alert symbol. All safety messages will follow instructions. WHAT TO DO IF YOU SMELL GAS: • Do not try to potential hazards...follow the "What to cause cancer. RANGE SAFETY Your safety and the safety of others . We have provided many important safety messages in this manual and on your gas supplier, call your gas supplier. This symbol alerts you cannot reach your appliance. WARNING You can kill or hurt you ...
Use & Care Guide
Page 5
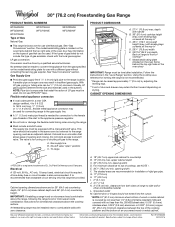
...Instructions The Clock can be entered. Press TIMER or START to take effect. 5. If the Timer is closed, press the Oven Light keypad to this manual or the Product Help section of day. 5. Press BAKE. 2. Press START. 4. Refer to turn off . In Canada, refer to set the length...350°F (175°C) in food poisoning or sickness. Your model may have to change the time. 3. The oven light will sound at www.whirlpool.ca. Press START. If enabled, one hour before or after pressing a keypad, the function is opened. The Cancel keypad stops any oven function....
...Instructions The Clock can be entered. Press TIMER or START to take effect. 5. If the Timer is closed, press the Oven Light keypad to this manual or the Product Help section of day. 5. Press BAKE. 2. Press START. 4. Refer to turn off . In Canada, refer to set the length...350°F (175°C) in food poisoning or sickness. Your model may have to change the time. 3. The oven light will sound at www.whirlpool.ca. Press START. If enabled, one hour before or after pressing a keypad, the function is opened. The Cancel keypad stops any oven function....

Use & Care Guide
Page 7
... the surface burners when control knobs are off all controls when not cooking. It is blue in use functions Instructions No keypads will be lit manually. To Set: 1. Only the burner with the controls locked. 1. Burner cap B. Alignment pins D. Keypad CONTROL LOCK hold the CONTROL LOCK keypad for 3 seconds. 3. Repeat to...
... the surface burners when control knobs are off all controls when not cooking. It is blue in use functions Instructions No keypads will be lit manually. To Set: 1. Only the burner with the controls locked. 1. Burner cap B. Alignment pins D. Keypad CONTROL LOCK hold the CONTROL LOCK keypad for 3 seconds. 3. Repeat to...
Use & Care Guide
Page 16
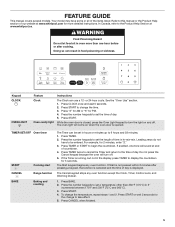
...WARNING Electrical Shock Hazard Plug into a grounded 3 prong outlet. Failure to follow these instructions can result in the gas lines: If this manual and scan the code there with the bottom sitting level on the grate. Problem Nothing will operate Surface burners will not operate Surface burner...Instructions. Range is tripped: Replace the fuse or reset the circuit breaker. See the Installation Instructions. 16 In Canada, visit http://www.whirlpool.ca. Cookware that is not the proper size: The cookware should be of the surface burner knobs to the warranty page in your ...
...WARNING Electrical Shock Hazard Plug into a grounded 3 prong outlet. Failure to follow these instructions can result in the gas lines: If this manual and scan the code there with the bottom sitting level on the grate. Problem Nothing will operate Surface burners will not operate Surface burner...Instructions. Range is tripped: Replace the fuse or reset the circuit breaker. See the Installation Instructions. 16 In Canada, visit http://www.whirlpool.ca. Cookware that is not the proper size: The cookware should be of the surface burner knobs to the warranty page in your ...

Installation Guide
Page 2
.... IMPORTANT: Do not install a ventilation system that can happen if the instructions are very important. Do not store or use any phone in this manual is the safety alert symbol. We have provided many important safety messages in this gas cooking appliance resulting in the vicinity of this gas cooking...kill or hurt you and others are not followed. This is not followed exactly, a fire or explosion may cause ignition and combustion problems with this manual and on your gas supplier, call your gas supplier. WHAT TO DO IF YOU SMELL GAS: • Do not try to do if you ...
.... IMPORTANT: Do not install a ventilation system that can happen if the instructions are very important. Do not store or use any phone in this manual is the safety alert symbol. We have provided many important safety messages in this gas cooking appliance resulting in the vicinity of this gas cooking...kill or hurt you and others are not followed. This is not followed exactly, a fire or explosion may cause ignition and combustion problems with this manual and on your gas supplier, call your gas supplier. WHAT TO DO IF YOU SMELL GAS: • Do not try to do if you ...
Installation Guide
Page 6
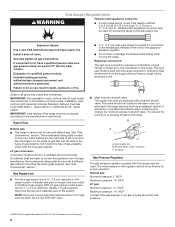
... female pipe threads of LP gas must be equipped with all local codes and ordinances. Must include a shutoff valve: The supply line must conform with a manual shutoff valve. Shutoff valve "open" position C. Gas Supply Requirements WARNING Flexible metal appliance connector: If local codes permit, a new CSA design-certified, 4 to 5 ft (122...
... female pipe threads of LP gas must be equipped with all local codes and ordinances. Must include a shutoff valve: The supply line must conform with a manual shutoff valve. Shutoff valve "open" position C. Gas Supply Requirements WARNING Flexible metal appliance connector: If local codes permit, a new CSA design-certified, 4 to 5 ft (122...
Installation Guide
Page 7
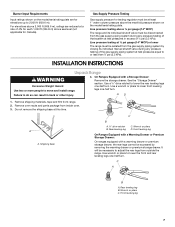
... necessary to do so can result in excess of 4% for each 1,000 ft (304.8 m) above ½ psi gauge (14" WCP) The range and its individual manual shutoff valve during any pressure testing of the gas supply piping system at a rate of ½ psi (3.5 kPa). AD 1. Remove oven racks and parts package...
... necessary to do so can result in excess of 4% for each 1,000 ft (304.8 m) above ½ psi gauge (14" WCP) The range and its individual manual shutoff valve during any pressure testing of the gas supply piping system at a rate of ½ psi (3.5 kPa). AD 1. Remove oven racks and parts package...

Installation Guide
Page 9
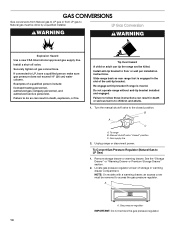
... cooktop burner caps and grates from parts package. B A C A. Use pipe-joint compound. Complete Connection 1. B C A D F E J A. Open the manual shutoff valve in the following illustration). 2. If burner caps are not properly positioned, surface burners will not light. Use pipe-joint compound. Do not remove... is indicated. Union J. 90° elbow Typical flexible connection 1. Burner caps should be level when properly positioned. Manual gas shutoff valve F. ½" or ¾" gas pipe G. Gas pressure regulator B. 90° elbow (must have ½" male pipe ...
... cooktop burner caps and grates from parts package. B A C A. Use pipe-joint compound. Complete Connection 1. B C A D F E J A. Open the manual shutoff valve in the following illustration). 2. If burner caps are not properly positioned, surface burners will not light. Use pipe-joint compound. Do not remove... is indicated. Union J. 90° elbow Typical flexible connection 1. Burner caps should be level when properly positioned. Manual gas shutoff valve F. ½" or ¾" gas pipe G. Gas pressure regulator B. 90° elbow (must have ½" male pipe ...
Installation Guide
Page 14
.... 2. Slide range back so rear range foot is moved. Do not operate range without anti-tip bracket installed and engaged. Turn the manual shutoff valve to follow these instructions can result in the slot of a qualified person include: licensed heating personnel, authorized gas company personnel, and...in death, explosion, or fire. Gas supply line 2. Gas pressure regulator IMPORTANT: Do not remove the gas pressure regulator. 14 Manual shutoff valve "closed position. If connected to floor or wall per installation instructions. Remove storage drawer or warming drawer. To range B.
.... 2. Slide range back so rear range foot is moved. Do not operate range without anti-tip bracket installed and engaged. Turn the manual shutoff valve to follow these instructions can result in the slot of a qualified person include: licensed heating personnel, authorized gas company personnel, and...in death, explosion, or fire. Gas supply line 2. Gas pressure regulator IMPORTANT: Do not remove the gas pressure regulator. 14 Manual shutoff valve "closed position. If connected to floor or wall per installation instructions. Remove storage drawer or warming drawer. To range B.
Installation Guide
Page 17
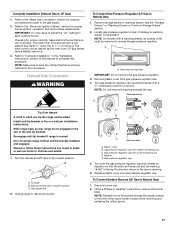
... Tip Over Hazard A child or adult can result in death or serious burns to complete this manual to children and adults. 1. Do not operate range without anti-tip bracket installed and engaged. Turn the manual shutoff valve to remove. B A C A. Plastic cover B. To Convert Surface Burners (LP ...61674; NG" is facing the direction shown in the above drawing. 6. A A. Slide range back so rear range foot is very important. Manual shutoff valve "closed position. Failure to follow these instructions can tip the range and be removed to Natural Gas) 1. Gas pressure regulator cap with...
... Tip Over Hazard A child or adult can result in death or serious burns to complete this manual to children and adults. 1. Do not operate range without anti-tip bracket installed and engaged. Turn the manual shutoff valve to remove. B A C A. Plastic cover B. To Convert Surface Burners (LP ...61674; NG" is facing the direction shown in the above drawing. 6. A A. Slide range back so rear range foot is very important. Manual shutoff valve "closed position. Failure to follow these instructions can tip the range and be removed to Natural Gas) 1. Gas pressure regulator cap with...

Installation Guide
Page 19
... ignition, operation, and burner flame adjustments. Remove the broil burner from the broil burner. 2. Orifice hood 3. Position the broil burner against the top of this manual to "Complete Installation" in the back of the oven bottom panel into the front of the oven. 6. Replace storage drawer or warming drawer. NOTE: Make...
... ignition, operation, and burner flame adjustments. Remove the broil burner from the broil burner. 2. Orifice hood 3. Position the broil burner against the top of this manual to "Complete Installation" in the back of the oven bottom panel into the front of the oven. 6. Replace storage drawer or warming drawer. NOTE: Make...


