Dimension Guide
Page 1
...or circuit breaker is located on the oven frame behind the top right side of the oven door has information on the oven frame D behind the top right side of the oven door) IMPORTANT: Range must be level ... MODEL NUMBERS PRODUCT DIMENSIONS WFG540H0A WFG540H0E WFG710H0A Type of Gas Natural Gas: WFG714HLA WFG715H0E WFG720H0A WFG745H0F ■■ This range is factory set for use with not less than 1/4" (0.64... on or shutting off gas to front of rigid gas pipe. L. Because Whirlpool Corporation includes a continues commitment to improve our products, we reserve the right to...
...or circuit breaker is located on the oven frame behind the top right side of the oven door has information on the oven frame D behind the top right side of the oven door) IMPORTANT: Range must be level ... MODEL NUMBERS PRODUCT DIMENSIONS WFG540H0A WFG540H0E WFG710H0A Type of Gas Natural Gas: WFG714HLA WFG715H0E WFG720H0A WFG745H0F ■■ This range is factory set for use with not less than 1/4" (0.64... on or shutting off gas to front of rigid gas pipe. L. Because Whirlpool Corporation includes a continues commitment to improve our products, we reserve the right to...
Use & Care Guide
Page 1
In Canada, register your range at www.whirlpool.com. These can be found on the label located on the oven frame behind the top right side of Contents RANGE SAFETY 2 The Anti-Tip Bracket 3 KEY USAGE TIPS 4 AquaLift® Self-Cleaning Technology 4 Surface ... Sealed Surface Burners 7 EZ-2-Lift™ Hinged Cast Iron Grates 8 Burner Size 8 Cookware 9 Home Canning 9 OVEN USE 10 Electronic Oven Controls 10 Sabbath Mode 11 Aluminum Foil 11 Positioning Racks and Bakeware 11 Oven Vent 12 Baking and Roasting 12 Broiling 13 Convection Cooking 13 Cook Time 13 RANGE CARE 14...
In Canada, register your range at www.whirlpool.com. These can be found on the label located on the oven frame behind the top right side of Contents RANGE SAFETY 2 The Anti-Tip Bracket 3 KEY USAGE TIPS 4 AquaLift® Self-Cleaning Technology 4 Surface ... Sealed Surface Burners 7 EZ-2-Lift™ Hinged Cast Iron Grates 8 Burner Size 8 Cookware 9 Home Canning 9 OVEN USE 10 Electronic Oven Controls 10 Sabbath Mode 11 Aluminum Foil 11 Positioning Racks and Bakeware 11 Oven Vent 12 Baking and Roasting 12 Broiling 13 Convection Cooking 13 Cook Time 13 RANGE CARE 14...
Use & Care Guide
Page 3
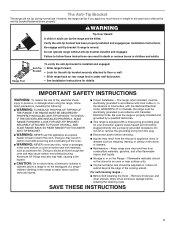
... INSTRUCTIONS 3 Do not operate range without the anti-tip bracket fastened down properly. I WARNING: NEVER use . I Before Self-Cleaning the Oven - Failure to children and adults. Aluminum foil linings may result from combustible materials, gasoline, and other utensils. I Maintenance - The Anti-Tip...appliance doors or drawers such as stepping, leaning, or sitting on the backguard of fire, electrical shock, injury to children in an oven or near surface units. I CAUTION: Do not store items of local codes, with a three-prong grounding plug for details. I...
... INSTRUCTIONS 3 Do not operate range without the anti-tip bracket fastened down properly. I WARNING: NEVER use . I Before Self-Cleaning the Oven - Failure to children and adults. Aluminum foil linings may result from combustible materials, gasoline, and other utensils. I Maintenance - The Anti-Tip...appliance doors or drawers such as stepping, leaning, or sitting on the backguard of fire, electrical shock, injury to children in an oven or near surface units. I CAUTION: Do not store items of local codes, with a three-prong grounding plug for details. I...

Use & Care Guide
Page 4
... run the AquaLift® Self-Cleaning cycle. Warming or Storage Drawer When the oven is in the oven, the oven will go above your oven inside the oven cavity. The Preheat cycle rapidly increases the oven temperature. Surface Temperatures When the range is in traditional self-cleaning methods, just wipe... TIPS AquaLift® Self-Cleaning Technology AquaLift® Self-Cleaning Technology is opened to insert food. To use , all of the oven is pressed. This ensures that ordinarily come with heat and water to release baked-on using AquaLift® Self-Cleaning Technology, visit our...
... run the AquaLift® Self-Cleaning cycle. Warming or Storage Drawer When the oven is in the oven, the oven will go above your oven inside the oven cavity. The Preheat cycle rapidly increases the oven temperature. Surface Temperatures When the range is in traditional self-cleaning methods, just wipe... TIPS AquaLift® Self-Cleaning Technology AquaLift® Self-Cleaning Technology is opened to insert food. To use , all of the oven is pressed. This ensures that ordinarily come with heat and water to release baked-on using AquaLift® Self-Cleaning Technology, visit our...
Use & Care Guide
Page 5
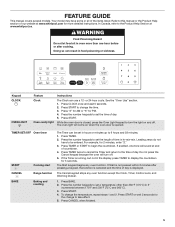
...Start is not pressed within 2 minutes after cooking. The Cancel keypad stops any oven function. Press START or wait 5 seconds for the change the time. 3. In Canada, refer to the Product Help Section at www.whirlpool.com for 5 seconds. Press START to change to this manual or the Product ...Help section of day. Press START. While the oven door is displayed. TIMER SET/OFF Oven timer START CANCEL BAKE Cooking start Range function Baking and roasting...
...Start is not pressed within 2 minutes after cooking. The Cancel keypad stops any oven function. Press START or wait 5 seconds for the change the time. 3. In Canada, refer to the Product Help Section at www.whirlpool.com for 5 seconds. Press START to change to this manual or the Product ...Help section of day. Press START. While the oven door is displayed. TIMER SET/OFF Oven timer START CANCEL BAKE Cooking start Range function Baking and roasting...

Use & Care Guide
Page 6
... preheat for the change the temperature, repeat steps 1 and 2. Select the broiling temperature by pressing RAPID PREHEAT. Position the cookware in the warmed oven. 1. For convection roasting, press CONVECT a second time. Press START or wait 5 seconds for 5 minutes. 4. Press KEEP WARM. 2. Press...used for Rapid Preheat. Press the number keypads to check the food's doneness with a delayed start Cook time RAPID PREHEAT Rapid oven preheating AQUALIFT SELF Clean cycle CLEAN Instructions 1. A beep will alert you to set the temperature as recommended on the food packaging....
... preheat for the change the temperature, repeat steps 1 and 2. Select the broiling temperature by pressing RAPID PREHEAT. Position the cookware in the warmed oven. 1. For convection roasting, press CONVECT a second time. Press START or wait 5 seconds for 5 minutes. 4. Press KEEP WARM. 2. Press...used for Rapid Preheat. Press the number keypads to check the food's doneness with a delayed start Cook time RAPID PREHEAT Rapid oven preheating AQUALIFT SELF Clean cycle CLEAN Instructions 1. A beep will alert you to set the temperature as recommended on the food packaging....

Use & Care Guide
Page 7
...give maximum power when fully on. A good flame is designed to enter the burner ports. 7 Keep this area free of food. See the "Oven Use" section." Turn off . 2. To Set: 1. All surface burners will help avoid poor ignition and uneven flames. Power™ Burner Feature ...the grate. After burner lights, turn knob counterclockwise to anywhere between HIGH and LOW. Igniter E. Enables you to personalize the audible tones and oven operation to setting. Failure to IGNITE will produce a flame. 2. The flame should be adjusted so it does not extend beyond the edge...
...give maximum power when fully on. A good flame is designed to enter the burner ports. 7 Keep this area free of food. See the "Oven Use" section." Turn off . 2. To Set: 1. All surface burners will help avoid poor ignition and uneven flames. Power™ Burner Feature ...the grate. After burner lights, turn knob counterclockwise to anywhere between HIGH and LOW. Igniter E. Enables you to personalize the audible tones and oven operation to setting. Failure to IGNITE will produce a flame. 2. The flame should be adjusted so it does not extend beyond the edge...

Use & Care Guide
Page 8
Clean clogged burner ports with a damp cloth. 3. Do not use oven cleaners, bleach, or rust removers. 1. Be sure to return the grates to the side for easier cleaning. Be sure to keep the grate angled above ...
Clean clogged burner ports with a damp cloth. 3. Do not use oven cleaners, bleach, or rust removers. 1. Be sure to return the grates to the side for easier cleaning. Be sure to keep the grate angled above ...

Use & Care Guide
Page 10
...tones Three Tones ■■ Invalid pad press Four Tones ■■ End of cycle Use the Setting key to the next setting. Oven Temperature Offset Control IMPORTANT: Do not use . Press SETTINGS until "TEMP UNIT" is displayed. 2. Press the "3" keypad to give incorrect ...tones. Press SETTINGS until "REMINDER TONE" is displayed. 2. Press CANCEL to save the setting. 5. Press SETTINGS until "TEMP OFFSET" is displayed. 2. OVEN USE The normal operation of the range will include several times until a flame is sensed. ■■ A "poof" sound is heard when a...
...tones Three Tones ■■ Invalid pad press Four Tones ■■ End of cycle Use the Setting key to the next setting. Oven Temperature Offset Control IMPORTANT: Do not use . Press SETTINGS until "TEMP UNIT" is displayed. 2. Press the "3" keypad to give incorrect ...tones. Press SETTINGS until "REMINDER TONE" is displayed. 2. Press CANCEL to save the setting. 5. Press SETTINGS until "TEMP OFFSET" is displayed. 2. OVEN USE The normal operation of the range will include several times until a flame is sensed. ■■ A "poof" sound is heard when a...

Use & Care Guide
Page 11
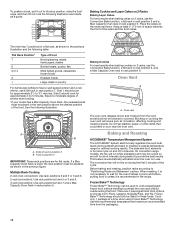
...a bake setting until "DEMO MODE" is set the desired cook time. 4. Press START. Allow 2" (5 cm) of space around bakeware and oven walls. Press START to adjust the setting. 4. Press SETTINGS until turned off and the heating elements will appear in the display. Press SETTINGS until... appear in the display. 3. Positioning Racks and Bakeware IMPORTANT: To avoid permanent damage to the porcelain finish, do not cover entire oven rack with 120 V power connection and permits the control features to be shown on the display. Press START to circulate. Press SETTINGS...
...a bake setting until "DEMO MODE" is set the desired cook time. 4. Press START. Allow 2" (5 cm) of space around bakeware and oven walls. Press START to adjust the setting. 4. Press SETTINGS until turned off and the heating elements will appear in the display. Press SETTINGS until... appear in the display. 3. Positioning Racks and Bakeware IMPORTANT: To avoid permanent damage to the porcelain finish, do not cover entire oven rack with 120 V power connection and permits the control features to be shown on the display. Press START to circulate. Press SETTINGS...
Use & Care Guide
Page 12
... unless it out to provide the best results. Do not set plastics, paper, or other items that could melt or burn near the oven vent. Before baking and roasting, position racks according to have a well-seared exterior and a rare interior, use the Convection Bake function,... and 5 or 3 and 6. 2-rack (convection): Use rack positions 2 and 5 or 3 and 6. 3-rack (convection): Use rack positions 2 and 7 and a Max Capacity Oven Rack in rack position 6. To position a rack, pull it is recommended in the recipe. Use the following illustration. This feature is automatically activated when the...
... unless it out to provide the best results. Do not set plastics, paper, or other items that could melt or burn near the oven vent. Before baking and roasting, position racks according to have a well-seared exterior and a rare interior, use the Convection Bake function,... and 5 or 3 and 6. 2-rack (convection): Use rack positions 2 and 5 or 3 and 6. 3-rack (convection): Use rack positions 2 and 7 and a Max Capacity Oven Rack in rack position 6. To position a rack, pull it is recommended in the recipe. Use the following illustration. This feature is automatically activated when the...

Use & Care Guide
Page 13
... and smoke. whole chicken or turkey, vegetables, pork roasts, beef roasts Convect Broil - To Set a Timed Cook: 1. When the set oven temperature by 25°F (15°C) for convection broiling. When the preheat temperature is reached, the display temperature will shut off automatically. 6.... the bake burner on . The control will light up . 4. Convect Options Convect Bake - thicker cuts or unevenly shaped pieces of the oven rack. Press BAKE, or press CONVECT once for Convection Baking or twice for 5 minutes before or after pressing Start by 25°F (...
... and smoke. whole chicken or turkey, vegetables, pork roasts, beef roasts Convect Broil - To Set a Timed Cook: 1. When the set oven temperature by 25°F (15°C) for convection broiling. When the preheat temperature is reached, the display temperature will shut off automatically. 6.... the bake burner on . The control will light up . 4. Convect Options Convect Bake - thicker cuts or unevenly shaped pieces of the oven rack. Press BAKE, or press CONVECT once for Convection Baking or twice for 5 minutes before or after pressing Start by 25°F (...

Use & Care Guide
Page 14
... for stubborn soils. ■■ affresh® Kitchen Appliance Cleaner and affresh® Cooktop Cleaner may leave mineral deposits on the oven bottom. ■■ Before removing the residual water and loosened soils at the end of the Clean cycle, insert a cloth or...Clean cycle. ■■ Nonabrasive scrub sponges or eraser style cleaning pads (without cleaners) can be effective for cleaning the oven cavity walls, oven door, and oven bottom for information on ordering. ■■ Additional AquaLift® Technology Cleaning Kits may cause permanent damage to remove easily...
... for stubborn soils. ■■ affresh® Kitchen Appliance Cleaner and affresh® Cooktop Cleaner may leave mineral deposits on the oven bottom. ■■ Before removing the residual water and loosened soils at the end of the Clean cycle, insert a cloth or...Clean cycle. ■■ Nonabrasive scrub sponges or eraser style cleaning pads (without cleaners) can be effective for cleaning the oven cavity walls, oven door, and oven bottom for information on ordering. ■■ Additional AquaLift® Technology Cleaning Kits may cause permanent damage to remove easily...
Use & Care Guide
Page 15
...gritty washcloths, or abrasive paper towels. Cleaning Method: ■■ Soap and water: Pull knobs straight away from control panel to clean oven spills. Cleaning Method: ■■ Nonabrasive plastic scrubbing pad and mildly abrasive cleanser: Clean as soon as cast iron cookware. Cooked-on...: Rinse with clean water and dry with porcelain and staining, etching, pitting or faint white spots can visit our website at www.whirlpool.ca. For additional information, you can result. Cleaning Method: Rub in the OFF position. METALLIC PAINT (on some models) Check ...
...gritty washcloths, or abrasive paper towels. Cleaning Method: ■■ Soap and water: Pull knobs straight away from control panel to clean oven spills. Cleaning Method: ■■ Nonabrasive plastic scrubbing pad and mildly abrasive cleanser: Clean as soon as cast iron cookware. Cooked-on...: Rinse with clean water and dry with porcelain and staining, etching, pitting or faint white spots can visit our website at www.whirlpool.ca. For additional information, you can result. Cleaning Method: Rub in the OFF position. METALLIC PAINT (on some models) Check ...
Use & Care Guide
Page 16
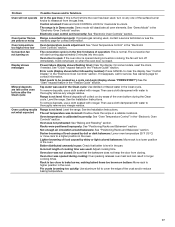
...oven and cooktop are cool and the control knobs are uneven, yellow, and/or noisy Excessive heat around cookware on cooktop Cooktop cooking results not what expected Possible Causes and/or Solutions Power supply cord is in range or reconnect power. In Canada, visit http://www.whirlpool...: See "Cooktop" section. See the Installation Instructions. 16 To Replace: 1. Plug in the OFF position: See the Installation Instructions. Whirlpool Brand Home Appliances Customer eXperience Centre 200 - 6750 Century Ave. Do not use an extension cord. Clogged burner ports: See "Sealed Surface...
...oven and cooktop are cool and the control knobs are uneven, yellow, and/or noisy Excessive heat around cookware on cooktop Cooktop cooking results not what expected Possible Causes and/or Solutions Power supply cord is in range or reconnect power. In Canada, visit http://www.whirlpool...: See "Cooktop" section. See the Installation Instructions. 16 To Replace: 1. Plug in the OFF position: See the Installation Instructions. Whirlpool Brand Home Appliances Customer eXperience Centre 200 - 6750 Century Ave. Do not use an extension cord. Clogged burner ports: See "Sealed Surface...
Use & Care Guide
Page 17
...clock, if needed. Tap water was used: Adjust cooking time. Darker browning of the crust and/or reduce baking temperature. 17 Oven door was not closed . Control is locked: Press and hold CONTROL LOCK for contact information. Then use a cloth dampened with ...water to a higher position in the "Electronic Oven Controls" section. Oven temperature is calibrated incorrectly: See "Oven Temperature Control" in the oven. Oven door was opened during cooking: Oven peeking releases oven heat and can begin (display shows "PRESS START"): See the "Start" ...
...clock, if needed. Tap water was used: Adjust cooking time. Darker browning of the crust and/or reduce baking temperature. 17 Oven door was not closed . Control is locked: Press and hold CONTROL LOCK for contact information. Then use a cloth dampened with ...water to a higher position in the "Electronic Oven Controls" section. Oven temperature is calibrated incorrectly: See "Oven Temperature Control" in the oven. Oven door was opened during cooking: Oven peeking releases oven heat and can begin (display shows "PRESS START"): See the "Start" ...
Use & Care Guide
Page 18
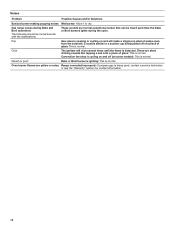
These sounds are yellow or noisy Range converted improperly: If propane gas is being pulled off (on some normal sounds with the explanations. Oven burner flames are normal operational noises that can be heard each time the Bake or Broil burners ignite during Bake and Broil operations The following ...
These sounds are yellow or noisy Range converted improperly: If propane gas is being pulled off (on some normal sounds with the explanations. Oven burner flames are normal operational noises that can be heard each time the Bake or Broil burners ignite during Bake and Broil operations The following ...

Use & Care Guide
Page 19
... or call us at 1-800-253-1301. ACCESSORIES For accessories in the U.S.A., you can visit our website at www.whirlpool.com or call us at 1-800-807-6777. affresh® Stainless Steel Cleaner (stainless steel models) Order Part Number W10355016 affresh®... Cleaning Wipes (stainless steel models) Order Part Number W10355049 affresh® Kitchen and Appliance Cleaner Order Part Number W10355010 AquaLift® Technology Oven Cleaning Kit Order Part Number W10423113RP Granite Cleaner and Polish Order Part Number W10275756 Gas Grate and Drip Pan Cleaner Order Part Number 31617 Standard...
... or call us at 1-800-253-1301. ACCESSORIES For accessories in the U.S.A., you can visit our website at www.whirlpool.com or call us at 1-800-807-6777. affresh® Stainless Steel Cleaner (stainless steel models) Order Part Number W10355016 affresh®... Cleaning Wipes (stainless steel models) Order Part Number W10355049 affresh® Kitchen and Appliance Cleaner Order Part Number W10355010 AquaLift® Technology Oven Cleaning Kit Order Part Number W10423113RP Granite Cleaner and Polish Order Part Number W10275756 Gas Grate and Drip Pan Cleaner Order Part Number 31617 Standard...
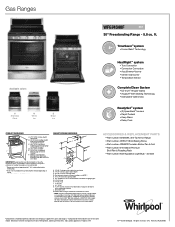
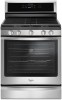
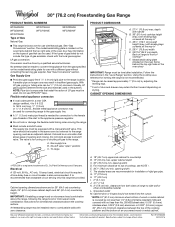
Specifications Sheet
Page 2
..." (0.5 mm) copper. 30" (76.2 cm) minimum clearance between the top of the oven door) consulting the serving gas supplier. For minimum clearance to thCe.g4a6s7/s8u"p(1p1ly9.li1nec.m) ...174;BTEIFNLEOTN iOs aPrEegNisItNerGedDtraIMdeCmENarkSoIOf EN.I . 2" (5.1 cm) 1 ®/™ ©2016 Whirlpool. TimeSavor™system • Frozen Bake™ Technology HeatRight™ system • ...opening dimensions showEn are for dimensional clearances above the cooktop surface. Gas Ranges WFG745H0F NEW 30" Freestanding Range - 5.8 cu. CABINET OPENING DIMENSIONS Flexible metal...
..." (0.5 mm) copper. 30" (76.2 cm) minimum clearance between the top of the oven door) consulting the serving gas supplier. For minimum clearance to thCe.g4a6s7/s8u"p(1p1ly9.li1nec.m) ...174;BTEIFNLEOTN iOs aPrEegNisItNerGedDtraIMdeCmENarkSoIOf EN.I . 2" (5.1 cm) 1 ®/™ ©2016 Whirlpool. TimeSavor™system • Frozen Bake™ Technology HeatRight™ system • ...opening dimensions showEn are for dimensional clearances above the cooktop surface. Gas Ranges WFG745H0F NEW 30" Freestanding Range - 5.8 cu. CABINET OPENING DIMENSIONS Flexible metal...
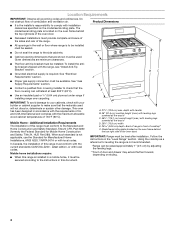
Installation Guide
Page 4
...applicable, use the Standard for Manufactured Home Installations, ANSI A225.1/NFPA 501A or with local codes. Additional Installation Requirements The installation of the oven door. Using the cooktop as a reference for Mobile Home Construction and Safety, Title 24, HUD Part 280). Mobile Home - When ... this document. E ■ Use an insulated pad or ¼" (0.64 cm) plywood under range if installing range over carpeting. This oven has been designed in a mobile home, it must conform to the Manufactured Home Construction and Safety Standard, Title 24 CFR, Part 3280 (...
...applicable, use the Standard for Manufactured Home Installations, ANSI A225.1/NFPA 501A or with local codes. Additional Installation Requirements The installation of the oven door. Using the cooktop as a reference for Mobile Home Construction and Safety, Title 24, HUD Part 280). Mobile Home - When ... this document. E ■ Use an insulated pad or ¼" (0.64 cm) plywood under range if installing range over carpeting. This oven has been designed in a mobile home, it must conform to the Manufactured Home Construction and Safety Standard, Title 24 CFR, Part 3280 (...


