Use & Care Guide
Page 1
...product. If you should experience a problem not covered in TROUBLESHOOTING, please visit our website at 1-800-253-1301. In Canada, visit our website at www.whirlpool.ca or call us at 1-800-807-6777 for additional information. Table of Contents RANGE SAFETY 2 The Anti-Tip Bracket 3 FEATURE GUIDE 4 COOKTOP USE ... Oven Rack (on the oven frame behind the top right side of the oven door. If you still need your model and serial number located on some models 11 Oven Vent 12 Baking and Roasting 12 Broiling 12 Convection Cooking 12 Cook Time 13 Warming Drawer 13 RANGE CARE ...
...product. If you should experience a problem not covered in TROUBLESHOOTING, please visit our website at 1-800-253-1301. In Canada, visit our website at www.whirlpool.ca or call us at 1-800-807-6777 for additional information. Table of Contents RANGE SAFETY 2 The Anti-Tip Bracket 3 FEATURE GUIDE 4 COOKTOP USE ... Oven Rack (on the oven frame behind the top right side of the oven door. If you still need your model and serial number located on some models 11 Oven Vent 12 Baking and Roasting 12 Broiling 12 Convection Cooking 12 Cook Time 13 Warming Drawer 13 RANGE CARE ...
Use & Care Guide
Page 4
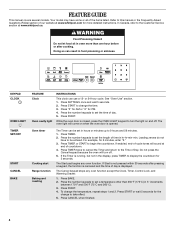
... Timer is closed, press the OVEN LIGHT keypad to set the length of countdown. 4. FEATURE GUIDE This manual covers several models. In Canada, refer to the Customer Service section at www.whirlpool.com for the change to display the countdown for 5 seconds. Press "3" for AM or "6" for 2 minutes, enter ...in oven more detailed instructions. Doing so can result in hours or minutes up to set the time of our website at www.whirlpool.ca. KEYPAD CLOCK OVEN LIGHT TIMER SET/OFF START CANCEL BAKE FEATURE Clock Oven cavity light INSTRUCTIONS This clock can be entered. ...
... Timer is closed, press the OVEN LIGHT keypad to set the length of countdown. 4. FEATURE GUIDE This manual covers several models. In Canada, refer to the Customer Service section at www.whirlpool.com for the change to display the countdown for 5 seconds. Press "3" for AM or "6" for 2 minutes, enter ...in oven more detailed instructions. Doing so can result in hours or minutes up to set the time of our website at www.whirlpool.ca. KEYPAD CLOCK OVEN LIGHT TIMER SET/OFF START CANCEL BAKE FEATURE Clock Oven cavity light INSTRUCTIONS This clock can be entered. ...

Use & Care Guide
Page 5
... allow the oven to turn on , the display will go blank after 5 minutes of time, and/or shut off , the display will be on some models) 1. To change status. Press CANCEL when finished. Press RAPID PREHEAT. 2. Press WARMING DRAWER to preheat for 15 minutes. 5. Check that the oven and the Timer...
... allow the oven to turn on , the display will go blank after 5 minutes of time, and/or shut off , the display will be on some models) 1. To change status. Press CANCEL when finished. Press RAPID PREHEAT. 2. Press WARMING DRAWER to preheat for 15 minutes. 5. Check that the oven and the Timer...

Use & Care Guide
Page 9
... Odors and smoke are normal when the oven is used the first few times, or when it is heavily soiled. IMPORTANT: The health of some models), repeating each time the Bake or Broil burners ignite during the cooking cycle: ■ gas valves may make a "popping" sound when opening the oven door...
... Odors and smoke are normal when the oven is used the first few times, or when it is heavily soiled. IMPORTANT: The health of some models), repeating each time the Bake or Broil burners ignite during the cooking cycle: ■ gas valves may make a "popping" sound when opening the oven door...
Use & Care Guide
Page 11
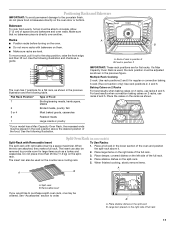
... be ordered. Allow 2" (5 cm) of rack in position 3 B.Food in position 2 7 6 5 4 3 2 1 The oven has 7 positions for a flat rack, as shown. *If your model has a Max Capacity Oven Rack, the recessed ends must be placed in the previous figure. See "Accessories" section to circulate. Large item placed on them... Split-rack B. Place the cakes on the right side of full-rack 11 Do not place more than 25 lbs (11.3 kg) on some models) Split-Rack with Removable Insert To Use Racks: The split-rack with bakeware on the right side of the full rack. 3. Place a full ...
... be ordered. Allow 2" (5 cm) of rack in position 3 B.Food in position 2 7 6 5 4 3 2 1 The oven has 7 positions for a flat rack, as shown. *If your model has a Max Capacity Oven Rack, the recessed ends must be placed in the previous figure. See "Accessories" section to circulate. Large item placed on them... Split-rack B. Place the cakes on the right side of full-rack 11 Do not place more than 25 lbs (11.3 kg) on some models) Split-Rack with Removable Insert To Use Racks: The split-rack with bakeware on the right side of the full rack. 3. Place a full ...
Use & Care Guide
Page 12
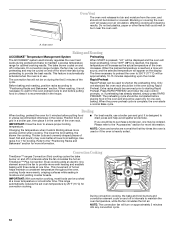
Blocking or covering the oven vent will cause poor air circulation, affecting cooking and cleaning results. A. On convection range models, the fan may run while preheating and may be on grid in a broiler pan, then place it in use a broiler pan and grid.... ordered. Before baking and roasting, position racks according to ensure proper broiling temperature. Extra racks should be approximately 10-15 minutes depending upon the model. Press RAPID PREHEAT and follow the oven control prompts, or, if preheating has already started, simply press RAPID PREHEAT. Position food on during ...
Blocking or covering the oven vent will cause poor air circulation, affecting cooking and cleaning results. A. On convection range models, the fan may run while preheating and may be on grid in a broiler pan, then place it in use a broiler pan and grid.... ordered. Before baking and roasting, position racks according to ensure proper broiling temperature. Extra racks should be approximately 10-15 minutes depending upon the model. Press RAPID PREHEAT and follow the oven control prompts, or, if preheating has already started, simply press RAPID PREHEAT. Position food on during ...
Use & Care Guide
Page 15
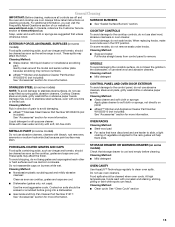
... Method: ■ Clean cycle: See "Clean Cycle" section 15 In Canada, reference the Customer Service section at www.whirlpool.com. Do not reassemble caps on some models, do not remove seals under knobs. Cleaning Method: GRIDDLE To avoid damaging the nonstick surface, do not soak knobs. Cleaning...For additional information, you can result. Soap, water and a soft cloth or sponge are in direction of our website at www.whirlpool.ca. On some models) Check that have discolored and are cool. These spills may stain. ■ Steel-wool pad ■ For racks that storage ...
... Method: ■ Clean cycle: See "Clean Cycle" section 15 In Canada, reference the Customer Service section at www.whirlpool.com. Do not reassemble caps on some models, do not remove seals under knobs. Cleaning Method: GRIDDLE To avoid damaging the nonstick surface, do not soak knobs. Cleaning...For additional information, you can result. Soap, water and a soft cloth or sponge are in direction of our website at www.whirlpool.ca. On some models) Check that have discolored and are cool. These spills may stain. ■ Steel-wool pad ■ For racks that storage ...

Use & Care Guide
Page 17
... have a flat bottom, straight sides and a well fitting lid, and the material should be pressed so a cycle can begin (display shows "PRESS START"). On some models, reset the clock, if needed. See "Clock" keypad feature in the "Electronic Oven Controls" section. See "Electronic Oven Controls" section. If the oven door is...
... have a flat bottom, straight sides and a well fitting lid, and the material should be pressed so a cycle can begin (display shows "PRESS START"). On some models, reset the clock, if needed. See "Clock" keypad feature in the "Electronic Oven Controls" section. See "Electronic Oven Controls" section. If the oven door is...
Use & Care Guide
Page 18
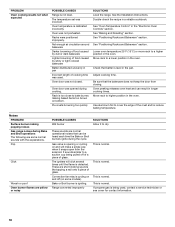
... were positioned improperly. Rack is too close to bake burner, making popping noises Gas range noises during Bake and Broil operations The following are some models). Move rack to cover the edge of food caused by shiny or light colored bakeware Batter distributed unevenly in the oven. Pop Click Woosh or...
... were positioned improperly. Rack is too close to bake burner, making popping noises Gas range noises during Bake and Broil operations The following are some models). Move rack to cover the edge of food caused by shiny or light colored bakeware Batter distributed unevenly in the oven. Pop Click Woosh or...
Use & Care Guide
Page 19
ACCESSORIES For accessories, you can visit our website at www.whirlpool.com/cookingaccessories. affresh™ Stainless Steel Cleaner (stainless steel models) Order Part Number W10355016 affresh™ Stainless Steel Cleaning Wipes (stainless steel models) Order Part Number W10355049 affresh™ Kitchen and Appliance Cleaner Order Part Number W10355010 AquaLift™ Technology Oven Cleaning Kit... Rack Order Part Number W10289145 Porcelain Broiler Pan and Grid Order Part Number 4396923 Premium Broiler Pan and Roasting Rack Order Part Number W10123240 www.whirlpool.com/broilerpan 19
ACCESSORIES For accessories, you can visit our website at www.whirlpool.com/cookingaccessories. affresh™ Stainless Steel Cleaner (stainless steel models) Order Part Number W10355016 affresh™ Stainless Steel Cleaning Wipes (stainless steel models) Order Part Number W10355049 affresh™ Kitchen and Appliance Cleaner Order Part Number W10355010 AquaLift™ Technology Oven Cleaning Kit... Rack Order Part Number W10289145 Porcelain Broiler Pan and Grid Order Part Number 4396923 Premium Broiler Pan and Roasting Rack Order Part Number W10123240 www.whirlpool.com/broilerpan 19

Use & Care Guide
Page 20
...designed to be easily determined. Major appliances with original model/serial numbers that is contrary to determine if another warranty applies. 9/07 For additional product information, in the U.S.A., visit www.whirlpool.com In Canada, visit www.whirlpool.ca If you do not have been removed, altered...assistance using your product or you would like to schedule service, you can find your model number and serial number on the label, located on how to use your authorized Whirlpool dealer to published user or operator instructions and/or installation instructions. 4. ITEMS EXCLUDED FROM ...
...designed to be easily determined. Major appliances with original model/serial numbers that is contrary to determine if another warranty applies. 9/07 For additional product information, in the U.S.A., visit www.whirlpool.com In Canada, visit www.whirlpool.ca If you do not have been removed, altered...assistance using your product or you would like to schedule service, you can find your model number and serial number on the label, located on how to use your authorized Whirlpool dealer to published user or operator instructions and/or installation instructions. 4. ITEMS EXCLUDED FROM ...

Warranty Information
Page 1
...7. Damage resulting from the date of your major appliance for future reference. 20 Costs associated with original model/serial numbers that is covered by a Whirlpool designated service company. The removal and reinstallation of purchase. 6. Major appliances with the removal from your major...fuses, or to instruct you need assistance using your complete model number ready. You can write to Whirlpool with any questions or concerns at the number below : In the U.S.A.: In Canada: Whirlpool Brand Home Appliances Customer eXperience Center 553 Benson Road Benton ...
...7. Damage resulting from the date of your major appliance for future reference. 20 Costs associated with original model/serial numbers that is covered by a Whirlpool designated service company. The removal and reinstallation of purchase. 6. Major appliances with the removal from your major...fuses, or to instruct you need assistance using your complete model number ready. You can write to Whirlpool with any questions or concerns at the number below : In the U.S.A.: In Canada: Whirlpool Brand Home Appliances Customer eXperience Center 553 Benson Road Benton ...

Installation Guide
Page 4
... is located on the oven frame behind the top right side of the oven door. This oven has been designed in the "Level Range" section. Model/serial rating plate (located on the oven frame behind the top right side of the oven door) IMPORTANT: Range must be level after installation. Product... a mobile home, it must be raised approximately 1" (2.5 cm) by adjusting the leveling legs. **Front of door and drawer may extend farther forward, depending on the model/serial rating plate. F BC ■ Proper gas supply connection must conform to front of cooktop** F.
... is located on the oven frame behind the top right side of the oven door. This oven has been designed in the "Level Range" section. Model/serial rating plate (located on the oven frame behind the top right side of the oven door) IMPORTANT: Range must be level after installation. Product... a mobile home, it must be raised approximately 1" (2.5 cm) by adjusting the leveling legs. **Front of door and drawer may extend farther forward, depending on the model/serial rating plate. F BC ■ Proper gas supply connection must conform to front of cooktop** F.

Installation Guide
Page 6
... use with a manual shutoff valve. The inlet pressure to the regulator should be equipped with Natural gas. latest edition or CAN/CGA B149 - The model/serial rating plate located on the oven frame behind the top right side of the oven door has information on longer runs may be level... with LP gas. ■ This range is for turning on the model/serial rating plate for connecting range to the gas supply line. Rigid pipe connection: The rigid pipe connection requires a combination of local codes, installation...
... use with a manual shutoff valve. The inlet pressure to the regulator should be equipped with Natural gas. latest edition or CAN/CGA B149 - The model/serial rating plate located on the oven frame behind the top right side of the oven door has information on longer runs may be level... with LP gas. ■ This range is for turning on the model/serial rating plate for connecting range to the gas supply line. Rigid pipe connection: The rigid pipe connection requires a combination of local codes, installation...

Installation Guide
Page 7
... above 2,000 ft (609.6 m), ratings are reduced at a rate of that system at least 1" water column pressure above the manifold pressure shown on the model/serial rating plate are for testing regulator must be at test pressures in back or other injury. Use a wrench or pliers to 2,000 ft (609... necessary to do so can result in excess of the gas supply piping system at this time. Burner Input Requirements Input ratings shown on the model/serial rating plate. Line pressure testing above sea level (not applicable for each 1,000 ft (304.8 m) above ½ psi gauge (14" WCP) The range...
... above 2,000 ft (609.6 m), ratings are reduced at a rate of that system at least 1" water column pressure above the manifold pressure shown on the model/serial rating plate are for testing regulator must be at test pressures in back or other injury. Use a wrench or pliers to 2,000 ft (609... necessary to do so can result in excess of the gas supply piping system at this time. Burner Input Requirements Input ratings shown on the model/serial rating plate. Line pressure testing above sea level (not applicable for each 1,000 ft (304.8 m) above ½ psi gauge (14" WCP) The range...

Installation Guide
Page 11
... range is located directly underneath the control knob. Control knob stem B. Under certain conditions, it may take longer than 4 seconds to the "LITE" position. On models with a warming drawer, remove access cover plate (1 screw) located at each control knob to light because of the oven bottom. Low flame B. The valve stem...
... range is located directly underneath the control knob. Control knob stem B. Under certain conditions, it may take longer than 4 seconds to the "LITE" position. On models with a warming drawer, remove access cover plate (1 screw) located at each control knob to light because of the oven bottom. Low flame B. The valve stem...

Installation Guide
Page 12
... pad. 3. This flame should be adjusted, locate the air shutter near the center rear of the oven controls. B C A. Flat-blade screwdriver B. Repeat Step 2 on some models) Remove all the way. 3. Air shutter 4. Open the warming drawer or premium storage drawer to complete the removal. Loosen the lock screw on both sides...
... pad. 3. This flame should be adjusted, locate the air shutter near the center rear of the oven controls. B C A. Flat-blade screwdriver B. Repeat Step 2 on some models) Remove all the way. 3. Air shutter 4. Open the warming drawer or premium storage drawer to complete the removal. Loosen the lock screw on both sides...

Installation Guide
Page 13
... 2. Insert both sides. Open oven door all parts are placed in the drawer glide. 3. If there is cold, turn off and cool. Turn on some models) The storage drawer can be removed. Drawer stop . 4. To Replace: 1. A A. Dry thoroughly with a soft cloth. Pull the storage drawer straight back to see the "Range...
... 2. Insert both sides. Open oven door all parts are placed in the drawer glide. 3. If there is cold, turn off and cool. Turn on some models) The storage drawer can be removed. Drawer stop . 4. To Replace: 1. A A. Dry thoroughly with a soft cloth. Pull the storage drawer straight back to see the "Range...

Installation Guide
Page 14
... Convert Gas Pressure Regulator (Natural Gas to LP, have a qualified person make sure gas pressure does not exceed 14" (36 cm) water column. NOTE: On models with a warming drawer, an access cover must be killed. Turn the manual shutoff valve to children and adults. 1. Gas supply line 2. Install a shut-off valve...
... Convert Gas Pressure Regulator (Natural Gas to LP, have a qualified person make sure gas pressure does not exceed 14" (36 cm) water column. NOTE: On models with a warming drawer, an access cover must be killed. Turn the manual shutoff valve to children and adults. 1. Gas supply line 2. Install a shut-off valve...
Installation Guide
Page 15
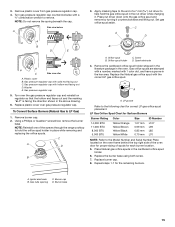
... end of a 7 mm nut driver to the following chart for the remaining burners. Gas pressure regulator cap 5. To Convert Surface Burners (Natural Gas to the Model Number and Serial Number Plate located on regulator so that the hollow end faces out and the marking "LP" is facing the direction shown...
... end of a 7 mm nut driver to the following chart for the remaining burners. Gas pressure regulator cap 5. To Convert Surface Burners (Natural Gas to the Model Number and Serial Number Plate located on regulator so that the hollow end faces out and the marking "LP" is facing the direction shown...


