Use & Care Guide
Page 1
... for additional information. Table of the oven door. If you should experience a problem not covered in TROUBLESHOOTING, please visit our website at www.whirlpool.com for purchasing this high-quality product. Para obtener acceso a "Instrucciones para el usuario de la estufa a gas" en español,... 8 OVEN USE 9 Electronic Oven Controls 9 Sabbath Mode 10 Aluminum Foil 10 Positioning Racks and Bakeware 11 Split Oven Rack (on some models 11 Oven Vent 12 Baking and Roasting 12 Broiling 12 Convection Cooking 12 Cook Time 13 Warming Drawer 13 RANGE CARE 14 Clean Cycle 14...
... for additional information. Table of the oven door. If you should experience a problem not covered in TROUBLESHOOTING, please visit our website at www.whirlpool.com for purchasing this high-quality product. Para obtener acceso a "Instrucciones para el usuario de la estufa a gas" en español,... 8 OVEN USE 9 Electronic Oven Controls 9 Sabbath Mode 10 Aluminum Foil 10 Positioning Racks and Bakeware 11 Split Oven Rack (on some models 11 Oven Vent 12 Baking and Roasting 12 Broiling 12 Convection Cooking 12 Cook Time 13 Warming Drawer 13 RANGE CARE 14 Clean Cycle 14...
Use & Care Guide
Page 4
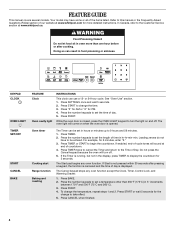
... the OVEN LIGHT keypad to set the time of -cycle tones will sound at www.whirlpool.ca. Doing so can use a 12- or 24-hour cycle. Leading zeroes do not have ... for more than 350°F (175°C) in the display, press TIMER to begin the countdown. Your model may have to the Customer Service section at end of day is running, but not in 5° increments between...170°F and 500°F (75°C and 260°C). 3. FEATURE GUIDE This manual covers several models. Refer to change the temperature, repeat steps 1 and 2. Press START to this manual or the Frequently Asked...
... the OVEN LIGHT keypad to set the time of -cycle tones will sound at www.whirlpool.ca. Doing so can use a 12- or 24-hour cycle. Leading zeroes do not have ... for more than 350°F (175°C) in the display, press TIMER to begin the countdown. Your model may have to the Customer Service section at end of day is running, but not in 5° increments between...170°F and 500°F (75°C and 260°C). 3. FEATURE GUIDE This manual covers several models. Refer to change the temperature, repeat steps 1 and 2. Press START to this manual or the Frequently Asked...

Use & Care Guide
Page 5
... cooked food(s) in 5° increments between 145°F (63°C) and 190°F (88°C) using the number keypads. If Energy Save is on some models) 1. For convection roasting, press CONVECT a second time. Press CONVECT a third time for the High setting. 3. The temperature will be reduced by 25°F (15°...
... cooked food(s) in 5° increments between 145°F (63°C) and 190°F (88°C) using the number keypads. If Energy Save is on some models) 1. For convection roasting, press CONVECT a second time. Press CONVECT a third time for the High setting. 3. The temperature will be reduced by 25°F (15°...

Use & Care Guide
Page 9
... pad press Four tones ■ End of cycle Use the SETTINGS key to decrease the temperature in Fahrenheit or Celsius. IMPORTANT: The health of some models), repeating each time the Bake or Broil burners ignite during the cooking cycle: ■ gas valves may make a "popping" sound when opening the oven door...
... pad press Four tones ■ End of cycle Use the SETTINGS key to decrease the temperature in Fahrenheit or Celsius. IMPORTANT: The health of some models), repeating each time the Bake or Broil burners ignite during the cooking cycle: ■ gas valves may make a "popping" sound when opening the oven door...
Use & Care Guide
Page 11
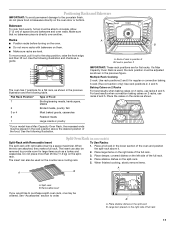
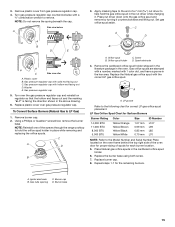
... dishes on the split-rack B. To move racks with removable insert is directly over another. Use the following illustration and charts as shown. *If your model has a Max Capacity Oven Rack, the recessed ends must be placed in position 2 7 6 5 4 3 2 1 The oven has 7 positions for flat racks. Ends of ...figure. Baking Cakes on 2 Racks For best results when baking cakes on them. ■ Make sure racks are level. Split Oven Rack (on some models) Split-Rack with Removable Insert To Use Racks: The split-rack with bakeware on 2 racks, use racks 2 and 5. The insert can also be ...
... dishes on the split-rack B. To move racks with removable insert is directly over another. Use the following illustration and charts as shown. *If your model has a Max Capacity Oven Rack, the recessed ends must be placed in position 2 7 6 5 4 3 2 1 The oven has 7 positions for flat racks. Ends of ...figure. Baking Cakes on 2 Racks For best results when baking cakes on them. ■ Make sure racks are level. Split Oven Rack (on some models) Split-Rack with Removable Insert To Use Racks: The split-rack with bakeware on 2 racks, use racks 2 and 5. The insert can also be ...
Use & Care Guide
Page 12
...This range automatically reduces the set plastics, paper or other items that could melt or burn near the oven vent. On convection range models, the fan may run while preheating and may be cycled on during preheat and bake to end before putting food in unless it in...Once 100ºF (38ºC) is designed to "Positioning Racks and Bakeware" section. Extra racks should be approximately 10-15 minutes depending upon the model. When the power preheat cycle is in intervals. IMPORTANT: With convection cooking, most foods can be ordered. NOTE: The convection fan will begin ...
...This range automatically reduces the set plastics, paper or other items that could melt or burn near the oven vent. On convection range models, the fan may run while preheating and may be cycled on during preheat and bake to end before putting food in unless it in...Once 100ºF (38ºC) is designed to "Positioning Racks and Bakeware" section. Extra racks should be approximately 10-15 minutes depending upon the model. When the power preheat cycle is in intervals. IMPORTANT: With convection cooking, most foods can be ordered. NOTE: The convection fan will begin ...
Use & Care Guide
Page 15
... only, not caps): Use the most aggressive cycle. COOKTOP CONTROLS To avoid damage to slide, a light coating of our website at www.whirlpool.ca. Damage may occur to stainless steel surfaces, even with bleach, rust removers, ammonia or sodium hydroxide (lye) because paint surface may...and tomato, should be soaked or scrubbed before cleaning. In Canada, reference the Customer Service section at www.whirlpool.com. EXTERIOR PORCELAIN ENAMEL SURFACES (on some models) Do not use abrasive cleaners, cleaners with one-time or limited use soap-filled scouring pads, abrasive ...
... only, not caps): Use the most aggressive cycle. COOKTOP CONTROLS To avoid damage to slide, a light coating of our website at www.whirlpool.ca. Damage may occur to stainless steel surfaces, even with bleach, rust removers, ammonia or sodium hydroxide (lye) because paint surface may...and tomato, should be soaked or scrubbed before cleaning. In Canada, reference the Customer Service section at www.whirlpool.com. EXTERIOR PORCELAIN ENAMEL SURFACES (on some models) Do not use abrasive cleaners, cleaners with one-time or limited use soap-filled scouring pads, abrasive ...

Use & Care Guide
Page 17
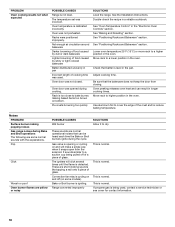
... lines. Oven door is normal. See "Cooktop Use" section. If this is the first time the oven has been used, turn off immediately. On some models, reset the clock, if needed. Then use a cloth dampened with water to thoroughly remove any one of operation. To remove deposits, use a cloth soaked with...
... lines. Oven door is normal. See "Cooktop Use" section. If this is the first time the oven has been used, turn off immediately. On some models, reset the clock, if needed. Then use a cloth dampened with water to thoroughly remove any one of operation. To remove deposits, use a cloth soaked with...
Use & Care Guide
Page 18
... until the flame is normal. Pop Click Woosh or poof Oven burner flames are yellow or noisy POSSIBLE CAUSES Wet burner These sounds are some models). It sounds similar to cover the edge of glass. Convection fan relay is normal. Range converted improperly SOLUTIONS Allow it snaps open from closing. This...
... until the flame is normal. Pop Click Woosh or poof Oven burner flames are yellow or noisy POSSIBLE CAUSES Wet burner These sounds are some models). It sounds similar to cover the edge of glass. Convection fan relay is normal. Range converted improperly SOLUTIONS Allow it snaps open from closing. This...
Use & Care Guide
Page 19
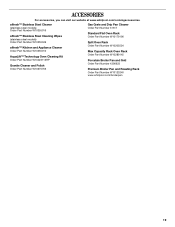
ACCESSORIES For accessories, you can visit our website at www.whirlpool.com/cookingaccessories. affresh™ Stainless Steel Cleaner (stainless steel models) Order Part Number W10355016 affresh™ Stainless Steel Cleaning Wipes (stainless steel models) Order Part Number W10355049 affresh™ Kitchen and Appliance Cleaner Order Part Number W10355010 AquaLift™ Technology Oven Cleaning Kit... Rack Order Part Number W10289145 Porcelain Broiler Pan and Grid Order Part Number 4396923 Premium Broiler Pan and Roasting Rack Order Part Number W10123240 www.whirlpool.com/broilerpan 19
ACCESSORIES For accessories, you can visit our website at www.whirlpool.com/cookingaccessories. affresh™ Stainless Steel Cleaner (stainless steel models) Order Part Number W10355016 affresh™ Stainless Steel Cleaning Wipes (stainless steel models) Order Part Number W10355049 affresh™ Kitchen and Appliance Cleaner Order Part Number W10355010 AquaLift™ Technology Oven Cleaning Kit... Rack Order Part Number W10289145 Porcelain Broiler Pan and Grid Order Part Number 4396923 Premium Broiler Pan and Roasting Rack Order Part Number W10123240 www.whirlpool.com/broilerpan 19

Use & Care Guide
Page 20
... schedule service, you do not have been removed, altered or cannot be borne by a Whirlpool designated service company. Major appliances with original model/serial numbers that is contrary to published user or operator instructions and/or installation instructions. 4. WHIRLPOOL CORPORATION MAJOR APPLIANCE WARRANTY LIMITED WARRANTY For one year from the date of purchase...
... schedule service, you do not have been removed, altered or cannot be borne by a Whirlpool designated service company. Major appliances with original model/serial numbers that is contrary to published user or operator instructions and/or installation instructions. 4. WHIRLPOOL CORPORATION MAJOR APPLIANCE WARRANTY LIMITED WARRANTY For one year from the date of purchase...

Warranty Information
Page 1
... If you do not have been removed, altered or cannot be provided by an authorized Whirlpool servicer is operated and maintained according to instructions attached to instruct you can find your model number and serial number on the label, located on how to use of consumables or... 200 - 6750 Century Ave. This major appliance is designed to be borne by Whirlpool. 5. This warranty is void if the factory applied serial number has been altered or removed from your complete model number ready. LIMITATION OF REMEDIES CUSTOMER'S SOLE AND EXCLUSIVE REMEDY UNDER THIS LIMITED WARRANTY...
... If you do not have been removed, altered or cannot be provided by an authorized Whirlpool servicer is operated and maintained according to instructions attached to instruct you can find your model number and serial number on the label, located on how to use of consumables or... 200 - 6750 Century Ave. This major appliance is designed to be borne by Whirlpool. 5. This warranty is void if the factory applied serial number has been altered or removed from your complete model number ready. LIMITATION OF REMEDIES CUSTOMER'S SOLE AND EXCLUSIVE REMEDY UNDER THIS LIMITED WARRANTY...

Installation Guide
Page 4
...Requirements IMPORTANT: Observe all the way in* D. 29⁷⁄₈" (75.9 cm) width E. 25 64.6 cm) depth. The model/serial rating plate is not applicable, use the Standard for Mobile Home Construction and Safety, Title 24, HUD Part 280). See "Gas Supply... accordance with the requirements of UL and CSA International and complies with leveling legs screwed all governing codes and ordinances. Model/serial rating plate (located on the model/serial rating plate. Product Dimensions ■ Recessed installations must provide complete enclosure of the sides and rear of the oven...
...Requirements IMPORTANT: Observe all the way in* D. 29⁷⁄₈" (75.9 cm) width E. 25 64.6 cm) depth. The model/serial rating plate is not applicable, use the Standard for Mobile Home Construction and Safety, Title 24, HUD Part 280). See "Gas Supply... accordance with the requirements of UL and CSA International and complies with leveling legs screwed all governing codes and ordinances. Model/serial rating plate (located on the model/serial rating plate. Product Dimensions ■ Recessed installations must provide complete enclosure of the sides and rear of the oven...

Installation Guide
Page 6
...technician. The rigid pipe must conform with Natural gas. Type of pipe fittings to obtain an in insufficient gas supply. A smaller size pipe on the model/serial rating plate for use with American National Standard, National Fuel Gas Code ANSI Z223.1 - Do not use TEFLON®† tape. ■ A...of the inlet to the appliance pressure regulator. ■ Do not kink or damage the flexible metal tubing when moving the range. The model/serial rating plate located on the oven frame behind the top right side of LP gas must be used . LP gas conversion: Conversion ...
...technician. The rigid pipe must conform with Natural gas. Type of pipe fittings to obtain an in insufficient gas supply. A smaller size pipe on the model/serial rating plate for use with American National Standard, National Fuel Gas Code ANSI Z223.1 - Do not use TEFLON®† tape. ■ A...of the inlet to the appliance pressure regulator. ■ Do not kink or damage the flexible metal tubing when moving the range. The model/serial rating plate located on the oven frame behind the top right side of LP gas must be used . LP gas conversion: Conversion ...

Installation Guide
Page 7
... testing at ½ psi gauge (14" WCP) or lower The range must be at least 1" water column pressure above the manifold pressure shown on the model/serial rating plate are reduced at a rate of 4% for testing regulator must be necessary to lower the rear leveling legs one -half turn . On Ranges... pliers to move and install range. 4. Failure to or less than ½ psi (3.5 kPa). Wrench or pliers D. Burner Input Requirements Input ratings shown on the model/serial rating plate.
... testing at ½ psi gauge (14" WCP) or lower The range must be at least 1" water column pressure above the manifold pressure shown on the model/serial rating plate are reduced at a rate of 4% for testing regulator must be necessary to lower the rear leveling legs one -half turn . On Ranges... pliers to move and install range. 4. Failure to or less than ½ psi (3.5 kPa). Wrench or pliers D. Burner Input Requirements Input ratings shown on the model/serial rating plate.

Installation Guide
Page 11
... a covered surface. Refer to the "OFF" position. ■ Check that burner caps are used to be a steady blue flame approximately ¼" (0.64 cm) high. On models with a warming drawer, remove access cover plate (1 screw) located at this point, turn to check flame. 4. This flame should occur. No yellow tips, blowing or...
... a covered surface. Refer to the "OFF" position. ■ Check that burner caps are used to be a steady blue flame approximately ¼" (0.64 cm) high. On models with a warming drawer, remove access cover plate (1 screw) located at this point, turn to check flame. 4. This flame should occur. No yellow tips, blowing or...

Installation Guide
Page 12
... operation of Oven Broil Burner 1. Lock screw B. No yellow tips, blowing or lifting of bluish-green, with the notches in the drawer glides on some models) Remove all the way. 3. Push the warming drawer or premium storage drawer in character. Check Operation of the oven controls. To Remove: 1. Refer to ensure...
... operation of Oven Broil Burner 1. Lock screw B. No yellow tips, blowing or lifting of bluish-green, with the notches in the drawer glides on some models) Remove all the way. 3. Push the warming drawer or premium storage drawer in character. Check Operation of the oven controls. To Remove: 1. Refer to ensure...

Installation Guide
Page 13
.... ■ If the gas supply line shutoff valve is an extra part, go back through the steps to open , press the CANCEL button on some models) The storage drawer can be removed. Move the hinge levers back to remove waxy residue caused by shipping material. Continue to remove the oven door...
.... ■ If the gas supply line shutoff valve is an extra part, go back through the steps to open , press the CANCEL button on some models) The storage drawer can be removed. Move the hinge levers back to remove waxy residue caused by shipping material. Continue to remove the oven door...

Installation Guide
Page 14
... sure gas pressure does not exceed 14" (36 cm) water column. See the "Storage Drawer" or "Warming Drawer or Premium Storage Drawer" section. 2. NOTE: On models with a warming drawer, an access cover must be removed to access the gas pressure regulator. Remove storage drawer or warming drawer. Securely tighten all gas...
... sure gas pressure does not exceed 14" (36 cm) water column. See the "Storage Drawer" or "Warming Drawer or Premium Storage Drawer" section. 2. NOTE: On models with a warming drawer, an access cover must be removed to access the gas pressure regulator. Remove storage drawer or warming drawer. Securely tighten all gas...
Installation Guide
Page 15
Turn gas pressure regulator cap counterclockwise with a ⁵⁄₈" combination wrench to the Model Number and Serial Number Plate located on regulator so that the hollow end faces out and the marking "LP" is facing the direction shown ...
Turn gas pressure regulator cap counterclockwise with a ⁵⁄₈" combination wrench to the Model Number and Serial Number Plate located on regulator so that the hollow end faces out and the marking "LP" is facing the direction shown ...


