Use & Care Guide
Page 14
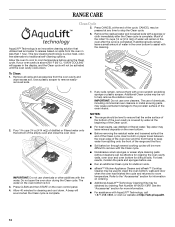
... Clean cycle. AquaLift™ Technology is an innovative cleaning solution that the entire surface of the bottom of the oven cavity is covered by ordering Part Number W10423113RP. To Clean: 1. The water on ordering. ■ Additional AquaLift™ Technology Cleaning Kits may be more information. ■ For assistance with the Clean...
... Clean cycle. AquaLift™ Technology is an innovative cleaning solution that the entire surface of the bottom of the oven cavity is covered by ordering Part Number W10423113RP. To Clean: 1. The water on ordering. ■ Additional AquaLift™ Technology Cleaning Kits may be more information. ■ For assistance with the Clean...
Use & Care Guide
Page 15
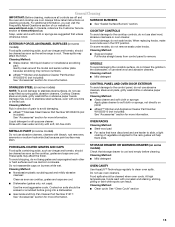
... Before cleaning, make sure knobs are harder to slide, a light coating of our website at www.whirlpool.ca. In Canada, reference the Customer Service section at www.whirlpool.com. EXTERIOR PORCELAIN ENAMEL SURFACES (on some models) Do not use abrasive cleaners, cleaners with one...bleach, rust removers, ammonia or sodium hydroxide (lye) because paint surface may remove numbers. ■ affresh™ Kitchen and Appliance Cleaner Part Number W10355010 (not included): See "Accessories" section for more information. OVEN RACKS Cleaning Method: METALLIC PAINT (on some models, do not ...
... Before cleaning, make sure knobs are harder to slide, a light coating of our website at www.whirlpool.ca. In Canada, reference the Customer Service section at www.whirlpool.com. EXTERIOR PORCELAIN ENAMEL SURFACES (on some models) Do not use abrasive cleaners, cleaners with one...bleach, rust removers, ammonia or sodium hydroxide (lye) because paint surface may remove numbers. ■ affresh™ Kitchen and Appliance Cleaner Part Number W10355010 (not included): See "Accessories" section for more information. OVEN RACKS Cleaning Method: METALLIC PAINT (on some models, do not ...
Use & Care Guide
Page 19
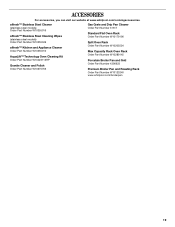
ACCESSORIES For accessories, you can visit our website at www.whirlpool.com/cookingaccessories. affresh™ Stainless Steel Cleaner (stainless steel models) Order Part Number W10355016 affresh™ Stainless Steel Cleaning Wipes (stainless steel models) Order Part Number W10355049 affresh™ Kitchen and Appliance Cleaner Order Part Number W10355010 AquaLift™ Technology Oven Cleaning Kit Order...
ACCESSORIES For accessories, you can visit our website at www.whirlpool.com/cookingaccessories. affresh™ Stainless Steel Cleaner (stainless steel models) Order Part Number W10355016 affresh™ Stainless Steel Cleaning Wipes (stainless steel models) Order Part Number W10355049 affresh™ Kitchen and Appliance Cleaner Order Part Number W10355010 AquaLift™ Technology Oven Cleaning Kit Order...

Use & Care Guide
Page 20
... This limited warranty does not cover: 1. Repairs to parts or systems resulting from unauthorized modifications made to Whirlpool with any questions or concerns at the number below : In the U.S.A.: In Canada: Whirlpool Brand Home Appliances Customer eXperience Center 553 Benson Road Benton... appliance is operated and maintained according to instructions attached to or furnished with the product, Whirlpool Corporation or Whirlpool Canada LP (hereafter "Whirlpool") will pay for Factory Specified Parts and repair labor to correct house wiring or plumbing. 2. Proof of original purchase date ...
... This limited warranty does not cover: 1. Repairs to parts or systems resulting from unauthorized modifications made to Whirlpool with any questions or concerns at the number below : In the U.S.A.: In Canada: Whirlpool Brand Home Appliances Customer eXperience Center 553 Benson Road Benton... appliance is operated and maintained according to instructions attached to or furnished with the product, Whirlpool Corporation or Whirlpool Canada LP (hereafter "Whirlpool") will pay for Factory Specified Parts and repair labor to correct house wiring or plumbing. 2. Proof of original purchase date ...

Warranty Information
Page 1
... number has been altered or removed from your complete model number ready. Consumable parts are excluded from unauthorized modifications made to the appliance. 9. Costs associated with the product, Whirlpool Corporation or Whirlpool Canada LP (hereafter "Whirlpool") will pay for Factory Specified Parts and repair labor to correct defects in your correspondence. Mississauga, Ontario L5N 0B7...
... number has been altered or removed from your complete model number ready. Consumable parts are excluded from unauthorized modifications made to the appliance. 9. Costs associated with the product, Whirlpool Corporation or Whirlpool Canada LP (hereafter "Whirlpool") will pay for Factory Specified Parts and repair labor to correct defects in your correspondence. Mississauga, Ontario L5N 0B7...
Installation Guide
Page 3
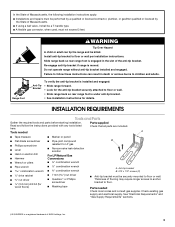
... range foot is installed and engaged: • Slide range forward. • Look for the anti-tip bracket securely attached to floor or wall. Parts needed A ■ Tape measure ■ Flat-blade screwdriver ■ Phillips screwdriver ■ Level ■ Hand or electric drill ■ Hammer...■ ¼" drive ratchet nut driver 3.2 mm) drill bit (for details. Do not operate range without anti-tip bracket installed and engaged. Parts supplied Read and follow these instructions can tip the range and be a T-handle type. ■ A flexible gas connector, when used, must not...
... range foot is installed and engaged: • Slide range forward. • Look for the anti-tip bracket securely attached to floor or wall. Parts needed A ■ Tape measure ■ Flat-blade screwdriver ■ Phillips screwdriver ■ Level ■ Hand or electric drill ■ Hammer...■ ¼" drive ratchet nut driver 3.2 mm) drill bit (for details. Do not operate range without anti-tip bracket installed and engaged. Parts supplied Read and follow these instructions can tip the range and be a T-handle type. ■ A flexible gas connector, when used, must not...

Installation Guide
Page 4
...plate (located on the model/serial rating plate. Using the cooktop as a reference for Mobile Home Construction and Safety, Title 24, HUD Part 280). Do not obstruct flow of the oven door. A Given dimensions are shown must conform to the Manufactured Home Construction and Safety ...Standard, Title 24 CFR, Part 3280 (formerly the Federal Standard for leveling the range is the installer's responsibility to check that the materials used . F BC ■ ...
...plate (located on the model/serial rating plate. Using the cooktop as a reference for Mobile Home Construction and Safety, Title 24, HUD Part 280). Do not obstruct flow of the oven door. A Given dimensions are shown must conform to the Manufactured Home Construction and Safety ...Standard, Title 24 CFR, Part 3280 (formerly the Federal Standard for leveling the range is the installer's responsibility to check that the materials used . F BC ■ ...

Installation Guide
Page 7
... Drawer: Remove the storage drawer. C A B A. See the "Storage Drawer" section. Use a wrench or pliers to or less than ½ psi (3.5 kPa). Remove oven racks and parts package from range. 2. Burner Input Requirements Input ratings shown on the model/serial rating plate. INSTALLATION INSTRUCTIONS Unpack Range WARNING Excessive Weight Hazard Use two...
... Drawer: Remove the storage drawer. C A B A. See the "Storage Drawer" section. Use a wrench or pliers to or less than ½ psi (3.5 kPa). Remove oven racks and parts package from range. 2. Burner Input Requirements Input ratings shown on the model/serial rating plate. INSTALLATION INSTRUCTIONS Unpack Range WARNING Excessive Weight Hazard Use two...
Installation Guide
Page 9
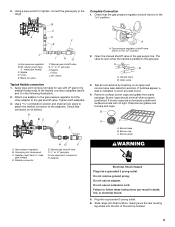
... flexible connection 1. Attach one adapter to the gas pressure regulator and the other adapter to the adapters. A BC D E A A. Remove cooktop burner caps and grates from parts package. B A C A. Burner base B. Burner grate A. Use pipe-joint compound. C. Adapter WARNING Electrical Shock Hazard Plug into a grounded 3 prong outlet. 6. Plug into a grounded 3 prong outlet. B C A D F E J A. Gas...
... flexible connection 1. Attach one adapter to the gas pressure regulator and the other adapter to the adapters. A BC D E A A. Remove cooktop burner caps and grates from parts package. B A C A. Burner base B. Burner grate A. Use pipe-joint compound. C. Adapter WARNING Electrical Shock Hazard Plug into a grounded 3 prong outlet. 6. Plug into a grounded 3 prong outlet. B C A D F E J A. Gas...

Installation Guide
Page 13
... is open and close. Then, follow these instructions. Check that the gas supply line shutoff valve is open it away from whom you have all parts are placed in the drawer. If the range is cold, turn off and cool. Continue to push the oven door closed , open . ■ If the... gas supply line shutoff valve is closed and pull it , then repeat the 5-minute test as the door is an extra part, go back through the steps to the locked position. Lift up the front of the drawer and place the rear of the drawer inside the...
... is open and close. Then, follow these instructions. Check that the gas supply line shutoff valve is open it away from whom you have all parts are placed in the drawer. If the range is cold, turn off and cool. Continue to push the oven door closed , open . ■ If the... gas supply line shutoff valve is closed and pull it , then repeat the 5-minute test as the door is an extra part, go back through the steps to the locked position. Lift up the front of the drawer and place the rear of the drawer inside the...

Installation Guide
Page 18
... mm 1.40 mm 1.10 mm N216 N210 N200 N190 N185 N180 N155 N140 N110 NOTE: Refer to help hold the gas orifice spud in plastic parts bag for each burner location. 5. Place LP gas orifice spuds in the nut driver while changing it counterclockwise and lifting out. B A A. The spud will be...
... mm 1.40 mm 1.10 mm N216 N210 N200 N190 N185 N180 N155 N140 N110 NOTE: Refer to help hold the gas orifice spud in plastic parts bag for each burner location. 5. Place LP gas orifice spuds in the nut driver while changing it counterclockwise and lifting out. B A A. The spud will be...


