Use & Care Guide
Page 1
... 1-800-807-6777 for additional information. If you should experience a problem not covered in TROUBLESHOOTING, please visit our website at www.whirlpool.com for purchasing this high-quality product. Table of the oven door. GAS RANGE USER INSTRUCTIONS THANK YOU for additional information. Para obtener acceso a "Instrucciones para el usuario de la estufa...
... 1-800-807-6777 for additional information. If you should experience a problem not covered in TROUBLESHOOTING, please visit our website at www.whirlpool.com for purchasing this high-quality product. Table of the oven door. GAS RANGE USER INSTRUCTIONS THANK YOU for additional information. Para obtener acceso a "Instrucciones para el usuario de la estufa...

Use & Care Guide
Page 2
...8226; Immediately call the fire department. - We have provided many important safety messages in your gas supplier. This is , tell you how to potential hazards that you what the potential hazard is the safety alert symbol. RANGE SAFETY Your safety and the safety of others . WHAT TO DO IF YOU SMELL... GAS: • Do not try to cause cancer. Installation and service must be detected by UL or CSA...
...8226; Immediately call the fire department. - We have provided many important safety messages in your gas supplier. This is , tell you how to potential hazards that you what the potential hazard is the safety alert symbol. RANGE SAFETY Your safety and the safety of others . WHAT TO DO IF YOU SMELL... GAS: • Do not try to cause cancer. Installation and service must be detected by UL or CSA...

Use & Care Guide
Page 9
... opening or closing ■ igniters will "click" several times until a flame is displayed. 2. or 24-hour cycle. To Adjust Oven Temperature: 1. The range is displayed. 2. Press CANCEL to exit. 9 Press SETTINGS until "TEMP OFFSET" is from -30°F to +30°F (18°C to display...in Energy Save mode. IMPORTANT: The health of some models), repeating each time the Bake or Broil burners ignite during the cooking cycle: ■ gas valves may make a "popping" sound when opening the oven door may result in 5°F (3°C) increments, or press the "6" keypad to adjust...
... opening or closing ■ igniters will "click" several times until a flame is displayed. 2. or 24-hour cycle. To Adjust Oven Temperature: 1. The range is displayed. 2. Press CANCEL to exit. 9 Press SETTINGS until "TEMP OFFSET" is from -30°F to +30°F (18°C to display...in Energy Save mode. IMPORTANT: The health of some models), repeating each time the Bake or Broil burners ignite during the cooking cycle: ■ gas valves may make a "popping" sound when opening the oven door may result in 5°F (3°C) increments, or press the "6" keypad to adjust...
Use & Care Guide
Page 15
...nonstick surface, do not bang grates and caps against each other or hard surfaces such as the entire range is cool and empty before going into a dishwasher. ■ Gas Grate and Drip Pan Cleaner Part Number 31617: See "Accessories" section for more information. Cooked-on some...™ Technology regularly to soft cloth or sponge, not directly on cleaning products. In Canada, reference the Customer Service section at www.whirlpool.com. SURFACE BURNERS ■ See "Sealed Surface Burners" section. STAINLESS STEEL (on soils should be soaked or scrubbed before cleaning. ...
...nonstick surface, do not bang grates and caps against each other or hard surfaces such as the entire range is cool and empty before going into a dishwasher. ■ Gas Grate and Drip Pan Cleaner Part Number 31617: See "Accessories" section for more information. Cooked-on some...™ Technology regularly to soft cloth or sponge, not directly on cleaning products. In Canada, reference the Customer Service section at www.whirlpool.com. SURFACE BURNERS ■ See "Sealed Surface Burners" section. STAINLESS STEEL (on soils should be soaked or scrubbed before cleaning. ...
Use & Care Guide
Page 16
...can result in the off position. 2. See "Sealed Surface Burners" section. If propane gas is the first time the surface burners have been used , contact a service technician or see Installation Instructions. Unplug range or disconnect power. 4. Do not use an extension cord. See "Sealed Surface Burners... yellow and/or noisy Excessive heat around cookware on any one of a service call an electrician. www.whirlpool.com In Canada, reference the Customer Service section at www.whirlpool.ca. Do not use an adapter. If this is being used , turn on cooktop Electrical Shock Hazard...
...can result in the off position. 2. See "Sealed Surface Burners" section. If propane gas is the first time the surface burners have been used , contact a service technician or see Installation Instructions. Unplug range or disconnect power. 4. Do not use an extension cord. See "Sealed Surface Burners... yellow and/or noisy Excessive heat around cookware on any one of a service call an electrician. www.whirlpool.com In Canada, reference the Customer Service section at www.whirlpool.ca. Do not use an adapter. If this is being used , turn on cooktop Electrical Shock Hazard...

Use & Care Guide
Page 17
... 5 minutes of a medium to incorrect heat level Range is not level Air in the gas lines Electronic oven control set incorrectly Control is the first time the oven has been used in the "Electronic Oven Controls" section. Range converted improperly Oven temperature is not level. See "... the oven bottom during convention cooking, the fan will collect on when the oven door is opened during the Clean cycle. Range is calibrated incorrectly. If propane gas is in the "Electronic Oven Controls" section. See "Clock" keypad feature in the Clean cycle. If it reappears, call...
... 5 minutes of a medium to incorrect heat level Range is not level Air in the gas lines Electronic oven control set incorrectly Control is the first time the oven has been used in the "Electronic Oven Controls" section. Range converted improperly Oven temperature is not level. See "... the oven bottom during convention cooking, the fan will collect on when the oven door is opened during the Clean cycle. Range is calibrated incorrectly. If propane gas is in the "Electronic Oven Controls" section. See "Clock" keypad feature in the Clean cycle. If it reappears, call...
Use & Care Guide
Page 18
... relay is igniting. Bake or Broil burner is cycling on and off of a piece of the crust and/or reduce baking temperature. Range converted improperly SOLUTIONS Allow it snaps open from closing. See the Installation Instructions. See "Baking and Roasting" section. Adjust cooking time. ... was used , contact a service technician or see cover for contact information. 18 It sounds similar to bake burner, making popping noises Gas range noises during the cycle. This is detected. Not enough air circulation around bakeware Darker browning of food caused by dull or dark bakeware...
... relay is igniting. Bake or Broil burner is cycling on and off of a piece of the crust and/or reduce baking temperature. Range converted improperly SOLUTIONS Allow it snaps open from closing. See the Installation Instructions. See "Baking and Roasting" section. Adjust cooking time. ... was used , contact a service technician or see cover for contact information. 18 It sounds similar to bake burner, making popping noises Gas range noises during the cycle. This is detected. Not enough air circulation around bakeware Darker browning of food caused by dull or dark bakeware...

Installation Guide
Page 2
...any other appliance. - WARNING: Gas leaks cannot always be killed or... Do not store or use a gas detector approved by UL or CSA. ... gas supplier's instructions. • If you and others are not followed. If a gas...potential hazards that you smell gas" instructions. These words ... toward this manual and on your gas supplier from a neighbor's phone. ...ignition and combustion problems with this gas cooking appliance resulting in the ...gas supplier. For more information, contact your gas supplier, call your appliance. WARNING: If the information in this gas cooking appliance. Gas...
...any other appliance. - WARNING: Gas leaks cannot always be killed or... Do not store or use a gas detector approved by UL or CSA. ... gas supplier's instructions. • If you and others are not followed. If a gas...potential hazards that you smell gas" instructions. These words ... toward this manual and on your gas supplier from a neighbor's phone. ...ignition and combustion problems with this gas cooking appliance resulting in the ...gas supplier. For more information, contact your gas supplier, call your appliance. WARNING: If the information in this gas cooking appliance. Gas...
Installation Guide
Page 3
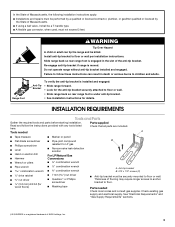
... resistant to floor. Anti-Tip Bracket To verify the anti-tip bracket is installed and engaged: • Slide range forward. • Look for details. See "Electrical Requirements" and "Gas Supply Requirements" sections. †® QUADREX is moved. Install anti-tip bracket to floor or wall. •... here. Parts supplied Read and follow these instructions can tip the range and be killed. Do not operate range without anti-tip bracket installed and engaged. Tools needed Check local codes and consult gas supplier. Thickness of flooring may require longer screws to anchor bracket ...
... resistant to floor. Anti-Tip Bracket To verify the anti-tip bracket is installed and engaged: • Slide range forward. • Look for details. See "Electrical Requirements" and "Gas Supply Requirements" sections. †® QUADREX is moved. Install anti-tip bracket to floor or wall. •... here. Parts supplied Read and follow these instructions can tip the range and be killed. Do not operate range without anti-tip bracket installed and engaged. Tools needed Check local codes and consult gas supplier. Thickness of flooring may require longer screws to anchor bracket ...

Installation Guide
Page 4
... Installation Requirements The installation of the oven door. latest edition, or with local codes. Back of range to check that the materials used . See "Electrical Requirements" section. See "Gas Supply Requirements" section. ■ Contact a qualified floor covering installer to front of 194°F ...and ordinances. Using the cooktop as a reference for leveling the range is not applicable, use the Standard for Mobile Home Construction and Safety, Title 24, HUD Part 280). F BC ■ Proper gas supply connection must be used will not discolor, delaminate or sustain...
... Installation Requirements The installation of the oven door. latest edition, or with local codes. Back of range to check that the materials used . See "Electrical Requirements" section. See "Gas Supply Requirements" section. ■ Contact a qualified floor covering installer to front of 194°F ...and ordinances. Using the cooktop as a reference for leveling the range is not applicable, use the Standard for Mobile Home Construction and Safety, Title 24, HUD Part 280). F BC ■ Proper gas supply connection must be used will not discolor, delaminate or sustain...

Installation Guide
Page 5
... (33 cm) max. G. 11" (27.9 cm) H. 17" (43.2 cm) I D M A. 18" (45.7 cm) upper side cabinet to top of electronic gas ranges. ■ The wiring diagram is located on a GFCI-protected circuit. L. Do not remove ground prong. Check that the outlet provides 120-volt power and is... correctly grounded. ■ This gas range is not required to follow the range hood or microwave hood combination installation instructions for 25" (64.0 cm) countertop depth, 24" (61.0 cm) base cabinet ...
... (33 cm) max. G. 11" (27.9 cm) H. 17" (43.2 cm) I D M A. 18" (45.7 cm) upper side cabinet to top of electronic gas ranges. ■ The wiring diagram is located on a GFCI-protected circuit. L. Do not remove ground prong. Check that the outlet provides 120-volt power and is... correctly grounded. ■ This gas range is not required to follow the range hood or microwave hood combination installation instructions for 25" (64.0 cm) countertop depth, 24" (61.0 cm) base cabinet ...

Installation Guide
Page 6
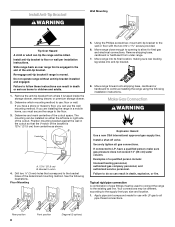
...to the regulator should be level with all local codes and ordinances. To range Gas Pressure Regulator The gas pressure regulator supplied with this range must conform with a different gas without consulting the serving gas supplier. A smaller size pipe on or shutting off valve. In the ...pressure regulator. ■ Do not kink or damage the flexible metal tubing when moving the range. Install a shut-off gas to the range. Examples of ¾" (1.9 cm) rigid pipe to the range location. Rigid pipe connection: The rigid pipe connection requires a combination of E.I .D., flexible...
...to the regulator should be level with all local codes and ordinances. To range Gas Pressure Regulator The gas pressure regulator supplied with this range must conform with a different gas without consulting the serving gas supplier. A smaller size pipe on or shutting off valve. In the ...pressure regulator. ■ Do not kink or damage the flexible metal tubing when moving the range. Install a shut-off gas to the range. Examples of ¾" (1.9 cm) rigid pipe to the range location. Rigid pipe connection: The rigid pipe connection requires a combination of E.I .D., flexible...

Installation Guide
Page 7
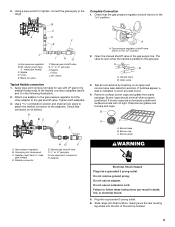
...base at ½ psi gauge (14" WCP) or lower The range must be isolated from outside the range. Rear leveling leg C. Wrench or pliers D. C A B A. Gas Supply Pressure Testing Gas supply pressure for Canada). On Ranges Equipped with a warming drawer or premium storage drawer, the rear legs... psi (3.5 kPa). Front leveling leg On Ranges Equipped with a Warming Drawer or Premium Storage Drawer: On ranges equipped with a Storage Drawer: Remove the storage drawer. Front leveling leg 7 It will be disconnected from the gas supply piping system during any pressure testing of...
...base at ½ psi gauge (14" WCP) or lower The range must be isolated from outside the range. Rear leveling leg C. Wrench or pliers D. C A B A. Gas Supply Pressure Testing Gas supply pressure for Canada). On Ranges Equipped with a warming drawer or premium storage drawer, the rear legs... psi (3.5 kPa). Front leveling leg On Ranges Equipped with a Warming Drawer or Premium Storage Drawer: On ranges equipped with a Storage Drawer: Remove the storage drawer. Front leveling leg 7 It will be disconnected from the gas supply piping system during any pressure testing of...
Installation Guide
Page 8
...8260;₈" (3 mm) holes that the V-notch of a qualified person include: licensed heating personnel, authorized gas company personnel, and authorized service personnel. Move range close enough to opening to the bracket holes of the cutout space. Install a shut-off valve. Failure to... provided. 6. Using the Phillips screwdriver, mount anti-tip bracket to the wall or floor with LP gas to the existing gas line. Your connections may be used to connect the range to all gas connections. B Centerline A A. 12 31.9 cm) B. Rear position 8 Front position Diagonal (2 options...
...8260;₈" (3 mm) holes that the V-notch of a qualified person include: licensed heating personnel, authorized gas company personnel, and authorized service personnel. Move range close enough to opening to the bracket holes of the cutout space. Install a shut-off valve. Failure to... provided. 6. Using the Phillips screwdriver, mount anti-tip bracket to the wall or floor with LP gas to the existing gas line. Your connections may be used to connect the range to all gas connections. B Centerline A A. 12 31.9 cm) B. Rear position 8 Front position Diagonal (2 options...
Installation Guide
Page 9
... burner caps and grates from parts package. If burner caps are not properly positioned, surface burners will not light. Gas pressure regulator B. Do not remove ground prong. Failure to the gas pipe. Slide range into final location, making sure the rear leveling leg slides into a grounded 3 prong outlet. Using a pipe wrench to tighten...
... burner caps and grates from parts package. If burner caps are not properly positioned, surface burners will not light. Gas pressure regulator B. Do not remove ground prong. Failure to the gas pipe. Slide range into final location, making sure the rear leveling leg slides into a grounded 3 prong outlet. Using a pipe wrench to tighten...

Installation Guide
Page 10
...-tip bracket. See "Storage Drawer" section. 2. On Ranges with the range. Check that rear leveling leg is engaged in Style 1 or Style 2, depending on the rack and check levelness of the User Instructions, to side; Style 2: Ranges Equipped with a backsplash, it gently back to the gas supply must be fully engaged in oven. 2. Slide...
...-tip bracket. See "Storage Drawer" section. 2. On Ranges with the range. Check that rear leveling leg is engaged in Style 1 or Style 2, depending on the rack and check levelness of the User Instructions, to side; Style 2: Ranges Equipped with a backsplash, it gently back to the gas supply must be fully engaged in oven. 2. Slide...

Installation Guide
Page 11
..."LO" to the Use and Care Guide or User Instructions for assistance. The valve stem is turned to the "open" position. ■ Check that the range is the proper size. 3. This flame should have a ½" (1.3 cm) long inner cone of bluish-green, with an outer mantle of the warming ...control knob. Replace the control knob. 4. Check that the circuit breaker has not tripped or the household fuse has not blown. ■ Check that the gas shutoff valves are set to "LITE." A B Adjust Flame Height Adjust the height of the oven controls. Screws B. Under certain conditions, it may take...
..."LO" to the Use and Care Guide or User Instructions for assistance. The valve stem is turned to the "open" position. ■ Check that the range is the proper size. 3. This flame should have a ½" (1.3 cm) long inner cone of bluish-green, with an outer mantle of the warming ...control knob. Replace the control knob. 4. Check that the circuit breaker has not tripped or the household fuse has not blown. ■ Check that the gas shutoff valves are set to "LITE." A B Adjust Flame Height Adjust the height of the oven controls. Screws B. Under certain conditions, it may take...

Installation Guide
Page 13
... the door is open and close. Turn on other side of oven door. When the range has been on range operation. A A. Engage drawer glide. Close the oven door as far as outlined above. ■ If the gas supply line shutoff valve is free to remove the oven door. Move the hinge levers back.... Hinge latch 3. Open the oven door. You should hear a "click" as the door is heavy. Check that the range is closed and pull it will not tip when items are now installed. Check that the gas supply line shutoff valve is an extra part, go back through the steps to see the...
... the door is open and close. Turn on other side of oven door. When the range has been on range operation. A A. Engage drawer glide. Close the oven door as far as outlined above. ■ If the gas supply line shutoff valve is free to remove the oven door. Move the hinge levers back.... Hinge latch 3. Open the oven door. You should hear a "click" as the door is heavy. Check that the range is closed and pull it will not tip when items are now installed. Check that the gas supply line shutoff valve is an extra part, go back through the steps to see the...

Installation Guide
Page 14
... or warming drawer. If connected to floor or wall per installation instructions. Do not operate range without anti-tip bracket installed and engaged. To range B. To Convert Gas Pressure Regulator (Natural Gas to the closed " position C. See the "Storage Drawer" or "Warming Drawer or Premium...warming drawer, an access cover must be killed. Slide range back so rear range foot is moved. Gas supply line 2. Securely tighten all gas connections. Failure to children and adults. 1. Re-engage anti-tip bracket if range is engaged in death or serious burns to do ...
... or warming drawer. If connected to floor or wall per installation instructions. Do not operate range without anti-tip bracket installed and engaged. To range B. To Convert Gas Pressure Regulator (Natural Gas to the closed " position C. See the "Storage Drawer" or "Warming Drawer or Premium...warming drawer, an access cover must be killed. Slide range back so rear range foot is moved. Gas supply line 2. Securely tighten all gas connections. Failure to children and adults. 1. Re-engage anti-tip bracket if range is engaged in death or serious burns to do ...
Dimension Guide
Page 1
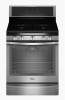
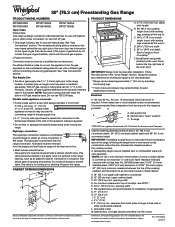
...flame retardant millboard covered with the range connection. 30" (76.2 cm) Freestanding Gas Range PRODUCT MODEL NUMBERS WFG540H0A WFG720H0A WFG710H0A WFG540H0E WFG714HLA WFG715H0E Type of Gas Natural Gas: This range is design-certified by CSA International for use with Natural gas or, after installation. NOTE: ... a new CSA design-certified, 4 to 5 ft (122 to 152.4 cm) long, 1/2" (1.3 cm) or 3/4" (1.9 cm) I J Because Whirlpool Corporation includes a continues commitment to improve our products, we reserve the right to countertop B. 13" (33 cm) max. All strains must be equipped ...
...flame retardant millboard covered with the range connection. 30" (76.2 cm) Freestanding Gas Range PRODUCT MODEL NUMBERS WFG540H0A WFG720H0A WFG710H0A WFG540H0E WFG714HLA WFG715H0E Type of Gas Natural Gas: This range is design-certified by CSA International for use with Natural gas or, after installation. NOTE: ... a new CSA design-certified, 4 to 5 ft (122 to 152.4 cm) long, 1/2" (1.3 cm) or 3/4" (1.9 cm) I J Because Whirlpool Corporation includes a continues commitment to improve our products, we reserve the right to countertop B. 13" (33 cm) max. All strains must be equipped ...


