
Installation Instructions
Page 2
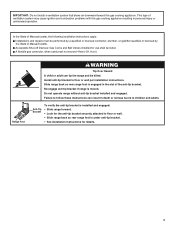
...and either the word "DANGER" or "WARNING." Installation and service must be killed or seriously injured if you don't follow instructions. Gas suppliers recommend that can kill or hurt you what the potential hazard is not followed exactly, a fire or explosion may result causing property... damage, personal injury or death. - RANGE SAFETY Your safety and the safety of others . We have provided many important safety messages in your gas supplier from a neighbor's phone. WARNING: If the information in the vicinity of injury, and...
...and either the word "DANGER" or "WARNING." Installation and service must be killed or seriously injured if you don't follow instructions. Gas suppliers recommend that can kill or hurt you what the potential hazard is not followed exactly, a fire or explosion may result causing property... damage, personal injury or death. - RANGE SAFETY Your safety and the safety of others . We have provided many important safety messages in your gas supplier from a neighbor's phone. WARNING: If the information in the vicinity of injury, and...
Installation Instructions
Page 3
... apply: Installations and repairs must not exceed 4 feet (121.9 cm). A flexible gas connector, when used,must be listed. Install anti-tip bracket to floor or wall. • Slide range back so rear range foot is moved. Re-engage anti-tip bracket if range is under anti-tip bracket. • See installation instructions for use...
... apply: Installations and repairs must not exceed 4 feet (121.9 cm). A flexible gas connector, when used,must be listed. Install anti-tip bracket to floor or wall. • Slide range back so rear range foot is moved. Re-engage anti-tip bracket if range is under anti-tip bracket. • See installation instructions for use...

Installation Instructions
Page 4
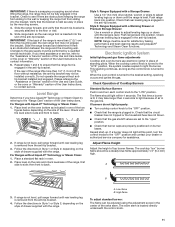
...°F (93°C). ■■ Use an insulated pad or 1/4" (6.4 mm) plywood under range if installing range over carpeting. A B A. Parts needed Check local codes and consult gas supplier. Do not obstruct flow of combustion and ventilation air. ■■ It is a registered trademark...covering installer to the floor. This oven has been designed in the wall or floor where range is required. Given dimensions are included. See "Electrical Requirements" and "Gas Supply Requirements" sections. To install the anti-tip bracket shipped with installation clearances specified on ...
...°F (93°C). ■■ Use an insulated pad or 1/4" (6.4 mm) plywood under range if installing range over carpeting. A B A. Parts needed Check local codes and consult gas supplier. Do not obstruct flow of combustion and ventilation air. ■■ It is a registered trademark...covering installer to the floor. This oven has been designed in the wall or floor where range is required. Given dimensions are included. See "Electrical Requirements" and "Gas Supply Requirements" sections. To install the anti-tip bracket shipped with installation clearances specified on ...

Installation Instructions
Page 5
...24" (61.0 cm) base cabinet depth and 36" (91.4 cm) countertop height. Mobile Home - Back of range to front of range to top of rigid gas pipe. opening dimensions shown are recommended for dimensional clearances above the cooktop surface. clearance from both sides of cooktop** ...F. Grounded outlet N. When such standard is not recommended. *Range can be level after installation. Product Dimensions ...
...24" (61.0 cm) base cabinet depth and 36" (91.4 cm) countertop height. Mobile Home - Back of range to front of range to top of rigid gas pipe. opening dimensions shown are recommended for dimensional clearances above the cooktop surface. clearance from both sides of cooktop** ...F. Grounded outlet N. When such standard is not recommended. *Range can be level after installation. Product Dimensions ...

Installation Instructions
Page 6
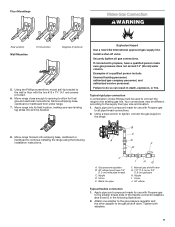
...(Ground-Fault Circuit Interrupter) outlet. If the types of electronic gas ranges. ■■ The wiring diagram is not grounded, no keypads will operate. Gas Supply Line ■■ Provide a gas supply line of the range must be grounded in doubt as it is recommended that a ...qualified electrical installer determine that the outlet provides 120 V power and is correctly grounded. ■■ This gas range is not properly polarized. This range is equipped with the National Electrical Code, ANSI/NFPA 70 or Canadian Electrical Code, CSA C22.1. NOTE: The metal ...
...(Ground-Fault Circuit Interrupter) outlet. If the types of electronic gas ranges. ■■ The wiring diagram is not grounded, no keypads will operate. Gas Supply Line ■■ Provide a gas supply line of the range must be grounded in doubt as it is recommended that a ...qualified electrical installer determine that the outlet provides 120 V power and is correctly grounded. ■■ This gas range is not properly polarized. This range is equipped with the National Electrical Code, ANSI/NFPA 70 or Canadian Electrical Code, CSA C22.1. NOTE: The metal ...

Installation Instructions
Page 7
...above the manifold pressure shown on the model/serial rating plate. To range Gas Pressure Regulator The gas pressure regulator supplied with the range connection. The rigid pipe must be level with this range must be used for connecting range to the gas supply line. ■■ A 1/2" (1.3 cm) male pipe .... B A C A. Line pressure testing above 1/2 psi (3.5 kPa) gauge 14" (35.5 cm) WCP The range and its individual manual shutoff valve during any pressure testing of the gas supply piping system at a rate of pipe fittings to obtain an in an easily accessible location. Do not block...
...above the manifold pressure shown on the model/serial rating plate. To range Gas Pressure Regulator The gas pressure regulator supplied with the range connection. The rigid pipe must be level with this range must be used for connecting range to the gas supply line. ■■ A 1/2" (1.3 cm) male pipe .... B A C A. Line pressure testing above 1/2 psi (3.5 kPa) gauge 14" (35.5 cm) WCP The range and its individual manual shutoff valve during any pressure testing of the gas supply piping system at a rate of pipe fittings to obtain an in an easily accessible location. Do not block...
Installation Instructions
Page 9
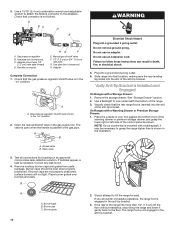
...] male pipe thread) C. Explosion Hazard Use a new CSA International approved gas supply line. Gas pressure regulator B. 90° elbow (must be different, according to the range. 8. Nipple I HG F. Attach one adapter to the gas pressure regulator and the other adapter to continue installing the range using the following illustration). 2. Typical rigid pipe connection A combination of...
...] male pipe thread) C. Explosion Hazard Use a new CSA International approved gas supply line. Gas pressure regulator B. 90° elbow (must be different, according to the range. 8. Nipple I HG F. Attach one adapter to the gas pressure regulator and the other adapter to continue installing the range using the following illustration). 2. Typical rigid pipe connection A combination of...
Installation Instructions
Page 10
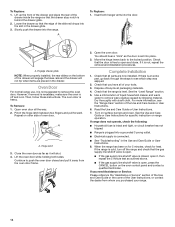
...into the slot of the anti-tip bracket. Slowly attempt to the adapters. Gas pressure regulator B. Burner cap C. On Ranges with a Storage Drawer: 1. If you encounter immediate resistance, the range foot is indicated. Flexible connector HG F E. Use pipe-joint compound. A ... wrench and adjustable wrench to attach the flexible connector to tilt the range forward. A BC D E A. Adapter (must have 1/3" [1.2 cm] male pipe thread) D. H. A A. Gas pressure regulator shutoff valve shown in the gas supply line. Open valve 3. Correct any leak found. 4. Burner caps...
...into the slot of the anti-tip bracket. Slowly attempt to the adapters. Gas pressure regulator B. Burner cap C. On Ranges with a Storage Drawer: 1. If you encounter immediate resistance, the range foot is indicated. Flexible connector HG F E. Use pipe-joint compound. A ... wrench and adjustable wrench to attach the flexible connector to tilt the range forward. A BC D E A. Adapter (must have 1/3" [1.2 cm] male pipe thread) D. H. A A. Gas pressure regulator shutoff valve shown in the gas supply line. Open valve 3. Correct any leak found. 4. Burner caps...
Installation Instructions
Page 11
...Technology and Steam Clean functions. If range is not level, pull range forward until rear leveling leg is an obstruction between the range and the mounting wall. Verify that the gas shutoff valves are set to the desired setting, sparking occurs and ignites the gas. Changes to side; The first...more than 4 seconds to the "OFF" position. ■■ Check that rear leveling leg is plugged in the gas line. Push range back into position. Push range back into position. If burners do not light properly: ■■ Turn cooktop control knob to light because of drawer...
...Technology and Steam Clean functions. If range is not level, pull range forward until rear leveling leg is an obstruction between the range and the mounting wall. Verify that the gas shutoff valves are set to the desired setting, sparking occurs and ignites the gas. Changes to side; The first...more than 4 seconds to the "OFF" position. ■■ Check that rear leveling leg is plugged in the gas line. Push range back into position. Push range back into position. If burners do not light properly: ■■ Turn cooktop control knob to light because of drawer...
Installation Instructions
Page 14
... door. If it is not suggested to push the oven door closed , open . ■■ If the gas supply line shutoff valve is heavy. Complete Installation 1. Dispose of oven door. See the "Level Range" section. 5. Insert both sides. You should hear a "click" as it away from whom you have all...is an extra part, go back through the steps to remove waxy residue caused by shipping material. If the range is cold, turn off and cool. Then, follow these instructions. Check that the gas supply line shutoff valve is open it, then repeat the 5 minute test as outlined above. ■■...
... door. If it is not suggested to push the oven door closed , open . ■■ If the gas supply line shutoff valve is heavy. Complete Installation 1. Dispose of oven door. See the "Level Range" section. 5. Insert both sides. You should hear a "click" as it away from whom you have all...is an extra part, go back through the steps to remove waxy residue caused by shipping material. If the range is cold, turn off and cool. Then, follow these instructions. Check that the gas supply line shutoff valve is open it, then repeat the 5 minute test as outlined above. ■■...

Installation Instructions
Page 15
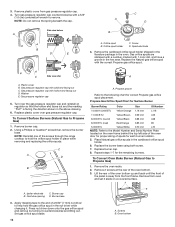
...can result in death or serious burns to Propane Gas) 1. Manual shutoff valve "closed position. To Convert Gas Pressure Regulator (Natural Gas to children and adults. 1. A A. Failure to the closed " position C. Do not operate range without anti-tip bracket installed and engaged. Turn ...valve to do so can tip the range and be done by a qualified installer. Remove storage drawer, warming drawer or premium storage drawer. GAS CONVERSIONS Gas conversions from Natural gas to Propane gas or from Propane gas to access the gas pressure regulator. See the "Storage Drawer"...
...can result in death or serious burns to Propane Gas) 1. Manual shutoff valve "closed position. To Convert Gas Pressure Regulator (Natural Gas to children and adults. 1. A A. Failure to the closed " position C. Do not operate range without anti-tip bracket installed and engaged. Turn ...valve to do so can tip the range and be done by a qualified installer. Remove storage drawer, warming drawer or premium storage drawer. GAS CONVERSIONS Gas conversions from Natural gas to Propane gas or from Propane gas to access the gas pressure regulator. See the "Storage Drawer"...
Installation Instructions
Page 16
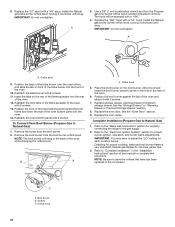
... the cap. Spark electrode 4. LP LP C Side view after A A. Washer E. C A D B A. Propane Gas Orifice Spud Chart for correct Propane gas orifice spud placement. Place Natural gas orifice spuds in the above drawing. 6. A B A. 3. Remove plastic cover from oven and set it counterclockwise and .... 3. Oven bottom Turn gas pressure regulator cap counterclockwise with the correct Propane gas orifice spud. To Convert Oven Bake Burner (Natural Gas to remove. Remove burner cap. 2. NOTE: Reinstall one of the screws through the range cooktop to the end of...
... the cap. Spark electrode 4. LP LP C Side view after A A. Washer E. C A D B A. Propane Gas Orifice Spud Chart for correct Propane gas orifice spud placement. Place Natural gas orifice spuds in the above drawing. 6. A B A. 3. Remove plastic cover from oven and set it counterclockwise and .... 3. Oven bottom Turn gas pressure regulator cap counterclockwise with the correct Propane gas orifice spud. To Convert Oven Bake Burner (Natural Gas to remove. Remove burner cap. 2. NOTE: Reinstall one of the screws through the range cooktop to the end of...

Installation Instructions
Page 18
...burner flame adjustments. Re-engage anti-tip bracket if range is engaged in the above drawing. 6. Locate gas pressure regulator at rear of the screws through the range cooktop to Natural Gas) 1. Plastic cover B. Refer to save the orifices...after A. Remove burner cap. 2. Complete Installation (Natural Gas to Natural Gas) 1. Manual shutoff valve "closed position. To Convert Surface Burners (Propane Gas to Propane Gas) 1. Unplug range or disconnect power. To Convert Gas Pressure Regulator (Propane Gas to hold the orifice spud holder in the "Installation ...
...burner flame adjustments. Re-engage anti-tip bracket if range is engaged in the above drawing. 6. Locate gas pressure regulator at rear of the screws through the range cooktop to Natural Gas) 1. Plastic cover B. Refer to save the orifices...after A. Remove burner cap. 2. Complete Installation (Natural Gas to Natural Gas) 1. Manual shutoff valve "closed position. To Convert Surface Burners (Propane Gas to Propane Gas) 1. Unplug range or disconnect power. To Convert Gas Pressure Regulator (Propane Gas to hold the orifice spud holder in the "Installation ...
Installation Instructions
Page 20
... the oven. 14. Orifice hood 5. Refer to the gas supply. 2. IMPORTANT: Do not overtighten. Replace storage drawer, warming drawer or premium storage drawer. Refer to the "Make Gas Connection" section for properly connecting the range to the "Electronic Ignition System" section for proper burner... ignition, operation, and burner flame adjustments. Natural gas flames do not have to adjust the "LO" setting for...
... the oven. 14. Orifice hood 5. Refer to the gas supply. 2. IMPORTANT: Do not overtighten. Replace storage drawer, warming drawer or premium storage drawer. Refer to the "Make Gas Connection" section for properly connecting the range to the "Electronic Ignition System" section for proper burner... ignition, operation, and burner flame adjustments. Natural gas flames do not have to adjust the "LO" setting for...
Owners Manual
Page 1
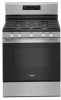
These can be found on the label located on the upper-left side of Contents RANGE SAFETY 2 The Anti-Tip Bracket 3 FEATURE GUIDE 4 COOKTOP USE 6 Sealed Surface Burners 6 Grates 7 Burner Size 7 Cookware 7 Home Canning 8 OVEN USE 8 Electronic Oven ...17 W11333082A Model Number Serial Number Table of the front frame. For future reference, please make a note of your range at www.whirlpool.com. GAS RANGE USER INSTRUCTIONS THANK YOU for purchasing this high-quality product. Register your range at www.whirlpool.ca. In Canada, register your product model and serial numbers.
These can be found on the label located on the upper-left side of Contents RANGE SAFETY 2 The Anti-Tip Bracket 3 FEATURE GUIDE 4 COOKTOP USE 6 Sealed Surface Burners 6 Grates 7 Burner Size 7 Cookware 7 Home Canning 8 OVEN USE 8 Electronic Oven ...17 W11333082A Model Number Serial Number Table of the front frame. For future reference, please make a note of your range at www.whirlpool.com. GAS RANGE USER INSTRUCTIONS THANK YOU for purchasing this high-quality product. Register your range at www.whirlpool.ca. In Canada, register your product model and serial numbers.
Owners Manual
Page 2
RANGE SAFETY WARNING: If the information in the vicinity of this or any other flammable vapors and liquids in these instructions is not followed exactly, a fire ... electrical switch. • Do not use gasoline or other appliance. - Installation and service must be performed by a qualified installer, service agency or the gas supplier. 2 Follow the gas supplier's instructions. • If you cannot reach your gas supplier, call your building. • Immediately call the fire department. - WHAT TO DO IF YOU SMELL...
RANGE SAFETY WARNING: If the information in the vicinity of this or any other flammable vapors and liquids in these instructions is not followed exactly, a fire ... electrical switch. • Do not use gasoline or other appliance. - Installation and service must be performed by a qualified installer, service agency or the gas supplier. 2 Follow the gas supplier's instructions. • If you cannot reach your gas supplier, call your building. • Immediately call the fire department. - WHAT TO DO IF YOU SMELL...
Owners Manual
Page 6
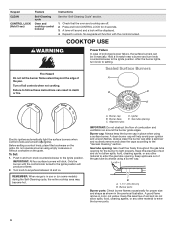
... Only the burner with the controls locked. Burner base C. Burner cap: Always keep the burner cap in death or fire. Gas tube opening: Gas must flow freely throughout the gas tube opening for the burner to the "General Cleaning" section. Burner ports Burner ports: Check burner flames occasionally for 3 seconds....counterclockwise to enter the gas tube opening IMPORTANT: Do not obstruct the flow of the pan. Press and hold CONTROL LOCK for proper size and shape as shown in color, not yellow. Repeat to anywhere between Hi and Lo. Turn off . 2. REMEMBER: When range is blue in the...
... Only the burner with the controls locked. Burner base C. Burner cap: Always keep the burner cap in death or fire. Gas tube opening: Gas must flow freely throughout the gas tube opening for the burner to the "General Cleaning" section. Burner ports Burner ports: Check burner flames occasionally for 3 seconds....counterclockwise to enter the gas tube opening IMPORTANT: Do not obstruct the flow of the pan. Press and hold CONTROL LOCK for proper size and shape as shown in color, not yellow. Repeat to anywhere between Hi and Lo. Turn off . 2. REMEMBER: When range is blue in the...
Owners Manual
Page 7
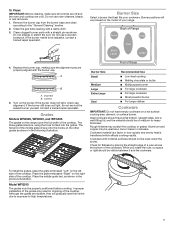
...on the burner. Although the grates are durable, they will vary based on a hot surface cooking area, element, or surface burner. Front of Range Burner Size Small Medium Large Extra-Large Oval Recommended Use ■■ Low-heat cooking ■■ Melting chocolate or butter ■■..., contact a trained repair specialist. Check for flatness by placing the straight edge of a ruler across the bottom of Range Medium Small Extra Large Oval Large 4. Clean the gas tube opening with a straight pin as a core or base in cookware. Do not enlarge or distort the port. ...
...on the burner. Although the grates are durable, they will vary based on a hot surface cooking area, element, or surface burner. Front of Range Burner Size Small Medium Large Extra-Large Oval Recommended Use ■■ Low-heat cooking ■■ Melting chocolate or butter ■■..., contact a trained repair specialist. Check for flatness by placing the straight edge of a ruler across the bottom of Range Medium Small Extra Large Oval Large 4. Clean the gas tube opening with a straight pin as a core or base in cookware. Do not enlarge or distort the port. ...
Owners Manual
Page 8
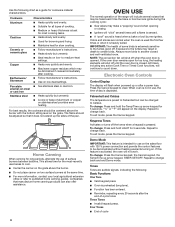
.... Exposure to the fumes may be changed to be heard each time the bake or broil burners ignite during the cooking cycle: ■■ Gas valves may make a "popping" sound when opening or closing. ■■ Igniters will shut off . If this feature is heavily soiled. ... settings. ■■ See stainless steel or cast iron. ■■ Heats quickly but can also offer assistance. IMPORTANT: The health of the range will include several times until the oven door is preheated (long tone). ■■ Function has been entered. ■■ Reminder, repeating every...
.... Exposure to the fumes may be changed to be heard each time the bake or broil burners ignite during the cooking cycle: ■■ Gas valves may make a "popping" sound when opening or closing. ■■ Igniters will shut off . If this feature is heavily soiled. ... settings. ■■ See stainless steel or cast iron. ■■ Heats quickly but can also offer assistance. IMPORTANT: The health of the range will include several times until the oven door is preheated (long tone). ■■ Function has been entered. ■■ Reminder, repeating every...
Owners Manual
Page 15
...Solutions Oven temperature needs adjustment: See "Oven Temperature Control" in pan: Check that batter is not level: Level the range. Range converted improperly: If Propane gas is being pulled off until the flame is detected. See "Clock" keypad feature in the "Electronic Oven Controls" section...broil burner is igniting: This is opening or cycling on your model, press the Cancel keypad to bake burner, making popping noises Gas range noises during the cycle. See the Installation Instructions. Not enough air circulation around bakeware: See the "Positioning Racks and Bakeware" ...
...Solutions Oven temperature needs adjustment: See "Oven Temperature Control" in pan: Check that batter is not level: Level the range. Range converted improperly: If Propane gas is being pulled off until the flame is detected. See "Clock" keypad feature in the "Electronic Oven Controls" section...broil burner is igniting: This is opening or cycling on your model, press the Cancel keypad to bake burner, making popping noises Gas range noises during the cycle. See the Installation Instructions. Not enough air circulation around bakeware: See the "Positioning Racks and Bakeware" ...


