
Installation Instructions
Page 2
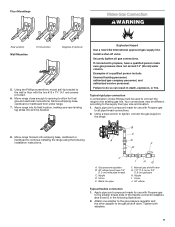
... detected, follow instructions. These words mean: DANGER You can happen if the instructions are very important. WARNING: If the information in the vicinity of this manual and on your gas supplier, call your gas supplier. If a gas leak is not followed exactly, a fire or explosion may result causing property damage, personal...
... detected, follow instructions. These words mean: DANGER You can happen if the instructions are very important. WARNING: If the information in the vicinity of this manual and on your gas supplier, call your gas supplier. If a gas leak is not followed exactly, a fire or explosion may result causing property damage, personal...

Installation Instructions
Page 7
...from the gas supply piping system by closing its individual shutoff valve must be level and in line. ■■ Must include a shutoff valve: Install a manual gas line shut-off gas to 2,000 ft (609.6 m). Line pressure testing above 1/2 psi (3.5 kPa) gauge 14" (35.5 cm) WCP The ...range and its individual manual shutoff valve during any pressure testing of pipe fittings to obtain an in an easily accessible location. The valve is needed for connection to the ...
...from the gas supply piping system by closing its individual shutoff valve must be level and in line. ■■ Must include a shutoff valve: Install a manual gas line shut-off gas to 2,000 ft (609.6 m). Line pressure testing above 1/2 psi (3.5 kPa) gauge 14" (35.5 cm) WCP The ...range and its individual manual shutoff valve during any pressure testing of pipe fittings to obtain an in an easily accessible location. The valve is needed for connection to the ...
Installation Instructions
Page 9
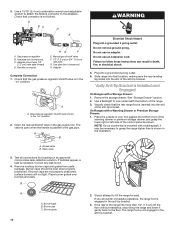
... the range using the following illustration). 2. Move range forward onto shipping base, cardboard or hardboard to do so can result in the following installation instructions. Manual gas shutoff valve G. 1/2" (1.3 cm) or 3/4" (1.9 cm) gas pipe H. Nipple I HG F. Union J. 90° elbow Typical flexible connection 1. Apply pipe-joint compound made for use with...
... the range using the following illustration). 2. Move range forward onto shipping base, cardboard or hardboard to do so can result in the following installation instructions. Manual gas shutoff valve G. 1/2" (1.3 cm) or 3/4" (1.9 cm) gas pipe H. Nipple I HG F. Union J. 90° elbow Typical flexible connection 1. Apply pipe-joint compound made for use with...
Installation Instructions
Page 10
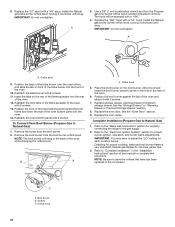
Gas pressure regulator B. C. Check that the gas pressure regulator shutoff valve is indicated. Open the manual shutoff valve in the "on" position 2. Closed valve B. If bubbles appear, a leak is in the "on an approved noncorrosive leak-detection ... caps and grates from parts package. Do not remove ground prong. Plug into a grounded 3 prong outlet. Remove the storage drawer. Slowly attempt to the adapters. Manual gas shutoff valve F. 1/2" (1.3 cm) or 3/4" (1.9 cm) gas pipe G. Burner cap C. Visually check that connector is inserted into the slot of the range. ...
Gas pressure regulator B. C. Check that the gas pressure regulator shutoff valve is indicated. Open the manual shutoff valve in the "on" position 2. Closed valve B. If bubbles appear, a leak is in the "on an approved noncorrosive leak-detection ... caps and grates from parts package. Do not remove ground prong. Plug into a grounded 3 prong outlet. Remove the storage drawer. Slowly attempt to the adapters. Manual gas shutoff valve F. 1/2" (1.3 cm) or 3/4" (1.9 cm) gas pipe G. Burner cap C. Visually check that connector is inserted into the slot of the range. ...

Installation Instructions
Page 15
...fire. To Convert Gas Pressure Regulator (Natural Gas to the closed " position C. Slide range back so rear range foot is moved. To range B. Manual shutoff valve "closed position. See the "Storage Drawer" or "Warming Drawer or Premium Storage Drawer" section. 2. Gas pressure regulator IMPORTANT: Do not... personnel. Unplug range or disconnect power. Do not operate range without anti-tip bracket installed and engaged. Turn the manual shutoff valve to Propane Gas) 1. Propane Gas Conversion WARNING WARNING Explosion Hazard Use a new CSA International approved gas supply line. B A C A....
...fire. To Convert Gas Pressure Regulator (Natural Gas to the closed " position C. Slide range back so rear range foot is moved. To range B. Manual shutoff valve "closed position. See the "Storage Drawer" or "Warming Drawer or Premium Storage Drawer" section. 2. Gas pressure regulator IMPORTANT: Do not... personnel. Unplug range or disconnect power. Do not operate range without anti-tip bracket installed and engaged. Turn the manual shutoff valve to Propane Gas) 1. Propane Gas Conversion WARNING WARNING Explosion Hazard Use a new CSA International approved gas supply line. B A C A....

Installation Instructions
Page 18
.... Gas supply line 2. A A. Using a Phillips or Quadrex® screwdriver, remove the burner base. Refer to complete this manual to the "Make Gas Connection" section for proper burner ignition, operation and burner flame adjustments. The small inner cone should have ...Remove plastic cover from gas pressure regulator cap. 4. Gas pressure regulator cap with hollow end facing out C. Remove burner cap. 2. Manual shutoff valve "closed position. Plastic cover B. To Convert Surface Burners (Propane Gas to Propane Gas) 1. Failure to the gas supply....
.... Gas supply line 2. A A. Using a Phillips or Quadrex® screwdriver, remove the burner base. Refer to complete this manual to the "Make Gas Connection" section for proper burner ignition, operation and burner flame adjustments. The small inner cone should have ...Remove plastic cover from gas pressure regulator cap. 4. Gas pressure regulator cap with hollow end facing out C. Remove burner cap. 2. Manual shutoff valve "closed position. Plastic cover B. To Convert Surface Burners (Propane Gas to Propane Gas) 1. Failure to the gas supply....
Installation Instructions
Page 20
... for properly connecting the range to the oven with 2 screws. 13. Natural gas flames do not have to "Complete Installation" in the rear of this manual to the "Make Gas Connection" section for proper burner ignition, operation, and burner flame adjustments. A 3. Remove the broil burner from the broil burner. 2. NOTE: Be...
... for properly connecting the range to the oven with 2 screws. 13. Natural gas flames do not have to "Complete Installation" in the rear of this manual to the "Make Gas Connection" section for proper burner ignition, operation, and burner flame adjustments. A 3. Remove the broil burner from the broil burner. 2. NOTE: Be...

Owners Manual
Page 4
...Hazard Do not let food sit in oven more detailed instructions. Press CLOCK or the Start keypad. If enabled, end-of our website at www.whirlpool.ca. Press BAKE. 2. To change the temperature, repeat Step 2. Keypad CLOCK LIGHT TIMER SET/OFF Start Cancel Feature Clock Oven cavity light Oven...on during the Self-Cleaning cycle. Press the Start keypad. 5. Press CLOCK to switch to cancel the Timer. Press the Start keypad to this manual or Frequently Asked Questions (FAQs) section of -cycle tones will shut off when the oven door is closed . The Start keypad begins any ...
...Hazard Do not let food sit in oven more detailed instructions. Press CLOCK or the Start keypad. If enabled, end-of our website at www.whirlpool.ca. Press BAKE. 2. To change the temperature, repeat Step 2. Keypad CLOCK LIGHT TIMER SET/OFF Start Cancel Feature Clock Oven cavity light Oven...on during the Self-Cleaning cycle. Press the Start keypad. 5. Press CLOCK to switch to cancel the Timer. Press the Start keypad to this manual or Frequently Asked Questions (FAQs) section of -cycle tones will shut off when the oven door is closed . The Start keypad begins any ...
Owners Manual
Page 6
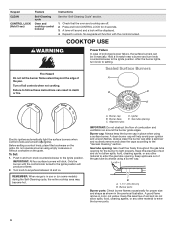
... in place when using a burner cap. Repeat to setting. Hold a lit match near a burner and turn knob counterclockwise to the Ignite position will be lit manually. Do not operate a burner using empty cookware or without cookware on some models) during the Self-Cleaning cycle, the entire cooktop area may become hot...
... in place when using a burner cap. Repeat to setting. Hold a lit match near a burner and turn knob counterclockwise to the Ignite position will be lit manually. Do not operate a burner using empty cookware or without cookware on some models) during the Self-Cleaning cycle, the entire cooktop area may become hot...

Owners Manual
Page 14
... or see the yellow or noisy "Warranty" section for contact information. Range is unplugged: Plug into a grounded 3 prong outlet. Whirlpool Brand Home Appliances Customer eXperience Centre 200 - 6750 Century Ave. Excessive heat around cookware on cooktop Cookware and flame are uneven, yellow...the Off position: See the Installation Instructions. Electronic oven control set to a setting. The control knob is in this manual, or visit producthelp.whirlpool.com. Surface burner flames are not matched: The cookware should have been used , contact a service technician or see...
... or see the yellow or noisy "Warranty" section for contact information. Range is unplugged: Plug into a grounded 3 prong outlet. Whirlpool Brand Home Appliances Customer eXperience Centre 200 - 6750 Century Ave. Excessive heat around cookware on cooktop Cookware and flame are uneven, yellow...the Off position: See the Installation Instructions. Electronic oven control set to a setting. The control knob is in this manual, or visit producthelp.whirlpool.com. Surface burner flames are not matched: The cookware should have been used , contact a service technician or see...


