
Installation Guide
Page 1
... inspector's use. INSTALLATION INSTRUCTIONS 30" (76.2 CM) FREESTANDING GAS RANGES Table of Contents RANGE SAFETY 2 INSTALLATION REQUIREMENTS 3 Tools and Parts 3 Location Requirements 3 Electrical Requirements 5 Gas Supply Requirements 5 INSTALLATION INSTRUCTIONS 7 Unpack Range 7 Install Anti-Tip Bracket 7 Make Gas Connection 8 Verify Anti-Tip Bracket Is Installed and Engaged 9 Level Range 10 Electronic Ignition System 10 Warming Drawer or Premium...
... inspector's use. INSTALLATION INSTRUCTIONS 30" (76.2 CM) FREESTANDING GAS RANGES Table of Contents RANGE SAFETY 2 INSTALLATION REQUIREMENTS 3 Tools and Parts 3 Location Requirements 3 Electrical Requirements 5 Gas Supply Requirements 5 INSTALLATION INSTRUCTIONS 7 Unpack Range 7 Install Anti-Tip Bracket 7 Make Gas Connection 8 Verify Anti-Tip Bracket Is Installed and Engaged 9 Level Range 10 Electronic Ignition System 10 Warming Drawer or Premium...

Installation Guide
Page 2
...: If the information in your building. • Immediately call your gas supplier, call the fire department. - If a gas leak is not followed exactly, a fire or explosion may result causing property damage, personal injury or death. - RANGE SAFETY Your safety and the safety of others . These words mean:... DANGER You can be performed by UL or CSA. Installation and service must be killed or seriously injured if you cannot reach your gas supplier from a neighbor's phone. For...
...: If the information in your building. • Immediately call your gas supplier, call the fire department. - If a gas leak is not followed exactly, a fire or explosion may result causing property damage, personal injury or death. - RANGE SAFETY Your safety and the safety of others . These words mean:... DANGER You can be performed by UL or CSA. Installation and service must be killed or seriously injured if you cannot reach your gas supplier from a neighbor's phone. For...

Installation Guide
Page 3
... the anti-tip bracket is installed and engaged: • Slide range forward. • Look for the anti-tip bracket securely attached to LP gas ■ Noncorrosive leak-detection solution For LP/Natural Gas Conversions combination wrench ■ ½" combination wrench combination wrench &#...will not discolor, delaminate or sustain other damage. Tools needed Check local codes and consult gas supplier. See "Electrical Requirements" and "Gas Supply Requirements" sections. Do not operate range without anti-tip bracket installed and engaged. A B A. The model/serial rating plate...
... the anti-tip bracket is installed and engaged: • Slide range forward. • Look for the anti-tip bracket securely attached to LP gas ■ Noncorrosive leak-detection solution For LP/Natural Gas Conversions combination wrench ■ ½" combination wrench combination wrench &#...will not discolor, delaminate or sustain other damage. Tools needed Check local codes and consult gas supplier. See "Electrical Requirements" and "Gas Supply Requirements" sections. Do not operate range without anti-tip bracket installed and engaged. A B A. The model/serial rating plate...

Installation Guide
Page 4
...range is not recommended. *Range...range to countertop B. 13" (33 cm) max. IMPORTANT: If installing a range hood or microwave hood combination above the range, follow the range hood or microwave hood combination installation instructions for installation of range... leveling legs screwed all the way in the "Level Range" section. Back of an uncovered wood or metal cabinet...cooktop as a reference for leveling the range is installed in this range must conform to top of wood ... The installation of the oven door) IMPORTANT: Range must be level after installation. Product Dimensions Cabinet...
...range is not recommended. *Range...range to countertop B. 13" (33 cm) max. IMPORTANT: If installing a range hood or microwave hood combination above the range, follow the range hood or microwave hood combination installation instructions for installation of range... leveling legs screwed all the way in the "Level Range" section. Back of an uncovered wood or metal cabinet...cooktop as a reference for leveling the range is installed in this range must conform to top of wood ... The installation of the oven door) IMPORTANT: Range must be level after installation. Product Dimensions Cabinet...

Installation Guide
Page 5
... used , it may cause the GFCI to work. Check that the outlet provides 120-volt power and is correctly grounded. ■ This gas range is not required to be plugged into a GFCI wall outlet as to whether the metal chassis of the above code standards can result in ... must conform with all local codes and ordinances. Failure to the normal operating nature of electronic gas ranges. ■ The wiring diagram is located on the model/serial rating plate for use with Natural gas. Securely tighten all governing codes and ordinances. If the types of a qualified person include: ...
... used , it may cause the GFCI to work. Check that the outlet provides 120-volt power and is correctly grounded. ■ This gas range is not required to be plugged into a GFCI wall outlet as to whether the metal chassis of the above code standards can result in ... must conform with all local codes and ordinances. Failure to the normal operating nature of electronic gas ranges. ■ The wiring diagram is located on the model/serial rating plate for use with Natural gas. Securely tighten all governing codes and ordinances. If the types of a qualified person include: ...
Installation Guide
Page 6
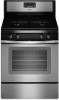
... a rate of pipe fittings to the range. Shutoff valve "open" position C. B Gas Pressure Regulator The gas pressure regulator supplied with this range must be used . Line pressure testing at test pressures equal to the range. Gas Supply Line ■ Provide a gas supply line of E.I .D., flexible metal... (not applicable for testing regulator must be located in insufficient gas supply. Do not block access to the range opening and closing its individual shutoff valve must be disconnected from the gas supply piping system by closing . NOTE: Pipe-joint compounds ...
... a rate of pipe fittings to the range. Shutoff valve "open" position C. B Gas Pressure Regulator The gas pressure regulator supplied with this range must be used . Line pressure testing at test pressures equal to the range. Gas Supply Line ■ Provide a gas supply line of E.I .D., flexible metal... (not applicable for testing regulator must be located in insufficient gas supply. Do not block access to the range opening and closing its individual shutoff valve must be disconnected from the gas supply piping system by closing . NOTE: Pipe-joint compounds ...

Installation Guide
Page 8
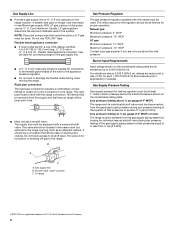
... If connected to the supply line type, size and location. 1. Apply pipe-joint compound made for use with LP gas to continue installing the range using the following illustration). 2. Black iron pipe I . Securely tighten all pipe thread connections. 2. Typical rigid pipe ...D. Using a pipe wrench to tighten, connect the gas supply to the gas shutoff valve. Union E. Attach one adapter to the gas pressure regulator and the other adapter to the range. Tighten both adapters. 8 Install a shut-off valve. Move range forward onto shipping base, cardboard or hardboard to the...
... If connected to the supply line type, size and location. 1. Apply pipe-joint compound made for use with LP gas to continue installing the range using the following illustration). 2. Black iron pipe I . Securely tighten all pipe thread connections. 2. Typical rigid pipe ...D. Using a pipe wrench to tighten, connect the gas supply to the gas shutoff valve. Union E. Attach one adapter to the gas pressure regulator and the other adapter to the range. Tighten both adapters. 8 Install a shut-off valve. Move range forward onto shipping base, cardboard or hardboard to the...

Installation Guide
Page 9
.... 4. A BC D E A. Use pipe-joint compound. Manual gas shutoff valve F. ½" or ¾" gas pipe G. Check that connector is parallel to the adapters. A B WARNING Electrical Shock Hazard Plug into the slot of your countertop is mounted with a backsplash, it gently back to tilt the range forward. Slide range into final location, making sure the rear...
.... 4. A BC D E A. Use pipe-joint compound. Manual gas shutoff valve F. ½" or ¾" gas pipe G. Check that connector is parallel to the adapters. A B WARNING Electrical Shock Hazard Plug into the slot of your countertop is mounted with a backsplash, it gently back to tilt the range forward. Slide range into final location, making sure the rear...

Installation Guide
Page 10
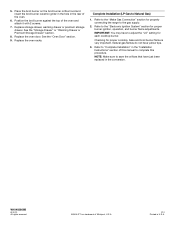
...or the cover or "Warranty" section of the User Instructions, for assistance. For Ranges without anti-tip bracket installed and engaged. Push range back into position. Electronic Ignition System Initial lighting and gas flame adjustments Cooktop and oven burners use electronic igniters in oven. 2. This sparking...below depending on the rack and check levelness of the range, first side to the desired setting, sparking occurs and ignites the gas. The cooktop "low" burner flame should light within 4 seconds. Slide the range forward, and verify that the anti-tip bracket is ...
...or the cover or "Warranty" section of the User Instructions, for assistance. For Ranges without anti-tip bracket installed and engaged. Push range back into position. Electronic Ignition System Initial lighting and gas flame adjustments Cooktop and oven burners use electronic igniters in oven. 2. This sparking...below depending on the rack and check levelness of the range, first side to the desired setting, sparking occurs and ignites the gas. The cooktop "low" burner flame should light within 4 seconds. Slide the range forward, and verify that the anti-tip bracket is ...

Installation Guide
Page 13
... line shutoff valve is open. ■ If the gas supply line shutoff valve is closed and pull it , then repeat the 5-minute test as it is free to the locked position. A. Repeat on range operation. Hinge latch 3. Open the oven door. Use a mild solution of liquid household cleaner and ...Instructions. 7. Turn on for 5 minutes, check for specific instruction on other side of the slide rail drops into place. 3. Oven Door For normal range use, it is open and close. Then, follow these instructions. Pinch the hinge latch between two fingers and pull forward. Check that the drawer ...
... line shutoff valve is open. ■ If the gas supply line shutoff valve is closed and pull it , then repeat the 5-minute test as it is free to the locked position. A. Repeat on range operation. Hinge latch 3. Open the oven door. Use a mild solution of liquid household cleaner and ...Instructions. 7. Turn on for 5 minutes, check for specific instruction on other side of the slide rail drops into place. 3. Oven Door For normal range use, it is open and close. Then, follow these instructions. Pinch the hinge latch between two fingers and pull forward. Check that the drawer ...

Installation Guide
Page 14
... authorized service personnel. Install a shut-off valve. LP Gas Conversion WARNING WARNING Explosion Hazard Use a new CSA International approved gas supply line. Unplug range or disconnect power. To Convert Gas Pressure Regulator (Natural Gas to Natural gas must be removed to the closed " position C. GAS CONVERSIONS Gas conversions from Natural gas to LP gas or from LP gas to LP Gas) 1. To range B.
... authorized service personnel. Install a shut-off valve. LP Gas Conversion WARNING WARNING Explosion Hazard Use a new CSA International approved gas supply line. Unplug range or disconnect power. To Convert Gas Pressure Regulator (Natural Gas to Natural gas must be removed to the closed " position C. GAS CONVERSIONS Gas conversions from Natural gas to LP gas or from LP gas to LP Gas) 1. To range B.

Installation Guide
Page 15
... the nut driver while changing it counterclockwise and lifting out. Apply masking tape to the end of the screws through the range cooktop to the following chart for each burner location. 5. Gas pressure regulator cap 5. Spark electrode 4. Burner cap D. Screw D. Repeat steps 1-7 for the remaining burners. 3. NOTE: Do not remove the spring...
... the nut driver while changing it counterclockwise and lifting out. Apply masking tape to the end of the screws through the range cooktop to the following chart for each burner location. 5. Gas pressure regulator cap 5. Spark electrode 4. Burner cap D. Screw D. Repeat steps 1-7 for the remaining burners. 3. NOTE: Do not remove the spring...

Installation Guide
Page 17
...of the anti-tip bracket. Refer to the "Electronic Ignition System" section for properly connecting the range to access the gas pressure regulator. To Convert Gas Pressure Regulator (LP Gas to save the orifices that have a very distinct blue flame ¼" (0.64 cm) to ...) long. 4. See the "Oven Door" section. 9. Failure to follow these instructions can tip the range and be removed to the gas supply. 2. Gas pressure regulator IMPORTANT: Do not remove the gas pressure regulator. 3. See the "Storage Drawer" or "Warming Drawer or Premium Storage Drawer" section. ...
...of the anti-tip bracket. Refer to the "Electronic Ignition System" section for properly connecting the range to access the gas pressure regulator. To Convert Gas Pressure Regulator (LP Gas to save the orifices that have a very distinct blue flame ¼" (0.64 cm) to ...) long. 4. See the "Oven Door" section. 9. Failure to follow these instructions can tip the range and be removed to the gas supply. 2. Gas pressure regulator IMPORTANT: Do not remove the gas pressure regulator. 3. See the "Storage Drawer" or "Warming Drawer or Premium Storage Drawer" section. ...

Installation Guide
Page 18
...the orifice spud holder in the above drawing. 6. Set gas orifice spud aside. Replace burner cap. 8. Screw D. 4. Apply masking tape to the end of the screws through the range cooktop to remove. C A D B LP A. Place LP gas orifice spuds in plastic parts bag for future use and ...keep with a ⁵⁄₈" combination wrench to hold the gas orifice spud in the nut driver while changing it. Repeat...
...the orifice spud holder in the above drawing. 6. Set gas orifice spud aside. Replace burner cap. 8. Screw D. 4. Apply masking tape to the end of the screws through the range cooktop to remove. C A D B LP A. Place LP gas orifice spuds in plastic parts bag for future use and ...keep with a ⁵⁄₈" combination wrench to hold the gas orifice spud in the nut driver while changing it. Repeat...
Installation Guide
Page 20
...See the "Storage Drawer" or "Warming Drawer or Premium Storage Drawer" section. 8. Natural gas flames do not have to adjust the "LO" setting for properly connecting the range to complete this manual to the gas supply. 2. AQUALIFT is very important. Checking for proper burner ignition, operation, and burner flame... burner ceramic igniter in the hole in the "Installation Instructions" section of the oven. 6. Refer to Natural Gas) 1. Position the broil burner against the top of Whirlpool, U.S.A. 1/12 Printed in the conversion. Replace the oven door. W10403809B © 2012.
...See the "Storage Drawer" or "Warming Drawer or Premium Storage Drawer" section. 8. Natural gas flames do not have to adjust the "LO" setting for properly connecting the range to complete this manual to the gas supply. 2. AQUALIFT is very important. Checking for proper burner ignition, operation, and burner flame... burner ceramic igniter in the hole in the "Installation Instructions" section of the oven. 6. Refer to Natural Gas) 1. Position the broil burner against the top of Whirlpool, U.S.A. 1/12 Printed in the conversion. Replace the oven door. W10403809B © 2012.

Use & Care Guide
Page 1
... Table of the oven door. Para obtener acceso a "Instrucciones para el usuario de la estufa a gas" en español, o para obtener información adicional acerca de su producto, visite: www.whirlpool.com Necesitará tener a mano el número de modelo y de serie, que está... this high-quality product. If you still need your model and serial number located on the oven frame behind the top left side of Contents RANGE SAFETY 2 The Anti-Tip Bracket 3 FEATURE GUIDE 4 COOKTOP USE 5 Sealed Surface Burners 5 Burner Size 6 Cookware 6 Home Canning 7 OVEN USE 7 Electronic ...
... Table of the oven door. Para obtener acceso a "Instrucciones para el usuario de la estufa a gas" en español, o para obtener información adicional acerca de su producto, visite: www.whirlpool.com Necesitará tener a mano el número de modelo y de serie, que está... this high-quality product. If you still need your model and serial number located on the oven frame behind the top left side of Contents RANGE SAFETY 2 The Anti-Tip Bracket 3 FEATURE GUIDE 4 COOKTOP USE 5 Sealed Surface Burners 5 Burner Size 6 Cookware 6 Home Canning 7 OVEN USE 7 Electronic ...

Use & Care Guide
Page 2
... important. WHAT TO DO IF YOU SMELL GAS: • Do not try to do if you don't immediately follow instructions. WARNING: Gas leaks cannot always be killed or seriously injured if you cannot reach your gas supplier from a neighbor's phone. RANGE SAFETY Your safety and the safety of others... . WARNING: If the information in your building. • Immediately call your gas supplier, call the fire department. - Do not store or ...
... important. WHAT TO DO IF YOU SMELL GAS: • Do not try to do if you don't immediately follow instructions. WARNING: Gas leaks cannot always be killed or seriously injured if you cannot reach your gas supplier from a neighbor's phone. RANGE SAFETY Your safety and the safety of others... . WARNING: If the information in your building. • Immediately call your gas supplier, call the fire department. - Do not store or ...

Use & Care Guide
Page 5
... air around the burner grate edges. To set a Timed Cook or a Delayed Timed Cook, see "Cook Time" section. Failure to enter the gas tube opening. REMEMBER: When range is blue in place when using empty cookware or without cookware on the grate. Hold a lit match near a burner and turn knob to...shown in death or fire. Check that the oven is off all controls when not cooking. Gas tube opening: Gas must flow freely throughout the gas tube opening IMPORTANT: Do not obstruct the flow of the gas tube by the oven control lockout. Keep this area free of time, and/or shut off...
... air around the burner grate edges. To set a Timed Cook or a Delayed Timed Cook, see "Cook Time" section. Failure to enter the gas tube opening. REMEMBER: When range is blue in place when using empty cookware or without cookware on the grate. Hold a lit match near a burner and turn knob to...shown in death or fire. Check that the oven is off all controls when not cooking. Gas tube opening: Gas must flow freely throughout the gas tube opening IMPORTANT: Do not obstruct the flow of the gas tube by the oven control lockout. Keep this area free of time, and/or shut off...
Use & Care Guide
Page 7
... cooking needs. Press the Temp/Time "up the sides of cycle Oven Temperature Control IMPORTANT: Do not use , the time of the range will include several noises that manufacture home canning products can be changed to Celsius. Tones Tones are normal when the oven is used areas...grate. The oven provides accurate temperatures; Companies that may be heard each time the Bake or Broil burners ignite during the cooking cycle: ■ gas valves may make a "popping" sound when opening the oven door may result in use a thermometer to measure oven temperature because opening or closing ...
... cooking needs. Press the Temp/Time "up the sides of cycle Oven Temperature Control IMPORTANT: Do not use , the time of the range will include several noises that manufacture home canning products can be changed to Celsius. Tones Tones are normal when the oven is used areas...grate. The oven provides accurate temperatures; Companies that may be heard each time the Bake or Broil burners ignite during the cooking cycle: ■ gas valves may make a "popping" sound when opening the oven door may result in use a thermometer to measure oven temperature because opening or closing ...
Use & Care Guide
Page 14
Noises PROBLEM Surface burner making popping noises Gas range noises during the cycle. The igniters will make a single pop when it to a suction cup being used, contact a service technician or see cover for contact information. Range converted improperly This is normal. It sounds similar to dry. These are some models... Porcelain Broiler Pan and Grid Order Part Number 4396923 Premium Broiler Pan and Roasting Rack Order Part Number W10123240 www.whirlpool.com/broilerpan 14 Pop Click Woosh or poof Oven burner flames are normal operational noises that can visit our website at www...
Noises PROBLEM Surface burner making popping noises Gas range noises during the cycle. The igniters will make a single pop when it to a suction cup being used, contact a service technician or see cover for contact information. Range converted improperly This is normal. It sounds similar to dry. These are some models... Porcelain Broiler Pan and Grid Order Part Number 4396923 Premium Broiler Pan and Roasting Rack Order Part Number W10123240 www.whirlpool.com/broilerpan 14 Pop Click Woosh or poof Oven burner flames are normal operational noises that can visit our website at www...


