
Installation Guide
Page 1
.... W10403809B Installer: Leave installation instructions with the homeowner. INSTALLATION INSTRUCTIONS 30" (76.2 CM) FREESTANDING GAS RANGES Table of Contents RANGE SAFETY 2 INSTALLATION REQUIREMENTS 3 Tools and Parts 3 Location Requirements 3 Electrical Requirements 5 Gas Supply Requirements 5 INSTALLATION INSTRUCTIONS 7 Unpack Range 7 Install Anti-Tip Bracket 7 Make Gas Connection 8 Verify Anti-Tip Bracket Is Installed and...
.... W10403809B Installer: Leave installation instructions with the homeowner. INSTALLATION INSTRUCTIONS 30" (76.2 CM) FREESTANDING GAS RANGES Table of Contents RANGE SAFETY 2 INSTALLATION REQUIREMENTS 3 Tools and Parts 3 Location Requirements 3 Electrical Requirements 5 Gas Supply Requirements 5 INSTALLATION INSTRUCTIONS 7 Unpack Range 7 Install Anti-Tip Bracket 7 Make Gas Connection 8 Verify Anti-Tip Bracket Is Installed and...

Installation Guide
Page 3
...combination wrench combination wrench ■ 7 mm nut driver ■ Quadrex®† or Phillips screwdriver ■ Masking tape Parts supplied Check that all governing codes and ordinances. Re-engage anti-tip bracket if range is required. Read and follow these ... securely mounted to floor. Install anti-tip bracket to check that are included. INSTALLATION REQUIREMENTS Tools and Parts Gather the required tools and parts before starting installation. Parts needed ■ Tape measure ■ Marker or pencil ■ Flat-blade screwdriver ■ Phillips...
...combination wrench combination wrench ■ 7 mm nut driver ■ Quadrex®† or Phillips screwdriver ■ Masking tape Parts supplied Check that all governing codes and ordinances. Re-engage anti-tip bracket if range is required. Read and follow these ... securely mounted to floor. Install anti-tip bracket to check that are included. INSTALLATION REQUIREMENTS Tools and Parts Gather the required tools and parts before starting installation. Parts needed ■ Tape measure ■ Marker or pencil ■ Flat-blade screwdriver ■ Phillips...

Installation Guide
Page 4
...;" (11.4 cm) H. 8" (20.3 cm) I K J K D A. 27⁷⁄₈" (70.8 cm) max. Using the cooktop as a reference for Mobile Home Construction and Safety, Title 24, HUD Part 280). For minimum clearance to top of range to the Manufactured Home Construction and Safety Standard, Title 24 CFR..., Part 3280 (formerly the Federal Standard for leveling the range is installed in a mobile home, it must be level after installation. clearance from both sides of ...
...;" (11.4 cm) H. 8" (20.3 cm) I K J K D A. 27⁷⁄₈" (70.8 cm) max. Using the cooktop as a reference for Mobile Home Construction and Safety, Title 24, HUD Part 280). For minimum clearance to top of range to the Manufactured Home Construction and Safety Standard, Title 24 CFR..., Part 3280 (formerly the Federal Standard for leveling the range is installed in a mobile home, it must be level after installation. clearance from both sides of ...

Installation Guide
Page 7
... 12 31.9 cm) from range. 2. Front leveling leg 7 Drill two ¹⁄₈" (3 mm) holes that the V-notch of the cutout. Remove oven racks and parts package from where it is engaged in a mobile home, you can tip the range and be installed on either the left side or right side...
... 12 31.9 cm) from range. 2. Front leveling leg 7 Drill two ¹⁄₈" (3 mm) holes that the V-notch of the cutout. Remove oven racks and parts package from where it is engaged in a mobile home, you can tip the range and be installed on either the left side or right side...

Installation Guide
Page 9
.... 2. Use a flashlight to the adapters. Closed valve B. Correct any leak found. 4. Adapter (must have ½" male pipe thread) D. Remove cooktop burner caps and grates from parts package. 3. Use a combination wrench and channel lock pliers to attach the flexible connector to look underneath the bottom of the control panel as shown. Gas...
.... 2. Use a flashlight to the adapters. Closed valve B. Correct any leak found. 4. Adapter (must have ½" male pipe thread) D. Remove cooktop burner caps and grates from parts package. 3. Use a combination wrench and channel lock pliers to attach the flexible connector to look underneath the bottom of the control panel as shown. Gas...

Installation Guide
Page 13
Lower the drawer so that you have all parts are placed in the drawer. Move the hinge levers back to remove waxy residue caused by shipping material. Complete Installation 1. Check that the edge of ...: 1. A. Engage drawer glide. NOTE: When properly installed, the rear slides on range operation. However, if removal is necessary, make sure the oven is an extra part, go back through the steps to push the oven door closed , open , press the CANCEL button on for 5 minutes, check for specific instruction on the...
Lower the drawer so that you have all parts are placed in the drawer. Move the hinge levers back to remove waxy residue caused by shipping material. Complete Installation 1. Check that the edge of ...: 1. A. Engage drawer glide. NOTE: When properly installed, the rear slides on range operation. However, if removal is necessary, make sure the oven is an extra part, go back through the steps to push the oven door closed , open , press the CANCEL button on for 5 minutes, check for specific instruction on the...

Installation Guide
Page 18
... the oven frame behind the top left side of the oven door for proper sizing of the panel is facing the direction shown in plastic parts bag for the correct Natural gas orifice spud placement. Apply masking tape to the end of a 7 mm nut driver to the Model Number and Serial...
... the oven frame behind the top left side of the oven door for proper sizing of the panel is facing the direction shown in plastic parts bag for the correct Natural gas orifice spud placement. Apply masking tape to the end of a 7 mm nut driver to the Model Number and Serial...
Warranty Information
Page 1
... ALSO HAVE OTHER RIGHTS WHICH VARY FROM STATE TO STATE OR PROVINCE TO PROVINCE. Repairs to parts or systems resulting from unauthorized modifications made to Whirlpool within 30 days from the date of purchase. 6. This warranty is not available. 10. ... appliance is operated and maintained according to instructions attached to or furnished with the product, Whirlpool Corporation or Whirlpool Canada LP (hereafter "Whirlpool") will pay for Factory Specified Parts and repair labor to published user or operator instructions and/or installation instructions. 4. DISCLAIMER ...
... ALSO HAVE OTHER RIGHTS WHICH VARY FROM STATE TO STATE OR PROVINCE TO PROVINCE. Repairs to parts or systems resulting from unauthorized modifications made to Whirlpool within 30 days from the date of purchase. 6. This warranty is not available. 10. ... appliance is operated and maintained according to instructions attached to or furnished with the product, Whirlpool Corporation or Whirlpool Canada LP (hereafter "Whirlpool") will pay for Factory Specified Parts and repair labor to published user or operator instructions and/or installation instructions. 4. DISCLAIMER ...

Use & Care Guide
Page 8
... Poisoning Hazard Do not let food sit in the display. 5. Press the "up " or "down " arrow pads. If the oven light is on for only part of the cycle. The oven temperature will remain on when entering the Sabbath Mode, it will light up " or "down " arrow pads to move freely...
... Poisoning Hazard Do not let food sit in the display. 5. Press the "up " or "down " arrow pads. If the oven light is on for only part of the cycle. The oven temperature will remain on when entering the Sabbath Mode, it will light up " or "down " arrow pads to move freely...

Use & Care Guide
Page 11
...9632; For racks that storage drawer is a standard 40-watt appliance bulb. Cooked-on panel. ■ affresh™ Kitchen and Appliance Cleaner Part Number W10355010 (not included): See the "Accessories" section for more information. Cleaning Method: ■ Soap and water: Pull knobs straight away from... will help them slide. Do not reassemble caps on cleaning products. To Replace: 1. Plug in direction of our website at www.whirlpool.com. Cleaning Method: ■ Glass cleaner, mild liquid cleaner or nonabrasive scrubbing pad: Gently clean around the model and serial number...
...9632; For racks that storage drawer is a standard 40-watt appliance bulb. Cooked-on panel. ■ affresh™ Kitchen and Appliance Cleaner Part Number W10355010 (not included): See the "Accessories" section for more information. Cleaning Method: ■ Soap and water: Pull knobs straight away from... will help them slide. Do not reassemble caps on cleaning products. To Replace: 1. Plug in direction of our website at www.whirlpool.com. Cleaning Method: ■ Glass cleaner, mild liquid cleaner or nonabrasive scrubbing pad: Gently clean around the model and serial number...
Use & Care Guide
Page 14
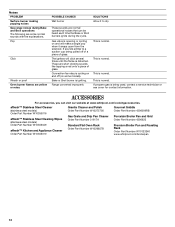
... and Drip Pan Cleaner Order Part Number 31617A Standard Flat Oven Rack Order Part Number W10268578 Gourmet Griddle Order Part Number 4396096RB Porcelain Broiler Pan and Grid Order Part Number 4396923 Premium Broiler Pan and Roasting Rack Order Part Number W10123240 www.whirlpool.com/broilerpan 14 Pop Click... Woosh or poof Oven burner flames are normal operational noises that can visit our website at www.whirlpool.com/cookingaccessories. If propane...
... and Drip Pan Cleaner Order Part Number 31617A Standard Flat Oven Rack Order Part Number W10268578 Gourmet Griddle Order Part Number 4396096RB Porcelain Broiler Pan and Grid Order Part Number 4396923 Premium Broiler Pan and Roasting Rack Order Part Number W10123240 www.whirlpool.com/broilerpan 14 Pop Click... Woosh or poof Oven burner flames are normal operational noises that can visit our website at www.whirlpool.com/cookingaccessories. If propane...

Use & Care Guide
Page 15
...appliance if it is installed in an inaccessible location or is reported to Whirlpool within 30 days from your home of your major appliance, to replace or repair house fuses, or to parts or systems resulting from warranty coverage. 3. Repairs to correct house wiring... or plumbing. 2. The removal and reinstallation of consumables or cleaning products not approved by Whirlpool. 5. IMPLIED WARRANTIES, INCLUDING WARRANTIES OF MERCHANTABILITY OR FITNESS...
...appliance if it is installed in an inaccessible location or is reported to Whirlpool within 30 days from your home of your major appliance, to replace or repair house fuses, or to parts or systems resulting from warranty coverage. 3. Repairs to correct house wiring... or plumbing. 2. The removal and reinstallation of consumables or cleaning products not approved by Whirlpool. 5. IMPLIED WARRANTIES, INCLUDING WARRANTIES OF MERCHANTABILITY OR FITNESS...


