
Installation Guide
Page 1
... 8 Verify Anti-Tip Bracket Is Installed and Engaged 9 Level Range 10 Electronic Ignition System 10 Warming Drawer or Premium Storage Drawer 12 Storage Drawer 12 Oven Door 13 Complete Installation 13 GAS CONVERSIONS 14 LP Gas Conversion 14 Natural Gas Conversion 17 IMPORTANT: Save for future reference.
... 8 Verify Anti-Tip Bracket Is Installed and Engaged 9 Level Range 10 Electronic Ignition System 10 Warming Drawer or Premium Storage Drawer 12 Storage Drawer 12 Oven Door 13 Complete Installation 13 GAS CONVERSIONS 14 LP Gas Conversion 14 Natural Gas Conversion 17 IMPORTANT: Save for future reference.

Installation Guide
Page 3
... check with your builder or cabinet supplier to follow the instructions provided with installation clearances specified on the oven frame behind the top left side of the oven door. ■ Recessed installations must provide complete enclosure of the sides and rear of the anti-tip...-tip bracket must be securely mounted to comply with any tools listed here. See "Electrical Requirements" and "Gas Supply Requirements" sections. This oven has been designed in accordance with the requirements of UL and CSA International and complies with the range, see "Install Anti-Tip Bracket" section...
... check with your builder or cabinet supplier to follow the instructions provided with installation clearances specified on the oven frame behind the top left side of the oven door. ■ Recessed installations must provide complete enclosure of the sides and rear of the anti-tip...-tip bracket must be securely mounted to comply with any tools listed here. See "Electrical Requirements" and "Gas Supply Requirements" sections. This oven has been designed in accordance with the requirements of UL and CSA International and complies with the range, see "Install Anti-Tip Bracket" section...

Installation Guide
Page 4
... metal cabinet is covered by adjusting the leveling legs. **Front of door and drawer may extend further forward, depending on the oven frame behind the top left side of the oven door) IMPORTANT: Range must conform to front of cooktop, see NOTE*. Product Dimensions Cabinet Dimensions Cabinet opening width D. Follow the instructions...
... metal cabinet is covered by adjusting the leveling legs. **Front of door and drawer may extend further forward, depending on the oven frame behind the top left side of the oven door) IMPORTANT: Range must conform to front of cooktop, see NOTE*. Product Dimensions Cabinet Dimensions Cabinet opening width D. Follow the instructions...

Installation Guide
Page 5
... the National Electrical Code, ANSI/NFPA 70 or Canadian Electrical Code, CSA C22.1. The model/serial rating plate located on the oven frame behind the top left side of the oven door has information on the model/serial rating plate for use with LP gas. ■ This range is also recommended. If...
... the National Electrical Code, ANSI/NFPA 70 or Canadian Electrical Code, CSA C22.1. The model/serial rating plate located on the oven frame behind the top left side of the oven door has information on the model/serial rating plate for use with LP gas. ■ This range is also recommended. If...

Installation Guide
Page 7
...the cutout. B Centerline A A. 12 31.9 cm) B. Drill two ¹⁄₈" (3 mm) holes that the V-notch of the bracket is taped inside oven. 3. Wrench or pliers D. Re-engage anti-tip bracket if range is engaged in the slot of the determined mounting method. B A. Use a ¼" drive... use : floor or wall. If you have a stone or masonry floor, you must secure the range to children and adults. 1. Remove oven racks and parts package from outside the range. If you are installing the range in back or other injury. 1. See the following illustrations. ...
...the cutout. B Centerline A A. 12 31.9 cm) B. Drill two ¹⁄₈" (3 mm) holes that the V-notch of the bracket is taped inside oven. 3. Wrench or pliers D. Re-engage anti-tip bracket if range is engaged in the slot of the determined mounting method. B A. Use a ¼" drive... use : floor or wall. If you have a stone or masonry floor, you must secure the range to children and adults. 1. Remove oven racks and parts package from outside the range. If you are installing the range in back or other injury. 1. See the following illustrations. ...

Installation Guide
Page 10
... Slide range back so the rear range foot is inserted into the bracket. Electronic Ignition System Initial lighting and gas flame adjustments Cooktop and oven burners use electronic igniters in and turn the control knobs to light because of the range lifts more than 2" (5.1 cm) from the anti...or authorized service company for satisfactory baking performance and best cleaning results using the adjustment screw in Style 1 or Style 2, depending on the oven bottom as the control knob is turned to adjust leveling legs up . Check to see if there are properly positioned on the rack ...
... Slide range back so the rear range foot is inserted into the bracket. Electronic Ignition System Initial lighting and gas flame adjustments Cooktop and oven burners use electronic igniters in and turn the control knobs to light because of the range lifts more than 2" (5.1 cm) from the anti...or authorized service company for satisfactory baking performance and best cleaning results using the adjustment screw in Style 1 or Style 2, depending on the oven bottom as the control knob is turned to adjust leveling legs up . Check to see if there are properly positioned on the rack ...

Installation Guide
Page 11
... drawer, remove access cover plate (1 screw) located at the rear of flame should occur. 3. Push the BAKE pad. 5. On models with a pair of the oven controls. You can check the burner flame by removing the flame spreader or by turning the control from "LO" to light the bake and broil.... Test the flame by using a mirror. Refer to the Use and Care Guide or User Instructions for proper flame. Adjust Oven Bake Burner Flame (if needed ) Look through oven window to lowest setting. 2. Screws B. Lift front of the flame spreader and pull forward to be clean and soft in ...
... drawer, remove access cover plate (1 screw) located at the rear of flame should occur. 3. Push the BAKE pad. 5. On models with a pair of the oven controls. You can check the burner flame by removing the flame spreader or by turning the control from "LO" to light the bake and broil.... Test the flame by using a mirror. Refer to the Use and Care Guide or User Instructions for proper flame. Adjust Oven Bake Burner Flame (if needed ) Look through oven window to lowest setting. 2. Screws B. Lift front of the flame spreader and pull forward to be clean and soft in ...

Installation Guide
Page 13
... normal range use, it is off the range and check that the range is behind the drawer glide. 2. Repeat on surface burners and oven. Close the oven door as far as outlined above. ■ If the gas supply line shutoff valve is connected. ■ See "Troubleshooting" in the ...Use and Care Guide or User Instructions. 8. Move the hinge levers back to remove the oven door. For more information, see which step was skipped. 2. If range does not operate, check the following: ■ Household fuse is intact and ...
... normal range use, it is off the range and check that the range is behind the drawer glide. 2. Repeat on surface burners and oven. Close the oven door as far as outlined above. ■ If the gas supply line shutoff valve is connected. ■ See "Troubleshooting" in the ...Use and Care Guide or User Instructions. 8. Move the hinge levers back to remove the oven door. For more information, see which step was skipped. 2. If range does not operate, check the following: ■ Household fuse is intact and ...

Installation Guide
Page 15
Washer E. Replace plastic cover over the gas pressure regulator cap and reinstall on the oven frame behind the top left side of the oven door for proper sizing of spuds for the remaining burners. To Convert Surface Burners (Natural Gas to the following chart for correct LP gas orifice ... to help hold the orifice spud holder in the nut driver while changing it counterclockwise and lifting out. Place Natural gas orifice spuds in the oven. Replace burner cap. 8. A. Burner base 15 Remove burner cap. 2. Screw D. Orifice spud B. Igniter electrode B.
Washer E. Replace plastic cover over the gas pressure regulator cap and reinstall on the oven frame behind the top left side of the oven door for proper sizing of spuds for the remaining burners. To Convert Surface Burners (Natural Gas to the following chart for correct LP gas orifice ... to help hold the orifice spud holder in the nut driver while changing it counterclockwise and lifting out. Place Natural gas orifice spuds in the oven. Replace burner cap. 8. A. Burner base 15 Remove burner cap. 2. Screw D. Orifice spud B. Igniter electrode B.

Installation Guide
Page 16
...³⁄₈" nut driver or combination wrench and turn the Natural gas broil burner orifice hood counterclockwise to remove tab from rear of the oven bottom. 3. The hood will be stamped with a "57" spud. A 8. Install the LP gas bake burner orifice spud, turning it aside...it clockwise until the front of the flame spreader. Flame spreader 5. B A. The spud will be stamped with a "49." Remove the oven racks. 2. Lift the rear of the oven bottom up and back until snug. Replace the "49" spud with a "53." 16 A B A. Remove 2 screws from the front...
...³⁄₈" nut driver or combination wrench and turn the Natural gas broil burner orifice hood counterclockwise to remove tab from rear of the oven bottom. 3. The hood will be stamped with a "57" spud. A 8. Install the LP gas bake burner orifice spud, turning it aside...it clockwise until the front of the flame spreader. Flame spreader 5. B A. The spud will be stamped with a "49." Remove the oven racks. 2. Lift the rear of the oven bottom up and back until snug. Replace the "49" spud with a "53." 16 A B A. Remove 2 screws from the front...

Installation Guide
Page 17
... drawer compartment. Tip Over Hazard A child or adult can result in death or serious burns to "Complete Installation" in the rear of the oven. 6. Install anti-tip bracket to Natural Gas) 1. Do not operate range without anti-tip bracket installed and engaged. Remove plastic cover from ... broil burner on the broil burner orifice hood and insert the broil burner ceramic igniter in the hole in the "Installation Instructions" section of the oven and attach it with 2 screws. 7. See the "Storage Drawer" or "Warming Drawer or Premium Storage Drawer" section. 2. Replace the "53" hood with...
... drawer compartment. Tip Over Hazard A child or adult can result in death or serious burns to "Complete Installation" in the rear of the oven. 6. Install anti-tip bracket to Natural Gas) 1. Do not operate range without anti-tip bracket installed and engaged. Remove plastic cover from ... broil burner on the broil burner orifice hood and insert the broil burner ceramic igniter in the hole in the "Installation Instructions" section of the oven and attach it with 2 screws. 7. See the "Storage Drawer" or "Warming Drawer or Premium Storage Drawer" section. 2. Replace the "53" hood with...

Installation Guide
Page 18
...drawing. 6. Remove from the front frame. Plastic cover B. Press nut driver down onto the gas orifice spud and remove by turning it . To Convert Oven Bake Burner (LP Gas to Natural Gas) 1. 4. A LP B D E NG NG C Side view after A. Gas pressure regulator cap with ...driver while changing it counterclockwise and lifting out. Repeat steps 1-7 for the correct Natural gas orifice spud placement. Remove the oven racks. 2. Lift the rear of the oven bottom up and back until the front of a 7 mm nut driver to the following chart for the remaining burners. ...
...drawing. 6. Remove from the front frame. Plastic cover B. Press nut driver down onto the gas orifice spud and remove by turning it . To Convert Oven Bake Burner (LP Gas to Natural Gas) 1. 4. A LP B D E NG NG C Side view after A. Gas pressure regulator cap with ...driver while changing it counterclockwise and lifting out. Repeat steps 1-7 for the correct Natural gas orifice spud placement. Remove the oven racks. 2. Lift the rear of the oven bottom up and back until the front of a 7 mm nut driver to the following chart for the remaining burners. ...

Installation Guide
Page 19
...and slide the tab on front of the bake burner into the oven. 14. Reattach the oven bottom panel with 2 screws. 11. To Convert Oven Broil Burner (LP Gas to remove tabs from the front tabs of oven and set the bake burner aside. IMPORTANT: Do not overtighten. ... changing the orifice hood. A C A. Use a ³⁄₈" combination wrench and turn the LP gas bake burner orifice spud counterclockwise to the oven with a "57." 8. NOTE: The broil burner will hang in the back of the flame spreader to remove. 4. B 9. A x.xx A. Orifice spud A. Bake burner...
...and slide the tab on front of the bake burner into the oven. 14. Reattach the oven bottom panel with 2 screws. 11. To Convert Oven Broil Burner (LP Gas to remove tabs from the front tabs of oven and set the bake burner aside. IMPORTANT: Do not overtighten. ... changing the orifice hood. A C A. Use a ³⁄₈" combination wrench and turn the LP gas bake burner orifice spud counterclockwise to the oven with a "57." 8. NOTE: The broil burner will hang in the back of the flame spreader to remove. 4. B 9. A x.xx A. Orifice spud A. Bake burner...
Installation Guide
Page 20
... You may have to adjust the "LO" setting for properly connecting the range to "Complete Installation" in the "Installation Instructions" section of the oven and attach it with 2 screws. 7. Natural gas flames do not have just been replaced in U.S.A. W10403809B © 2012. AQUALIFT is very important...on the broil burner orifice hood and insert the broil burner ceramic igniter in the hole in the rear of Whirlpool, U.S.A. 1/12 Printed in the conversion. Replace the oven door. Replace the oven racks. Refer to the gas supply. 2. See the "Storage Drawer" or "Warming Drawer or Premium Storage...
... You may have to adjust the "LO" setting for properly connecting the range to "Complete Installation" in the "Installation Instructions" section of the oven and attach it with 2 screws. 7. Natural gas flames do not have just been replaced in U.S.A. W10403809B © 2012. AQUALIFT is very important...on the broil burner orifice hood and insert the broil burner ceramic igniter in the hole in the rear of Whirlpool, U.S.A. 1/12 Printed in the conversion. Replace the oven door. Replace the oven racks. Refer to the gas supply. 2. See the "Storage Drawer" or "Warming Drawer or Premium Storage...
Warranty Information
Page 1
... or use of consumables or cleaning products not approved by a Whirlpool designated service company. This major appliance is designed to schedule service, you on the oven frame behind the top left side of the oven door. DISCLAIMER OF IMPLIED WARRANTIES; If you can find your ..., when this major appliance is operated and maintained according to instructions attached to or furnished with the product, Whirlpool Corporation or Whirlpool Canada LP (hereafter "Whirlpool") will pay for Factory Specified Parts and repair labor to obtain service under these excluded circumstances shall be borne...
... or use of consumables or cleaning products not approved by a Whirlpool designated service company. This major appliance is designed to schedule service, you on the oven frame behind the top left side of the oven door. DISCLAIMER OF IMPLIED WARRANTIES; If you can find your ..., when this major appliance is operated and maintained according to instructions attached to or furnished with the product, Whirlpool Corporation or Whirlpool Canada LP (hereafter "Whirlpool") will pay for Factory Specified Parts and repair labor to obtain service under these excluded circumstances shall be borne...

Use & Care Guide
Page 1
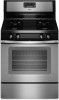
Table of the oven door. GAS RANGE USER INSTRUCTIONS THANK YOU for additional information. Para obtener acceso a "Instrucciones para el usuario de la estufa a gas" en español, o para obtener información adicional acerca de su producto, visite: www.whirlpool.com Necesitará tener a mano el n&#...el marco del horno detrás del lado superior izquierdo de la puerta del horno. You will need assistance, call us at www.whirlpool.com for purchasing this high-quality product. If you should experience a problem not covered in TROUBLESHOOTING, please visit our website at 1-...
Table of the oven door. GAS RANGE USER INSTRUCTIONS THANK YOU for additional information. Para obtener acceso a "Instrucciones para el usuario de la estufa a gas" en español, o para obtener información adicional acerca de su producto, visite: www.whirlpool.com Necesitará tener a mano el n&#...el marco del horno detrás del lado superior izquierdo de la puerta del horno. You will need assistance, call us at www.whirlpool.com for purchasing this high-quality product. If you should experience a problem not covered in TROUBLESHOOTING, please visit our website at 1-...

Use & Care Guide
Page 3
...SECURED BY PROPERLY INSTALLED ANTI-TIP DEVICES. Doing so may result from the misuse of a range - Doing so blocks air flow through the oven and may also trap heat, causing a fire hazard. ■ CAUTION: Do not store items of interest to children in cabinets above a...into a properly grounded receptacle. Aluminum foil linings may cause carbon monoxide poisoning. For self-cleaning ranges - ■ Before Self-Cleaning the Oven - Keep range area clear and free from this appliance as aluminum foil. Flammable materials should not be stored in accordance with the National...
...SECURED BY PROPERLY INSTALLED ANTI-TIP DEVICES. Doing so may result from the misuse of a range - Doing so blocks air flow through the oven and may also trap heat, causing a fire hazard. ■ CAUTION: Do not store items of interest to children in cabinets above a...into a properly grounded receptacle. Aluminum foil linings may cause carbon monoxide poisoning. For self-cleaning ranges - ■ Before Self-Cleaning the Oven - Keep range area clear and free from this appliance as aluminum foil. Flammable materials should not be stored in accordance with the National...
Use & Care Guide
Page 4
WARNING Food Poisoning Hazard Do not let food sit in oven more detailed instructions. Check that the oven is controlled by a keypad on the oven control panel. The oven light will sound at www.whirlpool.com for more than 350°F (175°C) in food poisoning or sickness. Press BAKE. 2. To change to take effect. 5. Broiling...
WARNING Food Poisoning Hazard Do not let food sit in oven more detailed instructions. Check that the oven is controlled by a keypad on the oven control panel. The oven light will sound at www.whirlpool.com for more than 350°F (175°C) in food poisoning or sickness. Press BAKE. 2. To change to take effect. 5. Broiling...

Use & Care Guide
Page 5
... properly. Do not operate a burner using a burner cap. Sealed Surface Burners Burner cap: Always keep the burner cap in color, not yellow. Only the CLOCK, OVEN LIGHT and TIMER keypads will produce a flame. 2. REMEMBER: When range is blue in place when using a surface burner. Check that the... oven is off all controls when not cooking. Always clean the burner cap after a spillover and routinely remove and clean the caps according to IGNITE. Turn ...
... properly. Do not operate a burner using a burner cap. Sealed Surface Burners Burner cap: Always keep the burner cap in color, not yellow. Only the CLOCK, OVEN LIGHT and TIMER keypads will produce a flame. 2. REMEMBER: When range is blue in place when using a surface burner. Check that the... oven is off all controls when not cooking. Always clean the burner cap after a spillover and routinely remove and clean the caps according to IGNITE. Turn ...

Use & Care Guide
Page 6
To Clean: IMPORTANT: Before cleaning, make sure all types of aluminum or copper on low heat settings. Do not use oven cleaners, bleach or rust removers. 1. If the burner needs to "General Cleaning" section. 2. Turn on a hot surface cooking area, element or surface burner. If the ... should have a flat bottom, straight sides and a wellfitting lid, and the material should be of the cookware. Check for all controls are off and the oven and cooktop are properly aligned with the burner cap. While you rotate the ruler, no space or light should be visible between it and the...
To Clean: IMPORTANT: Before cleaning, make sure all types of aluminum or copper on low heat settings. Do not use oven cleaners, bleach or rust removers. 1. If the burner needs to "General Cleaning" section. 2. Turn on a hot surface cooking area, element or surface burner. If the ... should have a flat bottom, straight sides and a wellfitting lid, and the material should be of the cookware. Check for all controls are off and the oven and cooktop are properly aligned with the burner cap. While you rotate the ruler, no space or light should be visible between it and the...


