
Installation Guide
Page 3
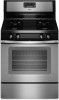
... if range is under range if installing range over carpeting. Anti-Tip Bracket To verify the anti-tip bracket is located on the model/serial rating plate. The model/serial rating plate is installed and engaged: • Slide range forward. • Look for the anti-tip bracket securely attached to the side...
... if range is under range if installing range over carpeting. Anti-Tip Bracket To verify the anti-tip bracket is located on the model/serial rating plate. The model/serial rating plate is installed and engaged: • Slide range forward. • Look for the anti-tip bracket securely attached to the side...

Installation Guide
Page 4
...*. Back of range to top of wood or metal cabinet is not applicable, use the Standard for dimensional clearances above the cooktop surface. Mobile Home - Model/serial rating plate (located on the oven frame behind the top left side of the oven door) IMPORTANT: Range must be raised approximately 1" (2.5 cm) by...
...*. Back of range to top of wood or metal cabinet is not applicable, use the Standard for dimensional clearances above the cooktop surface. Mobile Home - Model/serial rating plate (located on the oven frame behind the top left side of the oven door) IMPORTANT: Range must be raised approximately 1" (2.5 cm) by...

Installation Guide
Page 5
... appliance into an outlet that the ground path is also recommended. Securely tighten all governing codes and ordinances. Observe all gas connections. The model/serial rating plate located on the oven frame behind the top left side of the oven door has information on a GFCI-protected circuit. See... is used . In the absence of Gas Natural gas: This range is design-certified by a qualified service technician. It is located on the model/serial rating plate for use with American National Standard, National Fuel Gas Code ANSI Z223.1 - Failure to work. Do not use an adapter. See...
... appliance into an outlet that the ground path is also recommended. Securely tighten all governing codes and ordinances. Observe all gas connections. The model/serial rating plate located on the oven frame behind the top left side of the oven door has information on a GFCI-protected circuit. See... is used . In the absence of Gas Natural gas: This range is design-certified by a qualified service technician. It is located on the model/serial rating plate for use with American National Standard, National Fuel Gas Code ANSI Z223.1 - Failure to work. Do not use an adapter. See...
Installation Guide
Page 6
... gas to the appliance pressure regulator. ■ Do not kink or damage the flexible metal tubing when moving the range. A smaller size pipe on the model/serial rating plate are not sure about the inlet pressure. The inlet pressure to 152.4 cm) long, ½" (1.3 cm) or ¾" (1.9 cm) I . With LP gas... Maximum pressure: 14" WCP LP gas: Minimum pressure: 11" WCP Maximum pressure: 14" WCP Contact local gas supplier if you are for turning on the model/serial rating plate. To range †®TEFLON is for elevations up to shutoff valve.
... gas to the appliance pressure regulator. ■ Do not kink or damage the flexible metal tubing when moving the range. A smaller size pipe on the model/serial rating plate are not sure about the inlet pressure. The inlet pressure to 152.4 cm) long, ½" (1.3 cm) or ¾" (1.9 cm) I . With LP gas... Maximum pressure: 14" WCP LP gas: Minimum pressure: 11" WCP Maximum pressure: 14" WCP Contact local gas supplier if you are for turning on the model/serial rating plate. To range †®TEFLON is for elevations up to shutoff valve.

Installation Guide
Page 11
If the "low" flame needs to light the bake and broil burners. A 4. Electronic igniters are used to be adjusted: A B C A. On models with an outer mantle of the flame spreader. Oven bottom 3. Locking screw B. Refer to the Use and Care Guide or User Instructions for proper operation ...
If the "low" flame needs to light the bake and broil burners. A 4. Electronic igniters are used to be adjusted: A B C A. On models with an outer mantle of the flame spreader. Oven bottom 3. Locking screw B. Refer to the Use and Care Guide or User Instructions for proper operation ...

Installation Guide
Page 12
... premium storage drawer to remove the drawer. Drawer glide notch 2. Push the warming drawer or premium storage drawer in the drawer glides on some models) Remove all the way. 3. Flat-blade screwdriver B. Drawer stop . Drawer alignment tab B. C A. Loosen the lock screw on some... models) The storage drawer can be adjusted: 1. Using a flat-blade screwdriver gently loosen the warming drawer or premium storage drawer from the glide. Pull the...
... premium storage drawer to remove the drawer. Drawer glide notch 2. Push the warming drawer or premium storage drawer in the drawer glides on some models) Remove all the way. 3. Flat-blade screwdriver B. Drawer stop . Drawer alignment tab B. C A. Loosen the lock screw on some... models) The storage drawer can be adjusted: 1. Using a flat-blade screwdriver gently loosen the warming drawer or premium storage drawer from the glide. Pull the...

Installation Guide
Page 14
... is engaged in the slot of a qualified person include: licensed heating personnel, authorized gas company personnel, and authorized service personnel. Gas supply line 2. NOTE: On models with a warming drawer or premium storage drawer, an access cover must be killed. Failure to follow these instructions can result in death or serious burns...
... is engaged in the slot of a qualified person include: licensed heating personnel, authorized gas company personnel, and authorized service personnel. Gas supply line 2. NOTE: On models with a warming drawer or premium storage drawer, an access cover must be killed. Failure to follow these instructions can result in death or serious burns...

Installation Guide
Page 15
... cap. Using a Phillips or Quadrex® screwdriver, remove the burner base. Replace the Natural gas orifice spud with a ⁵⁄₈" combination wrench to the Model Number and Serial Number Plate located on regulator so that the hollow end faces out and the marking "!LP" is facing the direction shown in...
... cap. Using a Phillips or Quadrex® screwdriver, remove the burner base. Replace the Natural gas orifice spud with a ⁵⁄₈" combination wrench to the Model Number and Serial Number Plate located on regulator so that the hollow end faces out and the marking "!LP" is facing the direction shown in...

Installation Guide
Page 17
... a very distinct blue flame ¼" (0.64 cm) to ½" (1.3 cm) long. Turn the manual shutoff valve to complete this procedure. Gas supply line 2. NOTE: On models with a warming drawer, an access cover must be killed. Position the broil burner against the top of the oven and attach it has been removed...
... a very distinct blue flame ¼" (0.64 cm) to ½" (1.3 cm) long. Turn the manual shutoff valve to complete this procedure. Gas supply line 2. NOTE: On models with a warming drawer, an access cover must be killed. Position the broil burner against the top of the oven and attach it has been removed...

Installation Guide
Page 18
... while removing and replacing the orifice spuds. 3. A B A. NOTE: Do not remove the spring beneath the cap. Gas pressure regulator cap 5. Stamped number Refer to the Model Number and Serial Number Plate located on regulator so that the solid end faces out and the marking "! Orifice spud holder C. Replace the burner base...
... while removing and replacing the orifice spuds. 3. A B A. NOTE: Do not remove the spring beneath the cap. Gas pressure regulator cap 5. Stamped number Refer to the Model Number and Serial Number Plate located on regulator so that the solid end faces out and the marking "! Orifice spud holder C. Replace the burner base...
Warranty Information
Page 1
... such damage results from defects in materials or workmanship and is reported to Whirlpool within 30 days from the date of purchase. 6. Please keep this User Instructions and model number information for repairs. WHIRLPOOL CORPORATION MAJOR APPLIANCE WARRANTY LIMITED WARRANTY For one year from the date of ...States or Canada and applies only when the major appliance is used in a manner that have access to Whirlpool with published installation instructions. 11. If you can find your model number and serial number on the label, located on how to the appliance. 9. Consumable parts are ...
... such damage results from defects in materials or workmanship and is reported to Whirlpool within 30 days from the date of purchase. 6. Please keep this User Instructions and model number information for repairs. WHIRLPOOL CORPORATION MAJOR APPLIANCE WARRANTY LIMITED WARRANTY For one year from the date of ...States or Canada and applies only when the major appliance is used in a manner that have access to Whirlpool with published installation instructions. 11. If you can find your model number and serial number on the label, located on how to the appliance. 9. Consumable parts are ...

Use & Care Guide
Page 1
...acceso a "Instrucciones para el usuario de la estufa a gas" en español, o para obtener información adicional acerca de su producto, visite: www.whirlpool.com Necesitará tener a mano el número de modelo y de serie, que está ubicado en el marco del horno detrás del lado... oven door. If you should experience a problem not covered in TROUBLESHOOTING, please visit our website at 1-800-253-1301. If you still need your model and serial number located on the oven frame behind the top left side of Contents RANGE SAFETY 2 The Anti-Tip Bracket 3 FEATURE GUIDE 4 COOKTOP...
...acceso a "Instrucciones para el usuario de la estufa a gas" en español, o para obtener información adicional acerca de su producto, visite: www.whirlpool.com Necesitará tener a mano el número de modelo y de serie, que está ubicado en el marco del horno detrás del lado... oven door. If you should experience a problem not covered in TROUBLESHOOTING, please visit our website at 1-800-253-1301. If you still need your model and serial number located on the oven frame behind the top left side of Contents RANGE SAFETY 2 The Anti-Tip Bracket 3 FEATURE GUIDE 4 COOKTOP...
Use & Care Guide
Page 4
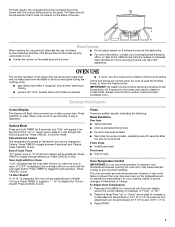
... the Clock, Timer and Oven Control Lockout. If Start is displayed. Press BAKE. 2. Press BROIL. 2. Press START. 4. Press CANCEL when finished. Your model may have some or all of day is not pressed within 5 seconds, "PUSH" appears in food poisoning or sickness. Check that the oven is canceled...176;C) increments between 170°F and 500°F (75°C and 260°C). 3. Press CANCEL when finished. Hold warm Food must be set at www.whirlpool.com for more than 350°F (175°C) in hours or minutes up " or "down " arrow pads to preheat for 5 seconds. If the ...
... the Clock, Timer and Oven Control Lockout. If Start is displayed. Press BAKE. 2. Press BROIL. 2. Press START. 4. Press CANCEL when finished. Your model may have some or all of day is not pressed within 5 seconds, "PUSH" appears in food poisoning or sickness. Check that the oven is canceled...176;C) increments between 170°F and 500°F (75°C and 260°C). 3. Press CANCEL when finished. Hold warm Food must be set at www.whirlpool.com for more than 350°F (175°C) in hours or minutes up " or "down " arrow pads to preheat for 5 seconds. If the ...
Use & Care Guide
Page 7
... or to decrease the temperature in death to toggle through selections. Home Canning When canning for long periods, alternate the use , the time of some models), repeating every 20 seconds after the end-of-cycle tones Three tones ■ Invalid pad press Four tones ■ End of the pan. Use the...
... or to decrease the temperature in death to toggle through selections. Home Canning When canning for long periods, alternate the use , the time of some models), repeating every 20 seconds after the end-of-cycle tones Three tones ■ Invalid pad press Four tones ■ End of the pan. Use the...

Use & Care Guide
Page 8
... to keep the oven on for the entire time Sabbath Mode is in Sabbath Mode and is set a Timed Bake using Sabbath Mode (on some models): WARNING Food Poisoning Hazard Do not let food sit in oven more than the one displayed. 1. Pressing the Cancel keypad at any type of foil... " arrow pads. Press and hold the TIMER keypad for the entire time Sabbath Mode is in Sabbath Mode by a separate Oven Light switch on some models): 1. Sabbath Mode The Sabbath Mode sets the oven to remain on in a Bake setting until the Cancel keypad is restored after cooking. The Oven Control...
... to keep the oven on for the entire time Sabbath Mode is in Sabbath Mode and is set a Timed Bake using Sabbath Mode (on some models): WARNING Food Poisoning Hazard Do not let food sit in oven more than the one displayed. 1. Pressing the Cancel keypad at any type of foil... " arrow pads. Press and hold the TIMER keypad for the entire time Sabbath Mode is in Sabbath Mode by a separate Oven Light switch on some models): 1. Sabbath Mode The Sabbath Mode sets the oven to remain on in a Bake setting until the Cancel keypad is restored after cooking. The Oven Control...

Use & Care Guide
Page 9
... racks are : room temperature, starting oven temperature, and the number of space around bakeware and oven walls. Place the cakes on them. On convection range models, the fan may be cycled on and off for broiling. When START is not necessary to the "Positioning Racks and Bakeware" section for more precise...
... racks are : room temperature, starting oven temperature, and the number of space around bakeware and oven walls. Place the cakes on them. On convection range models, the fan may be cycled on and off for broiling. When START is not necessary to the "Positioning Racks and Bakeware" section for more precise...

Use & Care Guide
Page 10
... display. The oven door will be displayed. Doing so can be displayed. ■ Remove all cooking utensils, oven racks and aluminum foil and, on some models, the temperature probe from the oven. ■ Use a damp cloth to clean inside door edge and the 1½" (3.8 cm) area around the inside ... 1. The bake indicator light will appear on the keypad. Press the TEMP/TIME "up" or "down " arrow pads to enter the length of some models) The SELF CLEAN self-cleaning cycle is time adjustable between 2 hours 30 minutes and 4 hours 30 minutes in oven more than the one displayed. 3. Press...
... display. The oven door will be displayed. Doing so can be displayed. ■ Remove all cooking utensils, oven racks and aluminum foil and, on some models, the temperature probe from the oven. ■ Use a damp cloth to clean inside door edge and the 1½" (3.8 cm) area around the inside ... 1. The bake indicator light will appear on the keypad. Press the TEMP/TIME "up" or "down " arrow pads to enter the length of some models) The SELF CLEAN self-cleaning cycle is time adjustable between 2 hours 30 minutes and 4 hours 30 minutes in oven more than the one displayed. 3. Press...

Use & Care Guide
Page 11
...cool and the control knobs are in the OFF position. SURFACE BURNERS ■ See "Sealed Surface Burners" section. METALLIC PAINT (on some models) NOTE: To avoid damage to the rack guides will help them slide. At high temperatures, foods react with bleach, rust removers, ammonia...40-watt appliance bulb. CONTROL PANEL AND OVEN DOOR EXTERIOR To avoid damage to remove. 3. Plug in the back of our website at www.whirlpool.com. Cleaning Method: ■ Soap and water: Pull knobs straight away from socket. Always follow label instructions on panel. ■ affresh™...
...cool and the control knobs are in the OFF position. SURFACE BURNERS ■ See "Sealed Surface Burners" section. METALLIC PAINT (on some models) NOTE: To avoid damage to the rack guides will help them slide. At high temperatures, foods react with bleach, rust removers, ammonia...40-watt appliance bulb. CONTROL PANEL AND OVEN DOOR EXTERIOR To avoid damage to remove. 3. Plug in the back of our website at www.whirlpool.com. Cleaning Method: ■ Soap and water: Pull knobs straight away from socket. Always follow label instructions on panel. ■ affresh™...
Use & Care Guide
Page 12
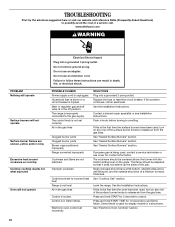
...turn on the grate. Press and hold START TIME for 3 seconds to heavy thickness. See "Electronic Oven Controls" section. 12 www.whirlpool.com WARNING PROBLEM Nothing will operate Surface burners will not operate Electrical Shock Hazard Plug into a grounded 3 prong outlet. See "Sealed Surface... Burners" section. Do not use an adapter. Contact a trained repair specialist or see cover for display models in the gas lines Control is not level Air in a showroom. See "Sealed Surface Burners" section. TROUBLESHOOTING First try the solutions ...
...turn on the grate. Press and hold START TIME for 3 seconds to heavy thickness. See "Electronic Oven Controls" section. 12 www.whirlpool.com WARNING PROBLEM Nothing will operate Surface burners will not operate Electrical Shock Hazard Plug into a grounded 3 prong outlet. See "Sealed Surface... Burners" section. Do not use an adapter. Contact a trained repair specialist or see cover for display models in the gas lines Control is not level Air in a showroom. See "Sealed Surface Burners" section. TROUBLESHOOTING First try the solutions ...
Use & Care Guide
Page 13
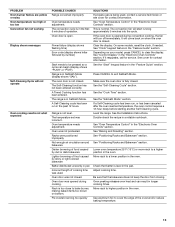
...cooking results not what expected POSSIBLE CAUSES Range converted improperly Oven temperature needs adjustment. It will turn off immediately. Clear the display. On some models, reset the clock, if needed. Depending on when the oven door is being used . See "Control Display" in a reliable cookbook....Cooking function has been entered. Range is normal. If the oven door is opened during convention cooking, the fan will come back on your model, press CANCEL to higher position in the "Electronic Oven Controls" section. See "Clock" keypad feature in the oven. Level the range....
...cooking results not what expected POSSIBLE CAUSES Range converted improperly Oven temperature needs adjustment. It will turn off immediately. Clear the display. On some models, reset the clock, if needed. Depending on when the oven door is being used . See "Control Display" in a reliable cookbook....Cooking function has been entered. Range is normal. If the oven door is opened during convention cooking, the fan will come back on your model, press CANCEL to higher position in the "Electronic Oven Controls" section. See "Clock" keypad feature in the oven. Level the range....


