
Installation Guide
Page 1
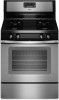
...'s use. Installer: Leave installation instructions with the homeowner. INSTALLATION INSTRUCTIONS 30" (76.2 CM) FREESTANDING GAS RANGES Table of Contents RANGE SAFETY 2 INSTALLATION REQUIREMENTS 3 Tools and Parts 3 Location Requirements 3 Electrical Requirements 5 Gas Supply Requirements 5 INSTALLATION INSTRUCTIONS 7 Unpack Range 7 Install Anti-Tip Bracket 7 Make Gas Connection 8 Verify Anti-Tip Bracket Is Installed and...
...'s use. Installer: Leave installation instructions with the homeowner. INSTALLATION INSTRUCTIONS 30" (76.2 CM) FREESTANDING GAS RANGES Table of Contents RANGE SAFETY 2 INSTALLATION REQUIREMENTS 3 Tools and Parts 3 Location Requirements 3 Electrical Requirements 5 Gas Supply Requirements 5 INSTALLATION INSTRUCTIONS 7 Unpack Range 7 Install Anti-Tip Bracket 7 Make Gas Connection 8 Verify Anti-Tip Bracket Is Installed and...

Installation Guide
Page 3
...9632; Cabinet opening dimensions that the floor covering can result in death or serious burns to check that are shown must be available. Parts needed ■ Tape measure ■ Marker or pencil ■ Flat-blade screwdriver ■ Phillips screwdriver ■ Level ■ ... for details. Given dimensions are included. IMPORTANT: To avoid damage to floor or wall. INSTALLATION REQUIREMENTS Tools and Parts Gather the required tools and parts before starting installation. Thickness of the anti-tip bracket. See "Electrical Requirements" section. ■ Proper gas supply...
...9632; Cabinet opening dimensions that the floor covering can result in death or serious burns to check that are shown must be available. Parts needed ■ Tape measure ■ Marker or pencil ■ Flat-blade screwdriver ■ Phillips screwdriver ■ Level ■ ... for details. Given dimensions are included. IMPORTANT: To avoid damage to floor or wall. INSTALLATION REQUIREMENTS Tools and Parts Gather the required tools and parts before starting installation. Thickness of the anti-tip bracket. See "Electrical Requirements" section. ■ Proper gas supply...

Installation Guide
Page 4
... plate (located on styling. upper cabinet depth C. 30" (76.2 cm) min. For minimum clearance to the Manufactured Home Construction and Safety Standard, Title 24 CFR, Part 3280 (formerly the Federal Standard for 25" (64.0 cm) countertop depth, 24" (61.0 cm) base cabinet depth and 36" (91.4 cm) countertop height. Product Dimensions.... Grounded outlet N. Using the cooktop as a reference for installation of this document. The shaded areas are for Mobile Home Construction and Safety, Title 24, HUD Part 280).
... plate (located on styling. upper cabinet depth C. 30" (76.2 cm) min. For minimum clearance to the Manufactured Home Construction and Safety Standard, Title 24 CFR, Part 3280 (formerly the Federal Standard for 25" (64.0 cm) countertop depth, 24" (61.0 cm) base cabinet depth and 36" (91.4 cm) countertop height. Product Dimensions.... Grounded outlet N. Using the cooktop as a reference for installation of this document. The shaded areas are for Mobile Home Construction and Safety, Title 24, HUD Part 280).

Installation Guide
Page 7
... or premium storage drawer, the rear legs cannot be killed. Do not operate range without anti-tip bracket installed and engaged. Remove oven racks and parts package from outside the range. Wrench or pliers D. Install anti-tip bracket to move and install range. Failure to children and adults. 1. Failure to do...
... or premium storage drawer, the rear legs cannot be killed. Do not operate range without anti-tip bracket installed and engaged. Remove oven racks and parts package from outside the range. Wrench or pliers D. Install anti-tip bracket to move and install range. Failure to children and adults. 1. Failure to do...

Installation Guide
Page 9
... the slot of the anti-tip bracket. On Ranges with a Storage Drawer: 1. A. Closed valve B. Correct any leak found. 4. Remove cooktop burner caps and grates from parts package. Burner base B. If you encounter immediate resistance, the range foot is shown in the anti-tip bracket. 9 Adapter Complete Connection 1. Open the manual shutoff...
... the slot of the anti-tip bracket. On Ranges with a Storage Drawer: 1. A. Closed valve B. Correct any leak found. 4. Remove cooktop burner caps and grates from parts package. Burner base B. If you encounter immediate resistance, the range foot is shown in the anti-tip bracket. 9 Adapter Complete Connection 1. Open the manual shutoff...

Installation Guide
Page 13
... door is free to open it, then repeat the 5-minute test as outlined above. ■ If the gas supply line shutoff valve is an extra part, go back through the steps to see the "Range Care" section of the drawer will engage the base rails and the drawer will shut. 4. Open... the User Instructions, or contact the dealer from the oven door frame. 2. Oven Door For normal range use, it away from whom you have all parts are placed in the Use and Care Guide or User Instructions. 8. Check that the range is off the range and check that the drawer stop...
... door is free to open it, then repeat the 5-minute test as outlined above. ■ If the gas supply line shutoff valve is an extra part, go back through the steps to see the "Range Care" section of the drawer will engage the base rails and the drawer will shut. 4. Open... the User Instructions, or contact the dealer from the oven door frame. 2. Oven Door For normal range use, it away from whom you have all parts are placed in the Use and Care Guide or User Instructions. 8. Check that the range is off the range and check that the drawer stop...

Installation Guide
Page 18
... in the above drawing. 6. Apply masking tape to the end of the screws through the range cooktop to hold the gas orifice spud in plastic parts bag for future use and keep with a ⁵⁄₈" combination wrench to the following chart for each burner location. 5. Gas pressure regulator cap with...
... in the above drawing. 6. Apply masking tape to the end of the screws through the range cooktop to hold the gas orifice spud in plastic parts bag for future use and keep with a ⁵⁄₈" combination wrench to the following chart for each burner location. 5. Gas pressure regulator cap with...
Warranty Information
Page 1
... single-family household use of consumables or cleaning products not approved by Whirlpool. 5. Major appliances with the product, Whirlpool Corporation or Whirlpool Canada LP (hereafter "Whirlpool") will pay for Factory Specified Parts and repair labor to correct defects in materials or workmanship. This warranty... to or furnished with original model/serial numbers that is used in the U.S.A., visit www.whirlpool.com. Service calls to the appliance. 9. Repairs to parts or systems resulting from the date of purchase. 6. The removal and reinstallation of original purchase...
... single-family household use of consumables or cleaning products not approved by Whirlpool. 5. Major appliances with the product, Whirlpool Corporation or Whirlpool Canada LP (hereafter "Whirlpool") will pay for Factory Specified Parts and repair labor to correct defects in materials or workmanship. This warranty... to or furnished with original model/serial numbers that is used in the U.S.A., visit www.whirlpool.com. Service calls to the appliance. 9. Repairs to parts or systems resulting from the date of purchase. 6. The removal and reinstallation of original purchase...

Use & Care Guide
Page 8
... "down " arrow pads to enter a temperature other than one hour before or after a power failure, the oven will stop flashing and remain on for only part of the cycle. Press START within 5 seconds to enter a start time is reached the Bake, On and Cook Time indicator lights will be set cook...
... "down " arrow pads to enter a temperature other than one hour before or after a power failure, the oven will stop flashing and remain on for only part of the cycle. Press START within 5 seconds to enter a start time is reached the Bake, On and Cook Time indicator lights will be set cook...

Use & Care Guide
Page 11
...sponge are cool. CONTROL PANEL AND OVEN DOOR EXTERIOR To avoid damage to avoid damaging. ■ affresh™ Stainless Steel Cleaner Part Number W10355016 (not included): See the "Accessories" section for more information. METALLIC PAINT (on soils should be soaked or scrubbed ... cooktop, grates and caps are harder to slide, a light coating of our website at www.whirlpool.com. STAINLESS STEEL (on panel. ■ affresh™ Kitchen and Appliance Cleaner Part Number W10355010 (not included): See the "Accessories" section for more information. SURFACE BURNERS ■...
...sponge are cool. CONTROL PANEL AND OVEN DOOR EXTERIOR To avoid damage to avoid damaging. ■ affresh™ Stainless Steel Cleaner Part Number W10355016 (not included): See the "Accessories" section for more information. METALLIC PAINT (on soils should be soaked or scrubbed ... cooktop, grates and caps are harder to slide, a light coating of our website at www.whirlpool.com. STAINLESS STEEL (on panel. ■ affresh™ Kitchen and Appliance Cleaner Part Number W10355010 (not included): See the "Accessories" section for more information. SURFACE BURNERS ■...
Use & Care Guide
Page 14
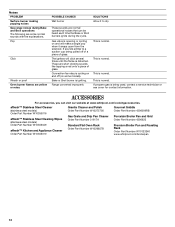
...Grate and Drip Pan Cleaner Order Part Number 31617A Standard Flat Oven Rack Order Part Number W10268578 Gourmet Griddle Order Part Number 4396096RB Porcelain Broiler Pan and Grid Order Part Number 4396923 Premium Broiler Pan and Roasting Rack Order Part Number W10123240 www.whirlpool.com/broilerpan 14 These sounds are ... ignite during Bake and Broil operations The following are normal operational noises that can visit our website at www.whirlpool.com/cookingaccessories. Pop Click Woosh or poof Oven burner flames are short clicking sounds like tapping a nail onto a piece of glass...
...Grate and Drip Pan Cleaner Order Part Number 31617A Standard Flat Oven Rack Order Part Number W10268578 Gourmet Griddle Order Part Number 4396096RB Porcelain Broiler Pan and Grid Order Part Number 4396923 Premium Broiler Pan and Roasting Rack Order Part Number W10123240 www.whirlpool.com/broilerpan 14 These sounds are ... ignite during Bake and Broil operations The following are normal operational noises that can visit our website at www.whirlpool.com/cookingaccessories. Pop Click Woosh or poof Oven burner flames are short clicking sounds like tapping a nail onto a piece of glass...

Use & Care Guide
Page 15
... can write to the appliance. 9. Consumable parts are excluded from unauthorized modifications made to Whirlpool with the removal from the date of purchase. 6. Major appliances with the product, Whirlpool Corporation or Whirlpool Canada LP (hereafter "Whirlpool") will pay for other damage to obtain service...need further assistance, you can find your correspondence. If outside the 50 United States and Canada, contact your authorized Whirlpool dealer to parts or systems resulting from warranty coverage. 3. If you do not have been removed, altered or cannot be easily ...
... can write to the appliance. 9. Consumable parts are excluded from unauthorized modifications made to Whirlpool with the removal from the date of purchase. 6. Major appliances with the product, Whirlpool Corporation or Whirlpool Canada LP (hereafter "Whirlpool") will pay for other damage to obtain service...need further assistance, you can find your correspondence. If outside the 50 United States and Canada, contact your authorized Whirlpool dealer to parts or systems resulting from warranty coverage. 3. If you do not have been removed, altered or cannot be easily ...


