
Installation Guide
Page 1
..." (76.2 CM) FREESTANDING GAS RANGES Table of Contents RANGE SAFETY 2 INSTALLATION REQUIREMENTS 3 Tools and Parts 3 Location Requirements 3 Electrical Requirements 5 Gas Supply Requirements 5 INSTALLATION INSTRUCTIONS 7 Unpack Range 7 Install Anti-Tip Bracket 7 Make Gas Connection 8 Verify Anti-Tip Bracket Is Installed and Engaged 9 Level Range 10 Electronic Ignition System 10 Warming Drawer or Premium Storage Drawer...
..." (76.2 CM) FREESTANDING GAS RANGES Table of Contents RANGE SAFETY 2 INSTALLATION REQUIREMENTS 3 Tools and Parts 3 Location Requirements 3 Electrical Requirements 5 Gas Supply Requirements 5 INSTALLATION INSTRUCTIONS 7 Unpack Range 7 Install Anti-Tip Bracket 7 Make Gas Connection 8 Verify Anti-Tip Bracket Is Installed and Engaged 9 Level Range 10 Electronic Ignition System 10 Warming Drawer or Premium Storage Drawer...

Installation Guide
Page 2
...your gas supplier. Do not store or use gasoline or other appliance. - Gas suppliers recommend that can be performed by a qualified installer, service agency or the gas supplier. This symbol alerts you to light any appliance. • Do not touch any electrical switch....a fire or explosion may result causing property damage, personal injury or death. - In the State of Massachusetts, the following installation instructions apply: ■ Installations and repairs must be performed by a qualified or licensed contractor, plumber, or gasfitter qualified or licensed by the State of ...
...your gas supplier. Do not store or use gasoline or other appliance. - Gas suppliers recommend that can be performed by a qualified installer, service agency or the gas supplier. This symbol alerts you to light any appliance. • Do not touch any electrical switch....a fire or explosion may result causing property damage, personal injury or death. - In the State of Massachusetts, the following installation instructions apply: ■ Installations and repairs must be performed by a qualified or licensed contractor, plumber, or gasfitter qualified or licensed by the State of ...

Installation Guide
Page 3
... has been designed in the wall or floor where range is required. Failure to follow the instructions provided with the range, see "Install Anti-Tip Bracket" section. ■ Grounded electrical supply is to the side cabinets. ■ Cabinet opening dimensions that the floor... Wrench or pliers ■ Pipe wrench combination wrench ■ ¼" drive ratchet nut driver 3.2 mm) drill bit (for details. To install the anti-tip bracket shipped with any tools listed here. See "Electrical Requirements" section. ■ Proper gas supply connection must be available. Slide...
... has been designed in the wall or floor where range is required. Failure to follow the instructions provided with the range, see "Install Anti-Tip Bracket" section. ■ Grounded electrical supply is to the side cabinets. ■ Cabinet opening dimensions that the floor... Wrench or pliers ■ Pipe wrench combination wrench ■ ¼" drive ratchet nut driver 3.2 mm) drill bit (for details. To install the anti-tip bracket shipped with any tools listed here. See "Electrical Requirements" section. ■ Proper gas supply connection must be available. Slide...

Installation Guide
Page 4
... way in the "Level Range" section. Using the cooktop as a reference for leveling the range is not applicable, use the Standard for Manufactured Home Installations, ANSI A225.1/NFPA 501A or with not less than No. 28 MSG sheet steel, 0.015" (0.4 mm) stainless steel, 0.024" (0.6 mm) aluminum... raised approximately 1" (2.5 cm) by not less than ¹⁄₄" (0.64 cm) flame retardant millboard covered with local codes. Mobile home installations require: ■ When this range is covered by adjusting the leveling legs. **Front of door and drawer may extend further forward, depending on...
... way in the "Level Range" section. Using the cooktop as a reference for leveling the range is not applicable, use the Standard for Manufactured Home Installations, ANSI A225.1/NFPA 501A or with not less than No. 28 MSG sheet steel, 0.015" (0.4 mm) stainless steel, 0.024" (0.6 mm) aluminum... raised approximately 1" (2.5 cm) by not less than ¹⁄₄" (0.64 cm) flame retardant millboard covered with local codes. Mobile home installations require: ■ When this range is covered by adjusting the leveling legs. **Front of door and drawer may extend further forward, depending on...

Installation Guide
Page 5
... codes and ordinances. Explosion Hazard Use a new CSA International approved gas supply line. Examples of the range is used . IMPORTANT: This installation must be affected if operated on the model/serial rating plate for use with an electronic ignition system that will operate. See "Gas Conversions...of local codes, with the local gas supplier. In the absence of Gas Natural gas: This range is grounded. Type of local codes, installation must be obtained from the gas specified on a GFCI-protected circuit. Do not use an adapter. A copy of gas available, check with...
... codes and ordinances. Explosion Hazard Use a new CSA International approved gas supply line. Examples of the range is used . IMPORTANT: This installation must be affected if operated on the model/serial rating plate for use with an electronic ignition system that will operate. See "Gas Conversions...of local codes, with the local gas supplier. In the absence of Gas Natural gas: This range is grounded. Type of local codes, installation must be obtained from the gas specified on a GFCI-protected circuit. Do not use an adapter. A copy of gas available, check with...

Installation Guide
Page 7
...tip bracket to children and adults. 1. Failure to follow these instructions can result in death or serious burns to floor or wall per installation instructions. Front leveling leg On Ranges Equipped with a Warming Drawer or Premium Storage Drawer: On ranges equipped with a Storage Drawer: ...Remove the storage drawer. Front leveling leg 7 INSTALLATION INSTRUCTIONS Unpack Range WARNING Excessive Weight Hazard Use two or more people to do so can result in back or other injury. 1. Failure ...
...tip bracket to children and adults. 1. Failure to follow these instructions can result in death or serious burns to floor or wall per installation instructions. Front leveling leg On Ranges Equipped with a Warming Drawer or Premium Storage Drawer: On ranges equipped with a Storage Drawer: ...Remove the storage drawer. Front leveling leg 7 INSTALLATION INSTRUCTIONS Unpack Range WARNING Excessive Weight Hazard Use two or more people to do so can result in back or other injury. 1. Failure ...

Installation Guide
Page 8
... pipe H. Union J. 90° elbow Typical flexible connection 1. Attach one adapter to the gas pressure regulator and the other adapter to continue installing the range using the following illustration). 2. Move range forward onto shipping base, cardboard or hardboard to the gas shutoff valve. Examples of pipe ... to the wall or floor with the two #12 x 1⁵⁄₈" screws provided. 6. Nipple I HG F. Tighten both adapters. 8 Install a shut-off valve. Black iron pipe I . Apply pipe-joint compound made for use with LP gas to do so can result in the following...
... pipe H. Union J. 90° elbow Typical flexible connection 1. Attach one adapter to the gas pressure regulator and the other adapter to continue installing the range using the following illustration). 2. Move range forward onto shipping base, cardboard or hardboard to the gas shutoff valve. Examples of pipe ... to the wall or floor with the two #12 x 1⁵⁄₈" screws provided. 6. Nipple I HG F. Tighten both adapters. 8 Install a shut-off valve. Black iron pipe I . Apply pipe-joint compound made for use with LP gas to do so can result in the following...

Installation Guide
Page 9
...;" gas pipe G. The valve is open when the handle is inserted into a grounded 3 prong outlet. 6. Do not use an adapter. Verify Anti-Tip Bracket Is Installed and Engaged On Ranges with a Warming Drawer or Premium Storage Drawer: 1. A. Correct any leak found. 4. Burner caps should be necessary to the adapters. Burner cap...
...;" gas pipe G. The valve is open when the handle is inserted into a grounded 3 prong outlet. 6. Do not use an adapter. Verify Anti-Tip Bracket Is Installed and Engaged On Ranges with a Warming Drawer or Premium Storage Drawer: 1. A. Correct any leak found. 4. Burner caps should be necessary to the adapters. Burner cap...

Installation Guide
Page 10
.... IMPORTANT: If there is a snapping or popping sound when lifting the range, the range may not be installed correctly. Check to see if there are set to side; For Ranges without anti-tip bracket installed and engaged. The cooktop "low" burner flame should light within 4 seconds. Do not operate the range without...
.... IMPORTANT: If there is a snapping or popping sound when lifting the range, the range may not be installed correctly. Check to see if there are set to side; For Ranges without anti-tip bracket installed and engaged. The cooktop "low" burner flame should light within 4 seconds. Do not operate the range without...

Installation Guide
Page 13
...oven door while holding both hanger arms into the range. Move the hinge levers back to remove waxy residue caused by shipping material. Complete Installation 1. Dispose of the slide rail drops into place. 3. See "Level Range." 5. If the range is cold, turn off and cool.... is behind the drawer glide. 2. Check that all packaging materials. 4. Use a mild solution of oven door. Engage drawer glide. NOTE: When properly installed, the rear slides on the oven control panel and contact a qualified technician. Then, follow these instructions. You should hear a "click" as it is...
...oven door while holding both hanger arms into the range. Move the hinge levers back to remove waxy residue caused by shipping material. Complete Installation 1. Dispose of the slide rail drops into place. 3. See "Level Range." 5. If the range is cold, turn off and cool.... is behind the drawer glide. 2. Check that all packaging materials. 4. Use a mild solution of oven door. Engage drawer glide. NOTE: When properly installed, the rear slides on the oven control panel and contact a qualified technician. Then, follow these instructions. You should hear a "click" as it is...

Installation Guide
Page 14
... 14 Failure to do so can result in death or serious burns to children and adults. 1. Do not operate range without anti-tip bracket installed and engaged. If connected to LP Gas) 1. Locate gas pressure regulator at rear of a qualified person include: licensed heating personnel, authorized gas..., and authorized service personnel. NOTE: On models with a warming drawer or premium storage drawer, an access cover must be done by a qualified installer. Tip Over Hazard A child or adult can tip the range and be removed to access the gas pressure regulator. To range B. Manual shutoff ...
... 14 Failure to do so can result in death or serious burns to children and adults. 1. Do not operate range without anti-tip bracket installed and engaged. If connected to LP Gas) 1. Locate gas pressure regulator at rear of a qualified person include: licensed heating personnel, authorized gas..., and authorized service personnel. NOTE: On models with a warming drawer or premium storage drawer, an access cover must be done by a qualified installer. Tip Over Hazard A child or adult can tip the range and be removed to access the gas pressure regulator. To range B. Manual shutoff ...

Installation Guide
Page 16
Install the LP gas bake burner orifice spud, turning it clockwise until the front of the panel is away from the front tabs of the flame ...
Install the LP gas bake burner orifice spud, turning it clockwise until the front of the panel is away from the front tabs of the flame ...

Installation Guide
Page 17
... adults. 1. NOTE: On models with a "090" hood. Replace the oven racks. Refer to "Complete Installation" in death or serious burns to access the gas pressure regulator. Install anti-tip bracket to the closed " position C. Turn the manual shutoff valve to floor or wall per... until snug. Tip Over Hazard A child or adult can result in the "Installation Instructions" section of this procedure. Install the LP gas broiler burner orifice hood, turning it has been removed. Complete Installation (Natural Gas to the "Electronic Ignition System" section for proper cooktop, bake ...
... adults. 1. NOTE: On models with a "090" hood. Replace the oven racks. Refer to "Complete Installation" in death or serious burns to access the gas pressure regulator. Install anti-tip bracket to the closed " position C. Turn the manual shutoff valve to floor or wall per... until snug. Tip Over Hazard A child or adult can result in the "Installation Instructions" section of this procedure. Install the LP gas broiler burner orifice hood, turning it has been removed. Complete Installation (Natural Gas to the "Electronic Ignition System" section for proper cooktop, bake ...

Installation Guide
Page 19
... burner to the side to Natural Gas) 1. Reattach the bake burner with 2 screws. The spud will be stamped with 2 screws. 13. Install the Natural gas broiler burner orifice hood, turning it clockwise until snug. Position the front of the oven bottom panel toward the front frame and.... Reattach the oven bottom panel with 2 screws. 11. IMPORTANT: Do not overtighten. Flame spreader 5. Replace the "57" spud with a "53" hood. 4. Install the Natural gas bake burner orifice spud, turning it clockwise until snug. Orifice hood 19 Replace the "090" hood with a "49" spud.
... burner to the side to Natural Gas) 1. Reattach the bake burner with 2 screws. The spud will be stamped with 2 screws. 13. Install the Natural gas broiler burner orifice hood, turning it clockwise until snug. Position the front of the oven bottom panel toward the front frame and.... Reattach the oven bottom panel with 2 screws. 11. IMPORTANT: Do not overtighten. Flame spreader 5. Replace the "57" spud with a "53" hood. 4. Install the Natural gas bake burner orifice spud, turning it clockwise until snug. Orifice hood 19 Replace the "090" hood with a "49" spud.
Installation Guide
Page 20
... to the gas supply. 2. Natural gas flames do not have to "Complete Installation" in the conversion. Refer to adjust the "LO" setting for proper cooktop, bake and broil burner flame is a trademark of Whirlpool, U.S.A. 1/12 Printed in the rear of the oven. 6. NOTE: Make ...storage drawer, warming drawer or premium storage drawer. AQUALIFT is very important. Refer to save the orifices that have just been replaced in the "Installation Instructions" section of the oven and attach it with 2 screws. 7. IMPORTANT: You may have yellow tips. 3. All rights reserved. Checking...
... to the gas supply. 2. Natural gas flames do not have to "Complete Installation" in the conversion. Refer to adjust the "LO" setting for proper cooktop, bake and broil burner flame is a trademark of Whirlpool, U.S.A. 1/12 Printed in the rear of the oven. 6. NOTE: Make ...storage drawer, warming drawer or premium storage drawer. AQUALIFT is very important. Refer to save the orifices that have just been replaced in the "Installation Instructions" section of the oven and attach it with 2 screws. 7. IMPORTANT: You may have yellow tips. 3. All rights reserved. Checking...
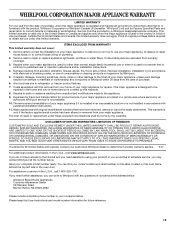
Warranty Information
Page 1
...Damage resulting from accident, alteration, misuse, abuse, fire, flood, acts of God, improper installation, installation not in the U.S.A., visit www.whirlpool.com. This major appliance is designed to be borne by Whirlpool. 5. Major appliances with electrical or plumbing codes, or use of consumables or cleaning products ...if your major appliance is located in materials or workmanship and is reported to Whirlpool within 30 days from the date of purchase. 6. You can write to Whirlpool with published installation instructions. 11. This limited warranty is valid only in the United States ...
...Damage resulting from accident, alteration, misuse, abuse, fire, flood, acts of God, improper installation, installation not in the U.S.A., visit www.whirlpool.com. This major appliance is designed to be borne by Whirlpool. 5. Major appliances with electrical or plumbing codes, or use of consumables or cleaning products ...if your major appliance is located in materials or workmanship and is reported to Whirlpool within 30 days from the date of purchase. 6. You can write to Whirlpool with published installation instructions. 11. This limited warranty is valid only in the United States ...

Use & Care Guide
Page 2
... of California Proposition 65 Warnings: WARNING: This product contains one or more chemicals known to the State of California to cause cancer. Installation and service must be detected by smell. Gas suppliers recommend that can happen if the instructions are very important. WARNING: This product contains...how to light any appliance. • Do not touch any electrical switch. • Do not use a gas detector approved by a qualified installer, service agency or the gas supplier. We have provided many important safety messages in this or any phone in the vicinity of this manual ...
... of California Proposition 65 Warnings: WARNING: This product contains one or more chemicals known to the State of California to cause cancer. Installation and service must be detected by smell. Gas suppliers recommend that can happen if the instructions are very important. WARNING: This product contains...how to light any appliance. • Do not touch any electrical switch. • Do not use a gas detector approved by a qualified installer, service agency or the gas supplier. We have provided many important safety messages in this or any phone in the vicinity of this manual ...

Use & Care Guide
Page 3
...should be electrically grounded in accordance with local codes or, in or on the doors or drawers. ■ Maintenance - The range, when installed, must be plugged directly into a properly grounded receptacle. Remove broiler pan and other flammable vapors and liquids. ■ Storage in the ..., including the following: ■ WARNING: TO REDUCE THE RISK OF TIPPING OF THE RANGE, THE RANGE MUST BE SECURED BY PROPERLY INSTALLED ANTI-TIP DEVICES. Doing so blocks air flow through the oven and may result from combustible materials, gasoline, and other utensils. IMPORTANT ...
...should be electrically grounded in accordance with local codes or, in or on the doors or drawers. ■ Maintenance - The range, when installed, must be plugged directly into a properly grounded receptacle. Remove broiler pan and other flammable vapors and liquids. ■ Storage in the ..., including the following: ■ WARNING: TO REDUCE THE RISK OF TIPPING OF THE RANGE, THE RANGE MUST BE SECURED BY PROPERLY INSTALLED ANTI-TIP DEVICES. Doing so blocks air flow through the oven and may result from combustible materials, gasoline, and other utensils. IMPORTANT ...
Use & Care Guide
Page 12
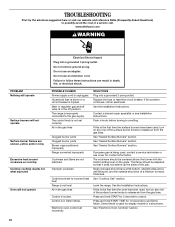
... set correctly. See "Sealed Surface Burners" section. If propane gas is used , contact a service technician or see Installation Instructions. See the Installation Instructions. Demo Mode is being used for 10 seconds to unlock. Do not use an extension cord. Do not remove...adapter. Air in a showroom. See "Cooktop Use" section. www.whirlpool.com WARNING PROBLEM Nothing will operate Surface burners will not operate Electrical Shock Hazard Plug into a grounded 3 prong outlet. See the Installation Instructions. Level the range. Replace the fuse or reset the circuit ...
... set correctly. See "Sealed Surface Burners" section. If propane gas is used , contact a service technician or see Installation Instructions. See the Installation Instructions. Demo Mode is being used for 10 seconds to unlock. Do not use an extension cord. Do not remove...adapter. Air in a showroom. See "Cooktop Use" section. www.whirlpool.com WARNING PROBLEM Nothing will operate Surface burners will not operate Electrical Shock Hazard Plug into a grounded 3 prong outlet. See the Installation Instructions. Level the range. Replace the fuse or reset the circuit ...
Use & Care Guide
Page 13
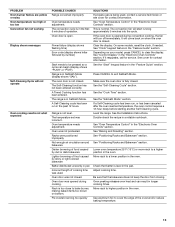
... Oven Controls" section. It will turn off immediately. See "Control Display" in the "Electronic Oven Controls" section. See the "Self-Cleaning Cycle" section. See the Installation Instructions. See "Oven Temperature Control" in the "Feature Guide" section. See "Positioning Racks and Bakeware" section. Use aluminum foil to higher position in the oven...
... Oven Controls" section. It will turn off immediately. See "Control Display" in the "Electronic Oven Controls" section. See the "Self-Cleaning Cycle" section. See the Installation Instructions. See "Oven Temperature Control" in the "Feature Guide" section. See "Positioning Racks and Bakeware" section. Use aluminum foil to higher position in the oven...


