
Installation Guide
Page 1
... Supply Requirements 5 INSTALLATION INSTRUCTIONS 7 Unpack Range 7 Install Anti-Tip Bracket 7 Make Gas Connection 8 Verify Anti-Tip Bracket Is Installed and Engaged 9 Level Range 10 Electronic Ignition System 10 Warming Drawer or Premium Storage Drawer 12 Storage Drawer 12 Oven Door 13 Complete Installation 13 GAS CONVERSIONS 14 LP Gas Conversion 14...
... Supply Requirements 5 INSTALLATION INSTRUCTIONS 7 Unpack Range 7 Install Anti-Tip Bracket 7 Make Gas Connection 8 Verify Anti-Tip Bracket Is Installed and Engaged 9 Level Range 10 Electronic Ignition System 10 Warming Drawer or Premium Storage Drawer 12 Storage Drawer 12 Oven Door 13 Complete Installation 13 GAS CONVERSIONS 14 LP Gas Conversion 14...

Installation Guide
Page 5
... 70 or Canadian Electrical Code, CSA C22.1. See "Gas Conversions" section. LP gas conversion: Conversion must be provided. ■ Electronic ignition systems operate within wide voltage limits, but proper grounding and polarity are in doubt as it is recommended that a qualified electrical installer determine ...local gas supplier. Check with LP gas. ■ This range is recommended that can result in order for use with an electronic ignition system that the outlet provides 120-volt power and is correctly grounded. ■ This gas range is required. Observe all gas connections...
... 70 or Canadian Electrical Code, CSA C22.1. See "Gas Conversions" section. LP gas conversion: Conversion must be provided. ■ Electronic ignition systems operate within wide voltage limits, but proper grounding and polarity are in doubt as it is recommended that a qualified electrical installer determine ...local gas supplier. Check with LP gas. ■ This range is recommended that can result in order for use with an electronic ignition system that the outlet provides 120-volt power and is correctly grounded. ■ This gas range is required. Observe all gas connections...

Installation Guide
Page 10
... into the bracket. NOTE: Range must be fully engaged in place of the valve stem. Electronic Ignition System Initial lighting and gas flame adjustments Cooktop and oven burners use electronic igniters in the bracket. This sparking continues, as long as indicated in the anti-tip bracket. When... the oven control is turned to the desired setting, sparking occurs and ignites the gas. The first time a burner is engaged in oven. 2. If burners do not light properly: ■ Turn cooktop control knob ...
... into the bracket. NOTE: Range must be fully engaged in place of the valve stem. Electronic Ignition System Initial lighting and gas flame adjustments Cooktop and oven burners use electronic igniters in the bracket. This sparking continues, as long as indicated in the anti-tip bracket. When... the oven control is turned to the desired setting, sparking occurs and ignites the gas. The first time a burner is engaged in oven. 2. If burners do not light properly: ■ Turn cooktop control knob ...

Installation Guide
Page 11
.... 11 Lift the rear of the oven bottom up to 50 to 60 seconds to one side of the burner. Press the START pad. Electronic igniters are used to check flame. Refer to the Use and Care Guide or User Instructions for proper operation of flame should occur. 3. Check the oven...
.... 11 Lift the rear of the oven bottom up to 50 to 60 seconds to one side of the burner. Press the START pad. Electronic igniters are used to check flame. Refer to the Use and Care Guide or User Instructions for proper operation of flame should occur. 3. Check the oven...

Installation Guide
Page 15
... spuds are stamped with a number, marked with 1 color dot, and have a groove in the cardboard orifice spud holder. 6. Replace the burner base using both screw. 7. Igniter electrode B. Press nut driver down onto the gas orifice spud and remove by turning it . Plastic cover B. Gas pressure regulator cap 5. Spark electrode 4. A A. Place Natural...
... spuds are stamped with a number, marked with 1 color dot, and have a groove in the cardboard orifice spud holder. 6. Replace the burner base using both screw. 7. Igniter electrode B. Press nut driver down onto the gas orifice spud and remove by turning it . Plastic cover B. Gas pressure regulator cap 5. Spark electrode 4. A A. Place Natural...

Installation Guide
Page 17
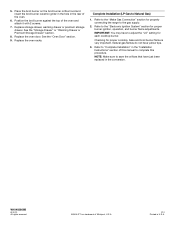
... Make sure to save the orifices that have to adjust the "LO" setting for properly connecting the range to the "Electronic Ignition System" section for proper cooktop, bake and broil burner flame is not as distinct as the inner cone. Remove plastic cover from... A. Unplug range or disconnect power. Turn the manual shutoff valve to children and adults. 1. See the "Oven Door" section. 9. Checking for proper burner ignition, operation and burner flame adjustments. To range B. IMPORTANT: Do not overtighten. Replace the "53" hood with a "090" hood. Refer to floor or wall...
... Make sure to save the orifices that have to adjust the "LO" setting for properly connecting the range to the "Electronic Ignition System" section for proper cooktop, bake and broil burner flame is not as distinct as the inner cone. Remove plastic cover from... A. Unplug range or disconnect power. Turn the manual shutoff valve to children and adults. 1. See the "Oven Door" section. 9. Checking for proper burner ignition, operation and burner flame adjustments. To range B. IMPORTANT: Do not overtighten. Replace the "53" hood with a "090" hood. Refer to floor or wall...
Installation Guide
Page 20
See the "Oven Door" section. 9. Refer to "Complete Installation" in the "Installation Instructions" section of Whirlpool, U.S.A. 1/12 Printed in U.S.A. Replace the oven racks. All rights reserved. W10403809B © 2012. Replace storage drawer, warming drawer or premium ... "Warming Drawer or Premium Storage Drawer" section. 8. AQUALIFT is very important. Replace the oven door. IMPORTANT: You may have to the "Electronic Ignition System" section for each cooktop burner. Position the broil burner against the top of the oven. 6. 5. Place the broil burner on the broil ...
See the "Oven Door" section. 9. Refer to "Complete Installation" in the "Installation Instructions" section of Whirlpool, U.S.A. 1/12 Printed in U.S.A. Replace the oven racks. All rights reserved. W10403809B © 2012. Replace storage drawer, warming drawer or premium ... "Warming Drawer or Premium Storage Drawer" section. 8. AQUALIFT is very important. Replace the oven door. IMPORTANT: You may have to the "Electronic Ignition System" section for each cooktop burner. Position the broil burner against the top of the oven. 6. 5. Place the broil burner on the broil ...

Use & Care Guide
Page 5
... using a burner cap. Power Failure In case of soil and do not allow spills, food, cleaning agents or any other material to IGNITE. Sealed Surface Burners Burner cap: Always keep the burner cap in the previous illustration. Burner base C. See the "Self-Cleaning Cycle" ...section. 1. The cooktop functions are turned to enter the burner ports. 5 Keep spillovers out of the pan. To set to turn knob to IGNITE will click. WARNING COOKTOP USE To Set: 1. Alignment pins D. All surface burners will produce a flame. 2. REMEMBER: When range is in color...
... using a burner cap. Power Failure In case of soil and do not allow spills, food, cleaning agents or any other material to IGNITE. Sealed Surface Burners Burner cap: Always keep the burner cap in the previous illustration. Burner base C. See the "Self-Cleaning Cycle" ...section. 1. The cooktop functions are turned to enter the burner ports. 5 Keep spillovers out of the pan. To set to turn knob to IGNITE will click. WARNING COOKTOP USE To Set: 1. Alignment pins D. All surface burners will produce a flame. 2. REMEMBER: When range is in color...
Use & Care Guide
Page 7
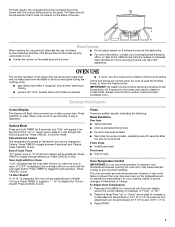
.... Use the Temp/Time "up" or "down " arrow pads to increase or to measure oven temperature because opening or closing ■ igniters will turn on when the door is heavily soiled. Fahrenheit and Celsius The temperature is displayed, the oven light will automatically shut off . If... and -30°F (-17°C). 3. Exposure to exit. 12-Hour Shutoff If "12 Hr" is heard when a Bake or Broil burner ignites Odors and smoke are audible signals, indicating the following options. Press TIMER to give incorrect readings. Oven Light with the bottom sitting level on 2 surface...
.... Use the Temp/Time "up" or "down " arrow pads to increase or to measure oven temperature because opening or closing ■ igniters will turn on when the door is heavily soiled. Fahrenheit and Celsius The temperature is displayed, the oven light will automatically shut off . If... and -30°F (-17°C). 3. Exposure to exit. 12-Hour Shutoff If "12 Hr" is heard when a Bake or Broil burner ignites Odors and smoke are audible signals, indicating the following options. Press TIMER to give incorrect readings. Oven Light with the bottom sitting level on 2 surface...
Use & Care Guide
Page 14
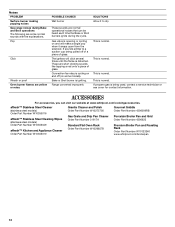
... For accessories, you can be heard each time the Bake or Broil burners ignite during Bake and Broil operations The following are normal operational noises that can visit our website at www.whirlpool.com/cookingaccessories. Pop Click Woosh or poof Oven burner flames are short clicking sounds like tapping a nail onto a piece...
... For accessories, you can be heard each time the Bake or Broil burners ignite during Bake and Broil operations The following are normal operational noises that can visit our website at www.whirlpool.com/cookingaccessories. Pop Click Woosh or poof Oven burner flames are short clicking sounds like tapping a nail onto a piece...
