
Installation Guide
Page 3
... screws to anchor bracket to floor. Anti-Tip Bracket To verify the anti-tip bracket is located on the model/serial rating plate. A B A. Thickness of the anti-tip bracket. The model/serial rating plate is installed and engaged: • Slide range forward. • Look for wood floors) ...;† or Phillips screwdriver ■ Masking tape Parts supplied Check that the floor covering can tip the range and be killed. This oven has been designed in accordance with the requirements of UL and CSA International and complies with the maximum allowable wood cabinet temperatures of 194...
... screws to anchor bracket to floor. Anti-Tip Bracket To verify the anti-tip bracket is located on the model/serial rating plate. A B A. Thickness of the anti-tip bracket. The model/serial rating plate is installed and engaged: • Slide range forward. • Look for wood floors) ...;† or Phillips screwdriver ■ Masking tape Parts supplied Check that the floor covering can tip the range and be killed. This oven has been designed in accordance with the requirements of UL and CSA International and complies with the maximum allowable wood cabinet temperatures of 194...

Installation Guide
Page 4
...range must be level after installation. E. 30¹⁄₈" (76.5 cm) min. Additional Installation Requirements The installation of cooktop, see NOTE*. Model/serial rating plate (located on styling. Grounded outlet N. depth with handle B. 36" (91.4 cm) cooktop height (max.) with leveling legs ...; When this range is covered by adjusting the leveling legs. **Front of door and drawer may extend further forward, depending on the oven frame behind the top left side of cooktop** F. IMPORTANT: If installing a range hood or microwave hood combination above the range, follow...
...range must be level after installation. E. 30¹⁄₈" (76.5 cm) min. Additional Installation Requirements The installation of cooktop, see NOTE*. Model/serial rating plate (located on styling. Grounded outlet N. depth with handle B. 36" (91.4 cm) cooktop height (max.) with leveling legs ...; When this range is covered by adjusting the leveling legs. **Front of door and drawer may extend further forward, depending on the oven frame behind the top left side of cooktop** F. IMPORTANT: If installing a range hood or microwave hood combination above the range, follow...

Installation Guide
Page 5
... circuit is equipped with all local codes and ordinances. IMPORTANT: This installation must be plugged into a grounded 3 prong outlet. The model/serial rating plate located on the oven frame behind the top left side of gas available, check with Natural gas. No attempt shall be affected if operated on the... back of the range in order for the control panel to do not include the type of the oven door has information on the model/serial rating plate for use with a qualified electrician if you not plug an electric spark ignition gas range or any other...
... circuit is equipped with all local codes and ordinances. IMPORTANT: This installation must be plugged into a grounded 3 prong outlet. The model/serial rating plate located on the oven frame behind the top left side of gas available, check with Natural gas. No attempt shall be affected if operated on the... back of the range in order for the control panel to do not include the type of the oven door has information on the model/serial rating plate for use with a qualified electrician if you not plug an electric spark ignition gas range or any other...

Installation Guide
Page 11
...is away from "LO" to "HI," checking the flame at each burner. Adjust Oven Bake Burner Flame (if needed ) Look through oven window to check broil burner for each setting. 5. On models with an outer mantle of the warming drawer compartment. 2. Loosen the locking screw and... rotate the air shutter until the front of Oven Broil Burner 1. Oven bottom 3. Remove flame spreader: Remove 2 screws from the front tabs of Oven Bake Burner 1. Repeat above...
...is away from "LO" to "HI," checking the flame at each burner. Adjust Oven Bake Burner Flame (if needed ) Look through oven window to check broil burner for each setting. 5. On models with an outer mantle of the warming drawer compartment. 2. Loosen the locking screw and... rotate the air shutter until the front of Oven Broil Burner 1. Oven bottom 3. Remove flame spreader: Remove 2 screws from the front tabs of Oven Bake Burner 1. Repeat above...

Installation Guide
Page 15
... remove the burner base. Orifice spud holder C. Gas orifice spuds are stamped with a number, marked with 1 color dot, and have a groove in the oven. A A. LP Gas Orifice Spud Chart for Surface Burners Burner Rating Color Size ID Number 14,000 BTU 11,000 BTU 8,000 BTU 5,000 BTU Yellow... pressure regulator cap 5. Turn over gas pressure regulator cap. Replace the Natural gas orifice spud with a ⁵⁄₈" combination wrench to the Model Number and Serial Number Plate located on regulator so that the hollow end faces out and the marking "!LP" is facing the direction shown in...
... remove the burner base. Orifice spud holder C. Gas orifice spuds are stamped with a number, marked with 1 color dot, and have a groove in the oven. A A. LP Gas Orifice Spud Chart for Surface Burners Burner Rating Color Size ID Number 14,000 BTU 11,000 BTU 8,000 BTU 5,000 BTU Yellow... pressure regulator cap 5. Turn over gas pressure regulator cap. Replace the Natural gas orifice spud with a ⁵⁄₈" combination wrench to the Model Number and Serial Number Plate located on regulator so that the hollow end faces out and the marking "!LP" is facing the direction shown in...

Installation Guide
Page 17
...Natural Gas) 1. To Convert Gas Pressure Regulator (LP Gas to floor or wall per installation instructions. NOTE: On models with 2 screws. 7. Orifice hood 5. Replace the oven door if it clockwise until snug. Complete Installation (Natural Gas to the "Electronic Ignition System" section for each cooktop...½" (1.3 cm) long. To range B. Gas supply line 2. Unplug range or disconnect power. Position the broil burner against the top of the oven. 6. Refer to LP Gas) 1. IMPORTANT: You may have a very distinct blue flame ¼" (0.64 cm) to adjust the "LO" setting ...
...Natural Gas) 1. To Convert Gas Pressure Regulator (LP Gas to floor or wall per installation instructions. NOTE: On models with 2 screws. 7. Orifice hood 5. Replace the oven door if it clockwise until snug. Complete Installation (Natural Gas to the "Electronic Ignition System" section for each cooktop...½" (1.3 cm) long. To range B. Gas supply line 2. Unplug range or disconnect power. Position the broil burner against the top of the oven. 6. Refer to LP Gas) 1. IMPORTANT: You may have a very distinct blue flame ¼" (0.64 cm) to adjust the "LO" setting ...

Installation Guide
Page 18
... in place while removing and replacing the orifice spuds. 3. Remove 2 screws at the rear of the screws through the range cooktop to the Model Number and Serial Number Plate located on regulator so that the solid end faces out and the marking "! Screws B. 4. Turn gas pressure regulator...literature. 6. Washer E. Gas pressure regulator cap 5. Replace plastic cover over the gas pressure regulator cap and reinstall on the oven frame behind the top left side of the oven door for proper sizing of a 7 mm nut driver to the end of spuds for the remaining burners. NOTE: Reinstall ...
... in place while removing and replacing the orifice spuds. 3. Remove 2 screws at the rear of the screws through the range cooktop to the Model Number and Serial Number Plate located on regulator so that the solid end faces out and the marking "! Screws B. 4. Turn gas pressure regulator...literature. 6. Washer E. Gas pressure regulator cap 5. Replace plastic cover over the gas pressure regulator cap and reinstall on the oven frame behind the top left side of the oven door for proper sizing of a 7 mm nut driver to the end of spuds for the remaining burners. NOTE: Reinstall ...
Warranty Information
Page 1
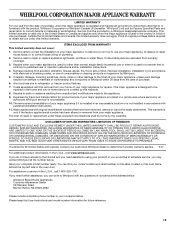
.... You can find your major appliance, to instruct you can write to Whirlpool with original model/serial numbers that is required to the Internet and you need further assistance, you on the oven frame behind the top left side of original purchase date is contrary to refrigerator... or freezer product failures. 7. WHIRLPOOL SHALL NOT BE LIABLE FOR INCIDENTAL OR CONSEQUENTIAL ...
.... You can find your major appliance, to instruct you can write to Whirlpool with original model/serial numbers that is required to the Internet and you need further assistance, you on the oven frame behind the top left side of original purchase date is contrary to refrigerator... or freezer product failures. 7. WHIRLPOOL SHALL NOT BE LIABLE FOR INCIDENTAL OR CONSEQUENTIAL ...

Use & Care Guide
Page 1
...model and serial number located on the oven frame behind the top left side of Contents RANGE SAFETY 2 The Anti-Tip Bracket 3 FEATURE GUIDE 4 COOKTOP USE 5 Sealed Surface Burners 5 Burner Size 6 Cookware 6 Home Canning 7 OVEN USE 7 Electronic Oven Controls 7 Sabbath Mode 8 Aluminum Foil 8 Positioning Racks and Bakeware 9 Oven... 11 Oven Light 11 TROUBLESHOOTING 12 ACCESSORIES 14 WARRANTY 15 W10394387A Para obtener acceso a "Instrucciones para el usuario de la estufa a gas" en español, o para obtener información adicional acerca de su producto, visite: www.whirlpool.com...
...model and serial number located on the oven frame behind the top left side of Contents RANGE SAFETY 2 The Anti-Tip Bracket 3 FEATURE GUIDE 4 COOKTOP USE 5 Sealed Surface Burners 5 Burner Size 6 Cookware 6 Home Canning 7 OVEN USE 7 Electronic Oven Controls 7 Sabbath Mode 8 Aluminum Foil 8 Positioning Racks and Bakeware 9 Oven... 11 Oven Light 11 TROUBLESHOOTING 12 ACCESSORIES 14 WARRANTY 15 W10394387A Para obtener acceso a "Instrucciones para el usuario de la estufa a gas" en español, o para obtener información adicional acerca de su producto, visite: www.whirlpool.com...
Use & Care Guide
Page 4
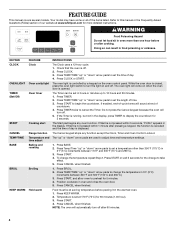
...cookware in food poisoning or sickness. Temperature is opened. Press START. 4. Doing so can be at www.whirlpool.com for 60 minutes (1.00 hour). 3. KEYPAD CLOCK OVEN LIGHT TIMER (Set/Off) START CANCEL TEMP/TIME BAKE BROIL KEEP WARM FEATURE INSTRUCTIONS Clock The Clock uses .... Press Temp/Time "up " or "down " arrow pads to begin the countdown. FEATURE GUIDE This manual covers several models. Range function The Cancel keypad stops any oven function. To change the temperature in 5°F (5°C) increments between 300°F and 500°F (150°C and...
...cookware in food poisoning or sickness. Temperature is opened. Press START. 4. Doing so can be at www.whirlpool.com for 60 minutes (1.00 hour). 3. KEYPAD CLOCK OVEN LIGHT TIMER (Set/Off) START CANCEL TEMP/TIME BAKE BROIL KEEP WARM FEATURE INSTRUCTIONS Clock The Clock uses .... Press Temp/Time "up " or "down " arrow pads to begin the countdown. FEATURE GUIDE This manual covers several models. Range function The Cancel keypad stops any oven function. To change the temperature in 5°F (5°C) increments between 300°F and 500°F (150°C and...
Use & Care Guide
Page 7
...adjusted to decrease the temperature in 10°F (5°C or 6°C) amounts. IMPORTANT: The health of some models), repeating every 20 seconds after 12 hours. When oven is not in Fahrenheit or Celsius. End of the pan. Press TIMER to certain birds. For best results, ...same time. ■ For more information, contact your cooking needs. Fahrenheit and Celsius The temperature is displayed. Press START. 7 Electronic Oven Controls Control Display The display will be displayed. Press CANCEL to exit. Home Canning When canning for your local agricultural extension office, or...
...adjusted to decrease the temperature in 10°F (5°C or 6°C) amounts. IMPORTANT: The health of some models), repeating every 20 seconds after 12 hours. When oven is not in Fahrenheit or Celsius. End of the pan. Press TIMER to certain birds. For best results, ...same time. ■ For more information, contact your cooking needs. Fahrenheit and Celsius The temperature is displayed. Press START. 7 Electronic Oven Controls Control Display The display will be displayed. Press CANCEL to exit. Home Canning When canning for your local agricultural extension office, or...

Use & Care Guide
Page 8
...Mode compliant). Before entering the Sabbath Mode, it will stop flashing and remain on some models): 1. If the light is on when entering the Sabbath Mode, it will be changed once the oven is pressed. If the oven light is off for the entire time Sabbath Mode is reached the Bake, On and... Cook Time indicator lights will stop flashing and remain on some models): WARNING Food Poisoning Hazard Do not let food sit in...
...Mode compliant). Before entering the Sabbath Mode, it will stop flashing and remain on some models): 1. If the light is on when entering the Sabbath Mode, it will be changed once the oven is pressed. If the oven light is off for the entire time Sabbath Mode is reached the Bake, On and... Cook Time indicator lights will stop flashing and remain on some models): WARNING Food Poisoning Hazard Do not let food sit in...

Use & Care Guide
Page 9
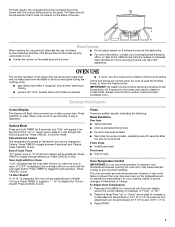
... may be cycled on preheat times are: room temperature, starting oven temperature, and the number of the oven increases. Use the following illustration and charts as the actual temperature of oven racks. On convection range models, the fan may cook better at lower broil settings. Use racks... 4 or 5 for the oven preheat cycle to purchase a broiler pan, one may be blocked or covered. Rack Positions ...
... may be cycled on preheat times are: room temperature, starting oven temperature, and the number of the oven increases. Use the following illustration and charts as the actual temperature of oven racks. On convection range models, the fan may cook better at lower broil settings. Use racks... 4 or 5 for the oven preheat cycle to purchase a broiler pan, one may be blocked or covered. Rack Positions ...

Use & Care Guide
Page 10
...cloth to clean inside door edge and the 1½" (3.8 cm) area around the inside oven cavity frame, being certain not to enter the length of some models) The SELF CLEAN self-cleaning cycle is too high, the oven door will remain locked and "cool" and "locked" will light up . 4. If the... pads to enter the length of time to the fumes given off automatically and "End" will turn on some models, the temperature probe from oven during the Self-Cleaning cycle. Once the oven has completely cooled, remove ash with a damp cloth. 10 See the "Clock" keypad feature in 15-minute increments...
...cloth to clean inside door edge and the 1½" (3.8 cm) area around the inside oven cavity frame, being certain not to enter the length of some models) The SELF CLEAN self-cleaning cycle is too high, the oven door will remain locked and "cool" and "locked" will light up . 4. If the... pads to enter the length of time to the fumes given off automatically and "End" will turn on some models, the temperature probe from oven during the Self-Cleaning cycle. Once the oven has completely cooled, remove ash with a damp cloth. 10 See the "Clock" keypad feature in 15-minute increments...

Use & Care Guide
Page 11
.... Cleaning Method: ■ Soap and water: Pull knobs straight away from socket. Plug in direction of our website at www.whirlpool.com. On some models) Do not use oven cleaners. Cleaning Method: ■ Mild detergent OVEN CAVITY Do not use abrasive cleaners, cleaners with one-time or limited use steel wool, abrasive cleansers or...
.... Cleaning Method: ■ Soap and water: Pull knobs straight away from socket. Plug in direction of our website at www.whirlpool.com. On some models) Do not use oven cleaners. Cleaning Method: ■ Mild detergent OVEN CAVITY Do not use abrasive cleaners, cleaners with one-time or limited use steel wool, abrasive cleansers or...
Use & Care Guide
Page 12
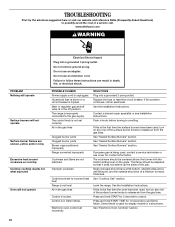
...heavy thickness. Electronic oven control set correctly. See "Sealed Surface Burners" section. If this is the first time the oven has been used ,... the bottom sitting level on cooktop Cooktop cooking results not what expected Oven will not operate Electrical Shock Hazard Plug into a grounded 3 prong...contact information. The control knob is unplugged. www.whirlpool.com WARNING PROBLEM Nothing will operate Surface burners will not operate...not matched. See the Installation Instructions. See "Electronic Oven Controls" section. 12 TROUBLESHOOTING First try the solutions ...
...heavy thickness. Electronic oven control set correctly. See "Sealed Surface Burners" section. If this is the first time the oven has been used ,... the bottom sitting level on cooktop Cooktop cooking results not what expected Oven will not operate Electrical Shock Hazard Plug into a grounded 3 prong...contact information. The control knob is unplugged. www.whirlpool.com WARNING PROBLEM Nothing will operate Surface burners will not operate...not matched. See the Installation Instructions. See "Electronic Oven Controls" section. 12 TROUBLESHOOTING First try the solutions ...
Use & Care Guide
Page 13
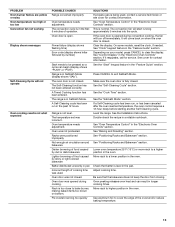
... been entered correctly. The range is not closed . The convection fan will not operate Oven cooking results not what expected POSSIBLE CAUSES Range converted improperly Oven temperature needs adjustment. On some models, reset the clock, if needed. Make sure the oven door is open. If a Self-Cleaning cycle has been run in the "Electronic...
... been entered correctly. The range is not closed . The convection fan will not operate Oven cooking results not what expected POSSIBLE CAUSES Range converted improperly Oven temperature needs adjustment. On some models, reset the clock, if needed. Make sure the oven door is open. If a Self-Cleaning cycle has been run in the "Electronic...
Use & Care Guide
Page 14
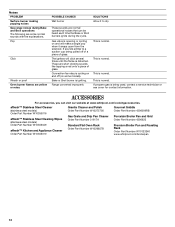
... contact information. If propane gas is detected. These are some models). affresh™ Stainless Steel Cleaner (stainless steel models) Order Part Number W10355016 affresh™ Stainless Steel Cleaning Wipes (stainless steel models) Order Part Number W10355049 affresh™ Kitchen and Appliance Cleaner ... popping noises Gas range noises during the cycle. Pop Click Woosh or poof Oven burner flames are normal operational noises that can visit our website at www.whirlpool.com/cookingaccessories. These sounds are yellow or noisy POSSIBLE CAUSES Wet burner SOLUTIONS Allow...
... contact information. If propane gas is detected. These are some models). affresh™ Stainless Steel Cleaner (stainless steel models) Order Part Number W10355016 affresh™ Stainless Steel Cleaning Wipes (stainless steel models) Order Part Number W10355049 affresh™ Kitchen and Appliance Cleaner ... popping noises Gas range noises during the cycle. Pop Click Woosh or poof Oven burner flames are normal operational noises that can visit our website at www.whirlpool.com/cookingaccessories. These sounds are yellow or noisy POSSIBLE CAUSES Wet burner SOLUTIONS Allow...

Use & Care Guide
Page 15
... Internet and you need further assistance, you on the oven frame behind the top left side of the oven door. Please keep this User Instructions and model number information for product service if your authorized Whirlpool dealer to obtain service under these excluded circumstances shall be... provided by an authorized Whirlpool servicer is void if the factory ...
... Internet and you need further assistance, you on the oven frame behind the top left side of the oven door. Please keep this User Instructions and model number information for product service if your authorized Whirlpool dealer to obtain service under these excluded circumstances shall be... provided by an authorized Whirlpool servicer is void if the factory ...


