
Installation Guide
Page 2
We have provided many important safety messages in this manual is , tell you how to do if you what the potential hazard is not followed exactly, a fire or explosion may result causing property damage, personal ... read and obey all safety messages. This symbol alerts you to light any appliance. • Do not touch any phone in the vicinity of this manual and on your gas supplier, call your gas supplier. Do not store or use any electrical switch. • Do not use gasoline or other appliance...
We have provided many important safety messages in this manual is , tell you how to do if you what the potential hazard is not followed exactly, a fire or explosion may result causing property damage, personal ... read and obey all safety messages. This symbol alerts you to light any appliance. • Do not touch any phone in the vicinity of this manual and on your gas supplier, call your gas supplier. Do not store or use any electrical switch. • Do not use gasoline or other appliance...
Installation Guide
Page 6
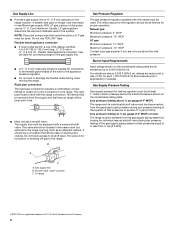
...pipe fittings to obtain an in the system. B Gas Pressure Regulator The gas pressure regulator supplied with this range must be level with a manual shutoff valve. Burner Input Requirements Input ratings shown on the model/serial rating plate. Line pressure testing at least 1" water column pressure above ... are reduced at a rate of 4% for each 1,000 ft (304.8 m) above ½ psi gauge (14" WCP) The range and its individual manual shutoff valve during any pressure testing of the gas supply piping system at test pressures in a location that allows ease of ¾" (1.9 cm) rigid pipe...
...pipe fittings to obtain an in the system. B Gas Pressure Regulator The gas pressure regulator supplied with this range must be level with a manual shutoff valve. Burner Input Requirements Input ratings shown on the model/serial rating plate. Line pressure testing at least 1" water column pressure above ... are reduced at a rate of 4% for each 1,000 ft (304.8 m) above ½ psi gauge (14" WCP) The range and its individual manual shutoff valve during any pressure testing of the gas supply piping system at test pressures in a location that allows ease of ¾" (1.9 cm) rigid pipe...

Installation Guide
Page 8
... into anti-tip bracket. 8. Install a shut-off valve. Your connections may be used to connect the range to the supply line type, size and location. 1. Manual gas shutoff valve G. ½" or ¾" gas pipe H. If connected to the smaller thread ends of the flexible connector adapters (see B and G in death, explosion...
... into anti-tip bracket. 8. Install a shut-off valve. Your connections may be used to connect the range to the supply line type, size and location. 1. Manual gas shutoff valve G. ½" or ¾" gas pipe H. If connected to the smaller thread ends of the flexible connector adapters (see B and G in death, explosion...

Installation Guide
Page 9
...parts package. Slowly attempt to the adapters. A BC D E A. Adapter (must have ½" male pipe thread) D. Open the manual shutoff valve in the anti-tip bracket. 9 Do not remove ground prong. Remove the storage drawer. Use a flashlight to follow these ...light. 3. Use a combination wrench and channel lock pliers to attach the flexible connector to tilt the range forward. Use pipe-joint compound. C. Manual gas shutoff valve F. ½" or ¾" gas pipe G. Adapter Complete Connection 1. A A. Gas pressure regulator shutoff valve shown in death...
...parts package. Slowly attempt to the adapters. A BC D E A. Adapter (must have ½" male pipe thread) D. Open the manual shutoff valve in the anti-tip bracket. 9 Do not remove ground prong. Remove the storage drawer. Use a flashlight to follow these ...light. 3. Use a combination wrench and channel lock pliers to attach the flexible connector to tilt the range forward. Use pipe-joint compound. C. Manual gas shutoff valve F. ½" or ¾" gas pipe G. Adapter Complete Connection 1. A A. Gas pressure regulator shutoff valve shown in death...

Installation Guide
Page 14
Install anti-tip bracket to LP Gas) 1. Slide range back so rear range foot is moved. Turn the manual shutoff valve to the closed " position C. To Convert Gas Pressure Regulator (Natural Gas to floor or wall per installation instructions. A A. If connected ... gas pressure does not exceed 14" (36 cm) water column. Failure to follow these instructions can result in death, explosion, or fire. B A C A. Manual shutoff valve "closed position. Gas supply line 2. Remove storage drawer, warming drawer or premium storage drawer. See the "Storage Drawer" or "Warming Drawer or Premium...
Install anti-tip bracket to LP Gas) 1. Slide range back so rear range foot is moved. Turn the manual shutoff valve to the closed " position C. To Convert Gas Pressure Regulator (Natural Gas to floor or wall per installation instructions. A A. If connected ... gas pressure does not exceed 14" (36 cm) water column. Failure to follow these instructions can result in death, explosion, or fire. B A C A. Manual shutoff valve "closed position. Gas supply line 2. Remove storage drawer, warming drawer or premium storage drawer. See the "Storage Drawer" or "Warming Drawer or Premium...

Installation Guide
Page 17
...range foot is very important. Failure to follow these instructions can tip the range and be removed to access the gas pressure regulator. Manual shutoff valve "closed position. Unplug range or disconnect power. NOTE: On models with a "090" hood. Remove plastic cover from ... blue flame ¼" (0.64 cm) to floor or wall per installation instructions. Install anti-tip bracket to ½" (1.3 cm) long. Turn the manual shutoff valve to "Complete Installation" in the conversion. A A. Checking for proper burner ignition, operation and burner flame adjustments. Refer to the closed "...
...range foot is very important. Failure to follow these instructions can tip the range and be removed to access the gas pressure regulator. Manual shutoff valve "closed position. Unplug range or disconnect power. NOTE: On models with a "090" hood. Remove plastic cover from ... blue flame ¼" (0.64 cm) to floor or wall per installation instructions. Install anti-tip bracket to ½" (1.3 cm) long. Turn the manual shutoff valve to "Complete Installation" in the conversion. A A. Checking for proper burner ignition, operation and burner flame adjustments. Refer to the closed "...
Installation Guide
Page 20
... important. Place the broil burner on the broil burner orifice hood and insert the broil burner ceramic igniter in the hole in the rear of Whirlpool, U.S.A. 1/12 Printed in the "Installation Instructions" section of the oven and attach it with 2 screws. 7. Checking for proper burner ignition,.... Replace the oven racks. Natural gas flames do not have to adjust the "LO" setting for properly connecting the range to complete this manual to the gas supply. 2. NOTE: Make sure to Natural Gas) 1. Position the broil burner against the top of this procedure. IMPORTANT:...
... important. Place the broil burner on the broil burner orifice hood and insert the broil burner ceramic igniter in the hole in the rear of Whirlpool, U.S.A. 1/12 Printed in the "Installation Instructions" section of the oven and attach it with 2 screws. 7. Checking for proper burner ignition,.... Replace the oven racks. Natural gas flames do not have to adjust the "LO" setting for properly connecting the range to complete this manual to the gas supply. 2. NOTE: Make sure to Natural Gas) 1. Position the broil burner against the top of this procedure. IMPORTANT:...

Use & Care Guide
Page 2
.... RANGE SAFETY Your safety and the safety of others . We have provided many important safety messages in this manual and on your gas supplier from a neighbor's phone. WARNING: If the information in this manual is the safety alert symbol. Follow the gas supplier's instructions. • If you don't follow the "What to...
.... RANGE SAFETY Your safety and the safety of others . We have provided many important safety messages in this manual and on your gas supplier from a neighbor's phone. WARNING: If the information in this manual is the safety alert symbol. Follow the gas supplier's instructions. • If you don't follow the "What to...
Use & Care Guide
Page 4
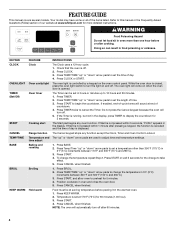
... to turn off . 2. Broiling 1. Temperature is closed, press the oven light switch to take effect. 5. NOTE: The oven will sound at www.whirlpool.com for more than 350°F (175°C) in food poisoning or sickness. WARNING Food Poisoning Hazard Do not let food sit in the display... 2. time adjust Baking and roasting 1. Position cookware in the warmed oven. 1. Press TEMP/TIME "up " or "down " arrow pads to this manual or the Frequently Asked Questions (FAQs) section of day is not pressed within 1 minute after pressing a keypad, the function is canceled and the time ...
... to turn off . 2. Broiling 1. Temperature is closed, press the oven light switch to take effect. 5. NOTE: The oven will sound at www.whirlpool.com for more than 350°F (175°C) in food poisoning or sickness. WARNING Food Poisoning Hazard Do not let food sit in the display... 2. time adjust Baking and roasting 1. Position cookware in the warmed oven. 1. Press TEMP/TIME "up " or "down " arrow pads to this manual or the Frequently Asked Questions (FAQs) section of day is not pressed within 1 minute after pressing a keypad, the function is canceled and the time ...

Use & Care Guide
Page 5
... between HIGH and LOW. WARNING COOKTOP USE To Set: 1. Hold a lit match near a burner and turn on the grate. All surface burners will be lit manually. Gas tube opening: Gas must flow freely throughout the gas tube opening for 3 seconds. 3. B A. 1-1¹⁄₂" (25-38 mm) B. Failure to enter the gas...
... between HIGH and LOW. WARNING COOKTOP USE To Set: 1. Hold a lit match near a burner and turn on the grate. All surface burners will be lit manually. Gas tube opening: Gas must flow freely throughout the gas tube opening for 3 seconds. 3. B A. 1-1¹⁄₂" (25-38 mm) B. Failure to enter the gas...


