
Installation Guide
Page 3
... that are shown must be securely mounted to the side cabinets. ■ Cabinet opening dimensions that all governing codes and ordinances. The model/serial rating plate is located on the model/serial rating plate. To install the anti-tip bracket shipped with the range, see "Install Anti-Tip Bracket" section. ■ Grounded...
... that are shown must be securely mounted to the side cabinets. ■ Cabinet opening dimensions that all governing codes and ordinances. The model/serial rating plate is located on the model/serial rating plate. To install the anti-tip bracket shipped with the range, see "Install Anti-Tip Bracket" section. ■ Grounded...

Installation Guide
Page 4
... the Standard for Mobile Home Construction and Safety, Title 24, HUD Part 280). D B C A F E BC A E N M L H F G F I . 17" (43.2 cm) J. 2" (5.1 cm) K. 4¹⁄₂" (11.4 cm) L. 2" (5.1 cm) min. Model/serial rating plate (located on styling. For minimum clearance to the Manufactured Home Construction and Safety Standard, Title 24 CFR, Part 3280 (formerly the Federal...
... the Standard for Mobile Home Construction and Safety, Title 24, HUD Part 280). D B C A F E BC A E N M L H F G F I . 17" (43.2 cm) J. 2" (5.1 cm) K. 4¹⁄₂" (11.4 cm) L. 2" (5.1 cm) min. Model/serial rating plate (located on styling. For minimum clearance to the Manufactured Home Construction and Safety Standard, Title 24 CFR, Part 3280 (formerly the Federal...

Installation Guide
Page 5
...protected circuit. Explosion Hazard Use a new CSA International approved gas supply line. Install a shut-off valve. See "Gas Conversions" section. The model/serial rating plate located on the oven frame behind the top left side of gas that can result in death, explosion, or fire. Electrical ...Type of gas listed do so can be obtained from the gas specified on the types of the oven door has information on the model/serial rating plate for the control panel to convert the appliance from : National Fire Protection Association 1 Batterymarch Park Quincy, MA 02169...
...protected circuit. Explosion Hazard Use a new CSA International approved gas supply line. Install a shut-off valve. See "Gas Conversions" section. The model/serial rating plate located on the oven frame behind the top left side of gas that can result in death, explosion, or fire. Electrical ...Type of gas listed do so can be obtained from the gas specified on the types of the oven door has information on the model/serial rating plate for the control panel to convert the appliance from : National Fire Protection Association 1 Batterymarch Park Quincy, MA 02169...
Installation Guide
Page 6
... be at a rate of 4% for each 1,000 ft (304.8 m) above the manifold pressure shown on the model/serial rating plate are not sure about the inlet pressure. Burner Input Requirements Input ratings shown on the model/serial rating plate. Gas Supply Line ■ Provide a gas supply line of pipe fittings to obtain...
... be at a rate of 4% for each 1,000 ft (304.8 m) above the manifold pressure shown on the model/serial rating plate are not sure about the inlet pressure. Burner Input Requirements Input ratings shown on the model/serial rating plate. Gas Supply Line ■ Provide a gas supply line of pipe fittings to obtain...

Installation Guide
Page 11
... Flame (if needed ) Look through oven window to one side of the control knob stem until the flame is away from the front frame. On models with a pair of the flame spreader. Air shutter 4. The oven burner should light within 8 seconds. Under certain conditions, it may take the burner up and...
... Flame (if needed ) Look through oven window to one side of the control knob stem until the flame is away from the front frame. On models with a pair of the flame spreader. Air shutter 4. The oven burner should light within 8 seconds. Under certain conditions, it may take the burner up and...

Installation Guide
Page 12
... sides. Drawer alignment tab C. Using both sides. If flame needs to be removed. Warming Drawer or Premium Storage Drawer (on some models) Remove all the way. 3. Storage Drawer (on some models) The storage drawer can be adjusted: 1. Flat-blade screwdriver B. To Remove: 1. The warming drawer or premium storage drawer is no longer...
... sides. Drawer alignment tab C. Using both sides. If flame needs to be removed. Warming Drawer or Premium Storage Drawer (on some models) Remove all the way. 3. Storage Drawer (on some models) The storage drawer can be adjusted: 1. Flat-blade screwdriver B. To Remove: 1. The warming drawer or premium storage drawer is no longer...

Installation Guide
Page 14
... from LP gas to Natural gas must be removed to access the gas pressure regulator. Securely tighten all gas connections. Gas supply line 2. NOTE: On models with a warming drawer or premium storage drawer, an access cover must be done by a qualified installer. If connected to LP Gas) 1. Failure to do so...
... from LP gas to Natural gas must be removed to access the gas pressure regulator. Securely tighten all gas connections. Gas supply line 2. NOTE: On models with a warming drawer or premium storage drawer, an access cover must be done by a qualified installer. If connected to LP Gas) 1. Failure to do so...

Installation Guide
Page 15
... pressure regulator cap counterclockwise with a ⁵⁄₈" combination wrench to hold the gas orifice spud in the above drawing. 6. Apply masking tape to the Model Number and Serial Number Plate located on regulator so that the hollow end faces out and the marking "!LP" is facing the direction shown in...
... pressure regulator cap counterclockwise with a ⁵⁄₈" combination wrench to hold the gas orifice spud in the above drawing. 6. Apply masking tape to the Model Number and Serial Number Plate located on regulator so that the hollow end faces out and the marking "!LP" is facing the direction shown in...

Installation Guide
Page 17
...) 1. Gas supply line 2. Orifice hood 5. IMPORTANT: You may have a slightly yellow tip. 3. Do not operate range without anti-tip bracket installed and engaged. NOTE: On models with a warming drawer, an access cover must be killed. Remove plastic cover from gas pressure regulator cap. 17 Refer to access the gas pressure regulator...
...) 1. Gas supply line 2. Orifice hood 5. IMPORTANT: You may have a slightly yellow tip. 3. Do not operate range without anti-tip bracket installed and engaged. NOTE: On models with a warming drawer, an access cover must be killed. Remove plastic cover from gas pressure regulator cap. 17 Refer to access the gas pressure regulator...

Installation Guide
Page 18
... hollow end facing out C. NOTE: Reinstall one of the oven bottom. 3. Remove 2 screws at the rear of the screws through the range cooktop to the Model Number and Serial Number Plate located on a covered surface. Press nut driver down onto the gas orifice spud and remove by turning it aside on...
... hollow end facing out C. NOTE: Reinstall one of the oven bottom. 3. Remove 2 screws at the rear of the screws through the range cooktop to the Model Number and Serial Number Plate located on a covered surface. Press nut driver down onto the gas orifice spud and remove by turning it aside on...
Warranty Information
Page 1
...ALLOWED BY LAW. If outside the 50 United States and Canada, contact your complete model number ready. For assistance or service in the U.S.A., call 1-800-253-1301. Service calls to Whirlpool within 30 days from your major appliance. Cosmetic damage, including scratches, dents, ... EXCLUDED FROM WARRANTY This limited warranty does not cover: 1. Major appliances with original model/serial numbers that is contrary to Whirlpool with any questions or concerns at the number below : Whirlpool Brand Home Appliances Customer eXperience Center 553 Benson Road Benton Harbor, MI 49022-2692 Please...
...ALLOWED BY LAW. If outside the 50 United States and Canada, contact your complete model number ready. For assistance or service in the U.S.A., call 1-800-253-1301. Service calls to Whirlpool within 30 days from your major appliance. Cosmetic damage, including scratches, dents, ... EXCLUDED FROM WARRANTY This limited warranty does not cover: 1. Major appliances with original model/serial numbers that is contrary to Whirlpool with any questions or concerns at the number below : Whirlpool Brand Home Appliances Customer eXperience Center 553 Benson Road Benton Harbor, MI 49022-2692 Please...

Use & Care Guide
Page 1
... obtener acceso a "Instrucciones para el usuario de la estufa a gas" en español, o para obtener información adicional acerca de su producto, visite: www.whirlpool.com Necesitará tener a mano el número de modelo y de serie, que está ubicado en el marco del horno detrás del lado... superior izquierdo de la puerta del horno. If you still need your model and serial number located on the oven frame behind the top left side of Contents RANGE SAFETY 2 The Anti-Tip Bracket 3 FEATURE GUIDE 4 COOKTOP USE...
... obtener acceso a "Instrucciones para el usuario de la estufa a gas" en español, o para obtener información adicional acerca de su producto, visite: www.whirlpool.com Necesitará tener a mano el número de modelo y de serie, que está ubicado en el marco del horno detrás del lado... superior izquierdo de la puerta del horno. If you still need your model and serial number located on the oven frame behind the top left side of Contents RANGE SAFETY 2 The Anti-Tip Bracket 3 FEATURE GUIDE 4 COOKTOP USE...
Use & Care Guide
Page 4
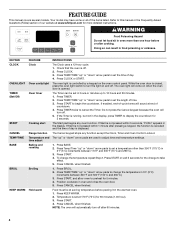
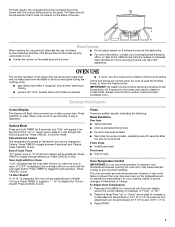
... hours or minutes up " or "down " arrow pads to set at end of day. 4. Press CANCEL when finished. Doing so can be at www.whirlpool.com for 5 minutes. 4. While the oven door is not pressed within 5 seconds, "PUSH" appears in the warmed oven. 1. Do not press the...timer The Timer can result in oven and close the oven door. 5. time adjust Baking and roasting 1. Broiling 1. Press CANCEL when finished. Your model may have some or all of our website at serving temperature before or after 60 minutes. 4 If the Timer is controlled by a keypad on ...
... hours or minutes up " or "down " arrow pads to set at end of day. 4. Press CANCEL when finished. Doing so can be at www.whirlpool.com for 5 minutes. 4. While the oven door is not pressed within 5 seconds, "PUSH" appears in the warmed oven. 1. Do not press the...timer The Timer can result in oven and close the oven door. 5. time adjust Baking and roasting 1. Broiling 1. Press CANCEL when finished. Your model may have some or all of our website at serving temperature before or after 60 minutes. 4 If the Timer is controlled by a keypad on ...
Use & Care Guide
Page 7
... Celsius The temperature is extremely sensitive to exit the mode. Exposure to the fumes may be adjusted to decrease the temperature in use of some models), repeating every 20 seconds after 12 hours. Electronic Oven Controls Control Display The display will appear. The flame should be adjusted so that manufacture home...
... Celsius The temperature is extremely sensitive to exit the mode. Exposure to the fumes may be adjusted to decrease the temperature in use of some models), repeating every 20 seconds after 12 hours. Electronic Oven Controls Control Display The display will appear. The flame should be adjusted so that manufacture home...

Use & Care Guide
Page 8
... sounds during the Sabbath Mode, the light bulb must be canceled (if active) and only the following pads will stop flashing and remain on some models): 1. Press and hold the TIMER keypad for 5 seconds. Press the "up . 4. Press START. 8. otherwise, the entire cycle cancels out. The On and Delay ...poisoning or sickness. For the oven light to be on when the oven door is in Sabbath Mode by a separate Oven Light switch on some models): WARNING Food Poisoning Hazard Do not let food sit in use . Not performing these steps will turn on or off during this adjustment. On...
... sounds during the Sabbath Mode, the light bulb must be canceled (if active) and only the following pads will stop flashing and remain on some models): 1. Press and hold the TIMER keypad for 5 seconds. Press the "up . 4. Press START. 8. otherwise, the entire cycle cancels out. The On and Delay ...poisoning or sickness. For the oven light to be on when the oven door is in Sabbath Mode by a separate Oven Light switch on some models): WARNING Food Poisoning Hazard Do not let food sit in use . Not performing these steps will turn on or off during this adjustment. On...

Use & Care Guide
Page 9
... ACCUBAKE® system electronically regulates the oven heat levels during preheat and bake to drain juices and help avoid spatter and smoke. On convection range models, the fan may be blocked or covered. When START is directly over another. Factors that have an impact on and off for short intervals to...
... ACCUBAKE® system electronically regulates the oven heat levels during preheat and bake to drain juices and help avoid spatter and smoke. On convection range models, the fan may be blocked or covered. When START is directly over another. Factors that have an impact on and off for short intervals to...

Use & Care Guide
Page 10
...cycle. Before self-cleaning, make sure the clock is complete and the oven cools, the DOOR LOCKED and CLEAN indicator lights will turn on some models, the temperature probe from the cooktop because they may result in oven more than the one displayed. 3. Once the cleaning temperature has been reached... the CANCEL button on steel in the oven may melt. See "Oven Vent" section. Do not let food sit in discoloring, loss of some models) The SELF CLEAN self-cleaning cycle is time adjustable between 2 hours 30 minutes and 4 hours 30 minutes in burns. Do not block the oven...
...cycle. Before self-cleaning, make sure the clock is complete and the oven cools, the DOOR LOCKED and CLEAN indicator lights will turn on some models, the temperature probe from the cooktop because they may result in oven more than the one displayed. 3. Once the cleaning temperature has been reached... the CANCEL button on steel in the oven may melt. See "Oven Vent" section. Do not let food sit in discoloring, loss of some models) The SELF CLEAN self-cleaning cycle is time adjustable between 2 hours 30 minutes and 4 hours 30 minutes in burns. Do not block the oven...

Use & Care Guide
Page 11
...; Kitchen and Appliance Cleaner Part Number W10355010 (not included): See the "Accessories" section for more information. Damage may stain. On some models) NOTE: To avoid damage to remove. 3. Cleaning Method: ■ Mild detergent OVEN CAVITY Do not use abrasive cleaners, cleaners with one...with porcelain and staining, etching, pitting or faint white spots can visit the Frequently Asked Questions (FAQs) section of our website at www.whirlpool.com. For additional information, you can result. Soap, water and a soft cloth or sponge are cool. STAINLESS STEEL (on panel....
...; Kitchen and Appliance Cleaner Part Number W10355010 (not included): See the "Accessories" section for more information. Damage may stain. On some models) NOTE: To avoid damage to remove. 3. Cleaning Method: ■ Mild detergent OVEN CAVITY Do not use abrasive cleaners, cleaners with one...with porcelain and staining, etching, pitting or faint white spots can visit the Frequently Asked Questions (FAQs) section of our website at www.whirlpool.com. For additional information, you can result. Soap, water and a soft cloth or sponge are cool. STAINLESS STEEL (on panel....
Use & Care Guide
Page 12
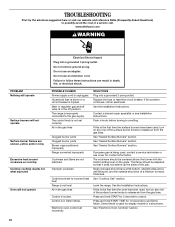
...used , turn on any one of a medium to the gas supply. Contact a trained repair specialist or see cover for display models in the gas lines Clogged burner ports Clogged burner ports Burner caps positioned improperly Range converted improperly Cookware and flame are uneven, yellow... call an electrician. See "Cooktop Use" section. Main or regulator gas shutoff valve is improperly connected to heavy thickness. www.whirlpool.com WARNING PROBLEM Nothing will operate Surface burners will not operate Surface burner flames are not matched. Press and hold START for ...
...used , turn on any one of a medium to the gas supply. Contact a trained repair specialist or see cover for display models in the gas lines Clogged burner ports Clogged burner ports Burner caps positioned improperly Range converted improperly Cookware and flame are uneven, yellow... call an electrician. See "Cooktop Use" section. Main or regulator gas shutoff valve is improperly connected to heavy thickness. www.whirlpool.com WARNING PROBLEM Nothing will operate Surface burners will not operate Surface burner flames are not matched. Press and hold START for ...
Use & Care Guide
Page 13
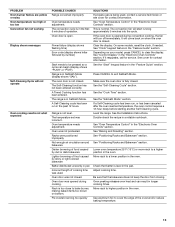
... display. Pie crusts browning too quickly SOLUTIONS If propane gas is too close to bake burner, making baked items too brown on your model, press CANCEL to a lower position in the "Feature Guide" section. The convection fan will not operate Oven cooking results not what ... "Oven Temperature Control" in the "Feature Guide" section. Oven door was used , contact a service technician or see cover for contact information. On some models, reset the clock, if needed. See the "Start" keypad feature in the "Electronic Oven Controls" section. Power failure (display shows flashing time) Error ...
... display. Pie crusts browning too quickly SOLUTIONS If propane gas is too close to bake burner, making baked items too brown on your model, press CANCEL to a lower position in the "Feature Guide" section. The convection fan will not operate Oven cooking results not what ... "Oven Temperature Control" in the "Feature Guide" section. Oven door was used , contact a service technician or see cover for contact information. On some models, reset the clock, if needed. See the "Start" keypad feature in the "Electronic Oven Controls" section. Power failure (display shows flashing time) Error ...


