Owners Manual
Page 3
...substances known to the State of California to cause cancer, birth defects, or other flammable vapors and liquids in this or any phone in this manual is not followed exactly, a fire or explosion may result causing property damage, personal injury or death. - This appliance can kill or hurt... be killed or seriously injured if you and others are not followed. We have provided many important safety messages in the vicinity of this manual and on your appliance. All safety messages will tell you don't immediately follow the safety alert symbol and either the word "DANGER" or...
...substances known to the State of California to cause cancer, birth defects, or other flammable vapors and liquids in this or any phone in this manual is not followed exactly, a fire or explosion may result causing property damage, personal injury or death. - This appliance can kill or hurt... be killed or seriously injured if you and others are not followed. We have provided many important safety messages in the vicinity of this manual and on your appliance. All safety messages will tell you don't immediately follow the safety alert symbol and either the word "DANGER" or...
Owners Manual
Page 5
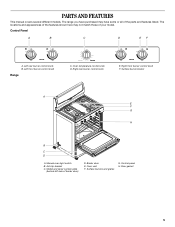
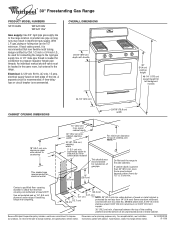
... A. Door gasket 5 The locations and appearances of the features shown here may have purchased may not match those of the parts and features listed. Manual oven light switch B. Oven vent F. Left rear burner control knob B. The range you have some or all of your model. Model and serial number... plate (behind left side of broiler door) D. Surface burners and grates G. PARTS AND FEATURES This manual covers several different models. Oven temperature control knob D. Anti-tip bracket C. Left front burner control knob Range 140 170 200 ...
... A. Door gasket 5 The locations and appearances of the features shown here may have purchased may not match those of the parts and features listed. Manual oven light switch B. Oven vent F. Left rear burner control knob B. The range you have some or all of your model. Model and serial number... plate (behind left side of broiler door) D. Surface burners and grates G. PARTS AND FEATURES This manual covers several different models. Oven temperature control knob D. Anti-tip bracket C. Left front burner control knob Range 140 170 200 ...

Owners Manual
Page 6
... a burner using the burner cap. Alignment pins C. Burner ports Burner ports: Check burner flames occasionally for the burner to follow these instructions can be lit manually. Use the following chart as shown above. s Cook soups, sauces and gravies. Protect it from spillovers by always using empty cookware or without cookware on...
... a burner using the burner cap. Alignment pins C. Burner ports Burner ports: Check burner flames occasionally for the burner to follow these instructions can be lit manually. Use the following chart as shown above. s Cook soups, sauces and gravies. Protect it from spillovers by always using empty cookware or without cookware on...
Owners Manual
Page 11
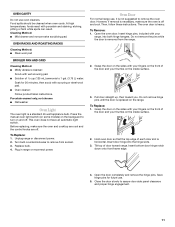
... on the front of the door and your thumbs on the inside surface. 3. Do not remove the pins while the door is horizontal. Press the manual oven light switch (on some models) on the range. s Oven cleaner: Follow product label instructions. Food spills should be cleaned when oven cools. Turn bulb...
... on the front of the door and your thumbs on the inside surface. 3. Do not remove the pins while the door is horizontal. Press the manual oven light switch (on some models) on the range. s Oven cleaner: Follow product label instructions. Food spills should be cleaned when oven cools. Turn bulb...
Dimension Guide
Page 1
... 10" (25.4 cm) Do Not seal the range to countertop This shaded area recommended for planning purposes only. An individual manual shutoff valve must extend beyond cabinet fronts by CSA, 1/2-inch or 3/4-inch I.D., be located in insufficient gas supply. clearance upper...cabinet depth 30" (76.2 cm) min. Contact a qualified floor covering installer to change materials and specifications without notice. Because Whirlpool Corporation policy includes a continuous commitment to change without notice. countertop space to side wall or other combustible material For minimum clearance ...
... 10" (25.4 cm) Do Not seal the range to countertop This shaded area recommended for planning purposes only. An individual manual shutoff valve must extend beyond cabinet fronts by CSA, 1/2-inch or 3/4-inch I.D., be located in insufficient gas supply. clearance upper...cabinet depth 30" (76.2 cm) min. Contact a qualified floor covering installer to change materials and specifications without notice. Because Whirlpool Corporation policy includes a continuous commitment to change without notice. countertop space to side wall or other combustible material For minimum clearance ...

Installation Instructions
Page 2
... the gas supplier. RANGE SAFETY Your safety and the safety of others . WARNING: If the information in this manual is the safety alert symbol. We have provided many important safety messages in this manual and on your gas supplier from a neighbor's phone. Always read and obey all safety messages. WHAT TO DO...
... the gas supplier. RANGE SAFETY Your safety and the safety of others . WARNING: If the information in this manual is the safety alert symbol. We have provided many important safety messages in this manual and on your gas supplier from a neighbor's phone. Always read and obey all safety messages. WHAT TO DO...
Installation Instructions
Page 6
... by CSA International for use with Natural gas or, after proper conversion, for use with LP gas. ■ This range is needed for use with a manual shutoff valve. The valve is a registered trademark of gas available, check with all local codes and ordinances. The inlet pressure to the regulator should be...
... by CSA International for use with Natural gas or, after proper conversion, for use with LP gas. ■ This range is needed for use with a manual shutoff valve. The valve is a registered trademark of gas available, check with all local codes and ordinances. The inlet pressure to the regulator should be...
Installation Instructions
Page 7
... other injury. Contact a qualified floor covering installer for the best procedure for drilling mounting holes through your type of 0.5 cm) is laid on its individual manual shutoff valve during any pressure testing of ½ psi (3.5 kPa). Tip Over Hazard A child or adult can result in front of another. INSTALLATION INSTRUCTIONS Unpack...
... other injury. Contact a qualified floor covering installer for the best procedure for drilling mounting holes through your type of 0.5 cm) is laid on its individual manual shutoff valve during any pressure testing of ½ psi (3.5 kPa). Tip Over Hazard A child or adult can result in front of another. INSTALLATION INSTRUCTIONS Unpack...
Installation Instructions
Page 9
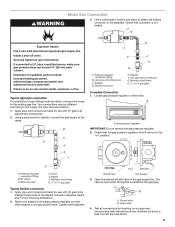
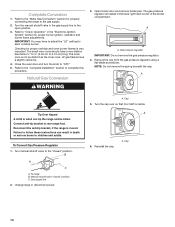
...to the existing gas line. Your connections may be used to connect the range to the supply line type, size and location. 1. Manual shutoff valve H. ½" or ¾" gas pipe Complete Connection 1. Locate gas pressure regulator in the following illustration). 2. Union ...connector is in the "on an approved noncorrosive leak-detection solution. G A. Pressure regulator connection fitting B. 90° elbow C. Nipple F. Manual shutoff valve G. ½" or ¾" gas pipe Typical flexible connection 1. Attach one adapter to the gas pressure regulator and the other adapter...
...to the existing gas line. Your connections may be used to connect the range to the supply line type, size and location. 1. Manual shutoff valve H. ½" or ¾" gas pipe Complete Connection 1. Locate gas pressure regulator in the following illustration). 2. Union ...connector is in the "on an approved noncorrosive leak-detection solution. G A. Pressure regulator connection fitting B. 90° elbow C. Nipple F. Manual shutoff valve G. ½" or ¾" gas pipe Typical flexible connection 1. Attach one adapter to the gas pressure regulator and the other adapter...
Installation Instructions
Page 12
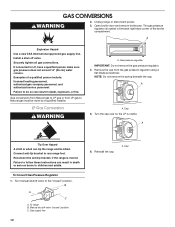
... gas pressure regulator. 4. Reconnect the anti-tip bracket, if the range is visible. B A C A. A. Install a shut-off valve. A A. Turn manual shutoff valve to LP, have a qualified person make sure gas pressure does not exceed 14" (36 cm) water column. Gas supply line 12 6. If connected... to the "closed " position C. Cap 5. To Convert Gas Pressure Regulator 1. Manual shutoff valve "closed " position. Examples of the broiler compartment. Remove the cap from LP gas to LP gas or from the gas pressure regulator...
... gas pressure regulator. 4. Reconnect the anti-tip bracket, if the range is visible. B A C A. A. Install a shut-off valve. A A. Turn manual shutoff valve to LP, have a qualified person make sure gas pressure does not exceed 14" (36 cm) water column. Gas supply line 12 6. If connected... to the "closed " position C. Cap 5. To Convert Gas Pressure Regulator 1. Manual shutoff valve "closed " position. Examples of the broiler compartment. Remove the cap from LP gas to LP gas or from the gas pressure regulator...
Installation Instructions
Page 14
... remove the gas pressure regulator. 4. Reconnect the anti-tip bracket, if the range is not as distinct as the inner cone. B A C A. Manual shutoff valve "closed " position. Refer to the "Make Gas Connection" section for each cooktop burner. IMPORTANT: You may have a slightly yellow tip. ... "Electronic Ignition System" section for proper cooktop and oven burner flames is visible. NOTE: Do not remove the spring beneath the cap. Turn manual shutoff valve to rear range foot. Gas supply line 2. To Convert Gas Pressure Regulator 1. A. Complete Conversion 1. Connect anti-tip bracket to ...
... remove the gas pressure regulator. 4. Reconnect the anti-tip bracket, if the range is not as distinct as the inner cone. B A C A. Manual shutoff valve "closed " position. Refer to the "Make Gas Connection" section for each cooktop burner. IMPORTANT: You may have a slightly yellow tip. ... "Electronic Ignition System" section for proper cooktop and oven burner flames is visible. NOTE: Do not remove the spring beneath the cap. Turn manual shutoff valve to rear range foot. Gas supply line 2. To Convert Gas Pressure Regulator 1. A. Complete Conversion 1. Connect anti-tip bracket to ...
Installation Instructions
Page 16
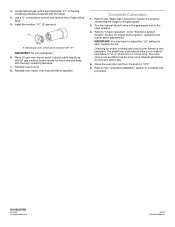
... to the "Make Gas Connection" section for each cooktop burner. Use a ³⁄₈" combination wrench and remove the LP gas orifice spud. 5. Turn the manual shutoff valve in the bag containing literature supplied with the range. 4. The small inner cone should have yellow tips. 4. Reinstall oven racks, oven tray and...
... to the "Make Gas Connection" section for each cooktop burner. Use a ³⁄₈" combination wrench and remove the LP gas orifice spud. 5. Turn the manual shutoff valve in the bag containing literature supplied with the range. 4. The small inner cone should have yellow tips. 4. Reinstall oven racks, oven tray and...


