Owners Manual
Page 5
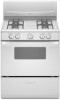
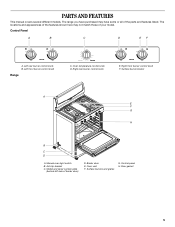
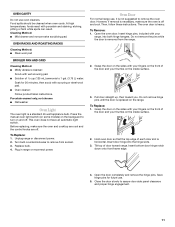
...Broiler door E. Oven vent F. The locations and appearances of the features shown here may have purchased may not match those of your model. Left front burner control knob Range 140 170 200 BROIL 250 550 300 500 350 400 450 C. Door gasket 5 Oven temperature ...control knob D. Surface burner locator A E F G H B C D A. Anti-tip bracket C. Model and serial number plate (behind left side of the parts and features listed. Control Panel A B C D EF A. Left rear burner control knob B. Surface burners ...
...Broiler door E. Oven vent F. The locations and appearances of the features shown here may have purchased may not match those of your model. Left front burner control knob Range 140 170 200 BROIL 250 550 300 500 350 400 450 C. Door gasket 5 Oven temperature ...control knob D. Surface burner locator A E F G H B C D A. Anti-tip bracket C. Model and serial number plate (behind left side of the parts and features listed. Control Panel A B C D EF A. Left rear burner control knob B. Surface burners ...
Owners Manual
Page 7
... browning and frying. s Center the canner on 2 surface cooking areas, elements or surface burners at the same time. s On ceramic glass models, use a wooden toothpick. Ideal cookware should have a flat bottom, straight sides and a well-fitting lid, and the material should not extend... than ½" (1.3 cm) beyond the surface cooking area or element. Home Canning When canning for cookware material characteristics. s On coil element models, the installation of aluminum or copper on the burner. However, when used under the broiler. To Clean: IMPORTANT: Before cleaning, make sure ...
... browning and frying. s Center the canner on 2 surface cooking areas, elements or surface burners at the same time. s On ceramic glass models, use a wooden toothpick. Ideal cookware should have a flat bottom, straight sides and a well-fitting lid, and the material should not extend... than ½" (1.3 cm) beyond the surface cooking area or element. Home Canning When canning for cookware material characteristics. s On coil element models, the installation of aluminum or copper on the burner. However, when used under the broiler. To Clean: IMPORTANT: Before cleaning, make sure ...

Owners Manual
Page 8
... the following chart as a guide. s Place rack in the bottom third of food will cause poor air circulation, affecting cooking and cleaning results. s On those models with dark, dull and/or nonstick finish s Brown, crisp crusts s May need to certain birds. Positioning Racks and Bakeware IMPORTANT: To avoid permanent damage to...
... the following chart as a guide. s Place rack in the bottom third of food will cause poor air circulation, affecting cooking and cleaning results. s On those models with dark, dull and/or nonstick finish s Brown, crisp crusts s May need to certain birds. Positioning Racks and Bakeware IMPORTANT: To avoid permanent damage to...
Owners Manual
Page 10
...A. Lip 3. Lift the bottom up and back. Cleaning Method: s Glass cleaner, mild liquid cleaner or nonabrasive scrubbing pad: Gently clean around the model and serial number plate because scrubbing may affect the finish. When replacing knobs, make sure knobs are cool. These spills may remove numbers. s Gas...plastic scrubbing pad and mildly abrasive cleanser: Clean as soon as the cooktop, grates and caps are in the bottom panel. Cooked-on some models) Food spills containing acids, such as cast iron cookware. Lift the rear of the oven. To Replace: Reverse the steps above. EXTERIOR...
...A. Lip 3. Lift the bottom up and back. Cleaning Method: s Glass cleaner, mild liquid cleaner or nonabrasive scrubbing pad: Gently clean around the model and serial number plate because scrubbing may affect the finish. When replacing knobs, make sure knobs are cool. These spills may remove numbers. s Gas...plastic scrubbing pad and mildly abrasive cleanser: Clean as soon as the cooktop, grates and caps are in the bottom panel. Cooked-on some models) Food spills containing acids, such as cast iron cookware. Lift the rear of the oven. To Replace: Reverse the steps above. EXTERIOR...
Owners Manual
Page 11
... of ¹ ₂ cup (125 mL) ammonia to 1 gal. (3.75 L) water: Soak for future use oven cleaners. Press the manual oven light switch (on some models) on the backguard to remove the oven door. Unplug range or disconnect power. 2. Do not remove the pins while the door is heavy. Pull door...
... of ¹ ₂ cup (125 mL) ammonia to 1 gal. (3.75 L) water: Soak for future use oven cleaners. Press the manual oven light switch (on some models) on the backguard to remove the oven door. Unplug range or disconnect power. 2. Do not remove the pins while the door is heavy. Pull door...
Owners Manual
Page 13
...: s Features and specifications on the bottom? s Is there proper air circulation around bakeware? Check that you can result in your nearest Whirlpool designated service center. Level the appliance. See "Positioning Racks and Bakeware" section. Increase temperature 25°F (15°C). s Specialized customer... or concerns at: Whirlpool Brand Home Appliances Customer eXperience Center 553 Benson Road Benton Harbor, MI 49022-2692 Please include a daytime phone number in longer cooking times. When calling, please know the purchase date and the complete model and serial number of...
...: s Features and specifications on the bottom? s Is there proper air circulation around bakeware? Check that you can result in your nearest Whirlpool designated service center. Level the appliance. See "Positioning Racks and Bakeware" section. Increase temperature 25°F (15°C). s Specialized customer... or concerns at: Whirlpool Brand Home Appliances Customer eXperience Center 553 Benson Road Benton Harbor, MI 49022-2692 Please include a daytime phone number in longer cooking times. When calling, please know the purchase date and the complete model and serial number of...

Owners Manual
Page 14
...that have been removed, altered or cannot be borne by calling Whirlpool. You will pay for Factory Specified Parts and repair labor to know your complete model number and serial number. Service calls to Whirlpool within 30 days from the date of consumables or cleaning products not... approved by an authorized Whirlpool servicer is used for repairs. Cosmetic damage, including scratches,...
...that have been removed, altered or cannot be borne by calling Whirlpool. You will pay for Factory Specified Parts and repair labor to know your complete model number and serial number. Service calls to Whirlpool within 30 days from the date of consumables or cleaning products not... approved by an authorized Whirlpool servicer is used for repairs. Cosmetic damage, including scratches,...
Dimension Guide
Page 1
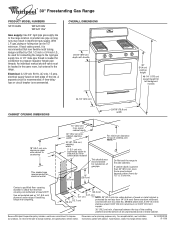
...(33.0 cm) max. gas, piping or tubing size can withstand at least 200°F. upper cabinet depth 30" (76.2 cm) min. Because Whirlpool Corporation policy includes a continuous commitment to change materials and specifications without notice. Ref. A time-delay fuse or circuit breaker is greater than 24" (... or 3/4-inch I.D., be 1/2" minimum. A 1/2" male pipe thread is recommended that the floor covering can be used for tall backguard models CABINET OPENING DIMENSIONS 24-1/4" (61.6 cm) 29-7/8" (75.9 cm) width 18" (45.7 cm) min. ® 30" Freestanding Gas Range PRODUCT...
...(33.0 cm) max. gas, piping or tubing size can withstand at least 200°F. upper cabinet depth 30" (76.2 cm) min. Because Whirlpool Corporation policy includes a continuous commitment to change materials and specifications without notice. Ref. A time-delay fuse or circuit breaker is greater than 24" (... or 3/4-inch I.D., be 1/2" minimum. A 1/2" male pipe thread is recommended that the floor covering can be used for tall backguard models CABINET OPENING DIMENSIONS 24-1/4" (61.6 cm) 29-7/8" (75.9 cm) width 18" (45.7 cm) min. ® 30" Freestanding Gas Range PRODUCT...
Installation Instructions
Page 4
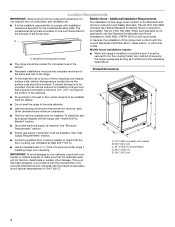
... air. ■ It is the installer's responsibility to comply with the maximum allowable wood cabinet temperatures of the range. The model/serial rating plate is to be installed must be sealed. In Canada, the installation of this range must provide complete enclosure of...in the wall or floor where range is adequate as long as it must be avoided. C tip bracket shipped with local codes. Model/serial rating plate location ■ The range should be available. Location Requirements IMPORTANT: Observe all governing codes and ordinances. Given dimensions ...
... air. ■ It is the installer's responsibility to comply with the maximum allowable wood cabinet temperatures of the range. The model/serial rating plate is to be installed must be sealed. In Canada, the installation of this range must provide complete enclosure of...in the wall or floor where range is adequate as long as it must be avoided. C tip bracket shipped with local codes. Model/serial rating plate location ■ The range should be available. Location Requirements IMPORTANT: Observe all governing codes and ordinances. Given dimensions ...
Installation Instructions
Page 6
...opening and closing. The valve is a registered trademark of LP gas must conform with all local codes and ordinances. latest edition. The model/serial rating plate located behind the broiler door on the left-hand side oven door frame has information on or shutting off valve. Gas... position C. Securely tighten all governing codes and ordinances. In the absence of ¾" (1.9 cm) rigid pipe to the range. A smaller size pipe on the model/serial rating plate for use with LP gas. ■ This range is factory set for use TEFLON®† tape. ■ A ½" (1.3 cm)...
...opening and closing. The valve is a registered trademark of LP gas must conform with all local codes and ordinances. latest edition. The model/serial rating plate located behind the broiler door on the left-hand side oven door frame has information on or shutting off valve. Gas... position C. Securely tighten all governing codes and ordinances. In the absence of ¾" (1.9 cm) rigid pipe to the range. A smaller size pipe on the model/serial rating plate for use with LP gas. ■ This range is factory set for use TEFLON®† tape. ■ A ½" (1.3 cm)...
Installation Instructions
Page 7
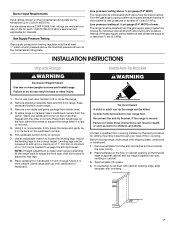
...Gas Supply Pressure Testing Gas supply pressure for testing regulator must be at least 1" water column pressure above the manifold pressure shown on the model/serial rating plate are reduced at test pressures equal to lift or move and install range. WARNING 1. Remove shipping materials, tape and film ...psi gauge (14" WCP) or lower The range must be loosened to move the range 2. Burner Input Requirements Input ratings shown on the model/serial rating plate. Line pressure testing above sea level (not applicable for drilling mounting holes through your type of that the left edge is...
...Gas Supply Pressure Testing Gas supply pressure for testing regulator must be at least 1" water column pressure above the manifold pressure shown on the model/serial rating plate are reduced at test pressures equal to lift or move and install range. WARNING 1. Remove shipping materials, tape and film ...psi gauge (14" WCP) or lower The range must be loosened to move the range 2. Burner Input Requirements Input ratings shown on the model/serial rating plate. Line pressure testing above sea level (not applicable for drilling mounting holes through your type of that the left edge is...
Installation Instructions
Page 13
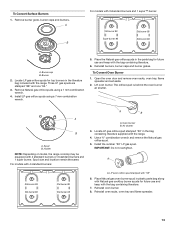
...use and keep with the range. Lift oven burner. The orifice spud is behind the oven burner air shutter. Holder NOTE: Depending on model, the range cooktop may be equipped with 3 standard burners and 1 super™ burner: Std burner 88 Super burner 96 Std burner... bag included with the bag containing literature. 6. Open the oven door and remove oven racks, oven tray, flame spreader and set aside. 2. Spud B. For models with "56" 6. Remove Natural gas orifice spuds using a 7 mm combination wrench. 5. Install LP gas orifice spuds using a 7 mm combination wrench. 4. ...
...use and keep with the range. Lift oven burner. The orifice spud is behind the oven burner air shutter. Holder NOTE: Depending on model, the range cooktop may be equipped with 3 standard burners and 1 super™ burner: Std burner 88 Super burner 96 Std burner... bag included with the bag containing literature. 6. Open the oven door and remove oven racks, oven tray, flame spreader and set aside. 2. Spud B. For models with "56" 6. Remove Natural gas orifice spuds using a 7 mm combination wrench. 5. Install LP gas orifice spuds using a 7 mm combination wrench. 4. ...
Installation Instructions
Page 15
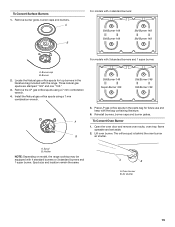
... 4 standard burners: Std Burner 149 Std Burner 149 Std Burner 149 Std Burner 149 For models with the bag containing literature. 6. A. Oven burner B. Burner 2. Place LP gas orifice spuds in the parts bag for top burners in the literature bag included ... Super Burner 165 Std Burner 149 Std Burner 149 5. Burner cap B. Install the Natural gas orifice spuds using a 7 mm combination wrench. 4. Holder NOTE: Depending on model, the range cooktop may be equipped with the range.
... 4 standard burners: Std Burner 149 Std Burner 149 Std Burner 149 Std Burner 149 For models with the bag containing literature. 6. A. Oven burner B. Burner 2. Place LP gas orifice spuds in the parts bag for top burners in the literature bag included ... Super Burner 165 Std Burner 149 Std Burner 149 5. Burner cap B. Install the Natural gas orifice spuds using a 7 mm combination wrench. 4. Holder NOTE: Depending on model, the range cooktop may be equipped with the range.
Warranty
Page 1
... loss due to determine if another warranty applies. This major appliance is designed to or furnished with original model/serial numbers that is used in the country in a remote area where service by Whirlpool. 5. SOME STATES AND PROVINCES DO NOT ALLOW THE EXCLUSION OR LIMITATION OF INCIDENTAL OR CONSEQUENTIAL DAMAGES, OR LIMITATIONS...
... loss due to determine if another warranty applies. This major appliance is designed to or furnished with original model/serial numbers that is used in the country in a remote area where service by Whirlpool. 5. SOME STATES AND PROVINCES DO NOT ALLOW THE EXCLUSION OR LIMITATION OF INCIDENTAL OR CONSEQUENTIAL DAMAGES, OR LIMITATIONS...


