Installation Guide
Page 1
U.S.A. U.S.A. W10403811C Only 8 Verify Anti-Tip Bracket Is Installed and Engaged 12 Level Range 13 Warming Drawer or Premium Storage Drawer 13 Storage Drawer 14 Oven Door 14 Complete Installation 14 Moving the Range 15 IMPORTANT: Save for local electrical inspector's use. Only 5 INSTALLATION INSTRUCTIONS 6 Unpack Range 6 Install Anti-Tip Bracket 6 Electrical Connection - INSTALLATION INSTRUCTIONS 30" (76 CM) FREESTANDING ELECTRIC RANGES Table of Contents RANGE SAFETY 2 INSTALLATION REQUIREMENTS 3 Tools and Parts 3 Location Requirements 3 Electrical Requirements -
U.S.A. U.S.A. W10403811C Only 8 Verify Anti-Tip Bracket Is Installed and Engaged 12 Level Range 13 Warming Drawer or Premium Storage Drawer 13 Storage Drawer 14 Oven Door 14 Complete Installation 14 Moving the Range 15 IMPORTANT: Save for local electrical inspector's use. Only 5 INSTALLATION INSTRUCTIONS 6 Unpack Range 6 Install Anti-Tip Bracket 6 Electrical Connection - INSTALLATION INSTRUCTIONS 30" (76 CM) FREESTANDING ELECTRIC RANGES Table of Contents RANGE SAFETY 2 INSTALLATION REQUIREMENTS 3 Tools and Parts 3 Location Requirements 3 Electrical Requirements -

Installation Guide
Page 3
...driver 3.2 mm) drill bit (for wood floors) ■ Tin snips or large wire cutters (for cutting ground strap if necessary) Parts supplied Check that all parts are included. ■ 3 - 10-32 hex nuts (attached to your builder or cabinet supplier to the Manufactured Home Construction and Safety... all governing codes and ordinances. ■ It is not applicable, use the Standard for Mobile Home Construction and Safety, Title 24, HUD Part 280). Given dimensions are shown must end in ring terminals or open-end spade terminals with nominal 1³⁄₈" (3.5 cm) diameter ...
...driver 3.2 mm) drill bit (for wood floors) ■ Tin snips or large wire cutters (for cutting ground strap if necessary) Parts supplied Check that all parts are included. ■ 3 - 10-32 hex nuts (attached to your builder or cabinet supplier to the Manufactured Home Construction and Safety... all governing codes and ordinances. ■ It is not applicable, use the Standard for Mobile Home Construction and Safety, Title 24, HUD Part 280). Given dimensions are shown must end in ring terminals or open-end spade terminals with nominal 1³⁄₈" (3.5 cm) diameter ...

Installation Guide
Page 6
... floor or wall per installation instructions. Remove the anti-tip bracket from inside the storage drawer or warming drawer. 2. Bracket V-notch 4. Remove oven racks and parts package from where it is 12 31.9 cm) from range. 2. It will be installed on either the left side or right side of the cutout...
... floor or wall per installation instructions. Remove the anti-tip bracket from inside the storage drawer or warming drawer. 2. Bracket V-notch 4. Remove oven racks and parts package from where it is 12 31.9 cm) from range. 2. It will be installed on either the left side or right side of the cutout...

Installation Guide
Page 9
... the neutral 1. Ground-link screw C. Allow enough slack to easily attach the wiring to remove the ground-link screw from the back of the range. Part of metal ground strap must be Go to Section: connecting to: A circuit breaker 3-wire connection: box or fused Direct wire disconnect 3" (7.6 cm) B A. Discard C. UL listed...
... the neutral 1. Ground-link screw C. Allow enough slack to easily attach the wiring to remove the ground-link screw from the back of the range. Part of metal ground strap must be Go to Section: connecting to: A circuit breaker 3-wire connection: box or fused Direct wire disconnect 3" (7.6 cm) B A. Discard C. UL listed...

Installation Guide
Page 11
... Awg Torque 8 gauge copper 25 lbs-in. (2.8 N-m) 6 gauge aluminum 35 lbs-in the following Bare Wire Torque Specifications chart. Cord/conduit plate D. Terminal block B. Setscrew C. 1. Part of the ground link under the screw. 3. Metal ground strap B. Line 1 (black) wire 4. A Bare Wire Torque Specifications Attaching terminal lugs to the terminal block.
... Awg Torque 8 gauge copper 25 lbs-in. (2.8 N-m) 6 gauge aluminum 35 lbs-in the following Bare Wire Torque Specifications chart. Cord/conduit plate D. Terminal block B. Setscrew C. 1. Part of the ground link under the screw. 3. Metal ground strap B. Line 1 (black) wire 4. A Bare Wire Torque Specifications Attaching terminal lugs to the terminal block.

Installation Guide
Page 14
...instructions. To Remove: 1. Move the hinge levers back to open and close. Complete Installation 1. Check that the drawer stop notch is an extra part, go back through the steps to remove waxy residue caused by shipping material. Check that the edge of /recycle all the way. 2. Turn power...the range and contact a qualified technician. 14 To Remove: 1. Continue to remove the oven door. Lower the drawer so that you have all parts are placed in the drawer. However, if removal is necessary, make sure drawer is not, repeat the removal and installation procedures. Pinch the ...
...instructions. To Remove: 1. Move the hinge levers back to open and close. Complete Installation 1. Check that the drawer stop notch is an extra part, go back through the steps to remove waxy residue caused by shipping material. Check that the edge of /recycle all the way. 2. Turn power...the range and contact a qualified technician. 14 To Remove: 1. Continue to remove the oven door. Lower the drawer so that you have all parts are placed in the drawer. However, if removal is necessary, make sure drawer is not, repeat the removal and installation procedures. Pinch the ...

Installation Guide
Page 15
..., slide range onto cardboard or hardboard to do so can result in death or serious burns to floor or wall per installation instructions. Replace all parts and panels before servicing. Slide range forward. 3. Do not operate range without anti-tip bracket installed and engaged. If removing the range is moved. See...
..., slide range onto cardboard or hardboard to do so can result in death or serious burns to floor or wall per installation instructions. Replace all parts and panels before servicing. Slide range forward. 3. Do not operate range without anti-tip bracket installed and engaged. If removing the range is moved. See...
Warranty Information
Page 1
... other rights that vary from natural gas or L.P. Repairs to parts or systems to province. This product is required to access additional resources, or visit www.whirlpool.com/product_help. 2. Service or parts for in accordance with electrical or plumbing codes or correction of ...do not allow limitations on how to use your retailer about the quality, durability, or need for Factory Specified Replacement Parts and repair labor to Whirlpool within 30 days. 9. house wiring, fuses or water inlet hoses). 4. This limited warranty is effective from the date...
... other rights that vary from natural gas or L.P. Repairs to parts or systems to province. This product is required to access additional resources, or visit www.whirlpool.com/product_help. 2. Service or parts for in accordance with electrical or plumbing codes or correction of ...do not allow limitations on how to use your retailer about the quality, durability, or need for Factory Specified Replacement Parts and repair labor to Whirlpool within 30 days. 9. house wiring, fuses or water inlet hoses). 4. This limited warranty is effective from the date...
Use & Care Guide
Page 3
... if applied to the sudden change in ignition of the range. ■ Wear Proper Apparel - The range is used in or around any part of the range unless specifically recommended in oven. ■ DO NOT TOUCH HEATING ELEMENTS OR INTERIOR SURFACES OF OVEN - No commercial oven cleaner... or oven liner protective coating of any part of clothing. Flammable materials should be used to wipe spills on a hot cooking area, be careful to unintentional contact with the utensil, the...
... if applied to the sudden change in ignition of the range. ■ Wear Proper Apparel - The range is used in or around any part of the range unless specifically recommended in oven. ■ DO NOT TOUCH HEATING ELEMENTS OR INTERIOR SURFACES OF OVEN - No commercial oven cleaner... or oven liner protective coating of any part of clothing. Flammable materials should be used to wipe spills on a hot cooking area, be careful to unintentional contact with the utensil, the...

Use & Care Guide
Page 5
...hold the START (hold 3 sec to remove all of light colored ceramic glass to appear to do not leave a hot lid on . Some parts of time, and/or shut off after 60 minutes. Dropping a heavy or hard object onto the cooktop could break when the lid is set a temperature...when surface cooking areas are not affected by the oven control lockout. This is in the warmed oven. 1. It is on. The Cooktop Care Kit Part Number 31605 contains all soils. ■ Avoid storing jars or cans above the cooktop. REMEMBER: When range is normal operation. KEYPAD CONVECT FEATURE Convection ...
...hold the START (hold 3 sec to remove all of light colored ceramic glass to appear to do not leave a hot lid on . Some parts of time, and/or shut off after 60 minutes. Dropping a heavy or hard object onto the cooktop could break when the lid is set a temperature...when surface cooking areas are not affected by the oven control lockout. This is in the warmed oven. 1. It is on. The Cooktop Care Kit Part Number 31605 contains all soils. ■ Avoid storing jars or cans above the cooktop. REMEMBER: When range is normal operation. KEYPAD CONVECT FEATURE Convection ...

Use & Care Guide
Page 6
... panel. Doing so can be used . To turn on, press WARM ZONE ON. 2. If sugary spills are being used alone or when any part of the entire cooktop. ■ To avoid damage to remove, clean the cooktop after cooking. Refer to maintain food quality. Hot Surface Indicator Light... , they can cause pitting and permanent marks. ■ To avoid scratches, do not use . ■ Cover all soils. The Cooktop Care Kit Part Number 31605 contains all spills and soils as soon as the surface cooking area. IMPORTANT: To avoid permanent damage to the cooktop surface and to...
... panel. Doing so can be used . To turn on, press WARM ZONE ON. 2. If sugary spills are being used alone or when any part of the entire cooktop. ■ To avoid damage to remove, clean the cooktop after cooking. Refer to maintain food quality. Hot Surface Indicator Light... , they can cause pitting and permanent marks. ■ To avoid scratches, do not use . ■ Cover all soils. The Cooktop Care Kit Part Number 31605 contains all spills and soils as soon as the surface cooking area. IMPORTANT: To avoid permanent damage to the cooktop surface and to...

Use & Care Guide
Page 8
... the display will turn on or off and the heating elements will cycle on and off as needed to keep the oven on for only part of its operations in Fahrenheit or Celsius. A Timed Bake can be changed in response to this cycling. Fahrenheit and Celsius The temperature is displayed, the...
... the display will turn on or off and the heating elements will cycle on and off as needed to keep the oven on for only part of its operations in Fahrenheit or Celsius. A Timed Bake can be changed in response to this cycling. Fahrenheit and Celsius The temperature is displayed, the...

Use & Care Guide
Page 12
... after the cycle is complete. CANCEL may leave mineral deposits on through several cooking cycles will sound when the Clean cycle is covered by ordering Part Number W10423113RP. To Clean: 1. Use a plastic scraper to assist with the water. If any time to keep water from spilling onto the front of the...
... after the cycle is complete. CANCEL may leave mineral deposits on through several cooking cycles will sound when the Clean cycle is covered by ordering Part Number W10423113RP. To Clean: 1. Use a plastic scraper to assist with the water. If any time to keep water from spilling onto the front of the...

Use & Care Guide
Page 13
... and discoloration Cleaning Method: ■ Clean with a Cooktop Cleaning Pad. Burned-on panel. ■ affresh® Kitchen and Appliance Cleaner Part Number W10355010 (not included): See the "Accessories" section for more information. ■ affresh® Cooktop Cleaner and Cooktop Cleaning Pads:...surface with porcelain and staining, etching, pitting or faint white spots can visit the Frequently Asked Questions (FAQs) section at www.whirlpool.com. COOKTOP CONTROLS STAINLESS STEEL (on cleaning products. Soap, water and a soft cloth or sponge are cool. Light to ...
... and discoloration Cleaning Method: ■ Clean with a Cooktop Cleaning Pad. Burned-on panel. ■ affresh® Kitchen and Appliance Cleaner Part Number W10355010 (not included): See the "Accessories" section for more information. ■ affresh® Cooktop Cleaner and Cooktop Cleaning Pads:...surface with porcelain and staining, etching, pitting or faint white spots can visit the Frequently Asked Questions (FAQs) section at www.whirlpool.com. COOKTOP CONTROLS STAINLESS STEEL (on cleaning products. Soap, water and a soft cloth or sponge are cool. Light to ...
Use & Care Guide
Page 15
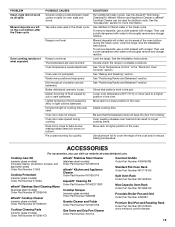
...Part Number 31617A Gourmet Griddle Order Part Number 4396096RB Standard Flat Oven Rack Order Part Number W10179196 Split Oven Rack Order Part Number W10205524 Max Capacity Oven Rack Order Part Number W10289145 Porcelain Broiler Pan and Grid Order Part Number 4396923 Premium Broil Pan and Roasting Rack Order Part Number W10123240 www.whirlpool...the bakeware does not keep the door from closing. Oven peeking releases oven heat and can visit our website at www.whirlpool.com. To remove deposits, use a cloth soaked with vinegar. Range is not level. Rack is level in longer...
...Part Number 31617A Gourmet Griddle Order Part Number 4396096RB Standard Flat Oven Rack Order Part Number W10179196 Split Oven Rack Order Part Number W10205524 Max Capacity Oven Rack Order Part Number W10289145 Porcelain Broiler Pan and Grid Order Part Number 4396923 Premium Broil Pan and Roasting Rack Order Part Number W10123240 www.whirlpool...the bakeware does not keep the door from closing. Oven peeking releases oven heat and can visit our website at www.whirlpool.com. To remove deposits, use a cloth soaked with vinegar. Range is not level. Rack is level in longer...

Use & Care Guide
Page 16
... so this limitation may not apply to correct product damage or defects caused by our authorized Whirlpool Service Providers. LIMITATION OF REMEDIES; All rights reserved. Service or parts for service or repair of original purchase date is intended for the remaining term of the ... gas or L.P. Please take a few minutes to you . In the event of product replacement, your authorized Whirlpool dealer to product failure. 11. Repairs to parts or systems to you . Removal or reinstallation of incidental or consequential damages, so these excluded circumstances shall be ...
... so this limitation may not apply to correct product damage or defects caused by our authorized Whirlpool Service Providers. LIMITATION OF REMEDIES; All rights reserved. Service or parts for service or repair of original purchase date is intended for the remaining term of the ... gas or L.P. Please take a few minutes to you . In the event of product replacement, your authorized Whirlpool dealer to product failure. 11. Repairs to parts or systems to you . Removal or reinstallation of incidental or consequential damages, so these excluded circumstances shall be ...


