
Dimension Guide
Page 1
...;" (119.1 cm) overall height (max.) with leveling legs screwed all the way in the "Level Range" section. E F Because Whirlpool Corporation policy includes a continuous commitment to improve our products, we reserve the right to front of the ...cm) depth - opening width E. W10403811B 2/17/12 30" (76.2 cm) Freestanding Electric Range PRODUCT MODEL NUMBERS WFC110M0A WFE330W0A WFE540H0A WFC120M0A WFE510S0A WFE710H0A WFC130M0A WFE520C0A WFE714HLA WFC310S0A WFE524CLA WFE720H0A WFC340S0A WFE524WLA WFI910H0A WFE320M0A WFE530C0A Electrical: To properly install your...
...;" (119.1 cm) overall height (max.) with leveling legs screwed all the way in the "Level Range" section. E F Because Whirlpool Corporation policy includes a continuous commitment to improve our products, we reserve the right to front of the ...cm) depth - opening width E. W10403811B 2/17/12 30" (76.2 cm) Freestanding Electric Range PRODUCT MODEL NUMBERS WFC110M0A WFE330W0A WFE540H0A WFC120M0A WFE510S0A WFE710H0A WFC130M0A WFE520C0A WFE714HLA WFC310S0A WFE524CLA WFE720H0A WFC340S0A WFE524WLA WFI910H0A WFE320M0A WFE530C0A Electrical: To properly install your...

Installation Guide
Page 3
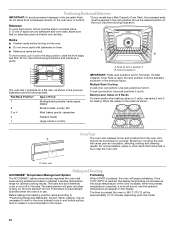
...storage space located above the surface units should be used . See "Electrical Connection - The cord should be made by installing a range hood that projects horizontally a minimum of 5" (12.7 cm) beyond the bottom of flooring may require longer screws to anchor bracket ...9632; It is recommended that is located on the model/serial rating plate. See the appropriate "Electrical Requirements" section. Mobile home installations require: ■ When this range must be revised. IMPORTANT: To avoid damage to comply with ranges. Only" section. 3 It is the installer's ...
...storage space located above the surface units should be used . See "Electrical Connection - The cord should be made by installing a range hood that projects horizontally a minimum of 5" (12.7 cm) beyond the bottom of flooring may require longer screws to anchor bracket ...9632; It is recommended that is located on the model/serial rating plate. See the appropriate "Electrical Requirements" section. Mobile home installations require: ■ When this range must be revised. IMPORTANT: To avoid damage to comply with ranges. Only" section. 3 It is the installer's ...

Installation Guide
Page 4
... covered by adjusting the leveling legs. **Front of wood or metal cabinet is not recommended. *Range can be level after installation. upper cabinet depth B. 30" (76.2 cm) min. opening width C. Model/serial rating plate (located on styling. Follow the instructions in * D. 29⁷⁄₈" (75.9 cm) width E. 25 64.3 cm) depth...
... covered by adjusting the leveling legs. **Front of wood or metal cabinet is not recommended. *Range can be level after installation. upper cabinet depth B. 30" (76.2 cm) min. opening width C. Model/serial rating plate (located on styling. Follow the instructions in * D. 29⁷⁄₈" (75.9 cm) width E. 25 64.3 cm) depth...

Installation Guide
Page 5
... MA 02169-7471 WARNING: Improper connection of the power supply cable (at the range and at the point the power supply cord enters the appliance. The model/serial rating plate is manufactured with ranges. or 50-amp range power supply cord (pigtail). Only" section. 3-wire receptacle (10-50R) ...or open -end spade terminals with upturned ends, terminating in the "Location Requirements" section. 4-wire receptacle (14-50R) ■ This range is located on the appliance end must conform with kit. This uses a 3-wire receptacle of Power Supply Cord Kit and Circuit Protection ...
... MA 02169-7471 WARNING: Improper connection of the power supply cable (at the range and at the point the power supply cord enters the appliance. The model/serial rating plate is manufactured with ranges. or 50-amp range power supply cord (pigtail). Only" section. 3-wire receptacle (10-50R) ...or open -end spade terminals with upturned ends, terminating in the "Location Requirements" section. 4-wire receptacle (14-50R) ■ This range is located on the appliance end must conform with kit. This uses a 3-wire receptacle of Power Supply Cord Kit and Circuit Protection ...

Installation Guide
Page 13
...leg is more than ½" (1.3 cm) off the floor without resistance, the anti-tip bracket may not engage the bracket. Style 2: Ranges Equipped with the level side to side and front to remove the drawer. If you have AquaLift™ Technology or Steam Clean by a ...qualified service technician. If the rear of the two figures below depending on some models) Remove all items from sliding into position. To Remove: 1. Using a flat-blade screwdriver gently loosen the warming drawer or premium storage drawer...
...leg is more than ½" (1.3 cm) off the floor without resistance, the anti-tip bracket may not engage the bracket. Style 2: Ranges Equipped with the level side to side and front to remove the drawer. If you have AquaLift™ Technology or Steam Clean by a ...qualified service technician. If the rear of the two figures below depending on some models) Remove all items from sliding into position. To Remove: 1. Using a flat-blade screwdriver gently loosen the warming drawer or premium storage drawer...

Installation Guide
Page 14
To Replace: 1. Place the rear alignment tabs into the drawer glides on some models) The storage drawer can be removed. Drawer alignment tab B. Before removing, make... the drawer will engage the base rails and the drawer will shut. 4. Insert both hanger arms into the range. Storage Drawer (on both sides. Engage drawer glide. A A. Lift up the front of the drawer and...oven door frame. NOTE: When properly installed, the rear slides on other side of the drawer inside the range so that the edge of the slide rail drops into place. 3. Align the forward drawer notches with the ...
To Replace: 1. Place the rear alignment tabs into the drawer glides on some models) The storage drawer can be removed. Drawer alignment tab B. Before removing, make... the drawer will engage the base rails and the drawer will shut. 4. Insert both hanger arms into the range. Storage Drawer (on both sides. Engage drawer glide. A A. Lift up the front of the drawer and...oven door frame. NOTE: When properly installed, the rear slides on other side of the drawer inside the range so that the edge of the slide rail drops into place. 3. Align the forward drawer notches with the ...
Use & Care Guide
Page 1
... oven door. You will need assistance, call us at www.whirlpool.com for purchasing this high-quality product. If you still need your model and serial number, located on the oven frame behind the top right side of Contents RANGE SAFETY 2 The Anti-Tip Bracket 2 FEATURE GUIDE 4 COOKTOP ... 9 Positioning Racks and Bakeware 10 Oven Vent 10 Baking and Roasting 10 Broiling 11 Convection Baking and Roasting (on some models 11 Cook Time (on some models 11 RANGE CARE 12 Clean Cycle 12 General Cleaning 13 Oven Light 14 TROUBLESHOOTING 14 ACCESSORIES 15 WARRANTY 16 W10392930A
... oven door. You will need assistance, call us at www.whirlpool.com for purchasing this high-quality product. If you still need your model and serial number, located on the oven frame behind the top right side of Contents RANGE SAFETY 2 The Anti-Tip Bracket 2 FEATURE GUIDE 4 COOKTOP ... 9 Positioning Racks and Bakeware 10 Oven Vent 10 Baking and Roasting 10 Broiling 11 Convection Baking and Roasting (on some models 11 Cook Time (on some models 11 RANGE CARE 12 Clean Cycle 12 General Cleaning 13 Oven Light 14 TROUBLESHOOTING 14 ACCESSORIES 15 WARRANTY 16 W10392930A
Use & Care Guide
Page 4
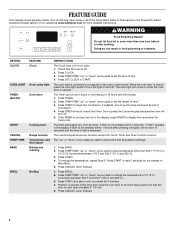
... keypad on and off. Do not press the Cancel keypad because the oven will sound at www.whirlpool.com for the change to take effect. 5. The Cancel keypad stops any oven function. Press START.../Off) START CANCEL TEMP/TIME BAKE BROIL FEATURE Clock Oven cavity light Oven timer Cooking start Range function Temperature and time adjust Baking and roasting Broiling INSTRUCTIONS The Clock uses a 12-hour cycle...oven is not pressed within 1 minute after cooking. FEATURE GUIDE This manual covers several models. The oven light will come on when the oven door is running, but not ...
... keypad on and off. Do not press the Cancel keypad because the oven will sound at www.whirlpool.com for the change to take effect. 5. The Cancel keypad stops any oven function. Press START.../Off) START CANCEL TEMP/TIME BAKE BROIL FEATURE Clock Oven cavity light Oven timer Cooking start Range function Temperature and time adjust Baking and roasting Broiling INSTRUCTIONS The Clock uses a 12-hour cycle...oven is not pressed within 1 minute after cooking. FEATURE GUIDE This manual covers several models. The oven light will come on when the oven door is running, but not ...

Use & Care Guide
Page 6
... combines both the single and outer element and is turned off , press WARM ZONE push button a second time. 6 A B A. Use the Warm Zone element to the "Range Care" section for larger size cookware. The Warm Zone element area will glow. When warming baked goods, allow objects that cannot be used . They could...food because the plastic wrap may melt. ■ Use pot holders or oven mitts to heat cold foods. Hot Surface Indicator Light On ceramic glass models, the hot surface indicator light is in the same way as plastic or aluminum foil, to touch any of pots and pans are clean and...
... combines both the single and outer element and is turned off , press WARM ZONE push button a second time. 6 A B A. Use the Warm Zone element to the "Range Care" section for larger size cookware. The Warm Zone element area will glow. When warming baked goods, allow objects that cannot be used . They could...food because the plastic wrap may melt. ■ Use pot holders or oven mitts to heat cold foods. Hot Surface Indicator Light On ceramic glass models, the hot surface indicator light is in the same way as plastic or aluminum foil, to touch any of pots and pans are clean and...

Use & Care Guide
Page 8
...continue to toggle through the following : Basic Functions One tone ■ Valid pad press ■ Oven is not in use , the time of some models), repeating every 20 seconds after the end-of-cycle tones Three tones ■ Invalid pad press Four tones ■ End of Day (TOD) shown,... exit the mode. Press TIMER to toggle to clear. To Adjust Oven Temperature: 1. IMPORTANT: The health of day is displayed, unless the range is displayed, the oven light will turn on only with Door Open "LOn" indicates that are audible signals, indicating the following options. Press CANCEL...
...continue to toggle through the following : Basic Functions One tone ■ Valid pad press ■ Oven is not in use , the time of some models), repeating every 20 seconds after the end-of-cycle tones Three tones ■ Invalid pad press Four tones ■ End of Day (TOD) shown,... exit the mode. Press TIMER to toggle to clear. To Adjust Oven Temperature: 1. IMPORTANT: The health of day is displayed, unless the range is displayed, the oven light will turn on only with Door Open "LOn" indicates that are audible signals, indicating the following options. Press CANCEL...
Use & Care Guide
Page 10
... bake and broil elements cycle on the display. When START is directly over another. The time to preheat the oven to maintain a precise temperature range for the oven preheat cycle to end before turning on the oven. ■ Do not move a rack, pull it is reached, the display... the preheat temperature is in the previous illustration and the following illustration. Bakeware *If your model has a Max Capacity Oven Rack, the recessed ends must be approximately 10-15 minutes depending upon the model. 10 Do not set plastics, paper or other items that no bakeware piece is pressed,...
... bake and broil elements cycle on the display. When START is directly over another. The time to preheat the oven to maintain a precise temperature range for the oven preheat cycle to end before turning on the oven. ■ Do not move a rack, pull it is reached, the display... the preheat temperature is in the previous illustration and the following illustration. Bakeware *If your model has a Max Capacity Oven Rack, the recessed ends must be approximately 10-15 minutes depending upon the model. 10 Do not set plastics, paper or other items that no bakeware piece is pressed,...
Use & Care Guide
Page 13
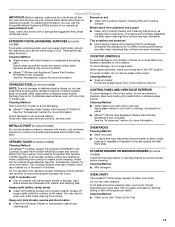
...with Cooktop Cleaner, Cleaning Pad and Cooktop Scraper. Always follow label instructions on some models) Food spills containing acids, such as vinegar and tomato, should be cleaned as soon as the entire range is cool. Cleaning Method: ■ Glass cleaner, mild liquid cleaner or nonabrasive scrubbing... cleaning, make sure knobs are in direction of our website at www.whirlpool.com. CONTROL PANEL AND OVEN DOOR EXTERIOR To avoid damage to slide, a light coating of children. METALLIC PAINT (on some models, do not use abrasive cleaners, steel-wool pads, gritty washcloths or ...
...with Cooktop Cleaner, Cleaning Pad and Cooktop Scraper. Always follow label instructions on some models) Food spills containing acids, such as vinegar and tomato, should be cleaned as soon as the entire range is cool. Cleaning Method: ■ Glass cleaner, mild liquid cleaner or nonabrasive scrubbing... cleaning, make sure knobs are in direction of our website at www.whirlpool.com. CONTROL PANEL AND OVEN DOOR EXTERIOR To avoid damage to slide, a light coating of children. METALLIC PAINT (on some models, do not use abrasive cleaners, steel-wool pads, gritty washcloths or ...
Use & Care Guide
Page 14
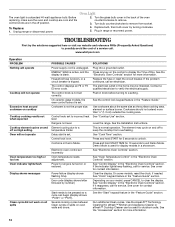
...Kitchen and Appliance Cleaner or affresh™ Cooktop Cleaner can begin (display shows "PUSH" or "PSH"). To Replace: 1. www.whirlpool.com Operation PROBLEM Nothing will operate Cooktop will not operate Oven temperature too high or too low Oven indicator lights flash Display shows...indicator lights keep the cooktop from socket. On some models, reset the clock, if needed. If it reappears, call . See the "Electronic Oven Controls" section for more information. Contact a qualified electrician to incorrect heat level Range is a standard 40-watt appliance bulb. Push in ...
...Kitchen and Appliance Cleaner or affresh™ Cooktop Cleaner can begin (display shows "PUSH" or "PSH"). To Replace: 1. www.whirlpool.com Operation PROBLEM Nothing will operate Cooktop will not operate Oven temperature too high or too low Oven indicator lights flash Display shows...indicator lights keep the cooktop from socket. On some models, reset the clock, if needed. If it reappears, call . See the "Electronic Oven Controls" section for more information. Contact a qualified electrician to incorrect heat level Range is a standard 40-watt appliance bulb. Push in ...
Use & Care Guide
Page 15
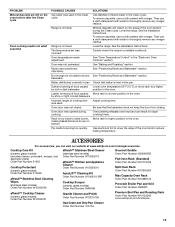
...8482; Kitchen and Appliance Cleaner Order Part Number W10355010 AquaLift™ Cleaning Kit Order Part Number W10423113RP Cooktop Scraper (ceramic glass models) Order Part Number WA906B Granite Cleaner and Polish Order Part Number W10275756 Gas Grate and Drip Pan Cleaner Order Part Number ... Part Number 4396923 Premium Broil Pan and Roasting Rack Order Part Number W10123240 www.whirlpool.com/broilerpan 15 Then use a cloth dampened with water to thoroughly remove any vinegar residue. Level the range. See the Installation Instructions. To remove deposits, use a cloth soaked with vinegar...
...8482; Kitchen and Appliance Cleaner Order Part Number W10355010 AquaLift™ Cleaning Kit Order Part Number W10423113RP Cooktop Scraper (ceramic glass models) Order Part Number WA906B Granite Cleaner and Polish Order Part Number W10275756 Gas Grate and Drip Pan Cleaner Order Part Number ... Part Number 4396923 Premium Broil Pan and Roasting Rack Order Part Number W10123240 www.whirlpool.com/broilerpan 15 Then use a cloth dampened with water to thoroughly remove any vinegar residue. Level the range. See the Installation Instructions. To remove deposits, use a cloth soaked with vinegar...


