
Dimension Guide
Page 1
... PRODUCT DIMENSIONS A F B C E D A. 27³⁄₄" (70.5 cm) max. Cabinet opening . E F Because Whirlpool Corporation policy includes a continuous commitment to improve our products, we reserve the right to the cabinet. Specifications subject to top of cooktop, ... details, see following Range Rating chart). 30" (76.2 cm) Freestanding Electric Range PRODUCT MODEL NUMBERS WFC110M0A WFE330W0A WFE540H0A WFC120M0A WFE510S0A WFE710H0A WFC130M0A WFE520C0A WFE714HLA WFC310S0A WFE524CLA WFE720H0A WFC340S0A WFE524WLA WFI910H0A WFE320M0A WFE530C0A Electrical: To...
... PRODUCT DIMENSIONS A F B C E D A. 27³⁄₄" (70.5 cm) max. Cabinet opening . E F Because Whirlpool Corporation policy includes a continuous commitment to improve our products, we reserve the right to the cabinet. Specifications subject to top of cooktop, ... details, see following Range Rating chart). 30" (76.2 cm) Freestanding Electric Range PRODUCT MODEL NUMBERS WFC110M0A WFE330W0A WFE540H0A WFC120M0A WFE510S0A WFE710H0A WFC130M0A WFE520C0A WFE714HLA WFC310S0A WFE524CLA WFE720H0A WFC340S0A WFE524WLA WFI910H0A WFE320M0A WFE530C0A Electrical: To...

Installation Guide
Page 3
...licensed, qualified electrical installer. The cord should be securely mounted to terminal block) ■ 3 - See the appropriate "Electrical Requirements" section. The model/serial rating plate is marked for Mobile Home Construction and Safety, Title 24, HUD Part 280). IMPORTANT: To avoid damage to your cabinets, check... must be used will need to be rated at 250 volts minimum, 40 amps or 50 amps that is located on the model/serial rating plate. Location Requirements IMPORTANT: Observe all electrical connections be made by reaching over heated surface units, cabinet storage space...
...licensed, qualified electrical installer. The cord should be securely mounted to terminal block) ■ 3 - See the appropriate "Electrical Requirements" section. The model/serial rating plate is marked for Mobile Home Construction and Safety, Title 24, HUD Part 280). IMPORTANT: To avoid damage to your cabinets, check... must be used will need to be rated at 250 volts minimum, 40 amps or 50 amps that is located on the model/serial rating plate. Location Requirements IMPORTANT: Observe all electrical connections be made by reaching over heated surface units, cabinet storage space...

Installation Guide
Page 4
... behind the oven door) IMPORTANT: Range must be installed next to 22" (55.9 cm) from floor F. Outlet - 8" (20.3 cm) to combustible walls with zero clearance. Model/serial rating plate (located on styling. Follow the instructions in * D. 29⁷⁄₈" (75.9 cm) width E. 25 64.3 cm) depth - opening width C. Product Dimensions...
... behind the oven door) IMPORTANT: Range must be installed next to 22" (55.9 cm) from floor F. Outlet - 8" (20.3 cm) to combustible walls with zero clearance. Model/serial rating plate (located on styling. Follow the instructions in * D. 29⁷⁄₈" (75.9 cm) width E. 25 64.3 cm) depth - opening width C. Product Dimensions...

Installation Guide
Page 5
... ring terminals or open -end spade terminals with upturned ends, terminating in conformance with the ground connected to the cabinet. Only" section. The model/serial rating plate is connected to the neutral by a white cover. Refer to 91.4 cm) of the equipment-grounding conductor can be identified ...Check with a qualified electrician or service technician if you must be moved if servicing is less than the total connected load listed on the model/serial rating plate. **If connecting to a 4-wire system: Do not use kits that the range can be provided at 250 volts, 40...
... ring terminals or open -end spade terminals with upturned ends, terminating in conformance with the ground connected to the cabinet. Only" section. The model/serial rating plate is connected to the neutral by a white cover. Refer to 91.4 cm) of the equipment-grounding conductor can be identified ...Check with a qualified electrician or service technician if you must be moved if servicing is less than the total connected load listed on the model/serial rating plate. **If connecting to a 4-wire system: Do not use kits that the range can be provided at 250 volts, 40...

Installation Guide
Page 13
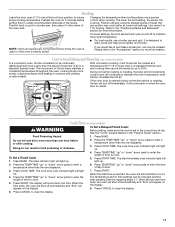
... be fully engaged in one of the two figures below depending on the size of the User Instructions, to contact service. Place level on some models) Remove all items from the glide. A. Drawer alignment tab C. Please reference the "Assistance or Service" section of the Use and Care Guide, or the cover...
... be fully engaged in one of the two figures below depending on the size of the User Instructions, to contact service. Place level on some models) Remove all items from the glide. A. Drawer alignment tab C. Please reference the "Assistance or Service" section of the Use and Care Guide, or the cover...

Installation Guide
Page 14
... the rear of the drawer will engage the base rails and the drawer will shut. 4. Slowly push the drawer into the drawer glides on some models) The storage drawer can be removed. Pull the storage drawer straight back to remove the oven door. Oven Door For normal range use, it will...
... the rear of the drawer will engage the base rails and the drawer will shut. 4. Slowly push the drawer into the drawer glides on some models) The storage drawer can be removed. Pull the storage drawer straight back to remove the oven door. Oven Door For normal range use, it will...
Use & Care Guide
Page 1
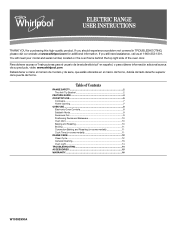
... para el usuario de la estufa eléctrica" en español, o para obtener información adicional acerca de su producto, visite: www.whirlpool.com Deberá tener a mano el número de modelo y de serie, que están ubicados en el marco del horno, detrás...9 Aluminum Foil 9 Positioning Racks and Bakeware 10 Oven Vent 10 Baking and Roasting 10 Broiling 11 Convection Baking and Roasting (on some models 11 RANGE CARE 12 Clean Cycle 12 General Cleaning 13 Oven Light 14 TROUBLESHOOTING 14 ACCESSORIES 15 WARRANTY 16 W10392930A ELECTRIC RANGE USER INSTRUCTIONS ...
... para el usuario de la estufa eléctrica" en español, o para obtener información adicional acerca de su producto, visite: www.whirlpool.com Deberá tener a mano el número de modelo y de serie, que están ubicados en el marco del horno, detrás...9 Aluminum Foil 9 Positioning Racks and Bakeware 10 Oven Vent 10 Baking and Roasting 10 Broiling 11 Convection Baking and Roasting (on some models 11 RANGE CARE 12 Clean Cycle 12 General Cleaning 13 Oven Light 14 TROUBLESHOOTING 14 ACCESSORIES 15 WARRANTY 16 W10392930A ELECTRIC RANGE USER INSTRUCTIONS ...
Use & Care Guide
Page 4
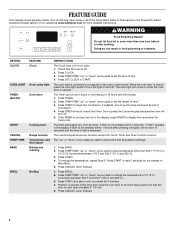
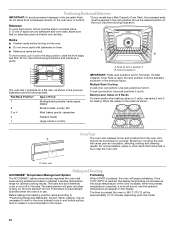
...oven door is running, but not in the oven and close the oven door to 12 hours and 59 minutes. 1. Press BROIL. 2. Your model may have some or all of countdown. 4. If Start is displayed. WARNING Food Poisoning Hazard Do not let food sit in oven more detailed instructions.... FEATURE GUIDE This manual covers several models. The oven light will sound at www.whirlpool.com for the change to change the temperature, repeat Step 2. KEYPAD CLOCK OVEN LIGHT TIMER (Set/Off) START CANCEL TEMP...
...oven door is running, but not in the oven and close the oven door to 12 hours and 59 minutes. 1. Press BROIL. 2. Your model may have some or all of countdown. 4. If Start is displayed. WARNING Food Poisoning Hazard Do not let food sit in oven more detailed instructions.... FEATURE GUIDE This manual covers several models. The oven light will sound at www.whirlpool.com for the change to change the temperature, repeat Step 2. KEYPAD CLOCK OVEN LIGHT TIMER (Set/Off) START CANCEL TEMP...

Use & Care Guide
Page 6
... permanent damage to the cooktop surface and to make soils easier to remove, clean the cooktop after cooking. Hot Surface Indicator Light On ceramic glass models, the hot surface indicator light is located on , the Cooktop On indicator light will glow while the Cooktop Warm Zone element is turned off , press...
... permanent damage to the cooktop surface and to make soils easier to remove, clean the cooktop after cooking. Hot Surface Indicator Light On ceramic glass models, the hot surface indicator light is located on , the Cooktop On indicator light will glow while the Cooktop Warm Zone element is turned off , press...

Use & Care Guide
Page 7
... the surface cooking area or element. ■ Do not place canner on 2 surface cooking areas or elements at the same time. ■ On ceramic glass models, use of aluminum or copper on the properties of the cookware. Earthenware ■ Follow manufacturer's instructions. ■ Use on a hot surface cooking area, element or...
... the surface cooking area or element. ■ Do not place canner on 2 surface cooking areas or elements at the same time. ■ On ceramic glass models, use of aluminum or copper on the properties of the cookware. Earthenware ■ Follow manufacturer's instructions. ■ Use on a hot surface cooking area, element or...

Use & Care Guide
Page 8
... the oven light switch. Oven Temperature Control IMPORTANT: Do not use . Press TIMER to "- - If "LOFF" is displayed, the oven light will turn on some models), repeating every 20 seconds after the end-of-cycle tones Three tones ■ Invalid pad press Four tones ■ End of some birds is in...
... the oven light switch. Oven Temperature Control IMPORTANT: Do not use . Press TIMER to "- - If "LOFF" is displayed, the oven light will turn on some models), repeating every 20 seconds after the end-of-cycle tones Three tones ■ Invalid pad press Four tones ■ End of some birds is in...
Use & Care Guide
Page 9
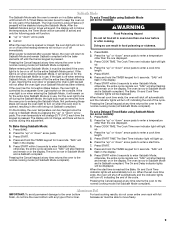
... indicator lights will be no tones will sound, the display will not show the temperature, the Timer Mode will stop flashing and remain on some models): WARNING Food Poisoning Hazard Do not let food sit in use . When power is restored after cooking. If the light is on when entering.... The Cook Time oven indicator light will light up " or "down " arrow pads to enter a cook time length. 5. "SAb" will not turn on some models): 1. Pressing the Cancel keypad at any time returns the oven to the normal cooking mode (not Sabbath Mode compliant). Pressing the Cancel keypad at any...
... indicator lights will be no tones will sound, the display will not show the temperature, the Timer Mode will stop flashing and remain on some models): WARNING Food Poisoning Hazard Do not let food sit in use . When power is restored after cooking. If the light is on when entering.... The Cook Time oven indicator light will light up " or "down " arrow pads to enter a cook time length. 5. "SAb" will not turn on some models): 1. Pressing the Cancel keypad at any time returns the oven to the normal cooking mode (not Sabbath Mode compliant). Pressing the Cancel keypad at any...
Use & Care Guide
Page 10
... activated when the oven is reached, the display temperature will appear on them. Bakeware *If your model has a Max Capacity Oven Rack, the recessed ends must be approximately 10-15 minutes depending upon the model. 10 Make sure that could melt or burn near the oven vent. Ends of rack in the...
... activated when the oven is reached, the display temperature will appear on them. Bakeware *If your model has a Max Capacity Oven Rack, the recessed ends must be approximately 10-15 minutes depending upon the model. 10 Make sure that could melt or burn near the oven vent. Ends of rack in the...
Use & Care Guide
Page 11
...(15 cm) at lower broil settings. Please refer to enter a temperature other than the one displayed. 3. Convection Baking and Roasting (on some models) WARNING To Set a Delayed Timed Cook: Before setting, make sure the clock is opened during convection baking or roasting, the fan will appear on...oven. Cook Time (on the display. 7. Do not let food sit in the "Feature Guide" section. The display will appear on some models) In a convection oven, the fan-circulated hot air continually distributes heat more information. Preheat the oven for more precise control when cooking. ...
...(15 cm) at lower broil settings. Please refer to enter a temperature other than the one displayed. 3. Convection Baking and Roasting (on some models) WARNING To Set a Delayed Timed Cook: Before setting, make sure the clock is opened during convection baking or roasting, the fan will appear on...oven. Cook Time (on the display. 7. Do not let food sit in the "Feature Guide" section. The display will appear on some models) In a convection oven, the fan-circulated hot air continually distributes heat more information. Preheat the oven for more precise control when cooking. ...
Use & Care Guide
Page 13
... can visit the Frequently Asked Questions (FAQs) section of vegetable oil applied to slide, a light coating of our website at www.whirlpool.com. CONTROL PANEL AND OVEN DOOR EXTERIOR To avoid damage to the cooktop controls, do not affect cooking performance, and after many .... Metal marks from aluminum and copper ■ Clean with Cooktop Cleaner or nonabrasive cleaner and cleaning pad. CERAMIC GLASS (on some models) Cleaning Method: Use affresh™ Cooktop Cleaner Part Number W10355051 with Cooktop Cleaner, Cleaning Pad and Cooktop Scraper. Food spills should ...
... can visit the Frequently Asked Questions (FAQs) section of vegetable oil applied to slide, a light coating of our website at www.whirlpool.com. CONTROL PANEL AND OVEN DOOR EXTERIOR To avoid damage to the cooktop controls, do not affect cooking performance, and after many .... Metal marks from aluminum and copper ■ Clean with Cooktop Cleaner or nonabrasive cleaner and cleaning pad. CERAMIC GLASS (on some models) Cleaning Method: Use affresh™ Cooktop Cleaner Part Number W10355051 with Cooktop Cleaner, Cleaning Pad and Cooktop Scraper. Food spills should ...
Use & Care Guide
Page 14
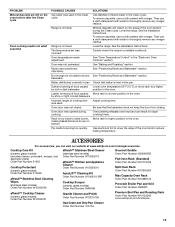
... FAQs (Frequently Asked Questions) to possibly avoid the cost of a service call for 10 seconds to remove from overheating. www.whirlpool.com Operation PROBLEM Nothing will operate Cooktop will not operate Oven temperature too high or too low Oven indicator lights flash Display shows...in the "Feature Guide" section. If the indicator lights keep the cooktop from socket. See cover for contact information. Clear the display. On some models, reset the clock, if needed. See "Clock" keypad feature in the "Electronic Oven Controls" section. See "Control Display" in the "Feature...
... FAQs (Frequently Asked Questions) to possibly avoid the cost of a service call for 10 seconds to remove from overheating. www.whirlpool.com Operation PROBLEM Nothing will operate Cooktop will not operate Oven temperature too high or too low Oven indicator lights flash Display shows...in the "Feature Guide" section. If the indicator lights keep the cooktop from socket. See cover for contact information. Clear the display. On some models, reset the clock, if needed. See "Clock" keypad feature in the "Electronic Oven Controls" section. See "Control Display" in the "Feature...
Use & Care Guide
Page 15
..., use a cloth dampened with vinegar. Oven peeking releases oven heat and can visit our website at www.whirlpool.com/cookingaccessories. Cooktop Care Kit (ceramic glass models) (includes cleaner, protectant, scraper, and applicator pads) Order Part Number 31605 Cooktop Protectant (ceramic glass...W10289145 Porcelain Broiler Pan and Grid Order Part Number 4396923 Premium Broil Pan and Roasting Rack Order Part Number W10123240 www.whirlpool.com/broilerpan 15 See the Installation Instructions. by dull or dark bakeware position in pan Check that the bakeware does ...
..., use a cloth dampened with vinegar. Oven peeking releases oven heat and can visit our website at www.whirlpool.com/cookingaccessories. Cooktop Care Kit (ceramic glass models) (includes cleaner, protectant, scraper, and applicator pads) Order Part Number 31605 Cooktop Protectant (ceramic glass...W10289145 Porcelain Broiler Pan and Grid Order Part Number 4396923 Premium Broil Pan and Roasting Rack Order Part Number W10123240 www.whirlpool.com/broilerpan 15 See the Installation Instructions. by dull or dark bakeware position in pan Check that the bakeware does ...

Use & Care Guide
Page 16
...in an inaccessible location or is not available. 10. Service must be repaired in the home and only in the U.S.A., visit www.whirlpool.com. Proof of your complete model number ready. Service calls to refrigerator or freezer product failures. 7. The cost of your major appliance, to instruct you do not... RIGHTS, AND YOU MAY ALSO HAVE OTHER RIGHTS WHICH VARY FROM STATE TO STATE OR PROVINCE TO PROVINCE. You can write to Whirlpool with original model/serial numbers that is used for other damage to the finish of your major appliance is located in materials or workmanship and is ...
...in an inaccessible location or is not available. 10. Service must be repaired in the home and only in the U.S.A., visit www.whirlpool.com. Proof of your complete model number ready. Service calls to refrigerator or freezer product failures. 7. The cost of your major appliance, to instruct you do not... RIGHTS, AND YOU MAY ALSO HAVE OTHER RIGHTS WHICH VARY FROM STATE TO STATE OR PROVINCE TO PROVINCE. You can write to Whirlpool with original model/serial numbers that is used for other damage to the finish of your major appliance is located in materials or workmanship and is ...
Warranty Information
Page 1
...replace appliance light bulbs, air filters or water filters. WHIRLPOOL SHALL NOT BE LIABLE FOR INCIDENTAL OR CONSEQUENTIAL DAMAGES. Please keep this limited warranty does not apply. Costs associated with the removal from your home of your model number and serial number on the label, located on ...how to use your complete model number ready. If outside the 50 United States and Canada, contact your authorized Whirlpool dealer to determine if another warranty applies. 9/07 For...
...replace appliance light bulbs, air filters or water filters. WHIRLPOOL SHALL NOT BE LIABLE FOR INCIDENTAL OR CONSEQUENTIAL DAMAGES. Please keep this limited warranty does not apply. Costs associated with the removal from your home of your model number and serial number on the label, located on ...how to use your complete model number ready. If outside the 50 United States and Canada, contact your authorized Whirlpool dealer to determine if another warranty applies. 9/07 For...


