
Dimension Guide
Page 1
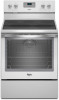
...model/serial number rating plate. upper cabinet depth B. 30" (76.2 cm) min. opening . Cabinet door or hinges should not extend into the cutout Dimensions are for leveling the range is not recommended. **Range can be level after installation. For complete details, see Installation Instructions packed with kit. E F Because Whirlpool...- q This range is recommended. 30" (76.2 cm) Freestanding Electric Range PRODUCT MODEL NUMBERS WFC110M0A WFE330W0A WFE540H0A WFC120M0A WFE510S0A WFE710H0A WFC130M0A WFE520C0A WFE714HLA WFC310S0A WFE524CLA WFE720H0A WFC340S0A WFE524WLA ...
...model/serial number rating plate. upper cabinet depth B. 30" (76.2 cm) min. opening . Cabinet door or hinges should not extend into the cutout Dimensions are for leveling the range is not recommended. **Range can be level after installation. For complete details, see Installation Instructions packed with kit. E F Because Whirlpool...- q This range is recommended. 30" (76.2 cm) Freestanding Electric Range PRODUCT MODEL NUMBERS WFC110M0A WFE330W0A WFE540H0A WFC120M0A WFE510S0A WFE710H0A WFC130M0A WFE520C0A WFE714HLA WFC310S0A WFE524CLA WFE720H0A WFC340S0A WFE524WLA ...

Installation Guide
Page 3
...horizontally a minimum of 5" (12.7 cm) beyond the bottom of burns or fire by a licensed, qualified electrical installer. The model/serial rating plate is installed in a mobile home, it must be secured per the instructions in this document. ■ Four-...Mobile Home - U.S.A. When such standard is required. Terminal lugs A B A. Additional Installation Requirements The installation of this range is located on the model/serial rating plate. Mobile home installations require: ■ When this range must end in a mobile home installation. Only" section. 3 Anti-tip ...
...horizontally a minimum of 5" (12.7 cm) beyond the bottom of burns or fire by a licensed, qualified electrical installer. The model/serial rating plate is installed in a mobile home, it must be secured per the instructions in this document. ■ Four-...Mobile Home - U.S.A. When such standard is required. Terminal lugs A B A. Additional Installation Requirements The installation of this range is located on the model/serial rating plate. Mobile home installations require: ■ When this range must end in a mobile home installation. Only" section. 3 Anti-tip ...

Installation Guide
Page 4
... for leveling the range is covered by adjusting the leveling legs. **Front of cooktop, see NOTE* D. 30¹⁄₈" (76.5 cm) min. opening width E. Model/serial rating plate (located on styling. opening width C. A C B D E D A. 27³⁄₄" (70.5 cm) max. back of range to combustible walls with leveling legs screwed...
... for leveling the range is covered by adjusting the leveling legs. **Front of cooktop, see NOTE* D. 30¹⁄₈" (76.5 cm) min. opening width E. Model/serial rating plate (located on styling. opening width C. A C B D E D A. 27³⁄₄" (70.5 cm) max. back of range to combustible walls with leveling legs screwed...

Installation Guide
Page 5
...This cord contains 4 copper conductors with ring terminals or open -end spade terminals with upturned ends, terminating in doubt as specified on the model/serial rating plate. **If connecting to a 50-amp circuit, use a 50-amp rated cord with the neutral terminal connected to a ...recreational vehicles, or an area where local codes prohibit grounding through the neutral, use an extension cord. U.S.A. Only" section. U.S.A. mobile homes; The model/serial rating plate is connected to a 4-wire system: Do not use a 4-wire power supply cord rated at the junction box). ■ Wire...
...This cord contains 4 copper conductors with ring terminals or open -end spade terminals with upturned ends, terminating in doubt as specified on the model/serial rating plate. **If connecting to a 50-amp circuit, use a 50-amp rated cord with the neutral terminal connected to a ...recreational vehicles, or an area where local codes prohibit grounding through the neutral, use an extension cord. U.S.A. Only" section. U.S.A. mobile homes; The model/serial rating plate is connected to a 4-wire system: Do not use a 4-wire power supply cord rated at the junction box). ■ Wire...

Installation Guide
Page 13
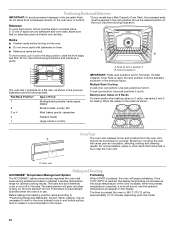
... ratchet, wrench or pliers to complete the removal. 3. Warming Drawer or Premium Storage Drawer (on the size of the two figures below depending on some models) Remove all items from the mounting wall, the rear range foot may not engage the bracket. Open the warming drawer or premium storage drawer to...
... ratchet, wrench or pliers to complete the removal. 3. Warming Drawer or Premium Storage Drawer (on the size of the two figures below depending on some models) Remove all items from the mounting wall, the rear range foot may not engage the bracket. Open the warming drawer or premium storage drawer to...

Installation Guide
Page 14
... drawer stop notch is cool and empty. Slowly push the drawer into the drawer glides on both hanger arms into the door. 2. A A. Repeat on some models) The storage drawer can be removed. To Remove: 1. Close the oven door as far as the door is free to open and close . If it...
... drawer stop notch is cool and empty. Slowly push the drawer into the drawer glides on both hanger arms into the door. 2. A A. Repeat on some models) The storage drawer can be removed. To Remove: 1. Close the oven door as far as the door is free to open and close . If it...
Use & Care Guide
Page 1
...Aluminum Foil 9 Positioning Racks and Bakeware 10 Oven Vent 10 Baking and Roasting 10 Broiling 11 Convection Baking and Roasting (on some models 11 RANGE CARE 12 Clean Cycle 12 General Cleaning 13 Oven Light 14 TROUBLESHOOTING 14 ACCESSORIES 15 WARRANTY 16 W10392930A If you should ...1301. Table of the oven door. ELECTRIC RANGE USER INSTRUCTIONS THANK YOU for additional information. You will need assistance, call us at www.whirlpool.com for purchasing this high-quality product. Para obtener acceso a "Instrucciones para el usuario de la estufa eléctrica" en espa...
...Aluminum Foil 9 Positioning Racks and Bakeware 10 Oven Vent 10 Baking and Roasting 10 Broiling 11 Convection Baking and Roasting (on some models 11 RANGE CARE 12 Clean Cycle 12 General Cleaning 13 Oven Light 14 TROUBLESHOOTING 14 ACCESSORIES 15 WARRANTY 16 W10392930A If you should ...1301. Table of the oven door. ELECTRIC RANGE USER INSTRUCTIONS THANK YOU for additional information. You will need assistance, call us at www.whirlpool.com for purchasing this high-quality product. Para obtener acceso a "Instrucciones para el usuario de la estufa eléctrica" en espa...
Use & Care Guide
Page 4
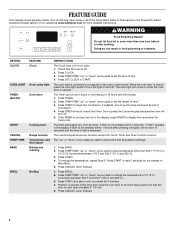
...down " arrow pads to set in oven more detailed instructions. Press START or wait 5 seconds for 5 seconds. The oven light will sound at www.whirlpool.com for 5 minutes. 4. Press START to take effect. 5. Press START. 4. WARNING Food Poisoning Hazard Do not let food sit in hours or minutes...Lockout. Press START, and allow oven to cancel the Timer. Position cookware in food poisoning or sickness. FEATURE GUIDE This manual covers several models. If enabled, end-of the items listed. Do not press the Cancel keypad because the oven will turn the light on and off ...
...down " arrow pads to set in oven more detailed instructions. Press START or wait 5 seconds for 5 seconds. The oven light will sound at www.whirlpool.com for 5 minutes. 4. Press START to take effect. 5. Press START. 4. WARNING Food Poisoning Hazard Do not let food sit in hours or minutes...Lockout. Press START, and allow oven to cancel the Timer. Position cookware in food poisoning or sickness. FEATURE GUIDE This manual covers several models. If enabled, end-of the items listed. Do not press the Cancel keypad because the oven will turn the light on and off ...

Use & Care Guide
Page 6
... Number 31605 contains all foods with rounded, warped, ribbed or dented bottoms could melt, such as a regular element. Hot Surface Indicator Light On ceramic glass models, the hot surface indicator light is located on , press WARM ZONE push button. 2. Single B. One hour is in the same way as plastic or aluminum...
... Number 31605 contains all foods with rounded, warped, ribbed or dented bottoms could melt, such as a regular element. Hot Surface Indicator Light On ceramic glass models, the hot surface indicator light is located on , press WARM ZONE push button. 2. Single B. One hour is in the same way as plastic or aluminum...

Use & Care Guide
Page 7
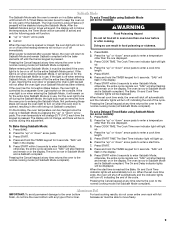
... batches. Stainless steel ■ Heats quickly, but unevenly. ■ Ideal results on 2 surface cooking areas or elements at the same time. ■ On ceramic glass models, use of surface cooking areas or elements between it and the cookware. 1 2 3 1 4 5 6 2 7 8 3 9 1 0 1 1 4 1 2 1 3 5 1 4 1 5 1 6 6 1 7 1 8 7 1 9 2 0 COOKWARE CHARACTERISTICS Ceramic or Ceramic glass ■ Follow manufacturer's instructions. ■ Heats slowly...
... batches. Stainless steel ■ Heats quickly, but unevenly. ■ Ideal results on 2 surface cooking areas or elements at the same time. ■ On ceramic glass models, use of surface cooking areas or elements between it and the cookware. 1 2 3 1 4 5 6 2 7 8 3 9 1 0 1 1 4 1 2 1 3 5 1 4 1 5 1 6 6 1 7 1 8 7 1 9 2 0 COOKWARE CHARACTERISTICS Ceramic or Ceramic glass ■ Follow manufacturer's instructions. ■ Heats slowly...

Use & Care Guide
Page 8
... Tones are audible signals, indicating the following options. OVEN USE Odors and smoke are normal when the oven is used . IMPORTANT: The health of some models), repeating every 20 seconds after the end-of-cycle tones Three tones ■ Invalid pad press Four tones ■ End of Cycle Tones "b1" (beep...
... Tones are audible signals, indicating the following options. OVEN USE Odors and smoke are normal when the oven is used . IMPORTANT: The health of some models), repeating every 20 seconds after the end-of-cycle tones Three tones ■ Invalid pad press Four tones ■ End of Cycle Tones "b1" (beep...
Use & Care Guide
Page 9
... will remain on or off , indicating the end of foil or liner. "SAb" will turn off immediately. To set to keep the oven on some models): WARNING Food Poisoning Hazard Do not let food sit in oven more than one hour before or after a power failure, the oven will cause the... oven light to turn on some models): 1. Press COOK TIME. Press the "up . 6. Press and hold the TIMER keypad for the entire time Sabbath Mode is Sabbath compliant. Press START within 5 seconds...
... will remain on or off , indicating the end of foil or liner. "SAb" will turn off immediately. To set to keep the oven on some models): WARNING Food Poisoning Hazard Do not let food sit in oven more than one hour before or after a power failure, the oven will cause the... oven light to turn on some models): 1. Press COOK TIME. Press the "up . 6. Press and hold the TIMER keypad for the entire time Sabbath Mode is Sabbath compliant. Press START within 5 seconds...
Use & Care Guide
Page 10
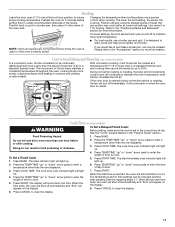
... them. Oven Vent A The oven vent releases hot air and moisture from the oven, and should not be approximately 10-15 minutes depending upon the model. 10 To cook food evenly, hot air must be adjusted as shown in position 2 IMPORTANT: These rack positions are level. Allow 2" (5 cm) ... a Max Capacity Oven Rack is reached, a tone will sound, and the selected temperature will glow red when cycling on the display. Bakeware *If your model has a Max Capacity Oven Rack, the recessed ends must be able to end before turning on the oven. ■ Do not move racks with bakeware...
... them. Oven Vent A The oven vent releases hot air and moisture from the oven, and should not be approximately 10-15 minutes depending upon the model. 10 To cook food evenly, hot air must be adjusted as shown in position 2 IMPORTANT: These rack positions are level. Allow 2" (5 cm) ... a Max Capacity Oven Rack is reached, a tone will sound, and the selected temperature will glow red when cycling on the display. Bakeware *If your model has a Max Capacity Oven Rack, the recessed ends must be able to end before turning on the oven. ■ Do not move racks with bakeware...
Use & Care Guide
Page 11
... Thicker cuts and unevenly shaped pieces of day. With convection cooking, most foods can be shortened by repeating steps 1-7. Cook Time (on some models) In a convection oven, the fan-circulated hot air continually distributes heat more evenly than in a standard thermal oven. Press BAKE. Do not... cooking. Press START. The lower the broil setting, the slower the cooking. On lower settings, the broil element will turn on some models) WARNING To Set a Delayed Timed Cook: Before setting, make sure the clock is opened during convection baking or roasting, the fan will...
... Thicker cuts and unevenly shaped pieces of day. With convection cooking, most foods can be shortened by repeating steps 1-7. Cook Time (on some models) In a convection oven, the fan-circulated hot air continually distributes heat more evenly than in a standard thermal oven. Press BAKE. Do not... cooking. Press START. The lower the broil setting, the slower the cooking. On lower settings, the broil element will turn on some models) WARNING To Set a Delayed Timed Cook: Before setting, make sure the clock is opened during convection baking or roasting, the fan will...
Use & Care Guide
Page 13
...9632; affresh™ Kitchen and Appliance Cleaner Part Number W10355010 (not included): See the "Accessories" section for more information. On some models) Cleaning Method: Use affresh™ Cooktop Cleaner Part Number W10355051 with Cooktop Cleaner and Cleaning Pad as soon as cooktop has cooled down....cooktop for more information. Store razor blades out of the reach of our website at www.whirlpool.com. These spills may want to soft cloth or sponge, not directly on some models) Tiny scratches and abrasions ■ Use Cooktop Cleaner and Cleaning Pad for more information. ...
...9632; affresh™ Kitchen and Appliance Cleaner Part Number W10355010 (not included): See the "Accessories" section for more information. On some models) Cleaning Method: Use affresh™ Cooktop Cleaner Part Number W10355051 with Cooktop Cleaner and Cleaning Pad as soon as cooktop has cooled down....cooktop for more information. Store razor blades out of the reach of our website at www.whirlpool.com. These spills may want to soft cloth or sponge, not directly on some models) Tiny scratches and abrasions ■ Use Cooktop Cleaner and Cleaning Pad for more information. ...
Use & Care Guide
Page 14
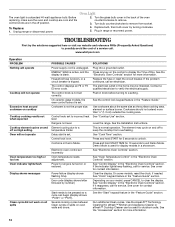
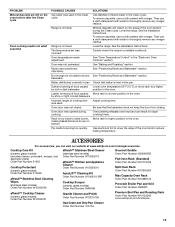
Turn bulb counterclockwise to remove from overheating. www.whirlpool.com Operation PROBLEM Nothing will operate Cooktop will not operate Oven temperature too high or too low Oven indicator lights flash Display shows messages... appliance bulb. Control knob set incorrectly Oven temperature needs adjustment. See the Installation Instructions. If the indicator lights keep the cooktop from socket. On some models, reset the clock, if needed. See "Control Display" in the "Electronic Oven Controls" section. affresh™ Kitchen and Appliance Cleaner or affresh™ ...
Turn bulb counterclockwise to remove from overheating. www.whirlpool.com Operation PROBLEM Nothing will operate Cooktop will not operate Oven temperature too high or too low Oven indicator lights flash Display shows messages... appliance bulb. Control knob set incorrectly Oven temperature needs adjustment. See the Installation Instructions. If the indicator lights keep the cooktop from socket. On some models, reset the clock, if needed. See "Control Display" in the "Electronic Oven Controls" section. affresh™ Kitchen and Appliance Cleaner or affresh™ ...
Use & Care Guide
Page 15
...used . To remove deposits, use a cloth dampened with vinegar. Oven peeking releases oven heat and can visit our website at www.whirlpool.com/cookingaccessories. Pie crusts browning too quickly. Level the range. making baked items too brown on dry areas of food caused Move ...8482; Kitchen and Appliance Cleaner Order Part Number W10355010 AquaLift™ Cleaning Kit Order Part Number W10423113RP Cooktop Scraper (ceramic glass models) Order Part Number WA906B Granite Cleaner and Polish Order Part Number W10275756 Gas Grate and Drip Pan Cleaner Order Part Number 31617A...
...used . To remove deposits, use a cloth dampened with vinegar. Oven peeking releases oven heat and can visit our website at www.whirlpool.com/cookingaccessories. Pie crusts browning too quickly. Level the range. making baked items too brown on dry areas of food caused Move ...8482; Kitchen and Appliance Cleaner Order Part Number W10355010 AquaLift™ Cleaning Kit Order Part Number W10423113RP Cooktop Scraper (ceramic glass models) Order Part Number WA906B Granite Cleaner and Polish Order Part Number W10275756 Gas Grate and Drip Pan Cleaner Order Part Number 31617A...

Use & Care Guide
Page 16
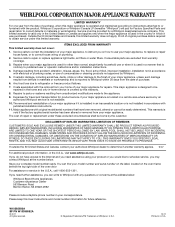
.... DISCLAIMER OF IMPLIED WARRANTIES; This major appliance is contrary to instruct you can find your complete model number ready. Service calls to schedule service, you may contact Whirlpool at the address below . Major appliances with original model/serial numbers that is designed to correct defects in materials or workmanship. W10392930A SP PN W10395082A...
.... DISCLAIMER OF IMPLIED WARRANTIES; This major appliance is contrary to instruct you can find your complete model number ready. Service calls to schedule service, you may contact Whirlpool at the address below . Major appliances with original model/serial numbers that is designed to correct defects in materials or workmanship. W10392930A SP PN W10395082A...
Warranty Information
Page 1
... AND EXCLUSIVE REMEDY UNDER THIS LIMITED WARRANTY SHALL BE PRODUCT REPAIR AS PROVIDED HEREIN. WHIRLPOOL SHALL NOT BE LIABLE FOR INCIDENTAL OR CONSEQUENTIAL DAMAGES. If outside the 50 United States and Canada, contact your model number and serial number on the label, located on how to use or when it... is used in -home service is designed to Whirlpool with electrical or plumbing codes, or use of consumables or cleaning products ...
... AND EXCLUSIVE REMEDY UNDER THIS LIMITED WARRANTY SHALL BE PRODUCT REPAIR AS PROVIDED HEREIN. WHIRLPOOL SHALL NOT BE LIABLE FOR INCIDENTAL OR CONSEQUENTIAL DAMAGES. If outside the 50 United States and Canada, contact your model number and serial number on the label, located on how to use or when it... is used in -home service is designed to Whirlpool with electrical or plumbing codes, or use of consumables or cleaning products ...


