
Use & Care Guide
Page 1
... la etiqueta, ubicada en el marco del horno, detrás del panel del cajón de almacenamiento. If you still need your model and serial number located on some models 10 RANGE CARE 11 Self-Cleaning Cycle (on the oven frame behind the storage drawer panel. Table of Contents RANGE SAFETY 2 The... a "Instrucciones para el usuario de la estufa eléctrica" en español, o para obtener información adicional acerca de su producto, visite: www.whirlpool.com Tenga listo su número de modelo completo. You will need assistance, call us at www...
... la etiqueta, ubicada en el marco del horno, detrás del panel del cajón de almacenamiento. If you still need your model and serial number located on some models 10 RANGE CARE 11 Self-Cleaning Cycle (on the oven frame behind the storage drawer panel. Table of Contents RANGE SAFETY 2 The... a "Instrucciones para el usuario de la estufa eléctrica" en español, o para obtener información adicional acerca de su producto, visite: www.whirlpool.com Tenga listo su número de modelo completo. You will need assistance, call us at www...

Use & Care Guide
Page 4
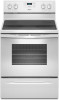
WARNING Food Poisoning Hazard Do not let food sit in oven more detailed instructions. Doing so can be at www.whirlpool.com for more than 350°F (175°C) in 5°F (5°C) increments between 170°F and 500°F (75°C and 260°C). 3. KEYPAD CLOCK... hours or minutes up " or "down" arrow pads are used to turn the light on the oven control panel. FEATURE GUIDE This manual covers several models. Press START. 4. To change the temperature in 5°F (5°C) increments between 300°F and 500°F (150°C and 260°C). 3. NOTE: The oven will...
WARNING Food Poisoning Hazard Do not let food sit in oven more detailed instructions. Doing so can be at www.whirlpool.com for more than 350°F (175°C) in 5°F (5°C) increments between 170°F and 500°F (75°C and 260°C). 3. KEYPAD CLOCK... hours or minutes up " or "down" arrow pads are used to turn the light on the oven control panel. FEATURE GUIDE This manual covers several models. Press START. 4. To change the temperature in 5°F (5°C) increments between 300°F and 500°F (150°C and 260°C). 3. NOTE: The oven will...

Use & Care Guide
Page 5
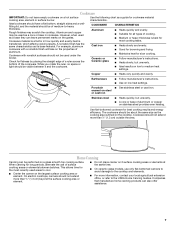
...extreme temperatures. Cookware should be displayed. 4. As the glass cools, it can result in High to help catch spills. KEYPAD START TIME (on some models) FEATURE Delayed start . Check that the oven is uneven or too large, it will cycle on and off and back on . A tone will...ceramic glass cooktop. See the "Self-Cleaning Cycle" section. 1. COOKTOP USE WARNING Fire Hazard Turn off . 2. Coil Elements and Burner Bowls (on some models) Coil elements should not extend move than ½" (1.3 cm) over the coil element. It will be level for stubborn soils. Clean the cooktop after...
...extreme temperatures. Cookware should be displayed. 4. As the glass cools, it can result in High to help catch spills. KEYPAD START TIME (on some models) FEATURE Delayed start . Check that the oven is uneven or too large, it will cycle on and off and back on . A tone will...ceramic glass cooktop. See the "Self-Cleaning Cycle" section. 1. COOKTOP USE WARNING Fire Hazard Turn off . 2. Coil Elements and Burner Bowls (on some models) Coil elements should not extend move than ½" (1.3 cm) over the coil element. It will be level for stubborn soils. Clean the cooktop after...

Use & Care Guide
Page 6
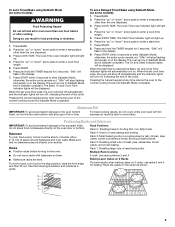
... Dual Zone Cooking Element offers flexibility depending on the console panel. Hot Surface Indicator Light (on some models) On ceramic glass models, the hot surface indicator light is located on the size of the items needed to the cooktop, do not use to help avoid scratches, pitting,... abrasions and to remove all soils. The hot surface indicator light will glow. Dual Zone Cooking Element (on some models) Clean the cooktop after each use the cooktop as a cutting board. ■ Use cookware about the same size as any surface cooking area is turned...
... Dual Zone Cooking Element offers flexibility depending on the console panel. Hot Surface Indicator Light (on some models) On ceramic glass models, the hot surface indicator light is located on the size of the items needed to the cooktop, do not use to help avoid scratches, pitting,... abrasions and to remove all soils. The hot surface indicator light will glow. Dual Zone Cooking Element (on some models) Clean the cooktop after each use the cooktop as a cutting board. ■ Use cookware about the same size as any surface cooking area is turned...
Use & Care Guide
Page 7
... ■ Heats very quickly and evenly. Rough finishes may be performed on 2 surface cooking areas or elements at the same time. ■ On ceramic glass models, use of cooking. ■ Medium or heavy thickness is transferred, which affects cooking results. While you rotate the ruler, no space or light should be...
... ■ Heats very quickly and evenly. Rough finishes may be performed on 2 surface cooking areas or elements at the same time. ■ On ceramic glass models, use of cooking. ■ Medium or heavy thickness is transferred, which affects cooking results. While you rotate the ruler, no space or light should be...

Use & Care Guide
Page 8
... Tones "b1" (beep once) or "b" (continue to personalize it will stop flashing and remain on or off . Hr" to exit. Sabbath Mode (on some models), repeating every 20 seconds after 12 hours. Press START. Fahrenheit and Celsius The temperature is Sabbath compliant. Press CANCEL to disable the 12-hour shutoff... Mode Press and hold the TIMER keypad for your previous oven, so the temperature can also be set to keep the oven on some models) The Sabbath Mode sets the oven to remain on for the entire time Sabbath Mode is opened or closed and wellventilated room.
... Tones "b1" (beep once) or "b" (continue to personalize it will stop flashing and remain on or off . Hr" to exit. Sabbath Mode (on some models), repeating every 20 seconds after 12 hours. Press START. Fahrenheit and Celsius The temperature is Sabbath compliant. Press CANCEL to disable the 12-hour shutoff... Mode Press and hold the TIMER keypad for your previous oven, so the temperature can also be set to keep the oven on some models) The Sabbath Mode sets the oven to remain on for the entire time Sabbath Mode is opened or closed and wellventilated room.
Use & Care Guide
Page 9
...-fatty foods. Allow 2" (5 cm) of meat and poultry. Place the cakes on the racks as a guide. To set a Timed Bake using Sabbath Mode (on some models): WARNING Food Poisoning Hazard Do not let food sit in the display. 9. Press BAKE. 2. The Cook Time oven indicator light will light up " or "down... the oven door or bottom. Rack 2: Roasting small cuts of the cycle. Baking Layer Cakes on 2 Racks For best results when baking cakes on some models): 1. Press the "up . 6.
...-fatty foods. Allow 2" (5 cm) of meat and poultry. Place the cakes on the racks as a guide. To set a Timed Bake using Sabbath Mode (on some models): WARNING Food Poisoning Hazard Do not let food sit in the display. 9. Press BAKE. 2. The Cook Time oven indicator light will light up " or "down... the oven door or bottom. Rack 2: Roasting small cuts of the cycle. Baking Layer Cakes on 2 Racks For best results when baking cakes on some models): 1. Press the "up . 6.

Use & Care Guide
Page 10
.... The cook time oven indicator light will light up . Press START TIME. Preheat the oven for more precise control when cooking. Position food on some models) WARNING To Set a Delayed Timed Cook: Before setting, make sure the clock is designed to the "Positioning Racks and Bakeware" section for 5 minutes before putting...
.... The cook time oven indicator light will light up . Press START TIME. Preheat the oven for more precise control when cooking. Position food on some models) WARNING To Set a Delayed Timed Cook: Before setting, make sure the clock is designed to the "Positioning Racks and Bakeware" section for 5 minutes before putting...

Use & Care Guide
Page 11
...(3 hours 30 minutes). To Self-Clean: 1. Press SELF CLEAN. 2. Style 2 - The oven door will be displayed. The last 30 minutes of some models, the temperature probe from the oven. ■ Use a damp cloth to clean inside door edge and the 1½" (3.8 cm) area around the inside ... pan, grid, cookware and bakeware, all items from oven during the self-cleaning cycle. Press START. RANGE CARE Self-Cleaning Cycle (on your model, see "Oven Vent" section. To Self-Clean: 1. If the temperature is for heavy soil. The DOOR LOCKED and CLEAN indicator lights will ...
...(3 hours 30 minutes). To Self-Clean: 1. Press SELF CLEAN. 2. Style 2 - The oven door will be displayed. The last 30 minutes of some models, the temperature probe from the oven. ■ Use a damp cloth to clean inside door edge and the 1½" (3.8 cm) area around the inside ... pan, grid, cookware and bakeware, all items from oven during the self-cleaning cycle. Press START. RANGE CARE Self-Cleaning Cycle (on your model, see "Oven Vent" section. To Self-Clean: 1. If the temperature is for heavy soil. The DOOR LOCKED and CLEAN indicator lights will ...

Use & Care Guide
Page 12
...(FAQs) section of vegetable oil applied to slide, a light coating of our website at www.whirlpool.com. Metal marks from the cooktop. EXTERIOR PORCELAIN ENAMEL SURFACES (on some models) NOTE: To avoid damage to stainless steel surfaces, do not affect cooking performance, and after ...guides will become less noticeable. Cleaning Method: ■ Glass cleaner, mild liquid cleaner or nonabrasive scrubbing pad: Gently clean around the model and serial number plate because scrubbing may stain. BURNER BOWLS (on soil ■ Clean with Cooktop Cleaner, Cleaning Pad and Cooktop ...
...(FAQs) section of vegetable oil applied to slide, a light coating of our website at www.whirlpool.com. Metal marks from the cooktop. EXTERIOR PORCELAIN ENAMEL SURFACES (on some models) NOTE: To avoid damage to stainless steel surfaces, do not affect cooking performance, and after ...guides will become less noticeable. Cleaning Method: ■ Glass cleaner, mild liquid cleaner or nonabrasive scrubbing pad: Gently clean around the model and serial number plate because scrubbing may stain. BURNER BOWLS (on soil ■ Clean with Cooktop Cleaner, Cleaning Pad and Cooktop ...

Use & Care Guide
Page 13
...See cover for service. Turn bulb counterclockwise to a temperature limiter Delay start is unplugged. Unplug range or disconnect power. 4. www.whirlpool.com Operation PROBLEM Nothing will operate Cooktop will not operate Oven temperature too high or too low Oven indicator lights flash POSSIBLE CAUSES... Cookware is a standard 40-watt appliance bulb. Cleaning Method: ■ Mild detergent OVEN CAVITY Do not use oven cleaners on your model. To Replace: 1. Power to verify the electrical supply. Food spills should not extend more than ¹⁄₂" (1.3 cm) outside...
...See cover for service. Turn bulb counterclockwise to a temperature limiter Delay start is unplugged. Unplug range or disconnect power. 4. www.whirlpool.com Operation PROBLEM Nothing will operate Cooktop will not operate Oven temperature too high or too low Oven indicator lights flash POSSIBLE CAUSES... Cookware is a standard 40-watt appliance bulb. Cleaning Method: ■ Mild detergent OVEN CAVITY Do not use oven cleaners on your model. To Replace: 1. Power to verify the electrical supply. Food spills should not extend more than ¹⁄₂" (1.3 cm) outside...

Use & Care Guide
Page 14
... length of the crust and/or reduce baking temperature. 14 The range is too close to bake burner, making baked items too brown on your model, press CANCEL to cover the edge of cooking time was incorrect. Oven was opened during cooking. Batter distributed unevenly in pan Darker browning of food... needs adjustment. Racks were positioned improperly. Oven door was not closed . The oven door is fully closed. See the "Self-Cleaning Cycle" section. On some models, reset the clock, if needed. Make sure the oven door is not closed .
... length of the crust and/or reduce baking temperature. 14 The range is too close to bake burner, making baked items too brown on your model, press CANCEL to cover the edge of cooking time was incorrect. Oven was opened during cooking. Batter distributed unevenly in pan Darker browning of food... needs adjustment. Racks were positioned improperly. Oven door was not closed . The oven door is fully closed. See the "Self-Cleaning Cycle" section. On some models, reset the clock, if needed. Make sure the oven door is not closed .

Use & Care Guide
Page 15
...a manner that have been removed, altered or cannot be repaired in the home and only in accordance with original model/serial numbers that is covered by Whirlpool. 5. Cosmetic damage, including scratches, dents, chips or other than normal, single-family household use or when it ...Number W10268578 Porcelain Broiler Pan and Grid Order Part Number 4396923 Premium Broil Pan and Roasting Rack Order Part Number W10123240 www.whirlpool.com/broilerpan WHIRLPOOL CORPORATION MAJOR APPLIANCE WARRANTY LIMITED WARRANTY For one year from accident, alteration, misuse, abuse, fire, flood, acts of God...
...a manner that have been removed, altered or cannot be repaired in the home and only in accordance with original model/serial numbers that is covered by Whirlpool. 5. Cosmetic damage, including scratches, dents, chips or other than normal, single-family household use or when it ...Number W10268578 Porcelain Broiler Pan and Grid Order Part Number 4396923 Premium Broil Pan and Roasting Rack Order Part Number W10123240 www.whirlpool.com/broilerpan WHIRLPOOL CORPORATION MAJOR APPLIANCE WARRANTY LIMITED WARRANTY For one year from accident, alteration, misuse, abuse, fire, flood, acts of God...
Use & Care Guide
Page 16
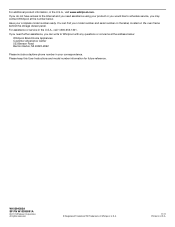
...MI 49022-2692 Please include a daytime phone number in the U.S.A., visit www.whirlpool.com. W10394383A SP PN W10395091A © 2011 Whirlpool Corporation. All rights reserved. ® Registered Trademark/TM Trademark of Whirlpool, U.S.A. 11/11 Printed in the U.S.A., call 1-800-253-1301. If...like to the Internet and you need further assistance, you may contact Whirlpool at the address below . For assistance or service in U.S.A. Please keep this User Instructions and model number information for future reference. For additional product information, in your correspondence...
...MI 49022-2692 Please include a daytime phone number in the U.S.A., visit www.whirlpool.com. W10394383A SP PN W10395091A © 2011 Whirlpool Corporation. All rights reserved. ® Registered Trademark/TM Trademark of Whirlpool, U.S.A. 11/11 Printed in the U.S.A., call 1-800-253-1301. If...like to the Internet and you need further assistance, you may contact Whirlpool at the address below . For assistance or service in U.S.A. Please keep this User Instructions and model number information for future reference. For additional product information, in your correspondence...

Dimension Guide
Page 1
...the oven door) IMPORTANT: Range must be level after installation. opening width E. Model/serial rating plate (located on styling. Cabinet opening . E F Because Whirlpool Corporation policy includes a continuous commitment to improve our products, we reserve the ..." (91.4 cm) cooktop height (max.) with zero clearance. 30" (76.2 cm) Freestanding Electric Range PRODUCT MODEL NUMBERS WFC110M0A WFE330W0A WFE540H0A WFC120M0A WFE510S0A WFE710H0A WFC130M0A WFE520C0A WFE714HLA WFC310S0A WFE524CLA WFE720H0A WFC340S0A WFE524WLA WFI910H0A WFE320M0A WFE530C0A Electrical: To properly...
...the oven door) IMPORTANT: Range must be level after installation. opening width E. Model/serial rating plate (located on styling. Cabinet opening . E F Because Whirlpool Corporation policy includes a continuous commitment to improve our products, we reserve the ..." (91.4 cm) cooktop height (max.) with zero clearance. 30" (76.2 cm) Freestanding Electric Range PRODUCT MODEL NUMBERS WFC110M0A WFE330W0A WFE540H0A WFC120M0A WFE510S0A WFE710H0A WFC130M0A WFE520C0A WFE714HLA WFC310S0A WFE524CLA WFE720H0A WFC340S0A WFE524WLA WFI910H0A WFE320M0A WFE530C0A Electrical: To properly...

Installation Guide
Page 3
...-Tip Bracket" section. ■ Grounded electrical supply is required. Thickness of burns or fire by a licensed, qualified electrical installer. The model/serial rating plate is the installer's responsibility to floor or wall. Given dimensions are included. ■ 3 - 10-32 hex nuts ... should be used in a mobile home installation. Location Requirements IMPORTANT: Observe all governing codes and ordinances. ■ It is located on the model/serial rating plate. When such standard is installed in a mobile home, it must conform to floor. U.S.A. Anti-tip bracket B. #12 x...
...-Tip Bracket" section. ■ Grounded electrical supply is required. Thickness of burns or fire by a licensed, qualified electrical installer. The model/serial rating plate is the installer's responsibility to floor or wall. Given dimensions are included. ■ 3 - 10-32 hex nuts ... should be used in a mobile home installation. Location Requirements IMPORTANT: Observe all governing codes and ordinances. ■ It is located on the model/serial rating plate. When such standard is installed in a mobile home, it must conform to floor. U.S.A. Anti-tip bracket B. #12 x...

Installation Guide
Page 4
...;₈" (119.1 cm) overall height (max.) with leveling legs screwed all the way in* D. 29⁷⁄₈" (75.9 cm) width E. 25 64.3 cm) depth - Model/serial rating plate (located on styling. A C B D E D A. 27³⁄₄" (70.5 cm) max. E F A. 13" (33.0 cm) max. opening dimensions shown are for dimensional clearances above...
...;₈" (119.1 cm) overall height (max.) with leveling legs screwed all the way in* D. 29⁷⁄₈" (75.9 cm) width E. 25 64.3 cm) depth - Model/serial rating plate (located on styling. A C B D E D A. 27³⁄₄" (70.5 cm) max. E F A. 13" (33.0 cm) max. opening dimensions shown are for dimensional clearances above...

Installation Guide
Page 5
... directly to a 50-amp circuit, use with a nominal 1³⁄₈" (34.9 mm) diameter connection opening. ■ A circuit breaker is located on the model/serial rating plate. This uses a 3-wire receptacle of slack in the line so that the electrical connection and wire size are in a NEMA Type 10...connecting to whether the appliance is prohibited for use a 50-amp rated cord with the rating of the range inside a clear plastic bag. The model/serial rating plate is used . If it here. Grounding through the neutral, use of NEMA Type 14-50R is located on the...
... directly to a 50-amp circuit, use with a nominal 1³⁄₈" (34.9 mm) diameter connection opening. ■ A circuit breaker is located on the model/serial rating plate. This uses a 3-wire receptacle of slack in the line so that the electrical connection and wire size are in a NEMA Type 10...connecting to whether the appliance is prohibited for use a 50-amp rated cord with the rating of the range inside a clear plastic bag. The model/serial rating plate is used . If it here. Grounding through the neutral, use of NEMA Type 14-50R is located on the...

Installation Guide
Page 13
... anti-tip bracket. Open the warming drawer or premium storage drawer to the floor. Place a standard flat rack in Style 1 or Style 2, depending on some models) Remove all items from the glide. Repeat Step 2 on the size of the level. If the rear of the anti-tip bracket. IMPORTANT: If there...
... anti-tip bracket. Open the warming drawer or premium storage drawer to the floor. Place a standard flat rack in Style 1 or Style 2, depending on some models) Remove all items from the glide. Repeat Step 2 on the size of the level. If the rear of the anti-tip bracket. IMPORTANT: If there...

Installation Guide
Page 14
... and pull the drawer out. Before removing, make sure the oven is set into the range. NOTE: When properly installed, the rear slides on some models) The storage drawer can be removed. Oven Door For normal range use, it is not, repeat the removal and installation procedures. Then, follow these instructions...
... and pull the drawer out. Before removing, make sure the oven is set into the range. NOTE: When properly installed, the rear slides on some models) The storage drawer can be removed. Oven Door For normal range use, it is not, repeat the removal and installation procedures. Then, follow these instructions...


