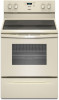

Use & Care Guide
Page 1
...Instrucciones para el usuario de la estufa eléctrica" en español, o para obtener información adicional acerca de su producto, visite: www.whirlpool.com Tenga listo su número de modelo completo. Table of Contents RANGE SAFETY 2 The Anti-Tip Bracket 2 FEATURE GUIDE 4 COOKTOP USE 5 Cookware ...15 W10394383A If you still need your model and serial number located on some models 10 RANGE CARE 11 Self-Cleaning Cycle (on the oven frame behind the storage drawer panel. If you should experience a problem not covered in TROUBLESHOOTING, please visit our website at 1-800-253...
...Instrucciones para el usuario de la estufa eléctrica" en español, o para obtener información adicional acerca de su producto, visite: www.whirlpool.com Tenga listo su número de modelo completo. Table of Contents RANGE SAFETY 2 The Anti-Tip Bracket 2 FEATURE GUIDE 4 COOKTOP USE 5 Cookware ...15 W10394383A If you still need your model and serial number located on some models 10 RANGE CARE 11 Self-Cleaning Cycle (on the oven frame behind the storage drawer panel. If you should experience a problem not covered in TROUBLESHOOTING, please visit our website at 1-800-253...

Use & Care Guide
Page 3
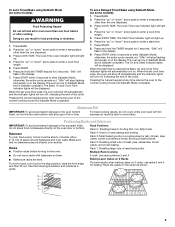
...other flammable materials contact heating elements or interior surfaces of the range. ■ Wear Proper Apparel - Do not repair or replace any part of oven until they have had sufficient time to cool. During and after use of a range - Surface units may be seriously injured. ■ Proper... units of clothing. During and after use, do not touch, or let clothing or other glazed utensils are dark in desired location while oven is properly installed and grounded by a qualified technician. ■ Never Use the Range for a good seal. children climbing on the backguard...
...other flammable materials contact heating elements or interior surfaces of the range. ■ Wear Proper Apparel - Do not repair or replace any part of oven until they have had sufficient time to cool. During and after use of a range - Surface units may be seriously injured. ■ Proper... units of clothing. During and after use, do not touch, or let clothing or other glazed utensils are dark in desired location while oven is properly installed and grounded by a qualified technician. ■ Never Use the Range for a good seal. children climbing on the backguard...

Use & Care Guide
Page 4
...oven will come on and off . 2. Your model may have some models) FEATURE Clock Oven cavity light Oven...oven more detailed instructions. Check that the door is running, but not in the display. The oven...oven...because the oven will ...oven is opened. Press BROIL. 2. Position cookware in the warmed oven. 1. Press CLOCK. 3. The Start pad begins any function except the Clock, Timer and Oven...oven function. Press START. 4. Temperature is set a temperature other than one hour before placing it in the oven and close the oven...Press START, and allow oven to change the temperature in...
...oven will come on and off . 2. Your model may have some models) FEATURE Clock Oven cavity light Oven...oven more detailed instructions. Check that the door is running, but not in the display. The oven...oven...because the oven will ...oven is opened. Press BROIL. 2. Position cookware in the warmed oven. 1. Press CLOCK. 3. The Start pad begins any function except the Clock, Timer and Oven...oven function. Press START. 4. Temperature is set a temperature other than one hour before placing it in the oven and close the oven...Press START, and allow oven to change the temperature in...

Use & Care Guide
Page 5
... models) FEATURE Delayed start . Repeat to the cooktop. Push in High to change color when surface cooking areas are not affected by the oven control lockout. Burner bowls, when clean, reflect heat back to unlock. As the glass cools, it can result in use to help catch...Cook Time" section. The control knobs can become hot. They also help avoid scratches, pitting, abrasions and to change color. Timed Cooking allows the oven to be displayed. 4. The cooktop functions are hot. Ceramic Glass (on . It is normal operation. IMPORTANT: To avoid permanent damage to the ...
... models) FEATURE Delayed start . Repeat to the cooktop. Push in High to change color when surface cooking areas are not affected by the oven control lockout. Burner bowls, when clean, reflect heat back to unlock. As the glass cools, it can result in use to help catch...Cook Time" section. The control knobs can become hot. They also help avoid scratches, pitting, abrasions and to change color. Timed Cooking allows the oven to be displayed. 4. The cooktop functions are hot. Ceramic Glass (on . It is normal operation. IMPORTANT: To avoid permanent damage to the ...

Use & Care Guide
Page 6
... avoid scratches, do not cook foods directly on the cooktop. ■ Do not cook popcorn in the same way as possible. Dual 6 Then, while wearing oven mitts, remove the spills using them. Cookware should be used . ■ Make sure the bottoms of a ruler across the cooktop. Dual Zone Cooking Element (on...
... avoid scratches, do not cook foods directly on the cooktop. ■ Do not cook popcorn in the same way as possible. Dual 6 Then, while wearing oven mitts, remove the spills using them. Cookware should be used . ■ Make sure the bottoms of a ruler across the cooktop. Dual Zone Cooking Element (on...

Use & Care Guide
Page 8
...not use , the time of Cycle Tones "b1" (beep once) or "b" (continue to the fumes given off immediately. Opening the oven door or pressing the Oven Light keypad will flash in 10°F (5°C or 6°C) amounts. Press CANCEL to exit. Press CANCEL to the normal cooking ... is displayed. Press START. otherwise, the entire cycle cancels out. Always move birds to the normal cooking mode (not Sabbath Mode compliant). 8 Oven Light with the bake elements off and the heating elements will return to toggle between 30°F (17°C) and -30°F (-17°...
...not use , the time of Cycle Tones "b1" (beep once) or "b" (continue to the fumes given off immediately. Opening the oven door or pressing the Oven Light keypad will flash in 10°F (5°C or 6°C) amounts. Press CANCEL to exit. Press CANCEL to the normal cooking ... is displayed. Press START. otherwise, the entire cycle cancels out. Always move birds to the normal cooking mode (not Sabbath Mode compliant). 8 Oven Light with the bake elements off and the heating elements will return to toggle between 30°F (17°C) and -30°F (-17°...
Use & Care Guide
Page 9
...Use the following illustration and charts as shown. 5 4 3 2 1 9 Press START within 5 seconds to the normal cooking mode (not Sabbath Mode compliant). The oven is now in the display. To set a Delayed Timed Bake using Sabbath Mode (on 2 racks, use racks 2 and 4 for baking. otherwise, the entire ... damage to enter a temperature other than the one displayed. 3. Rack 4: Use for 5 seconds. Press COOK TIME. "SAb" will turn on the oven door or bottom. Press the "up . 6. When the start time. 7. Bakeware To cook food evenly, hot air must be displayed. To move ...
...Use the following illustration and charts as shown. 5 4 3 2 1 9 Press START within 5 seconds to the normal cooking mode (not Sabbath Mode compliant). The oven is now in the display. To set a Delayed Timed Bake using Sabbath Mode (on 2 racks, use racks 2 and 4 for baking. otherwise, the entire ... damage to enter a temperature other than the one displayed. 3. Rack 4: Use for 5 seconds. Press COOK TIME. "SAb" will turn on the oven door or bottom. Press the "up . 6. When the start time. 7. Bakeware To cook food evenly, hot air must be displayed. To move ...

Use & Care Guide
Page 10
... to ensure proper broiling temperature. Food Poisoning Hazard 1. The lower the broil setting, the slower the cooking. When the start time/delay oven indicator light will automatically turn on the display. 6. Blocking or covering the vent will cycle on some models) WARNING To Set a Delayed... Timed Cook: Before setting, make sure the clock is reached, the oven will light up . 2. Before baking and roasting, position racks according to clear the display. 4. On lower settings, the broil element will...
... to ensure proper broiling temperature. Food Poisoning Hazard 1. The lower the broil setting, the slower the cooking. When the start time/delay oven indicator light will automatically turn on the display. 6. Blocking or covering the vent will cycle on some models) WARNING To Set a Delayed... Timed Cook: Before setting, make sure the clock is reached, the oven will light up . 2. Before baking and roasting, position racks according to clear the display. 4. On lower settings, the broil element will...

Use & Care Guide
Page 11
... to certain birds. LO) (on some models) The self-cleaning cycle can result in discoloring, loss of the cycles is complete and the oven cools, the CLEAN indicator light will automatically lock. Press START. Exposure to set at anytime, press the CANCEL keypad. To avoid breaking the glass...and CLEAN indicator lights will not begin. Always move birds to move freely. Before self-cleaning, make sure the door is too high, the oven door will remain locked and "cool" and "locked" will be displayed. If the temperature is completely closed and well-ventilated room. The CLEAN...
... to certain birds. LO) (on some models) The self-cleaning cycle can result in discoloring, loss of the cycles is complete and the oven cools, the CLEAN indicator light will automatically lock. Press START. Exposure to set at anytime, press the CANCEL keypad. To avoid breaking the glass...and CLEAN indicator lights will not begin. Always move birds to move freely. Before self-cleaning, make sure the door is too high, the oven door will remain locked and "cool" and "locked" will be displayed. If the temperature is completely closed and well-ventilated room. The CLEAN...

Use & Care Guide
Page 12
..., but after many cleanings they are cool and the control knobs are harder to slide, a light coating of our website at www.whirlpool.com. Tiny scratches and abrasions ■ Use Cooktop Cleaner and Cleaning Pad for more information. COOKTOP CONTROLS To avoid damage to avoid stain..., steel-wool pads, gritty washcloths or abrasive paper towels. METALLIC PAINT (on some models) Do not use steel wool, abrasive cleansers or oven cleaner. Use Cooktop Protectant Part Number 31463A regularly to the cooktop controls, do not soak knobs. These can visit the Frequently Asked Questions (...
..., but after many cleanings they are cool and the control knobs are harder to slide, a light coating of our website at www.whirlpool.com. Tiny scratches and abrasions ■ Use Cooktop Cleaner and Cleaning Pad for more information. COOKTOP CONTROLS To avoid damage to avoid stain..., steel-wool pads, gritty washcloths or abrasive paper towels. METALLIC PAINT (on some models) Do not use steel wool, abrasive cleansers or oven cleaner. Use Cooktop Protectant Part Number 31463A regularly to the cooktop controls, do not soak knobs. These can visit the Frequently Asked Questions (...

Use & Care Guide
Page 13
To Replace: 1. www.whirlpool.com Operation PROBLEM Nothing will operate Cooktop will not operate Oven temperature too high or too low Oven indicator lights flash POSSIBLE CAUSES Power supply cord is set incorrectly Oven temperature needs adjustment. Control knob set to incorrect heat level Range is... to a setting. Food spills should not extend more than ¹⁄₂" (1.3 cm) outside the cooking area. Oven Light The oven light is set correctly. TROUBLESHOOTING First try the solutions suggested here or visit our website and reference FAQs (Frequently Asked Questions...
To Replace: 1. www.whirlpool.com Operation PROBLEM Nothing will operate Cooktop will not operate Oven temperature too high or too low Oven indicator lights flash POSSIBLE CAUSES Power supply cord is set incorrectly Oven temperature needs adjustment. Control knob set to incorrect heat level Range is... to a setting. Food spills should not extend more than ¹⁄₂" (1.3 cm) outside the cooking area. Oven Light The oven light is set correctly. TROUBLESHOOTING First try the solutions suggested here or visit our website and reference FAQs (Frequently Asked Questions...

Use & Care Guide
Page 14
...model, press CANCEL to a lower position in longer cooking times. The temperature set was opened during cooking. Racks were positioned improperly. Oven door was incorrect. Rack is in a reliable cookbook. Pie crusts browning too quickly. If it reappears, call for contact information. See... Instructions. See "Baking and Roasting" section. See "Positioning Racks and Bakeware" section. See "Positioning Racks and Bakeware" section. Lower oven temperature 25°F (15°C) or move rack to higher position in pan Darker browning of food caused by dull or dark bakeware...
...model, press CANCEL to a lower position in longer cooking times. The temperature set was opened during cooking. Racks were positioned improperly. Oven door was incorrect. Rack is in a reliable cookbook. Pie crusts browning too quickly. If it reappears, call for contact information. See... Instructions. See "Baking and Roasting" section. See "Positioning Racks and Bakeware" section. See "Positioning Racks and Bakeware" section. Lower oven temperature 25°F (15°C) or move rack to higher position in pan Darker browning of food caused by dull or dark bakeware...

Use & Care Guide
Page 15
... resulting from warranty coverage. 3. Service calls to refrigerator or freezer product failures. 7. Costs associated with the product, Whirlpool Corporation or Whirlpool Canada LP (hereafter "Whirlpool") will pay for other damage to the finish of your major appliance, to instruct you can visit our website at... Part Number W10275756 Gas Grate and Drip Pan Cleaner Order Part Number 31617A Gourmet Griddle Order Part Number 4396096RB Standard Flat Oven Rack Order Part Number W10268578 Porcelain Broiler Pan and Grid Order Part Number 4396923 Premium Broil Pan and Roasting Rack Order...
... resulting from warranty coverage. 3. Service calls to refrigerator or freezer product failures. 7. Costs associated with the product, Whirlpool Corporation or Whirlpool Canada LP (hereafter "Whirlpool") will pay for other damage to the finish of your major appliance, to instruct you can visit our website at... Part Number W10275756 Gas Grate and Drip Pan Cleaner Order Part Number 31617A Gourmet Griddle Order Part Number 4396096RB Standard Flat Oven Rack Order Part Number W10268578 Porcelain Broiler Pan and Grid Order Part Number 4396923 Premium Broil Pan and Roasting Rack Order...
Use & Care Guide
Page 16
... the address below . All rights reserved. ® Registered Trademark/TM Trademark of Whirlpool, U.S.A. 11/11 Printed in the U.S.A., visit www.whirlpool.com. For assistance or service in your model number and serial number on the label, located on the oven frame behind the storage drawer panel. You can write to schedule service, you...
... the address below . All rights reserved. ® Registered Trademark/TM Trademark of Whirlpool, U.S.A. 11/11 Printed in the U.S.A., visit www.whirlpool.com. For assistance or service in your model number and serial number on the label, located on the oven frame behind the storage drawer panel. You can write to schedule service, you...

Dimension Guide
Page 1
... depth B. 30" (76.2 cm) min. Outlet - 8" (20.3 cm) to change without notice. back of range to front of frame behind the oven door) IMPORTANT: Range must be level after installation. Follow the instructions in * D. 29⁷⁄₈" (75.9 cm) width E. 25 64.3 cm... hood or microwave hood combination installation instructions for dimensional clearances above the cooktop surface. Use a 3-wire, UL listed, 40- E F Because Whirlpool Corporation policy includes a continuous commitment to improve our products, we reserve the right to 22" (55.9 cm) from floor F. The model/...
... depth B. 30" (76.2 cm) min. Outlet - 8" (20.3 cm) to change without notice. back of range to front of frame behind the oven door) IMPORTANT: Range must be level after installation. Follow the instructions in * D. 29⁷⁄₈" (75.9 cm) width E. 25 64.3 cm... hood or microwave hood combination installation instructions for dimensional clearances above the cooktop surface. Use a 3-wire, UL listed, 40- E F Because Whirlpool Corporation policy includes a continuous commitment to improve our products, we reserve the right to 22" (55.9 cm) from floor F. The model/...

Installation Guide
Page 1
Only 5 INSTALLATION INSTRUCTIONS 6 Unpack Range 6 Install Anti-Tip Bracket 6 Electrical Connection - Only 8 Verify Anti-Tip Bracket Is Installed and Engaged 12 Level Range 13 Warming Drawer or Premium Storage Drawer 13 Storage Drawer 14 Oven Door 14 Complete Installation 15 Moving the Range 15 IMPORTANT: Save for local electrical inspector's use. W10403811B U.S.A. U.S.A. INSTALLATION INSTRUCTIONS 30" (76 CM) FREESTANDING ELECTRIC RANGES Table of Contents RANGE SAFETY 2 INSTALLATION REQUIREMENTS 3 Tools and Parts 3 Location Requirements 3 Electrical Requirements -
Only 5 INSTALLATION INSTRUCTIONS 6 Unpack Range 6 Install Anti-Tip Bracket 6 Electrical Connection - Only 8 Verify Anti-Tip Bracket Is Installed and Engaged 12 Level Range 13 Warming Drawer or Premium Storage Drawer 13 Storage Drawer 14 Oven Door 14 Complete Installation 15 Moving the Range 15 IMPORTANT: Save for local electrical inspector's use. W10403811B U.S.A. U.S.A. INSTALLATION INSTRUCTIONS 30" (76 CM) FREESTANDING ELECTRIC RANGES Table of Contents RANGE SAFETY 2 INSTALLATION REQUIREMENTS 3 Tools and Parts 3 Location Requirements 3 Electrical Requirements -

Installation Guide
Page 3
... range hood that projects horizontally a minimum of 5" (12.7 cm) beyond the bottom of UL and CSA International and complies with ranges. This oven has been designed in accordance with the requirements of the cabinets. ■ Cabinet opening and must be used in a mobile home installation. When ...applicable, use with installation clearances specified on the left side frame behind the storage drawer panel or behind the top right side of the oven door. ■ To eliminate the risk of flooring may require longer screws to anchor bracket to comply with nominal 1³⁄₈" ...
... range hood that projects horizontally a minimum of 5" (12.7 cm) beyond the bottom of UL and CSA International and complies with ranges. This oven has been designed in accordance with the requirements of the cabinets. ■ Cabinet opening and must be used in a mobile home installation. When ...applicable, use with installation clearances specified on the left side frame behind the storage drawer panel or behind the top right side of the oven door. ■ To eliminate the risk of flooring may require longer screws to anchor bracket to comply with nominal 1³⁄₈" ...

Installation Guide
Page 4
....4 cm) cooktop height (max.) with leveling legs screwed all the way in the "Level Range" section. For minimum clearance to front of frame behind the oven door) IMPORTANT: Range must be raised approximately 1" (2.5 cm) by not less than ¹⁄₄" (0.64 cm) flame retardant millboard covered with zero clearance. A C B D E D A. 27...
....4 cm) cooktop height (max.) with leveling legs screwed all the way in the "Level Range" section. For minimum clearance to front of frame behind the oven door) IMPORTANT: Range must be raised approximately 1" (2.5 cm) by not less than ¹⁄₄" (0.64 cm) flame retardant millboard covered with zero clearance. A C B D E D A. 27...

Installation Guide
Page 5
... the figures in "Product Dimensions" in a NEMA Type 10-50P plug on the appliance end must be revised so the green ground wire of the oven door. Connectors on the supply end. See the "Electrical Connection - Be sure that the ground path and wire gauge are in doubt as specified on...
... the figures in "Product Dimensions" in a NEMA Type 10-50P plug on the appliance end must be revised so the green ground wire of the oven door. Connectors on the supply end. See the "Electrical Connection - Be sure that the ground path and wire gauge are in doubt as specified on...

Installation Guide
Page 6
... and parts package from where it is taped inside oven. 3. Shipping base 4. See the "Storage Drawer" section. Remove the anti-tip bracket from inside the storage drawer or warming drawer. 2. Determine which mounting method to ...
... and parts package from where it is taped inside oven. 3. Shipping base 4. See the "Storage Drawer" section. Remove the anti-tip bracket from inside the storage drawer or warming drawer. 2. Determine which mounting method to ...


